REMEHA Avanta Plus Timer Bedienungsanleitung
2-kanal zeitschaltuhr

Verwandte Anleitungen für REMEHA Avanta Plus Timer

Inhaltszusammenfassung für REMEHA Avanta Plus Timer
- Seite 1 Technical and operating instructions Bedienungs- und Betriebsanleitung • Built-in electronic time 2-Channel time clock clock with day and 2-Kanal Zeitschaltuhr week programmes • Zeitschaltuhr mit Tages- und Wochenprogramm...
- Seite 2 2-Channel time clock ENGLISH DEUTSCH...
-
Seite 12: Vorwort
2-Channel time clock VORWORT Diese Zeitschaltuhr ist bestimmt für Einbau in den Remeha AvantaPlus Brennwert-Kessel. Bitte lesen Sie diese Anweisungen gut durch, bevor Sie den AvantaPlus montieren, anschließen oder in Betrieb nehmen; machen Sie sich mit der Funktionsweise und der Bedienung der Kessel gut vertraut und befolgen Sie die Anweisungen sorgfältig. -
Seite 13: Sicherheit
Gefahr Gefahr für Leib und Leben durch den Kontakt mit elektrischem Strom. 1.2 Einsatzbereich Diese Zeitschaltuhr ist bestimmt für Einbau in den Remeha AvantaPlus Brennwert-Kessel. Die Schaltuhr bestimmt mittels programmierbarer Wochen- und Tagesblöcke den genauen Zeitpunkt, zu den der Kessel eingeschaltet wird (z.B. -
Seite 14: Algemeine Information
2-Channel time clock 2 ALGEMEINE INFORMATION 1 - 2 Kontakte zum Anschluss an die Spannungsvers- orgung 3 - 4 - 5 Relaiskontakte Kanal: Zentralheizung (ZH) Kanal 2: Warmwasserversorgung (WW) Tabelle 01 Elektrische Anschlüsse 62432.LT.AL.REM.001 3 TECHNISCHE DATEN Funktionen Zeitschalter: Tages- und Wochenprogramm Kürzester Schaltabstand: 1 Min. -
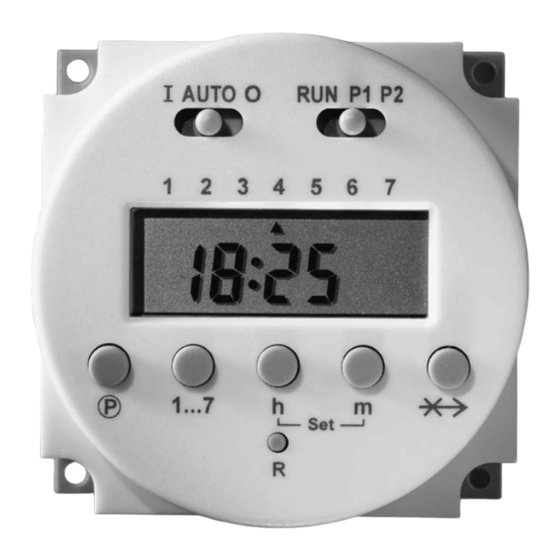
Seite 15: Bedienung Und Display
BEDIENUNG UND DISPLAY Nehmen Sie vor der ersten Inbetriebnahme ein Reset vor: • Stellen Sie sicher, dass der rechte Schiebeschalter auf AUTO O RUN P1 P2 Position RUN steht. • Drücken Sie mit einer dünnen Kugelschreibermine oder Ähnlichem auf die „R“-Taste. Im Display beginnt 0 00 zu blinken. -
Seite 16: Einstellen Der Betriebsarten
2-Channel time clock 4.1 Einstellen der Betriebsarten Betriebsart • Stellen Sie den linken Schiebeschalter auf Position I. Dauer EIN • Die Wahl des Kanals erfolgt mit Hilfe der „-X->“-Taste: Der/die angeschlossene(n) Kanal auswählen: Verbraucher Kanal 1 (ZH): 1 x drücken wird/werden Kanal 2 (WW): 2 x drücken dauernd... -
Seite 17: Schaltzeiten
4.2 Schaltzeiten 4.2.1 Programmierung Es sind je Kanal 16 Schaltzeitpunkte (8 x EIN, 8 x AUS) pro- grammierbar: Nr. 1, 3, 5, 7, 9, 11, 13, 15 sind Einschaltzeitpunkte („Lampen“- Symbol ☼ im Display), Nr. 2, 4, 6, 8, 10, 12, 14, 16 sind Ausschaltzeitpunkte (kein Symbol im Display). -
Seite 18: Einstellen Des Ausschaltzeitpunktes
2-Channel time clock 4.2.3 Einstellen des Ausschaltzeitpunktes So gehen Sie vor: • Drücken Sie die „P“-Taste. Der nächste Schaltzeitpunkt (2, Ausschalten) wird angezeigt. • Drücken Sie die „1...7“-Taste, um den Wochentag oder Tagesblöcke einzustellen. Durch entsprechend mehrmaliges Drücken dieser Taste können Sie einzelne Wochentage oder Tagesblöcke auswählen. -
Seite 19: Skip-Funktion (Soft-Override)
4.2.5 Skip-Funktion (Soft-Override) Die Skip-Funktion wechselt den Schaltzustand des anges- chlossenen Gerätes, bis der nächste Programmschritt erreicht ist. Beispiel: Ist das Gerät gerade im Schaltzustand EIN, wird das Gerät durch Drücken der Skip-Taste „-X->“ sofort ausge- schaltet und umgekehrt. So gehen Sie vor: •...