Herunterladen Inhalt Inhalt Diese Seite drucken
ADE CK 2113 Bedienungsanleitung
Vorschau ausblenden Andere Handbücher für CK 2113:
Inhaltsverzeichnis

Werbung

Verfügbare Sprachen
  • DE

Verfügbare Sprachen

  • DEUTSCH, seite 1
XL-Funkuhr mit Dual-Alarm
und Thermo- / Hygrometer
XL radio-controlled clock with dual alarm and thermometer/
hygrometer | Radio reloj XL con alarma dual y termómetro/
higrómetro | Horloge radiopilotée XL avec double alarme
et thermomètre/hygromètre | Orologio radiocontrollato XL
con doppia sveglia e termoigrometro | Zegar radiowy XL
z podwójnym alarmem i termo-/higrometrem
Bedienungsanleitung
CK 2113
Operating instructions | Instrucciones de operación | Mode d'emploi
Istruzioni per l'uso | Instrukcja obsługi

Werbung

Inhaltsverzeichnis
loading

Inhaltszusammenfassung für ADE CK 2113

  • Seite 1 | Horloge radiopilotée XL avec double alarme et thermomètre/hygromètre | Orologio radiocontrollato XL con doppia sveglia e termoigrometro | Zegar radiowy XL z podwójnym alarmem i termo-/higrometrem Bedienungsanleitung CK 2113 Operating instructions | Instrucciones de operación | Mode d‘emploi Istruzioni per l‘uso | Instrukcja obsługi...
  • Seite 2: Allgemeines

    Liebe Kundin, lieber Kunde ! Sie haben sich für den Kauf eines qualitativ hochwertigen Produkts der Marke ADE entschieden, das intelligente Funktionen mit einem außergewöhnlichen Design vereint. Mit dieser Funkuhr haben Sie die Uhrzeit stets präzise im Blick. Die langjährige Erfahrung der Marke ADE stellt eine technisch hohen Standard und bewährte...
  • Seite 3: Inhaltsverzeichnis

    Geweckt werden ...................12 Sonstige Funktionen ..................13 Batterien wechseln .....................13 Reinigen ........................14 Störung / Abhilfe ....................14 Konformitätserklärung ..................15 Entsorgen .......................15 Lieferumfang ‚ XL-Funkuhr mit Dual-Alarm und Thermo- / Hygrometer ‚ 2 Batterien Typ LR6 (AA), 1,5 V ‚ Bedienungsanleitung XL-Funkwanduhr CK 2113...
  • Seite 4: Sicherheit

    Auslaufen entstehen können. ‚ Achten Sie beim Einsetzen und Wechseln der Batterien auf die richtige Polarität (+/-). ‚ Setzen Sie die Batterien keinen extremen Bedingungen aus, indem Sie diese z. B. auf Heizkörpern oder unter direkter Sonneneinstrahlung lagern. Erhöhte Auslaufgefahr! XL-Funkwanduhr CK 2113...
  • Seite 5: Bestimmungsgemäßer Gebrauch

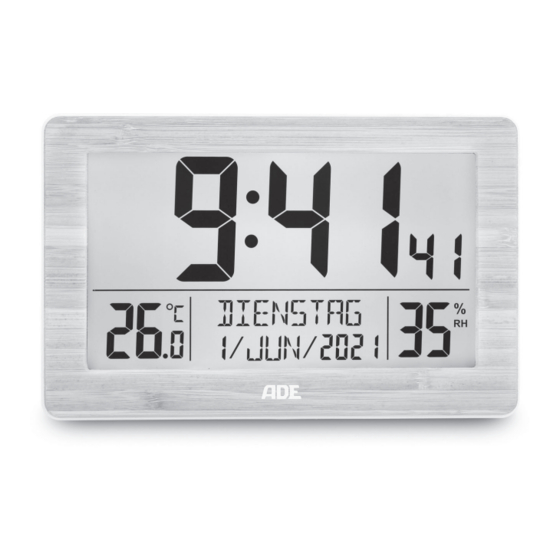
    Diese XL-Funkwanduhr dient zum Anzeigen der Uhrzeit. Sie zeigt außerdem noch wei- tere Daten an (z. B. die Raumtemperatur) und verfügt über eine Weckfunktion. Der Artikel ist für den Privatgebrauch und den Einsatz in trockenen Räumen konzipiert. Technische Daten Modell: DCF-Funkuhr CK 2113 Batterie: 2x R6/LR6 (AA), 1,5 V Bemessungsstrom: 50 mA...
  • Seite 6: Auf Einen Blick

    Auf einen Blick Auf einen Blick XL-Funkwanduhr CK 2113...
  • Seite 7 : Werte erhöhen / Werte verringern : Weckfunktion ein- und ausschalten (im Einstellmodus) : Zwischen 12- und 24-Stunden-Format umschalten Taste ‚ Weckzeit einstellen ‚ Weckfunktion aktivieren und deaktivieren Taste ‚ manuellen Einstellmodus aktivieren ‚ vorgenommene Einstellung speichern XL-Funkwanduhr CK 2113...
  • Seite 8: Inbetriebnahme

    Zeitpunkt neu gestartet. Die Uhrzeit läuft in diesem Fall (ausgehend von der Startzeit „00:00“) normal weiter. Checkliste bei fehlender Datenanzeige im Display Keine Datenanzeige vom Zeitzeichensender Prüfen Sie, ob der Standort der Funkuhr geeignet ist, siehe „Standort wählen“. XL-Funkwanduhr CK 2113...
  • Seite 9: Funkempfang Des Zeitsignals Manuell Starten

    4. Gehen Sie weiter vor, wie vorstehend beschrieben: − Drücken Sie die Taste oder , um den gewünschten Wert einzustellen. − Drücken Sie jeweils , um eine Einstellung zu speichern. 5. Führen Sie nachfolgende Einstellungen durch: − Stundenzeit − Minutenzeit XL-Funkwanduhr CK 2113...
  • Seite 10: Standort Wählen

    Sobald die Funkuhr mit Strom versorgt wird, schaltet sie auf Empfang und sucht das Signal vom Sender DCF77. Wurde das Zeitsignal in ausreichender Stärke empfangen, werden im Display Datum, Uhrzeit und Wochentag angezeigt. Die Funkuhr schaltet sich mehrmals täglich ein und synchronisiert die Uhrzeit mit dem XL-Funkwanduhr CK 2113...
  • Seite 11: Wecken

    9. Drücken Sie 10. Gehen Sie vor wie beschrieben, um die gleichen Einstellungen für „AL 2“vorzuneh- men. Wenn Sie keine zweite Weckzeit einstellen möchten, drücken Sie einfach wie- derholt , bis wieder die normale Display-Anzeige angezeigt wird. XL-Funkwanduhr CK 2113...
  • Seite 12: Weckfunktion Ein- Und Ausschalten

    Gerät wieder ein und weckt Sie erneut. Dieser Vorgang kann mehrfach wiederholt werden. Wenn Sie während der Snooze-Phase eine beliebige Taste an der Seite drü- cken oder einige Sekunden lang gedrückt halten, wird die Snooze- Funktion ausgeschaltet. Der Alarm wird dann erst nach 24 Stunden wieder ausgelöst. XL-Funkwanduhr CK 2113...
  • Seite 13: Sonstige Funktionen

    − Gehen Sie vor, wie im Abschnitt „Inbetriebnahme“ beschrieben. ‚ Verwenden Sie nur den Batterietyp, der in den „Technischen Daten“ angegeben ist. ‚ Wechseln Sie immer alle Batterien aus. ‚ Entsorgen Sie alte Batterien umweltgerecht, siehe „Entsorgen“. XL-Funkwanduhr CK 2113...
  • Seite 14: Reinigen

    ‚ Die Werte liegen ober- bzw. unterhalb des tigkeit dauerhaft „19% RH“ bzw. Messbereichs. „96% RH“ angezeigt. Der Wecker hat nicht geklingelt. ‚ Haben Sie die richtige Weckzeit aktiviert? Prüfen Sie, ob Wecktag und Einstellung („M-F“, „S-S“ bzw. „M-S“) zueinander passen. XL-Funkwanduhr CK 2113...
  • Seite 15: Konformitätserklärung

    Konformitätserklärung Konformitätserklärung Hiermit erklärt die GRENDS GmbH, dass die Funkuhr CK 2113 den Richtlinien 2014/53/EU und 2011/65/EU entspricht. Der vollständige Text der EU-Konformitätserklärung ist unter der folgenden Internetadresse verfügbar: www.ade-germany.de/doc Die Erklärung verliert ihre Gültigkeit, falls an dem Artikel eine nicht mit uns abgestimm- te Änderung vorgenommen wurde.
  • Seite 16: General Information

    With this radio-controlled clock, you always have the exact time in view. The wealth of experience of the ADE brand ensures a high technical standard and proven quality. We wish you easy timing at any time!
  • Seite 17: Scope Of Delivery

    Changing the battery ..................27 Cleaning ........................28 Fault/Remedy......................28 Declaration of conformity ................29 Disposal ........................29 Scope of delivery ‚ XL radio-controlled clock with dual alarm and thermometer/hygrometer ‚ 2 batteries of type LR6 (AA), 1.5 V ‚ Operating Manual CK 2113 XL radio-controlled wall clock...
  • Seite 18: Safety

    ‚ Clean the battery and device contacts, as needed, before inserting the battery. ‚ Do not make any modifications to the product. Only allow repairs to be carried out by a specialist workshop. Repairs carried out improperly can considerably endanger the user. CK 2113 XL radio-controlled wall clock...
  • Seite 19: Intended Use

    In the event of a warranty claim, please return the product with the proof of purchase (specifying the reason for claim) to your dealer. CK 2113 XL radio-controlled wall clock...
  • Seite 20: Overview

    Overview Overview CK 2113 XL radio-controlled wall clock...
  • Seite 21 : Switch alarm function on and off (in setting mode) : Toggle between 12 and 24 hour formats Button ‚ Setting the alarm time ‚ Enable and disable alarm function Button ‚ Enable manual setting mode ‚ Save changed settings CK 2113 XL radio-controlled wall clock...
  • Seite 22: Start-Up

    Checklist when data is missing on the display No data display from the time signal transmitter Check whether the location of the radio-controlled clock is suitable, see “Choosing a location”. Restart reception manually, see "Starting signal reception manually". CK 2113 XL radio-controlled wall clock...
  • Seite 23: Starting Signal Reception Of The Time Signal Manually

    4. Proceed as previously described: − Press the button to set the desired value. − Press to save a setting. 5. You should set the following: − Hours − Minutes − Year − Month CK 2113 XL radio-controlled wall clock...
  • Seite 24: Choosing A Location

    DCF77. In the event the signal is not received, e.g. during a strong storm, the device continues to run precisely and then switches to receiving mode again at the next scheduled time. CK 2113 XL radio-controlled wall clock...
  • Seite 25: Alarm

    9. Press 10. Proceed as described to make the same settings for “AL 2”. If you do not want to set a second alarm time, simply press repeatedly until the normal display is shown again. CK 2113 XL radio-controlled wall clock...
  • Seite 26: Switches The Alarm Function On/Off

    5 minutes) to wake you up again. This procedure can be repeated multiple times. To disable the snooze function, press any button on the side or keep pressed for a few seconds during the snooze phase. The alarm is then only triggered again in 24 hours. CK 2113 XL radio-controlled wall clock...
  • Seite 27: Other Functions

    ‚ Only use the type of battery that is specified in the “Technical data”. ‚ Always change all batteries at the same time. ‚ Dispose of old batteries in an environmentally appropriate way (see “Disposal”). CK 2113 XL radio-controlled wall clock...
  • Seite 28: Cleaning

    “96% RH” appears permanently on measurement range. the display. The alarm clock didn't ring. ‚ Did you activate the correct alarm time? Check whether the wake-up day and setting (“M-F”, “S-S” or “M-S”) match. CK 2113 XL radio-controlled wall clock...
  • Seite 29: Declaration Of Conformity

    Declaration of conformity Declaration of conformity GRENDS GmbH hereby declares that the CK 2113 radio-controlled clock complies with Directives 2014/53/EU and 2011/65/EU. The full text of the EU declaration of conformity is available at the following Internet address: www.ade-germany.de/doc This declaration loses its validity if any modification is made to the item that has not been agreed with us in advance.
  • Seite 30: Información General

    ADE, que aúna unas funciones inteligentes con un diseño extraordinario. Con este reloj radio controlado tendrá siempre a la vista la hora exacta. La larga experiencia de la marca ADE le asegura unos elevados estándares técnicos y es garantía de calidad.
  • Seite 31: Material Suministrado

    Limpieza .........................42 Problema/Solución .....................42 Declaración de conformidad ................43 Eliminación ......................43 Material suministrado ‚ Radio reloj XL con alarma dual y termómetro/higrómetro ‚ 2 pilas tipo LR6 (AA), 1,5 V ‚ Manual de instrucciones Reloj de pared radiocontrolado XL CK 2113...
  • Seite 32: Seguridad

    ‚ No exponga las pilas a condiciones extremas, poniéndolas, por ejemplo, sobre radiadores o expuestas directamente al sol. ¡Riesgo elevado de fugas! ‚ Cuando sea necesario, limpie los contactos del aparato y de las pilas antes de colocarlas. Reloj de pared radiocontrolado XL CK 2113...
  • Seite 33: Uso Adecuado

    En caso de solicitar la aplicación de la garantía, lleve el artículo a su distribuidor con el justificante de compra (explicando el motivo de la reclamación). Reloj de pared radiocontrolado XL CK 2113...
  • Seite 34: De Un Vistazo

    De un vistazo De un vistazo Reloj de pared radiocontrolado XL CK 2113...
  • Seite 35 : Escoger entre el formato de 12 o 24 horas Botón ‚ Ajustar hora de alarma ‚ Activar o desactivar la función de alarma Botón ‚ Activar modo de ajuste manual ‚ guardar ajuste predeterminado Reloj de pared radiocontrolado XL CK 2113...
  • Seite 36: Puesta En Marcha

    Lista de comprobación en caso de fallo en la indicación de datos en la pantalla No hay indicación de datos del emisor de señal horaria Compruebe que la ubicación del radio reloj es la adecuada, para ello consulte "Seleccionar ubicación". Reloj de pared radiocontrolado XL CK 2113...
  • Seite 37: Inicio Manual De La Recepción De Radio De La Señal Horaria

    ("00" es la configuración predeterminada para el continente europeo). 4. Continúe como se describe más arriba: − Pulse el botón o , para seleccionar los valores deseados. − Pulse para guardar un ajuste. Reloj de pared radiocontrolado XL CK 2113...
  • Seite 38: Seleccionar Ubicación

    La emisora está en Mainflingen, junto a Frankfurt am Main y, con un alcance de 2.000 km, hace llegar las señales de radio a la mayoría de los relojes radio controlados de Europa occidental. Reloj de pared radiocontrolado XL CK 2113...
  • Seite 39: Despertador

    En la pantalla parpadea "05" (= configuración predeterminada 5 minutos) y " ". 8. Use los botones para ajustar el intervalo de tiempo deseado para la función de repetición (intervalo de tiempo entre dos alarmas). Si selecciona "OFF", la función de repetición se desactivará. Reloj de pared radiocontrolado XL CK 2113...
  • Seite 40: Conectar Y Desconectar La Función Despertador

    Si durante la fase de repetición de alarma pulsa cualquier botón del lateral o mantiene pulsado unos segundos, la función de repetición de la alarma se desactivará. La alarma saltará de nuevo 24 horas después. Reloj de pared radiocontrolado XL CK 2113...
  • Seite 41: Otras Funciones

    − Proceda como se describe en el apartado "Puesta en marcha". ‚ Utilice únicamente el tipo de pilas especificado en los "Datos técnicos". ‚ Sustituya siempre todas las pilas. ‚ Elimine las pilas usadas siguiendo la normativa medioambiental, consulte "Eliminación". Reloj de pared radiocontrolado XL CK 2113...
  • Seite 42: Limpieza

    "19% RH" o "96% RH". El despertador no ha sonado. ‚ ¿Ha activado la hora de alarma correcta? Compruebe que coinciden el día de la alarma y el valor configurado ("M-F", "S-S" o "M-S"). Reloj de pared radiocontrolado XL CK 2113...
  • Seite 43: Declaración De Conformidad

    Todas las pilas y baterías deben depositarse en los puntos de recogida del ayuntamiento, del distrito o en los comercios. De este modo, puede realizarse la eliminación de pilas y baterías de una forma respetuosa con el medio ambiente. Reloj de pared radiocontrolado XL CK 2113...
  • Seite 44: Généralités

    Chère cliente, cher client ! Nous sommes ravis que vous ayez choisi un appareil de haute qualité de la marque ADE, qui allie des fonctions intelligentes à un design exceptionnel. Grâce à cette horloge radiopilotée, vous êtes toujours ponctuel. Les années d’expérience de la marque ADE garantissent une haute technicité...
  • Seite 45: Contenu De L'emballage

    Problèmes/solutions ...................56 Déclaration de conformité ................57 Mise au rebut ......................57 Contenu de l’emballage ‚ Horloge radiopilotée XL avec double alarme et thermomètre/hygromètre ‚ 2 piles de type LR6 (AA), 1,5 V ‚ Mode d’emploi Horloge murale XL radiopilotée CK 2113...
  • Seite 46: Sécurité

    ‚ Lorsque vous insérez et remplacez les piles, veillez à respecter la polarité (+/-). ‚ Ne soumettez pas les piles à des conditions extrêmes en les conservant sur des radiateurs ou en les exposant au rayonnement direct du soleil. Risque accru de fuite pour les piles ! Horloge murale XL radiopilotée CK 2113...
  • Seite 47: Utilisation Conforme

    2 ans à compter de la date d’achat. Dans le cas où vous souhaitez faire usage de cette garantie, veuillez remettre l’article ainsi que la preuve d’achat (en indiquant les raisons de votre réclamation) à votre revendeur. Horloge murale XL radiopilotée CK 2113...
  • Seite 48: Aperçu

    Aperçu Aperçu Horloge murale XL radiopilotée CK 2113...
  • Seite 49 : Pour passer du format 12 heures au format 24 heures Touche  : ‚ régler l’heure de réveil ‚ activer/désactiver la fonction réveil Touche  : ‚ Pour activer le mode Réglage manuel ‚ Pour sauvegarder les réglages effectués Horloge murale XL radiopilotée CK 2113...
  • Seite 50: Mise En Marche

    Dans ce cas, l’heure continue de fonctionner normalement (à partir de l’heure de départ « 00:00 »). Liste de contrôle en cas de données erronées affichées à l’écran Aucun affichage de données de l’émetteur de signal horaire Assurez-vous que l’emplacement de l’horloge est approprié. (Voir « Choisir l’emplacement ».) Horloge murale XL radiopilotée CK 2113...
  • Seite 51: Lancer Manuellement La Réception Radio Du Signal Horaire

    (« 00 » est le réglage standard pour le territoire européen). 4. Procédez ensuite comme indiqué ci-après : − Appuyez sur pour régler la valeur. − Appuyez sur pour sauvegarder un réglage. 5. Effectuez les réglages suivants : − Heure Horloge murale XL radiopilotée CK 2113...
  • Seite 52: Choisir L'emplacement

    Une fois alimenté en courant, l’horloge se met en mode réception et recherche le signal de l’émetteur DCF77. Si le signal est assez puissant, la date, l’heure et le jour de la semaine s’affichent. Horloge murale XL radiopilotée CK 2113...
  • Seite 53: Réveil

    « 05 » clignote sur l'écran (= réglage standard 5 minutes) et «   ». 8. Réglez la période souhaitée pour la fonction Snooze (période entre deux alarmes) à l’aide de la touche ou . Lorsque vous sélectionnez « OFF », la fonction Snooze se désactive. 9. Appuyez sur Horloge murale XL radiopilotée CK 2113...
  • Seite 54: Allumer/Éteindre La Fonction Réveil

    Si vous appuyez sur une touche quelconque sur le côté de l’appareil ou si vous maintenez enfoncé pendant quelques secondes pendant la phase de répétition, la fonction de répétition sera désactivée. L'alarme ne sera alors redéclenchée qu'après 24 heures. Horloge murale XL radiopilotée CK 2113...
  • Seite 55: Autres Fonctions

    ‚ N’utilisez que le type de pile indiqué dans les « Caractéristiques techniques ». ‚ Remplacez toujours toutes les piles à la fois. ‚ Éliminez les piles usagées dans le respect de l’environnement, voir « Mise au rebut ». Horloge murale XL radiopilotée CK 2113...
  • Seite 56: Nettoyage

    Le réveil n’a pas sonné. ‚ Avez-vous activé la bonne heure de réveil ? Vérifiez si le jour et le réglage de l'alarme (« M-F », « S-S » ou « M-S ») correspondent. Horloge murale XL radiopilotée CK 2113...
  • Seite 57: Déclaration De Conformité

    Toutes les piles et batteries doivent être déposées dans un point de collecte de votre localité ou rapportées à leur point d’achat. Les piles et batteries seront ainsi traitées dans le respect de l’environnement. Horloge murale XL radiopilotée CK 2113...
  • Seite 58: Gentile Cliente

    Gentile cliente! La ringraziamo per aver scelto un prodotto di alta qualità della ADE che unisce funzioni intelligenti e un design fuori dal comune. Questo orologio radiocontrollato permette di vedere l'orario in modo preciso. La lunga esperienza della ADE garantisce standard tecnici elevati e qualità...
  • Seite 59: Ambito Della Fornitura

    Risoluzione dei problemi ..................70 Dichiarazione di conformità ................71 Smaltimento ......................71 Ambito della fornitura ‚ Orologio radiocontrollato XL con doppia sveglia e termoigrometro ‚ 2 batterie di tipo LR6 (AA), da 1,5 V ‚ Istruzioni per l'uso Orologio XL da parete radiocontrollato CK 2113...
  • Seite 60: Sicurezza

    ‚ Durante l'inserimento e la sostituzione delle batterie, prestare attenzione alla corretta polarità (+/-). ‚ Non sottoporre le batterie a temperature estreme, ad esempio conservandole vicino a termosifoni o alla luce diretta del sole. Serio rischio di fuoriuscita di liquido! Orologio XL da parete radiocontrollato CK 2113...
  • Seite 61: Destinazione D'uso

    2 anni a partire dalla data di acquisto, nel caso di difetti di materiale o fabbricazione del prodotto. A tale scopo, consegnare al rivenditore il prodotto e la prova di acquisto (citando i motivi del reclamo). Orologio XL da parete radiocontrollato CK 2113...
  • Seite 62: Descrizione

    Descrizione Descrizione Orologio XL da parete radiocontrollato CK 2113...
  • Seite 63 : Modifica del formato orario da 12 a 24 ore o viceversa Pulsante ‚ Impostazione della sveglia ‚ Attivazione e disattivazione della sveglia Pulsante ‚ Attivazione della modalità di impostazione manuale ‚ Memorizzazione delle impostazioni eseguite Orologio XL da parete radiocontrollato CK 2113...
  • Seite 64: Messa In Funzione

    Lista di controllo con indicazione dei dati sul display Nessuna indicazione dei dati dal trasmettitore di segnale orario Dapprima, controllare che l'orologio radiocontrollato sia collocato in una posizione adeguata, consultare in proposito la sezione "Scelta della posizione". Orologio XL da parete radiocontrollato CK 2113...
  • Seite 65: Avvio Manuale Della Ricezione Radio Del Segnale Orario

    ("00" è l'impostazione standard per il continente europeo). 4. Procedere come descritto: − Premere il tasto per impostare il valore desiderato. − Premere ogni volta , per salvare un’impostazione. Orologio XL da parete radiocontrollato CK 2113...
  • Seite 66: Scelta Della Posizione

    Informazioni sul trasmettitore di segnale orario DCF77 Questo orologio radiocontrollato riceve il suo segnale radio dal trasmettitore di segnale orario DCF77. Che trasmette l'ora esatta e ufficiale dalla Germania sulla frequenza a onde lunghe 77,5 kHz. Orologio XL da parete radiocontrollato CK 2113...
  • Seite 67: Sveglia

    − Da sabato a domenica (indicazione sul display “S-S”) oppure − Da lunedì a domenica (indicazione sul display “M-S”). 7. Premere Sul display lampeggia “05” (= impostazione standard 5 minuti) e “ ”. Orologio XL da parete radiocontrollato CK 2113...
  • Seite 68: Attivazione E Disattivazione Della Sveglia

    Questa azione può essere ripetuta più volte. Se durante la fase Snooze viene premuto o tenuto premuto per alcuni secondi un tasto qualsiasi sul lato, la funzione Snooze viene disattivata. La sveglia risuonerà solamente dopo 24 ore. Orologio XL da parete radiocontrollato CK 2113...
  • Seite 69: Altre Funzioni

    − Procedere come descritto nella sezione “Messa in funzione”. ‚ Utilizzare solo il tipo di batterie indicato nella scheda dei “Dati tecnici”. ‚ Sostituire sempre tutte le batterie. ‚ Provvedere allo smaltimento corretto delle batterie, vedi “Smaltimento”. Orologio XL da parete radiocontrollato CK 2113...
  • Seite 70: Pulizia

    “19% RH” o di misura. “96% RH”. La sveglia non ha suonato. ‚ È stato attivato l’orario di sveglia corretto? Controllare se il giorno della sveglia e l'impostazione (“M-F”, “S-S” o “M-S”) corrispondono. Orologio XL da parete radiocontrollato CK 2113...
  • Seite 71: Dichiarazione Di Conformità

    Le batterie e gli accumulatori devono essere consegnati presso un centro di raccolta comunale o di quartiere, oppure presso il proprio rivenditore, al fine di garantire il loro smaltimento in modo rispettoso dell'ambiente. Orologio XL da parete radiocontrollato CK 2113...
  • Seite 72: Szanowny Kliencie

    Informacje ogólne Szanowny Kliencie! Zakupiony wysokiej jakości produkt marki ADE łączy w sobie inteligentne funkcje z wyjątkową stylistyką. Dzięki niniejszemu zegarowi radiowemu godzina jest zawsze precyzyjnie w zasięgu wzroku. Wieloletnie doświadczenie marki ADE gwarantuje wysoki standard techniczny oraz sprawdzoną jakość.
  • Seite 73: Zakres Dostawy

    Czyszczenie ......................84 Usterka / środek zaradczy ................84 Deklaracja zgodności ..................85 Utylizacja ........................85 Zakres dostawy ‚ Zegar radiowy XL z podwójnym alarmem i termo-/higrometrem ‚ 2 baterie typu LR6 (AA), 1,5 V ‚ Instrukcja obsługi Zegar ścienny radiowy XL CK 2113...
  • Seite 74: Bezpieczeństwo

    ‚ Podczas wkładania i wymiany baterii należy zwrócić uwagę na prawidłową biegunowość (+/-). ‚ Nie narażać baterii na oddziaływanie skrajnych warunków poprzez np. układanie ich na grzejnikach lub bezpośrednio w miejscach nasłonecznionych. Podwyższone niebezpieczeństwo wycieku! Zegar ścienny radiowy XL CK 2113...
  • Seite 75: Użycie Zgodne Z Przeznaczeniem

    Firma GRENDS GmbH gwarantuje przez 2 lata od daty zakupu bezpłatne usuwanie braków z tytułu błędów materiałowych lub produkcyjnych w drodze naprawy lub wymiany. W przypadku korzystania z gwarancji prosimy o zwrócenie sprzedawcy artykułu wraz z dowodem zakupu (podając również powód reklamacji). Zegar ścienny radiowy XL CK 2113...
  • Seite 76: W Skrócie

    W skrócie W skrócie Zegar ścienny radiowy XL CK 2113...
  • Seite 77 : Włączanie i wyłączanie funkcji budzenia (w trybie ustawień) : Przełączanie pomiędzy formatem 12- i 24- godzinnym Przycisk ‚ Ustawianie czasu budzenia ‚ Aktywacja i dezaktywacja funkcji budzenia Przycisk ‚ Aktywowanie ręcznego trybu nastawczego ‚ Zapisanie wprowadzonego ustawienia Zegar ścienny radiowy XL CK 2113...
  • Seite 78: Uruchomienie

    Godziny mijają w takiej sytuacji normalnie dalej (od początkowej godziny „00:00”). Lista kontrolna w przypadku braku wskazań danych na wyświetlaczu Brak wskazań danych z nadajnika sygnału czasu Sprawdzić, czy miejsce ustawienia zegara radiowego jest odpowiednie, patrz  „ Wybór miejsca ustawienia”. Zegar ścienny radiowy XL CK 2113...
  • Seite 79: Ręczne Włączanie Odbioru Sygnału Czasu

    4. Dalej należy postępować zgodnie z niniejszym opisem: − Nacisnąć przycisk lub , aby ustawić żądaną wartość. − Naciskać za każdym razem , aby zapisać ustawienie. 5. Wykonać poniższe ustawienia: − Godzina − Minuty Zegar ścienny radiowy XL CK 2113...
  • Seite 80: Wybór Miejsca Ustawienia

    Po podłączeniu zegara do prądu włącza się on automatycznie na tryb odbioru i szuka sygnału z nadajnika DCF77. Po odebraniu sygnału czasu o odpowiedniej sile na wyświetlaczu pojawi się data, godzina i dzień tygodnia. Zegar ścienny radiowy XL CK 2113...
  • Seite 81: Budzenie

    Po wybraniu opcji „OFF” funkcja drzemki jest wyłączona. 9. Nacisnąć 10. Postępować tak, jak opisano, aby dokonać tych samych ustawień dla „AL 2”. Jeśli nie ma potrzeby ustawiać drugiego alarmu, nacisnąć kilkakrotnie, aż pojawi się standardowy wyświetlacz. Zegar ścienny radiowy XL CK 2113...
  • Seite 82: Włączanie I Wyłączanie Funkcji Budzenia

    Cię kolejny raz. Proces ten można powtarzać wielokrotnie. Jeżeli w fazie drzemki naciśniesz dowolny przycisk z boku lub naciśniesz i przytrzymasz go kilka sekund , funkcja drzemki zostanie wyłączona. Alarm aktywuje się wtedy dopiero po 24 godzinach. Zegar ścienny radiowy XL CK 2113...
  • Seite 83: Pozostałe Funkcje

    − Postępować zgodnie z opisem w rozdziale „Uruchomienie”. ‚ Używać tylko typu baterii podanego w rozdziale „Dane techniczne”. ‚ Zawsze należy wymieniać wszystkie baterie. ‚ Utylizować stare baterie w sposób ekologiczny, patrz „Utylizacja”. Zegar ścienny radiowy XL CK 2113...
  • Seite 84: Czyszczenie

    ‚ Wartości są większe lub niższe niż zakres powietrza wyświetla się permanentnie pomiarowy. „19% RH” lub „96% RH”. Alarm nie włączył się. ‚ Czy aktywowano prawidłowy czas przebudzenia? Sprawdzić, czy dzień budzenia i ustawienie („M–F”, „S–S” lub „M–S”) pasują do siebie. Zegar ścienny radiowy XL CK 2113...
  • Seite 85: Deklaracja Zgodności

    Deklaracja zgodności Deklaracja zgodności Firma GRENDS GmbH niniejszym oświadcza, że radiowy zegar CK 2113 jest zgodny z dyrektywami 2014/53/EU i 2011/65/EU. Pełny tekst deklaracji zgodności UE jest dostępny na poniższej stronie internetowej: www.ade-germany.de/doc Deklaracja traci ważność, jeżeli w przedmiocie dokonano zmian, które nie zostały z nami uzgodnione.

Inhaltsverzeichnis