LSC CIP-39900AT Bedienungsanleitung
EN
|
Instruction manual
NL
|
Gebruiksaanwijzing
FR
|
Mode d' e mploi
DE
|
Bedienungsanleitung
PL
|
Instrukcja obsługi
CS
|
Návod na použití
SK
|
Návod na použitie
ES
|
Manual de usuario
IT
|
Manuele utente
DK
|
Brugervejledning
CIP-39900AT
|
Outdoor Light
with Camera
EN NON REPLACEABLE LIGHT SOURCE NL NIET VERVANGBARE LICHTBRON
FR SOURCE LUMINEUSE NON REMPLAÇABLE DE NICHT AUSWECHSELBARES
LEUCHTMITTEL PL NIEWYMIENNE ŹRÓDŁO ŚWIATŁA CS NEVYMĚNITELNÝ SVĚTELNÝ
ZDROJ SK NEVYMENITEĽNÝ SVETELNÝ ZDROJ ES FUENTE DE LUZ NO REEMPLAZABLE
IT SORGENTE LUMINOSA NON SOSTITUIBILE DK IKKE UDSKIFTELIG LYSKILDE
PARTS DESCRIPTION / ONDERDELENBESCHRIJVING / DESCRIPTION DES PIÈCES /
TEILEBESCHREIBUNG / OPIS CZĘŚCI / POPIS SOUČÁSTÍ / POPIS SÚČASTÍ /
DESCRIPCIÓN DE LAS PIEZAS / DESCRIZIONE DELLE PARTI / BESKRIVELSE AF DELE
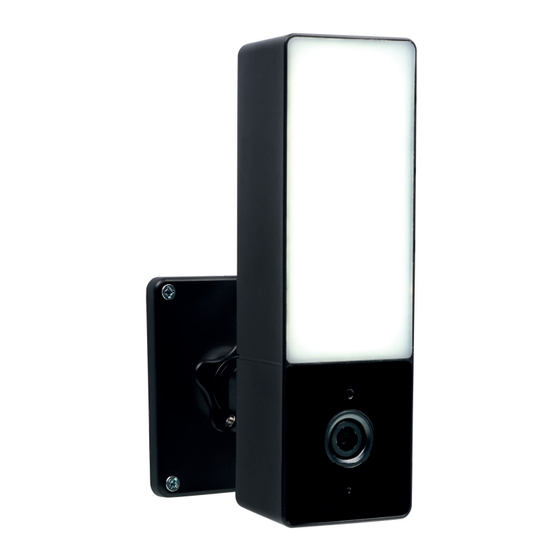
7
1
2
4
8
3
4
5
20cm
Technical data:
Wireless technology: Wi-Fi
Frequency: 2.4 GHz
Max. Radio Transmission Power: 15,59dBm
Antenna gain: 3dB
Information for power adapter:
Input: 100-240V 50/60Hz
Output: DC 5.0V 2.5A
- 900 Lumen
- 7000 Kelvin
- IP65
Only use supplied power adaptor
EN
BOX CONTENT
•
•
•
•
PARTS DESCRIPTION
1.
2.
3.
4.
5.
6.
7.
8.
INSTALLATION
Optional: Insert a MicroSD card (not included)
•
•
•
•
•
•
•
•
•
GETTING STARTED
Preparation
•
•
•
Download the LSC Smart Connect App
•
•
•
•
•
LSC-App
Light mode:
•
Instruction manual
Camera
USB power adapter and cable (use only the
adaptor provided)
Screw pack
Instruction manual
LED light
Day/Night sensor
Microphone
Camera lens
SD card slot
Reset button
Speaker
Back plate
First make sure your camera is not powered.
Insert your Micro-SD card in the MicroSD card
slot on the camera. Only use a Class 10
MicroSD card (max 128GB).
Choose a location to place your camera and
check if there is a strong Wi-fi signal.
Tip: Complete set up on the LSC Smart
Connect app first before mounting the camera
to the wall. See the section "Download the LSC
Smart Connect app" in this manual.
Mark the drill holes using the backplate. Also,
mark a drill hole of at least 15mm (in diameter)
to lead the camera cable inside.
Note: Before drilling, make sure that there are
no wires or pipes located in the wall to prevent
damage.
Drill the holes and mount the backplate to the
wall using the screws and plugs supplied.
Connect the USB cable the camera and the
other side to the power adapter.
Place the power adapter in a wall socket.
Note: Use only the power adaptor provided.
Note: This item only works on a 2.4GHz Wi-Fi
network, not on a 5GHz Wi-Fi network.
One device can only be paired with one App
account at a time, if the device has already
been paired with another account, then it can't
be paired to a new account.
The device can be removed from the app
account by deleting it from the app.
Download the LSC Smart Connect App from
the Appstore or Google Playstore or scan the
QR code.
Open the LSC Smart Connect App, click "+" or
"Add Device". Then select "Security" on the
"Select Device Type" page.
Select "Smart Lighting Camera". Power the
device on and make sure the a prompt tone is
heard.
Input the Wi-Fi password and click on
"Confirm". Hold the device about 20 cm from
the camera lens and scan the QR Code with
the device.
When the device sounds "dong dong dong",
click on "I heard the beep" in the app. You can
then complete the set-up. (About +/- 30 s.)
You can turn the light on and off manually via
the app.
Night Modes:
•
Smart mode: If you want the light to go on
automatically when motion is detected, select:
"Smart mode". The light will go off 1 minute
after motion is detected. The Smart mode will
only work when it is dark and when the feature
'Motion detection' is activated.
•
Infrared mode: With this mode you can see
the camera images at night, without the white
light.
•
Color light mode:
The light will constantly be on when it is dark.
Resetting
•
Press and hold the reset button for 5 seconds
to reset the camera. (If you have modified the
settings, they will return to factory defaults)
•
One device can only be paired with one App
account at a time, if the device has already
been paired with another account, then it can't
be paired to a new account.
•
The device can be removed from the app
account by deleting it from the app.
Gebruiksaanwijzing
NL
INHOUD VAN DE DOOS
•
Camera
•
USB-stroomadapter en -kabel (gebruik alleen
de meegeleverde adapter)
•
Schroefset
•
Handleiding
BESCHRIJVING VAN DE ONDERDELEN
1.
Ledlamp
2.
Dag/nacht-sensor
3.
Microfoon
4.
Cameralens
5.
SD-kaartsleuf
6.
Resetknop
7.
Speaker
8.
Achterplaat
INSTALLATIE
Optioneel: Een MicroSD-kaart plaatsen (niet
meegeleverd)
•
Zorg er eerst voor dat de camera niet is
ingeschakeld. Plaats de MicroSD-kaart in de
sleuf voor MicroSD-kaarten van de camera.
Gebruik alleen Class 10 MicroSD-kaarten
(maximaal 128 GB).
•
Kies een locatie om uw camera te plaatsen en
controleer of er een sterk wifi-signaal is.
•
Tip: Rond eerst de installatie af op de LSC
Smart Connect-app voordat u uw camera
monteert aan de muur. Zie het gedeelte
'Download de LSC Smart Connect-app' in deze
handleiding.
•
Markeer de boorgaten met behulp van de
achterplaat. Markeer ook een boorgat van
minstens 15 mm (in diameter) om de
camerakabel doorheen te leiden.
•
Let op: Controleer om schade te voorkomen
voordat u gaat boren of geen draden of
leidingen in de wand aanwezig zijn.
•
Boor de gaten en monteer de achterplaat op de
muur met de meegeleverde schroeven en
pluggen.
•
Sluit de USB-kabel aan op de camera en het
andere uiteinde op de stroomadapter.
•
Steek de stekker van de stroomadapter in een
stopcontact.
•
Let op: Gebruik alleen de meegeleverde
stroomadapter.
Inhaltsverzeichnis

Verwandte Anleitungen für LSC CIP-39900AT


Inhaltszusammenfassung für LSC CIP-39900AT
- Seite 1 DESCRIPCIÓN DE LAS PIEZAS / DESCRIZIONE DELLE PARTI / BESKRIVELSE AF DELE Connect app first before mounting the camera • Schroefset to the wall. See the section “Download the LSC • Handleiding Smart Connect app” in this manual. •...
- Seite 2 " + " ou " Ajouter un appareil ". Sélectionnez ensuite • Druk op de resetknop en houd deze 5 seconden LSC Smart Connect App ab, bevor Sie die Kamera " Sécurité " sur la page " Sélectionner le type ingedrukt om de camera te resetten. (Als u de an der Wand montieren.
-
Seite 3: Instrukcje Użytkowania
Najpierw upewnij się, że kamera nie jest Download der LSC Smart Connect App podłączona do zasilania. Włóż kartę MicroSD • Laden Sie sich die LSC Smart Connect-App do gniazda MicroSD w kamerze. Używaj vom App Store oder Google Play Store wyłącznie kart MicroSD klasy 10 (maks. - Seite 4 • Naciśnij i przytrzymaj przycisk resetowania przez 5 • Otevřete aplikaci LSC Smart Connect a klikněte na • Poznámka: Pred vŕtaním sa uistite, že v stene nie sekund, aby zresetować kamerę. (Jeśli ustawienia možnost „+” nebo „Přidat zařízení”. Poté vyberte sú...
- Seite 5 Scegliere una posizione in cui collocare la escanee el código QR. videocamera e assicurarsi che il segnale Wi-Fi • Abre la aplicación LSC Smart Connect y haz sia forte. clic en "+" o "Añadir dispositivo". Y a • Consiglio: Completare la configurazione continuación, selecciona "Seguridad"...
-
Seite 6: Kom Godt I Gang
Google Playstore, oppure scansionando il codice afsnittet "Download LSC Smart Connect-appen" i denne manual. • Aprire l'app LSC Smart Connect, fare clic su "+" o su • Marker borehullerne ved hjælp af bagpladen. Marker "Aggiungi dispositivo". Quindi selezionare også et borehul på mindst 15 mm (i diameter) for at "Sicurezza"...