
Verwandte Anleitungen für SuperFish Dosing Pump One


Inhaltszusammenfassung für SuperFish Dosing Pump One
- Seite 1 User manual Gebrauchsanweisung Mode d’emploi Gebruiksaanwijzing Dosing Pump One Single channel dosing pump • Einkanalige Dosierpumpe Pompe doseuse monocanal • Eén-kanaals doseerpomp...
-
Seite 3: General Instructions
Translation of original manual. SuperFish Dosing Pump One General instructions Read this manual carefully before using this device. Keep this manual for future reference. Meaning of the symbols on the device itself: This device complies with all applicable EU standards. -
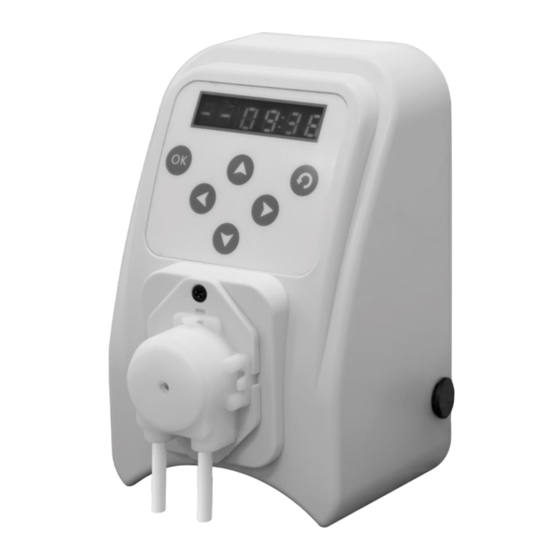
Seite 4: Control Panel
Installation • Place the dosing pump in a dry, accessible place near your aquarium, terrarium or pond. You can easily set the pump down or hang it up with the suspension eye on the back. Fig. B Attach a tube via the tube coupling to the inlet of the pump, this inlet tube goes into the reservoir with the liquid to be dosed. - Seite 5 Manual dosing (F2) The display shows F2, press OK and the pump starts pumping. The tube fills slowly with water and the water will flow out of the other tube. Press OK to stop pumping. Press to move on to the calibration of the pump (F3). Calibrating the pump (F3) Before calibrating, make sure there is no air in the tubes and that the measuring cup is empty.
-
Seite 6: Allgemeine Anweisung
Übersetzung der originalen Anleitung SuperFish Dosing Pump One Allgemeine Anweisung Lesen Sie dieses Handbuch sorgfältig durch, bevor Sie das Gerät verwenden. Bewahren Sie dieses Handbuch für den späteren Gebrauch auf. Bedeutung der Symbole auf dem Gerät selbst: Dieses Gerät entspricht den geltenden EU-Normen. -
Seite 7: Kalibrierung (Vor Der Ersten Verwendung)
Installation • Stellen Sie die Dosierpumpe an einem trockenen, zugänglichen Ort in der Nähe Ihres Aquariums, Terrariums oder Teiches auf. Sie können die Pumpe einfach abstellen oder an der Aufhängeöse an der Rückseite aufhängen. Fig. B Schließen Sie einen Schlauch über den Schlauchanschluss an den Eingang der Pumpe an, dieser Schlauch führt in den Behälter mit der zu dosierenden Flüssigkeit, achten Sie darauf, dass das Ende dieses Schlauches auf dem Boden des Behälters liegt. -
Seite 8: Wartung
Manuelle Dosierung (F2) Auf dem Display erscheint F2, drücken Sie OK und die Pumpe beginnt zu pumpen. Das Rohr füllt sich langsam mit Wasser und das Wasser beginnt aus dem anderen Rohr zu fließen. Drücken Sie OK um den Pumpvorgang zu beenden. Drücken Sie ... -
Seite 9: Instructions Générales
Traduction du manuel d’origine. SuperFish Dosing Pump One Instructions générales Lisez attentivement ce manuel avant d’utiliser l’appareil. Conservez ce manuel pour ses futures utilisations. Signification des symboles sur l’appareil lui-même : Cet appareil est conforme aux normes européennes applicables. Cet appareil ne doit pas être jeté avec les ordures ménagères normales mais doit être collecté séparément pour être recyclé. -
Seite 10: Panneau De Commande
Installation • Placez la pompe doseuse dans un endroit sec et accessible près de votre aquarium, terrarium ou bassin. Vous pouvez facilement poser la pompe ou la suspendre à l'aide de l'œillet de suspension situé à l'arrière. Fig. B Fixez un tuyau via le raccord à l'entrée de la pompe, ce tuyau d'entrée va dans le réservoir contenant le liquide à doser, assurez-vous que l'extrémité... - Seite 11 Le dosage manuel (F2) L'écran affiche F2, appuyez sur OK et la pompe va commencer à pomper Le tuyau se remplit lentement d'eau et l'eau s'écoule par l'autre tuyau. Appuyez sur OK pour arrêter le pompage. Appuyez sur pour passer à l'étalonnage de la pompe (F3). Étalonnage de la pompe (F3) Avant de procéder à...
-
Seite 12: Algemene Instructies
Gebruiksaanwijzing in oorspronkelijke taal. SuperFish Dosing Pump One Algemene instructies Lees deze gebruiksaanwijzing zorgvuldig door voordat u het apparaat in gebruik neemt. Bewaar deze gebruiksaanwijzing voor toekomstig gebruik. Betekenis van de symbolen op het apparaat zelf: Dit apparaat voldoet aan de geldende EU normen. -
Seite 13: Bedieningspaneel
Installatie • Plaats de doseerpomp op een droge toegankelijke plaats bij uw aquarium, terrarium of vijver. U kunt de pomp eenvoudig neerzetten of ophangen aan het ophangoog aan de achterzijde. Fig. B Bevestig een slang via de slangkoppeling aan de inlaat van de pomp, deze aanvoerslang gaat in het reservoir met de te doseren vloeistof, zorg dat het uiteinde van deze slang op de bodem van het reservoir ligt. - Seite 14 Manueel doseren (F2) Op de display verschijnt F2, druk op OK en de pomp start met pompen. De slang vult zich langzaam met water en het water zal uit de andere slang gaan lopen. Druk op OK om het pompen te stoppen. Druk op ...
- Seite 15 GB - Warranty conditions 1 year manufacturer’s warranty on materials and construction defects. Devices must be returned complete with all components, accompanied with an official proof of purchase confirming a purchase date for any warranty claims. Incomplete devices of which parts are missing, and devices without proof of purchase are not eligible for warranty. After receiving and checking, we will determine whether the device will be repaired or replaced.
- Seite 16 GB - Recycle information This symbol indicates that this product (if it is discarded) may not be disposed of with normal household waste. Instead it must be handed in at an official collection centre (e.g. HWRC). Or can be returned to the dealer when purchasing a similar new product. Follow the applicable rules in your country for the separate collection of electrical and electronic products.