Herunterladen Inhalt Inhalt Diese Seite drucken
Inhaltsverzeichnis

Werbung

Verfügbare Sprachen
  • DE

Verfügbare Sprachen

  • DEUTSCH, seite 8
HEIZSTRAHLER FLEX
Bedienungsanleitung
|
Instructions for use
Notice d´utilisation
|
Gebruiksaanwijzing
Istruzioni per l'uso
|
Instrucciones de uso
Návod k obsluze
Instrukcja obsługi
Modell 86706
Bitte lesen Sie die folgenden Anweisungen und bewahren Sie diese auf.
Please read the following instructions and keep them on hand for later
reference.

Werbung

Inhaltsverzeichnis
loading

Inhaltszusammenfassung für Unold 86706

  • Seite 1 Notice d´utilisation Gebruiksaanwijzing Istruzioni per l’uso Instrucciones de uso Návod k obsluze Instrukcja obsługi Modell 86706 Bitte lesen Sie die folgenden Anweisungen und bewahren Sie diese auf. Please read the following instructions and keep them on hand for later reference.
  • Seite 2 Impressum: Bedienungsanleitung Modell 86706 Stand: März 2015 /nr Copyright © Mannheimer Straße 4 68766 Hockenheim Telefon +49 (0) 62 05/94 18-0 Telefax +49 (0) 62 05/94 18-12 E-Mail info@unold.de Internet www.unold.de...
  • Seite 3 Weitere Informationen zu unserem Sortiment erhalten Sie unter www.unold.de...
  • Seite 4: Inhaltsverzeichnis

    Traitement des déchets / Informationen für den Fachhandel ....16 Protection de l’environnement ....33 Service-Adressen ........17 Service ............ 17 Instructions for use Model 86706 Gebruiksaanwijzing Model 86706 Technical Specifications ......18 Technische gegevens ........ 34 Explanation of the symbols ......18 Verklaring van de symbolen ......
  • Seite 5 INHALTSVERZEICHNIS Istruzioni per l’uso Modello 86706 Návod k obsluze Modelu 86706 Dati tecnici ..........42 Technické údaje ........58 Significato dei simboli ......42 Vysvětlení symbolů ........58 Per la vostra sicurezza ....... 42 Pro Vaši bezpečnost ........58 Montaggio ..........46 Montáž...
  • Seite 6: Ihr Neuer Heizstrahler

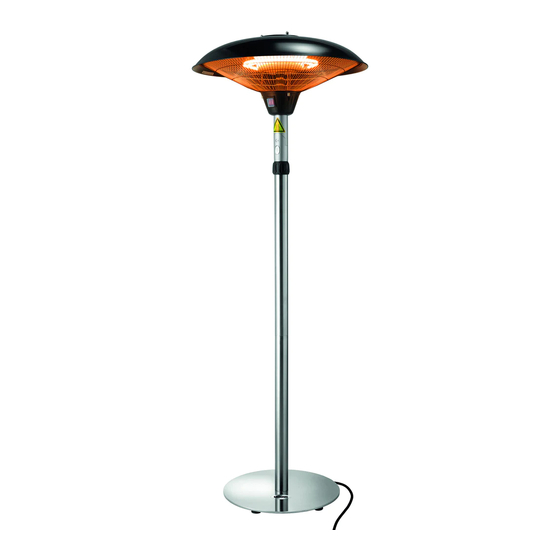
    IHR NEUER HEIZSTRAHLER Ab Seite 8 Zuleitung Sockel Unteres Standrohr Oberes Standrohr Höhenverstellung Feststellring Reflektor Knopf Neigungswinkel Schalter Heizelement 1 Schalter Heizelement 2...
  • Seite 7 Page 18 Página 50 Power cord Cable de alimentación Base Base Lower stand pipe Tubo vertical inferior Upper stand pipe Tubo vertical superior Height-adjustable locking ring Ajuste de altura Anillo de fijación Reflector Reflector Head tilt angle Botón ángulo de inclinación Switch - heating element 1 Interruptor elemento calorífico 1 Switch - heating element 2...
  • Seite 8: Bedienungsanleitung Modell 86706 Technische Daten

    BEDIENUNGSANLEITUNG MODELL 86706 TECHNISCHE DATEN Leistung: 2.100 Watt, 220–240 V~, 50 Hz Maße: Ca. 58,5 x 46,0 x 208,0 cm (L/B/H) Zuleitung: Ca. 180 cm Gewicht: Ca. 14,4 kg Sockel/Halterung: Edelstahl gebürstet Schutzklasse: IP 44 Ausstattung: 3 Heizstufen, Heizelemente mit Halogen-Technologie, getrennt regelbar, stufenlos höhenverstellbar von 170 bis...
  • Seite 9 ein- und ausschalten, wenn es 11. Das Gerät ist ausschließlich sich in seiner vorgesehenen für den Haushaltsgebrauch normalen Bedienungsposition oder ähnliche Verwendungs- befindet, sie beaufsichtigt zwecke bestimmt, z. B. werden oder bezüglich des ƒ Teeküchen in Geschäften, sicheren Gebrauchs unterwie- Büros oder sonstigen Arbeits- sen wurden und die daraus stätten,...
  • Seite 10 größe falsch gewählte Heiz- 25. Wickeln Sie die Zuleitung nie leistung entstehen. um das Gerät, um Schäden Sicherheitshinweise zum Aufstellen am Kabel zu vermeiden. und Betrieb des Gerätes 26. Ziehen Sie den Netzstecker 16. Das Gerät ist nur für den immer am Stecker aus der Außenbereich oder für den Steckdose, ziehen Sie dabei...
  • Seite 11: Verwenden Sie Das Gerät

    Badewannen oder Wasseran- den. Bewegen Sie das Gerät schlüssen verwendet werden. erst, wenn es ausgeschaltet 33. Berühren Sie das Gerät nie ist und ausreichend abgekühlt mit nassen oder feuchten ist – Verbrennungsgefahr!. Händen – Lebensgefahr durch 39. Durch die austretende, heiße Stromschlag! Luft können Verletzungen ent- 34.
  • Seite 12: Montieren

    MONTIEREN Wir empfehlen, den Aufbau mit zwei Personen vorzunehmen. Sie benötigen zur Montage einen Kreuzschlitz-Schraubendreher für Schrauben M4. Entfernen Sie alle Verpackungs- materialien und ggf. Transport- sicherungen. Halten Sie Verpa- ckungsmaterialien von Kindern fern. Prüfen Sie, ob alle aufgeführten Teile vorhanden und intakt sind. Fixieren Sie das untere Standrohr (3) am Sockel (2), indem Sie es in die Öffnung im Sockel stecken...
  • Seite 13: Schließen Sie Die Zuleitungs

    Schließen Sie die Zuleitungs- buchse am Reflektor (6) an. Set- zen Sie dann den Reflektor vor- sichtig auf das obere Standrohr. Schrauben Sie den Reflektor mit den mitgelieferten Schrau- ben (M4x8) fest. Nachdem Sie Stecker und Buchse verbunden haben, legen Sie die schwarze Schutzkappe um beides und ver- schließen Sie die Schutzkappe.
  • Seite 14: Der Ideale Standort

    DER IDEALE STANDORT Das Gerät ist nur für den Außen- Teppichen oder in staubreicher bereich oder für den Betrieb in Umgebung aufzustellen. sehr großen, gut belüfteten Räu- Das Gerät darf aus Sicherheitsgrün- men geeignet. den nicht in der Nähe von Wasch- Bei Sturm, Regen, Schneefall becken, Badewannen,...
  • Seite 15: Reinigen Und Pflegen

    fixieren Sie diese Höhe, indem Punkte erscheinen. Dies ist nor- Sie den Feststellring festdrehen. mal und hat keinen Einfluss auf Am Reflektor befinden sich zwei die Leistung des Geräts. Schalter, durch den die beiden 10. Wenn das Gerät nicht mehr benö- Halogen-Heizelemente separat tigt wird, schalten Sie das Gerät...
  • Seite 16: Garantiebestimmungen

    Produkt in gesundheits- und umweltverträglicher Weise entsorgt wird. INFORMATIONEN FÜR DEN FACHHANDEL Hiermit erklärt die UNOLD AG, dass sich der Heizlstrahler 86706 in Übereinstimmung mit den grundlegenden Anforderungen der europäischen Richtlinie für elektromagnetische Verträglichkeit (2004/108/EG) und der Niederspannungsrichtlinie (2006/95/EC) befindet.
  • Seite 17: Service-Adressen

    68766 Hockenheim Internet www.unold.de Sie möchten innerhalb der Garantiezeit ein Gerät zur Reparatur einsenden? Auf unserer Internetseite www.unold.de/ruecksendung können Sie sich einen Rücksendeschein ausdrucken, um damit das Paket kostenlos bei der Post abzugeben (nur für Einsendungen aus Deutschland und Österreich).
  • Seite 18: Instructions For Use Model 86706 Technical Specifications

    INSTRUCTIONS FOR USE MODEL 86706 TECHNICAL SPECIFICATIONS Power: 2,100 watts, 220–240 V~, 50 Hz Dimensions: Approx. 58.5 x 46.0 x 208.0 cm (W/D/H) Power cord: Approx. 180 cm Weight: Approx. 14.4 kg Base/holder: Stainless steel, brushed Degree of protection: IP 44...
  • Seite 19 ded normal operating posi- ƒ for use by guests in hotels, tion and they have been given motels or other lodgings, supervision or instruction con- ƒ in private guest houses or cerning use of the appliance holiday homes. in a safe way and understand 12.
  • Seite 20 18. Ensure that an adequate not pinched or pulled over distance (at least 100 cm corners. is maintained to branches, 29. If possible, do not use an bushes, shrubbery, furni- extension cord. If you must ture, curtains, or other flam- use an extension cord, com- mable objects.
  • Seite 21: Assembly

    37. Never leave the house when 40. Do not stick any objects in the appliance is switched the appliance openings, this on. Do not allow the appli- can result in electric shock. ance to run unattended. 41. Do to use any highly flamma- 38.
  • Seite 22 Fix the lower stand pipe in place on the base by inserting it into the opening in the base and firmly screwing it in. Route the power cord through the base and the lower stand pipe, so that the power cord projects on the upper end of the stand pipe Note that the plug for the electri- cal outlet must poke out on the...
  • Seite 23: The Ideal Location

    (M4 x 12) and the two fixing plates provided for this purpose. Caution: The power cord underneath the base must be protected with the provided rubber mantle! Unscrew the fixing plates on the underside of the base, remove the rubber mantel. Place the rubber mantel around the power cord and then fix both in place with the fixing plates.
  • Seite 24: Cleaning And Care

    To return the reflector to its ori- During the first two minutes after ginal position, press the button switching on the appliance, two again, bend the reflector back, dark spots can appear on the sur- and release the button. The but- face of the heating elements.
  • Seite 25: Guarantee Conditions

    By separate collection and disposal of waste products you help to protect natural resources and ensure, that the product is disposed in an adequate way to protect health and environment. This instruction manual is also available for download: http://www.unold.de...
  • Seite 26: Notice D´utilisation Modèle 86706 Spécification Technique

    NOTICE D´UTILISATION MODÈLE 86706 SPÉCIFICATION TECHNIQUE Puissance : 2 100 Watt, 220–240 V~, 50 Hz Dimensions : Env. 58,5 x 46,0 x 208,0 cm (H/L/P) Cordon d’alimentation : Env. 180 cm Poids : Env. 14,4 kg Socle/support : Acier inoxydable brossé...
  • Seite 27 d‘utilisation prévue norma- que ou à des fins similaires lement, qu‘ils sont surveillés telles que ou qu‘ils ont été instruits au ƒ dans une kitchenette de niveau de l‘utilisation sûre et magasin, de bureaux ou de ont compris les dangers qui tout autre lieu de travail, en résultent.
  • Seite 28 gel en raison d‘une mauvaise 24. Veillez à ce que le cordon isolation thermique ou pour d‘alimentation soit posé de une puissance de chauffage sorte qu‘il ne soit pas possi- non adaptée à la grandeur ble de trébucher. de la pièce. 25.
  • Seite 29 cet appareil à proximité des 38. Tant l‘appareil lavabos, des baignoires ou allumé, il ne doit pas être des raccords d‘eau. transporté à un autre end- 33. Ne touchez jamais l‘appareil roit. Déplacez l‘appareil seu- avec des mains mouillées ou lement quand il est éteint et humides - risque de mort par refroidi - risque de brûlure !
  • Seite 30: Montage

    MONTAGE Nous recommandons de réaliser le montage avec deux personnes. Vous avez besoin pour le montage d‘un tournevis cruciforme pour les vis M4. 1. Retirez tous les matériaux d‘emballage et éventuellement les sécurités de transport. Tenez les emballages loin des enfants. 2.
  • Seite 31: L'emplacement Idéal

    lisez pour ce faire les vis fournies (M4x1«) et les deux petites plaques de fixation. Attention : Le cordon d‘alimentation sous le socle doit être protégé avec la gaine en caoutchouc fournie ! Visser les plaquettes de fixation à la face inférieure du socle et retirer la gaine en caoutchouc.
  • Seite 32: Nettoyage Et Entretien

    le réflecteur dans le sens désiré (attention : 8. Choisissez le mode de fonctionnement le réflecteur peut être incliné que dans une désiré et allumez l‘appareil avec les inter- direction !) et relâcher le bouton rupteurs. 5. Pour remettre le réflecteur dans sa position 9.
  • Seite 33: Conditions De Garantie

    CONDITIONS DE GARANTIE En cas d’utilisation conforme et lors de dégâts manifestement dus à des défauts de fabrication, nos appareils sont garantis 24 mois, lors d’utilisation professionnelles 12 mois, à dater de l’achat. Notre garantie n’est valide que pour les appareils vendus en Allemagne et en Autriche.
  • Seite 34: Gebruiksaanwijzing Model 86706 Technische Gegevens

    GEBRUIKSAANWIJZING MODEL 86706 TECHNISCHE GEGEVENS Vermogen: 2.100 Watt, 220–240 V~, 50 Hz Afmetingen: Ca. 58,5 x 46,0 x 208,0 cm (L/B/H) Aansluitkabel: Ca. 180 cm Gewicht: Ca. 14,4 kg Sokkel/Houder: RVS geborsteld Beschermklasse IP 44 Uitvoering: 3 verwarmingsstanden, verwarmingselementen met halogeen technologie, apart regelbaar, traploos in hoogte verstelbaar van 170 tot 208 cm, kop tot 30 °...
  • Seite 35 in zijn voorziene, normale 11. Het apparaat is uitsluitend bedieningspositie bevindt, bestemd voor huishoudelijk de kinderen onder toezicht gebruik of voor soortgelijke staan of instructies over het doeleinden, bijv.: gebruik van dit apparaat ƒ kitchenettes winkels, hebben gekregen en de hie- kantoren of op andere werk- ruit resulterende...
  • Seite 36 verkeerde bediening, 24. Let op dat de aansluitkabel stroomuitval, vorstschade zodanig gelegd wordt dat er als gevolg van een slechte niemand over kan struikelen. warmte-isolatie is ontstaan 25. Wikkel aansluitkabel of voor schade als gevolg van nooit om het apparaat, om het feit dat er een verkeerd schade aan de kabel te ver- verwarmingsvermogen...
  • Seite 37 32. Om veiligheidsredenen mag 38. Zolang het apparaat inge- het apparaat niet in de buurt schakeld is, mag het niet van wasbakken, badkuipen verplaatst worden. Beweeg of wateraansluitingen wor- het apparaat pas, als het den gebruikt. uitgeschakeld en voldoende 33. Raak het apparaat nooit met afgekoeld is –...
  • Seite 38: Monteren

    MONTEREN Wij adviseren om het apparaat met twee personen te monteren. Voor de montage hebt u een kruiskopschroevendraaier voor schroeven M4 nodig. 1. Verwijder alle verpakkingsmaterialen en eventuele transportbeveiligingen. Houd verpakkingsmaterialen verwijderd van kin- deren. 2. Controleer of alle genoemde delen compleet en intact voorhanden zijn.
  • Seite 39: De Ideale Standplaats

    werd, omdat de aansluitkabel binnenin de buizen anders te kort is. 10. Nu moet de aansluitkabel aan de onder- kant van de sokkel nog bevestigd worden. Maak hiervoor gebruik van de meegeleverde schroeven (M4 x12) en de twee bevesti- gingsplaatjes. Attentie: Het snoer onder de sokkel moet met de meegeleverde rubberen ommanteling beschermd worden! Schroef de bevestigingsplaatjes aan de onderkant...
  • Seite 40: Bedienen

    BEDIENEN 1. Neem alle instructies van de veiligheidsins- Verwarmingselement 1 900 Watt tructies in acht. Verwarmingselement 2 1.200 Watt 2. Controleer of u een geschikte standplaats Beide verwarmingselementen 2.100 Watt gekozen hebt. 3. Steek de stekker in een stopcontact (220– 8.
  • Seite 41: Garantievoorwaarden

    GARANTIEVOORWAARDEN Wij geven op onze apparaten een garantietermijn van 24 maanden (12 maanden bij commerciële gebruik), gerekend vanaf de dag van aanschaf. Deze garantie geldt voor schade, die bij correct gebruik aantoonbaar is veroorzaakt door een fout in de pro- ductie.
  • Seite 42: Istruzioni Per L'uso Modello 86706 Dati Tecnici

    ISTRUZIONI PER L’USO MODELLO 86706 DATI TECNICI Potenza: 2.100 Watt, 220-–240 V~, 50 Hz Misure: Circa 58,5 x 46,0 x 208,0 cm (Lu/La/H) Cavo di alimentazione: Circa 180 cm Peso: Circa 14,4 kg Base/supporto: Acciaio inox, spazzolato Classe di isolamento:...
  • Seite 43 soltanto quando questo 11. L’apparecchio è progettato si trova nella posizione di esclusivamente l’uso comando normalmente pre- domestico o per impieghi vista, se sono sorvegliati o se similari, ad es. sono stati istruiti in relazione ƒ in aree cucina di negozi, all‘uso sicuro e hanno com- uffici o altri luoghi di lavoro, preso i pericoli risultanti.
  • Seite 44 alle dimensioni del relativo 25. Non avvolgere mai il cavo ambiente. alimentazione attorno all’apparecchio, in modo da Avvertenze sicurezza evitare danni al cavo. l‘installazione l‘esercizio 26. Staccare la spina di rete dell‘apparecchio dalla presa elettrica affer- 16. L‘apparecchio è adatto sol- rando sempre la spina, mai il tanto per il funzionamento in cavo di alimentazione, al fine...
  • Seite 45 lavandini, vasche da bagno o Spostare l‘apparecchio sol- raccordi dell‘acqua. tanto quando è spento e suf- 33. Non toccare ficientemente raffreddato – l‘apparecchio a mani bag- pericolo di ustioni!. nate o umide – Pericolo di 39. L‘aria calda fuoriuscente morte da scosse elettriche! può...
  • Seite 46: Montaggio

    MONTAGGIO Consigliamo di eseguire il montaggio in due. Per il montaggio serve un cacciavite a stella per viti M4. 1. Rimuovere tutti i materiali da imballo e le eventuali protezioni da trasporto. Tenere i materiali da imballo fuori dalla portata dei bambini.
  • Seite 47: Ubicazione Ideale

    punto 6 è stato correttamente rispettato, in quanto altrimenti il cavo di alimentazione all‘interno dei montanti è troppo corto. 10. Il cavo di alimentazione deve ora essere fis- sato al lato inferiore della base. A questo scopo utilizzare le viti M4 x12) e le due piastrine di fissaggio fornite in dotazione.
  • Seite 48: Uso

    1. Osservare tutte le avvertenze delle disposizi- Elemento riscaldatore 1 900 Watt oni di sicurezza. Elemento riscaldatore 2 1.200 Watt 2. Verificare di aver scelto un‘ubicazione Entrambi gli elementi riscaldatori 2.100 Watt adatta. 8. Scegliere la modalità operativa desiderata 3. Inserire la spina in una presa (220–240 V~, e accendere l‘apparecchio tramite gli inter- 50 Hz, 13 Ampere).
  • Seite 49: Norme Die Garanzia

    NORME DIE GARANZIA I nostri prodotti sono garantiti per 24 mesi dalla data di acquisto per i guasti manifestatisi durante un utilizzo conforme alle disposizioni e attribuibili in modo dimostrabile a difetti di fabbricazione. Nel periodo di garanzia porremo rimedio ai difetti materiali e di produzione secondo la nostra valutazione, procedendo alla riparazione o alla sostituzione dell’apparecchio.
  • Seite 50: Manual De Instrucciones Modelo 86706

    MANUAL DE INSTRUCCIONES MODELO 86706 DATOS TÉCNICOS Potencia: 2.100 vatios, 220–240 V~, 50 Hz Medidas: Aprox. 58,5 x 46,0 x 208,0 cm (L/P/A) Cable de alimentación: Aprox. 180 cm Peso: Aprox. 14,4 kg Base/soporte: Acero inoxidable, cepillado Clase de protección:...
  • Seite 51 prevista, si están siendo doméstico o fines de uso supervisados o si han sido similares, por ejemplo, correspondientemente inst- ƒ cocinas tipo office ruidos en el manejo seguro comercios, oficinas u otros del mismo y comprenden los lugares de trabajo, peligros derivados.
  • Seite 52 de una potencia calorífica del aparato para evitar daños incorrecta para el tamaño de en el cable. la habitación. 26. Para desenchufar el aparato, sujete siempre la clavija. Indicaciones de seguridad para la Con el fin de evitar daños en colocación y el uso del aparato el cable, no tire nunca del 16.
  • Seite 53 33. No toque el aparato nunca rato solo cuando esté apa- con las manos mojadas o gado y se haya enfriado lo húmedas: ¡peligro de muerte suficiente. ¡Peligro de que- por descarga eléctrica! maduras! 34. Por motivos de seguridad, el 39.
  • Seite 54: Montaje

    MONTAJE Recomendamos realizar el montaje con dos personas. Para el montaje necesitará un destornillador en cruz para tornillos M4. 1. Retire todos los materiales de embalaje y, dado el caso, los seguros de transporte. Mantenga los materiales de embalaje ale- jado de los niños.
  • Seite 55: El Emplazamiento Ideal

    posible si se ha respetado el punto 6 durante el montaje, dado que por el contrario el cable de alimentación en el interior de los tubos es demasiado corto. 10. Ahora, debe fijarse el cable de alimentación en la parte inferior de la base. Para ello, uti- lice los tornillos suministrados (M4x12) y las dos placas de fijación.
  • Seite 56: Manejo

    MANEJO 1. Observe todas las indicaciones de seguri- Elemento calorífico 1 900 vatios dad. Elemento calorífico 2 1.200 vatios 2. Cerciórese de haber elegido un emplaza- Ambos elementos caloríficos 2.100 vatios miento adecuado. 8. Seleccione el modo de servicio deseado y 3.
  • Seite 57: Condiciones De Garantia

    CONDICIONES DE GARANTIA Otorgamos garantía de 24 meses sobre nuestros aparatos a partir de la fecha de compra por daños que durante su uso com- prabadamente tengan que ver con errores de fábrica. Dentro del período de garantía, solucionamos errores de material y de fabricación a consideración nuestra mediante reparación o cambio.
  • Seite 58: Návod K Obsluze Modelu 86706 Technické Údaje

    NÁVOD K OBSLUZE MODELU 86706 TECHNICKÉ ÚDAJE Výkon: 2100 W, 220–240 V~, 50 Hz š Rozměry: Cca 58,5 x 46,0 x 208,0 cm (D/ Přívod: Cca 180 cm Hmotnost: Cca 14,4 kg Podstavec/držák: Kartáčovaná nerezová ocel Stupeň ochrany: IP 44 Vybavení:...
  • Seite 59 připojovat ani ovládat, čistit kabel, zda nejsou opotřebeny nebo provádět údržbu. nebo poškozeny. Při 4. POZOR - části tohoto výrobku poškození přívodního kabelu se mohou silně ohřát a způsobit nebo jiných dílů pošlete popálení! Při přítomnosti dětí a přístroj nebo přívod na kon- ohrožených osob buďte zvláště...
  • Seite 60 lenost od stropu musí činit a dbejte na mezní výkon minimálně 30 cm. daného kabelu. 19. Hlavice topného zářiče musí 30. Vytáhněte zástrčku být minimálně 180 cm nad zásuvky zemí. ƒ když přístroj nefunguje 20. Dbejte na to, abyste se bezchybně...
  • Seite 61: Montáž

    přístrojem až tehdy, když 41. V blízkosti přístroje je vypnutý a dostatečně nepoužívejte žádné snadno vychladnul – nebezpečí zápalné látky nebo např. popálení! spreje – nebezpečí požáru! 39. Proudící horký vzduch může 42. Nebude-li přístroj používán, způsobit zranění. Proto uložte jej pouze v suchých bezpodmínečně...
  • Seite 62 5. Dbejte na to, že zástrčka do zásuvky musí vyčnívat ze spodní strany podstavce. Konec přívodu, na kterém je namontována přípojná zdířka, musí být protažen skrz trubku. 6. Zkontrolujte, zda je horní trubka stojanu zcela vytažena. Pokud ne, povolte aretační kroužek, vytáhněte horní...
  • Seite 63: Ideální Stanoviště

    IDEÁLNÍ STANOVIŠTĚ 1. Přístroj je vhodný pouze pro venkovní 8. Z bezpečnostních důvodů se přístroj nesmí použití nebo pro provoz ve velmi velkých, používat v blízkosti umyvadel, van, jezírek, dobře větraných prostorech. bazénů nebo přípojů vody. 2. Při bouřce, dešti, sněžení atd. nesmí být 9.
  • Seite 64: Čištění A Péče

    10. Když přístroj již není potřeba, vypněte Dbejte na to, že přístroj se může silně jej uvedením spínačů do polohy „0“ a ohřát - nebezpečí popálení! Zabraňte vytáhněte síťovou zástrčku. zvláště dětem v přístupu k přístroji. 11. Pozor: Když se přístroj převrátí, vypne se automaticky.
  • Seite 65: Instrukcja Obsługi Model 86706 Dane Techniczne

    INSTRUKCJA OBSŁUGI MODEL 86706 DANE TECHNICZNE Moc: 2100 W, 220–240 V~, 50 Hz Wymiary: Ok. 58,5 x 46,0 x 208,0 cm Przewód zasilający: Ok. 180 cm Ciężar: Ok. 14,4 kg Podstawa/uchwyt: Stal nierdzewna szczotkowana Stopień ochrony: IP 44 Wyposażenie: 3 stopnie grzania, elementy grzejne w technologii halogenowej, regulowane oddzielnie, bezstopniowa regulacja wysokości od 170 do 208 cm, główka...
  • Seite 66 5. Urządzenie może 11. Urządzenia wolno pracować zewnętrznym używać z akcesoriami innych programatorem zegarowym producentów lub marek, aby systemem sterowania uniknąć szkód. zdalnego (pilotem). 12. Po użyciu i przed czyszcze- 6. W żadnym wypadku niem wyjąć wtyczkę z gniaz- zanurzać urządzenia dka.
  • Seite 67 18. Zwrócić uwagę na to, aby wód przedłużający nie zbliżać się do reflektora przekraczać mocy maksym- z włosami, nakryciem głowy: alnej dla każdego przewodu. Niebezpieczeństwo oparze- 28. Wyciągnąć wtyczkę z gniaz- nia! dka sieciowego 19. Nie używać urządzenia w ƒ gdy urządzenie nie pracuje garażach, drewnianych szo- prawidłowo pach lub podobnych pomies-...
  • Seite 68: Montaż

    35. Nigdy nie opuszczać mies- 39. Do otworów urządzenia nie zkania, gdy urządzenie jest wkładać żadnych przed- włączone. miotów, istnieje niebez- 36. Urządzenie może pieczeństwo porażenia prą- pracować bez nadzoru. dem. 37. Gdy urządzenie jest 40. W pobliżu urządzenia nie włączone, wolno używać...
  • Seite 69 3. Na podstawie zamocować dolną rurę stojaka wkładając ją w otwór podstawy i dokręcając przez obracanie rury. 4. Przeprowadzić przewód przez podstawę i dolną rurę tak, aby przewód wystawał na górnym końcu rury 5. Zwrócić uwagę na to, aby na spodzie pods- tawy była widoczna wtyczka do gniazdka.
  • Seite 70: Idealne Stanowisko

    IDEALNE STANOWISKO 1. Urządzenie nadaje się wyłącznie 8. Ze względów bezpieczeństwa urządzenia nie używania na zewnątrz lub w bardzo dużych, wolno używać w pobliżu umywalek, wanien dobrze wentylowanych pomieszczeniach. kąpielowych, stawów, basenów kąpielowych 2. W razie burzy, deszczu, śnieżycy itd. lub przyłączy wody.
  • Seite 71: Czyszczenie I Konserwacja

    nych mogą ukazać się dwa ciemne punkty. 11. Uwaga: Gdy urządzenie przewróci się, Jest to normalne i nie ma żadnego wpływu wyłączy się automatycznie. na wydajność urządzenia. Zwrócić uwagę na to, że urządzenie 10. Gdy urządzenie nie jest już potrzebne, może być...
  • Seite 72: Aus Dem Hause

    Aus dem Hause Aus dem Hause...

Inhaltsverzeichnis