Inhaltsverzeichnis
Werbung
Verfügbare Sprachen
Verfügbare Sprachen
Quicklinks
Werbung
Inhaltsverzeichnis

Inhaltszusammenfassung für VonHaus 20V MAX
- Seite 1 20V MAX POLE TRIMMER 15/200 UK - Instruction Manual 8100002 EU...
- Seite 2 CONTENTS Safety Instructions Safety Instructions Safety Instructions Safety Instructions, Safety Symbols Technical Specification Charging the Battery, Important Charging Notes...
- Seite 3 Installing & Removing the Battery, Short Trimmer Assembly Extending the Pole, Angle Adjustment Auxillary Handle & Shoulder Strap, Balance & Working Position Operation, Cleaning & Maintenance Blade Maintenance, Troubleshooting Warranty...
- Seite 4 WARNING PLEASE READ THESE INSTRUCTIONS CAREFULLY AND KEEP FOR FUTURE REFERENCE GENERAL POWER TOOL SAFETY equipment such as a dust mask, non- INFORMATION. skid safety shoes, hard hat, or hearing Read, and make sure you fully protection used for appropriate understand, all safety information before conditions will reduce the risk of personal using this tool.
- Seite 5 WARNING PLEASE READ THESE INSTRUCTIONS CAREFULLY AND KEEP FOR FUTURE REFERENCE Be aware of unintentional starting. Ensure the power tool before making any the switch is in the off position before adjustments, changing accessories, or connecting to the power source and/ storing.
- Seite 6 WARNING PLEASE READ THESE INSTRUCTIONS CAREFULLY AND KEEP FOR FUTURE REFERENCE First read the safety instructions and To reduce risk of damage to the electric then follow the charging notes and plug and cord, pull by the plug rather procedures. than the cord when disconnecting the The charger is only designed to operate charger.
-
Seite 7: Safety Symbols
WARNING PLEASE READ THESE INSTRUCTIONS CAREFULLY AND KEEP FOR FUTURE REFERENCE Regularly check external nuts and fixings to ensure vibration caused by normal use has not begun to loosen them. Make sure the cord is located so that it will not be stepped on, tripped over, or otherwise subjected to damage or stress. -
Seite 8: Technical Specification
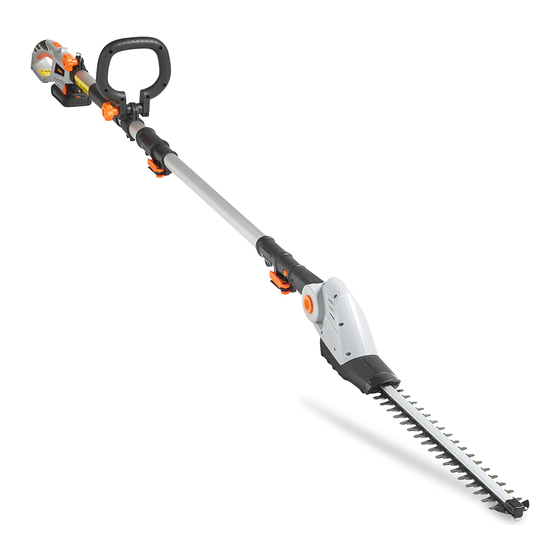
TECHNICAL SPECIFICATION MAX CUTTING CHARGE NO LOAD BATTERY BATTERY TIME SPEED CAPACITY Hours Li-Ion 1500mAh 1400 1. Blade Guard 2. Blade 3. Rotational Button 4. Pin Cover 5. Shoulder Strap Mount 5A. Auxiliary Handle Mount 6. Safety Switch 7. Power Trigger 8. -
Seite 9: Charging The Battery
CHARGING THE BATTERY Plug the Battery Charger (12) into a suitable mains power outlet. Insert the opposite end into the top of the Battery to begin charging. The green indicator lights on the Battery will indicate charging. LEVEL OF CHARGE Pressing the Charge Indicator Button (15) will indicate the level of charge. -
Seite 10: Installing & Removing The Battery
INSTALLING & REMOVING THE BATTERY WARNING! Always switch off the tool before removing or inserting the Battery. Align the notches to the base of the Pole Trimmer Rear Handle, with those on the Battery and slide the Battery and Pole Trimmer together until the Battery locks into place. -
Seite 11: Angle Adjustment
EXTENDING THE POLE To Extend the Pole Trimmer, Release the Extending Release Lever and pull to the desired length, re- secure by returning the Release Lever to its original position. NOTE: It is advised to adjust the length of the Trimmer to best suit the size of the hedge to be cut. - Seite 12 AUXILIARY HANDLE & SHOULDER STRAP To attach the Auxiliary Handle (11) push the Auxiliary Handle Mount (5A) onto the Pole Trimmer. Push the Auxiliary Handle (11) onto the Mount and adjust to the desired angle. Insert the Bolt trough the Auxiliary Handle and secure by tightening the Nut onto the opposite end.
-
Seite 13: Cleaning & Maintenance
OPERATION CAUTION: Always hold the Pole Trimmer with both POWERING OFF THE POLE TRIMMER hands when in use. To power off the Pole Trimmer release the Power Trigger (7) When using in the extended position always use the Wait until the Blades come to a complete stop before AUXILIARY HANDLE (11) and SHOULDER STRAP carrying out any maintenance or storing the tool. -
Seite 14: Blade Maintenance
BLADE MAINTENANCE WARNING! Always wear gloves when handling or cleaning the Dual Action Cutting Blades. Always clean the Dual Action Cutting Blades after operation and coat with lubricating oil or spray. This will prevent the Blades from becoming seized or corroded during storage. -
Seite 15: Disposal Information
WARRANTY To register your product and find out if you qualify for a free extended warranty please go to Vonhaus.com/warranty. Please retain a proof of purchase receipt or statement as proof of the purchase date. The warranty only applies if the product is used solely in the manner indicated in the Warnings page of this manual, and all other instructions have been followed accurately. - Seite 16 SOMMAIRE Consignes de sécurité Consignes de sécurité Consignes de sécurité Consignes de sécurité, Symboles de sécurité Caractéristiques techniques Chargement de la batterie, Notes importantes sur le chargement...
- Seite 17 Installer et retirer la Batterie, Assemblage du Taille-haie court Prolonger la perche, Réglage de l’angle Poignée supplémentaire et bandoulière, Équilibre et posture de travail Utilisation, Nettoyage et entretien Entretien de la Lame, Dépannage Garantie...
- Seite 18 AVERTISSEMENT VEUILLEZ LIRE CES INSTRUCTIONS ATTENTIVEMENT ET CONSERVEZ-LES POUR POUVOIR LES CONSULTER À L ’AVENIR INFORMATIONS GÉNÉRALES distractions. RELATIVES À LA SÉCURITÉ D’UN Habillez-vous de manière appropriée. Ne OUTIL ÉLECTRIQUE. portez pas de vêtements amples ni de Avant d’utiliser cet outil, lisez et assurez- bijoux.
- Seite 19 AVERTISSEMENT VEUILLEZ LIRE CES INSTRUCTIONS ATTENTIVEMENT ET CONSERVEZ-LES POUR POUVOIR LES CONSULTER À L ’AVENIR RISQUE DE BLESSURES. ou avec ces instructions, à utiliser l’outil Si le Taille-haie sur perche sans fil ne électrique. Les outils électriques sont fonctionne pas correctement, qu’il est dangereux entre les mains d’utilisateurs tombé, qu’il a été...
- Seite 20 AVERTISSEMENT VEUILLEZ LIRE CES INSTRUCTIONS ATTENTIVEMENT ET CONSERVEZ-LES POUR POUVOIR LES CONSULTER À L ’AVENIR instructions, en tenant compte des créer un risque de choc électrique ou conditions de travail et du travail à d’incendie. réaliser. Utilisez l’outil électrique pour N’exposez la batterie à...
-
Seite 21: Symboles De Sécurité
AVERTISSEMENT VEUILLEZ LIRE CES INSTRUCTIONS ATTENTIVEMENT ET CONSERVEZ-LES POUR POUVOIR LES CONSULTER À L ’AVENIR Le liquide éjecté de la batterie peut où la température peut dépasser 40° C causer des irritations ou des brûlures. (par exemple des hangars ou bâtiments Faites entretenir votre outil électrique métalliques pendant l’été). -
Seite 22: Caractéristiques Techniques
CARACTÉRISTIQUES TECHNIQUES AUCUNE CAPACITÉ TEMPS DE BATTERIE VITESSE DE DE COUPE BATTERIE CHARGEMENT CHARGEMENT MAXIMUM Heures Li-Ion 1500mAh 1400 1. Couvre-lame 2. Lame 3. Bouton de rotation 4. Couvre-borne 5. Fixation de la bandoulière 5A. Fixation de la poignée supplémentaire 6. -
Seite 23: Chargement De La Batterie
CHARGEMENT DE LA BATTERIE Branchez le Chargeur de Batterie (12) dans une prise de courant adaptée. Insérez le bout opposé au sommet de la Batterie pour débuter le chargement. Le témoin indicateur vert se trouvant sur la Batterie indiquera le chargement. NIVEAU DE CHARGE Appuyer sur le Bouton indicateur de charge (15) indiquera le niveau de charge. - Seite 24 INSTALLER ET RETIRER LA BATTERIE AVERTISSEMENT ! Arrêtez toujours l’outil avant de retirer ou d’insérer la Batterie. Alignez les encoches de la base de Poignée arrière du Taille-haie sur perche avec celles de la Batterie et faites coulisser la Batterie et le Taille-haie sur perche ensemble jusqu’à...
-
Seite 25: Réglage De L'angle
AGRANDIR LA PERCHE Pour agrandir le Taille-haie sur perche, libérez le Levier de libération de l’extension et placez à la longueur désirée, puis rattachez en replaçant le Levier de libération à sa place initiale. NOTE : il est conseillé de régler la longueur du Taille- haie pour s’adapter à... - Seite 26 POIGNÉE SUPPLÉMENTAIRE ET BANDOULIÈRE Pour attacher la Poignée supplémentaire (11), poussez la Fixation de la poignée supplémentaire (5A) sur le Taille-haie sur perche. Poussez la Poignée supplémentaire (11) sur la Fixation et réglez à l’angle désiré. Insérez le Boulon à travers la Poignée supplémentaire et attachez en vissant l’écrou du côté...
-
Seite 27: Nettoyage Et Maintenance
UTILISATION ATTENTION : en cours d’utilisation, tenez toujours le ÉTEINDRE LE TAILLE-HAIE SUR PERCHE Taille-haie sur perche à deux mains. Pour éteindre le Taille-haie sur perche, relâchez la Gâchette d’alimentation (7). Lorsque vous utilisez une position étendue, utilisez Attendez que les Lames se soient totalement arrêtées toujours la POIGNÉE SUPPLÉMENTAIRE (11) et la avant de réaliser une opération d’entretien ou de BANDOULIÈRE (10) pour équilibrer. -
Seite 28: Entretien De La Lame
ENTRETIEN DE LA LAME ATTENTION ! Portez toujours des gants lorsque vous maniez ou nettoyez les Lames Coupantes double action. Après utilisation, nettoyez toujours les Lames à Ne pas le faire pourrait entraîner la rouille des Lames double action et recouvrez d’huile ou de spray et réduirait de beaucoup les performances de coupe lubrifiant. -
Seite 29: Informations Sur Le Recyclage
GARANTIE Pour enregistrer votre produit et découvrir si vous vous qualifiez pour une extension gratuite de garantie, rendez-vous sur Vonhaus.com/warranty. Conservez une preuve d’achat, reçu ou attestation, pour prouver la date de l’achat. La garantie ne s’applique que si le produit a été utilisé de la manière indiquée dans la section de la page des avertissements de ce manuel et que toute les instructions ont été... - Seite 30 INHALT Sicherheitshinweise Sicherheitshinweise Sicherheitshinweise Sicherheitshinweise, Sicherheitssymbole Technische Spezifikation Akkuwechsel, Wichtige Information zum Aufladen...
- Seite 31 Installieren & Entfernen des Akkus, Aufbau des kurzen Trimmers Verlängerung des Stabs, Winkel-Einstellung Hilfsgriff & Schultergurt, Balance & Arbeitsposition Bedienung, Reinigung & Pflege Pflege der Klingen, Fehlersuche Garantie...
- Seite 32 WARNUNG BITTE LESEN SIE DIESE ANWEISUNGEN SORGFÄLTIG UND BEWAHREN SIE SIE ALS KÜNFTIGE REFERENZ AUF. ALLGEMEINE SICHERHEITSHINWEISE Haare sollten zurückgebunden werden, BEI DER NUTZUNG VON Kleidung und Handschuhe sollten fern ELEKTRISCHEN GERÄTEN. von sich bewegenden Teilen bleiben, um Lesen Sie alle Sicherheitsinformationen sicherzustellen, dass sich nicht im Gerät bevor Sie das Gerät verwenden und verfangen.
- Seite 33 WARNUNG BITTE LESEN SIE DIESE ANWEISUNGEN SORGFÄLTIG UND BEWAHREN SIE SIE ALS KÜNFTIGE REFERENZ AUF. geblieben ist oder in Flüssigkeit getaucht mit dem Gerät nicht auskennt, oder wurde nutzen Sie es nicht. Kontaktieren der diese Anleitung nicht gelesen hat. Sie in diesem Fall den DOMU Brands Elektrogeräte sind in den Händen von Kundendienst.
- Seite 34 WARNUNG BITTE LESEN SIE DIESE ANWEISUNGEN SORGFÄLTIG UND BEWAHREN SIE SIE ALS KÜNFTIGE REFERENZ AUF. Bedenken Sie die Arbeitsbedingungen Setzen Sie den Akku nicht längere Zeit und die Arbeit, die ausgeführt werden direkten Sonnenlicht aus. soll. Wenn Sie das Elektrowerkzeug für Schützen Sie Akku und Ladegerät vor andere Zwecke als die Wasser und Feuchtigkeit.
-
Seite 35: Sicherheitssymbole
WARNUNG BITTE LESEN SIE DIESE ANWEISUNGEN SORGFÄLTIG UND BEWAHREN SIE SIE ALS KÜNFTIGE REFERENZ AUF. austritt kann zu Hautreizungen oder Beispiel im Sommer in Hütten oder in Verbrennungen führen. Metallgebäuden). Lassen Sie Ihr Elektrogerät nur durch Stellen Sie sicher, dass die Griffe sauber einen qualifizierten Servicemitarbeiter, und frei von Öl und Feuchtigkeit bleiben, der identische Ersatzteile verwendet,... -
Seite 36: Technische Spezifikation
TECHNISCHE SPEZIFIKATION MAX SCHNITT- LADE- KEINE LADE- AKKU AKKU KAPAZITÄT ZEIT GESCHWINDIGKEIT Stunden Li-Ion 1500mAh 1400 1. Klingen-Schutz 2. Klinge 3. Drehknopf 4. Pin-Abdeckung 5. Befestigung des Schultergurts 5A. Befestigung des Hilfsgriffs 6. Sicherheitshebel 7. Einschalthebel 8. Entriegelungshebel für die Verlängerung 9. -
Seite 37: Aufladen Des Akkus
AUFLADEN DES AKKUS Stecken Sie den Lade-Adapter (12) in eine geeignete Steckdose. Setzen Sie das Gegenstück in das Oberteil des Akkus ein, um mit dem Laden zu beginnen. Das grüne Licht am Akku bedeutet, dass der Akku geladen wird. LADEZUSTAND Wenn Sie auf den Ladeanzeigeknopf (15) drücken, wird der Ladestand angezeigt. -
Seite 38: Installieren & Entfernen Des Akkus
INSTALLIEREN & ENTFERNEN DES AKKUS WARNUNG! Schalten Sie das Gerät immer aus, bevor Sie den Akku entfernen oder einsetzen. Legen Sie die Kerben unten am hinteren Griff des Stab-Trimmers über die Kerben am Akku und schieben Sie Akku und Stab-Trimmer ineinander, bis der Akku an der richtigen Stelle sitzt. -
Seite 39: Verlängerung Des Stils
VERLÄNGERUNG DES STILS Um die Stab-Heckenschere zu verlängern, entsperren Sie den ENTRIEGELUNGSHEBEL FÜR DIE VERLÄNGERUNG und ziehen den Stab auf die gewünschte Länge, sperren Sie dann den Stab wieder, indem Sie den ENTRIEGELUNGSHEBEL FÜR DIE VERLÄNGERUNG wieder in die Ausgangsposition zurückschieben. - Seite 40 HILFS-GRIFF & SCHULTERGURT Um den Hilfsgriff (11) anzubringen, drücken Sie die Anbringung für den Hilfsgriff (5A) auf die Stab- Heckenschere. Drücken Sie den Hilfsgriff (11) auf die Befestigung und stellen Sie den gewünschten Winkel ein. Setzen Sie die Schraube des Hilfsgriffs ein und befestigen Sie sie, indem Sie sie auf der Gegenseite die Mutter anziehen.
-
Seite 41: Bedienung
BEDIENUNG VORSICHT: Halten Sie die Heckenschere immer mit EINSCHALTEN DES STAB-TRIMMERS beiden Händen, wenn Sie sie benutzen. Um den Stab-Trimmer auszuschalten lassen den Einschalthebel (7) los. Wenn Sie sie in ausgefahrener Position verwenden, Warten Sie, bis die Klingen komplett stillstehen, nutzen Sie immer den HILFSGRIFF (11) und den bevor Sie das Gerät pflegen oder aufräumen. -
Seite 42: Pflege Der Klingen
PFLEGE DER KLINGEN WARNUNG! Tragen Sie immer Handschuhe, wenn Sie die Dual Action Klingen anfassen oder reinigen. Reinigen Sie die Dual Action Klingen immer nach der Tun Sie dies nicht, können die Klingen rosten und die Nutzung und überziehen Sie sie mit Schmieröl oder Schnittleistung sowie die Laufzeit des Akkus ernsthaft Spray. -
Seite 43: Entsorgung
GARANTIE Um Ihr Produkt zu registrieren und zu erfahren, ob eine kostenlose verlängerte Garantie möglich ist, gehen Sie bitte auf Vonhaus.com/warranty. Bitte behalten Sie eine Rechnung oder den Kassenzettel als Nachweis des Einkaufdatums auf. Die Garantie gilt nur, wenn das Produkt nur wie in dieser Anleitung beschrieben verwendet wurde und wenn alle Anweisungen befolgt wurden. - Seite 44 CONTENIDOS Instrucciones de seguridad Instrucciones de seguridad Instrucciones de seguridad Instrucciones de seguridad, Símbolos de seguridad Especificaciones técnicas Cargar la batería, Notas de carda...
- Seite 45 Instalar y retirar la batería, Ensamblaje Podadora corta Extender la podadora, Ajuste de ángulo Asa auxiliar & Tira del hombro, Equilibrio y posición de trabajo Operación, limpieza y mantenimiento Mantenimiento de la cuchilla, Resolución de problemas Garantía...
- Seite 46 ADVERTENCIA LEA ESTAS INSTRUCCIONES CUIDADOSAMENTE Y GUÁRDELAS PARA FUTURAS REFERENCIAS INFORMACIÓN DE SEGURIDAD herramienta. GENERAL DE LA HERRAMIENTA. Use protección visual y equipo Lea y entienda por completo toda la protector como una máscara para el información de seguridad antes de usar polvo, zapatos seguros, un sombrero la herramienta.
- Seite 47 ADVERTENCIA LEA ESTAS INSTRUCCIONES CUIDADOSAMENTE Y GUÁRDELAS PARA FUTURAS REFERENCIAS herramienta eléctrica. No la use bajo pueda ser controlada con un interruptor la influencia del alcohol, las drogas o la es peligrosa y debe ser reparada. medicación. Un momento de distracción Desconecte el enchufe de la toma de al operar la herramienta puede resultar corriente y/o la batería de la herramienta...
- Seite 48 ADVERTENCIA LEA ESTAS INSTRUCCIONES CUIDADOSAMENTE Y GUÁRDELAS PARA FUTURAS REFERENCIAS ningún propósito diferente al de Para reducir el riesgo de daños en cargar baterías recargables. Cualquier el enchufe y cable eléctricos, tire del otro uso puede acabar en incendio o enchufe en vez del cable al desconectar electrocución.
-
Seite 49: Símbolos De Seguridad
ADVERTENCIA LEA ESTAS INSTRUCCIONES CUIDADOSAMENTE Y GUÁRDELAS PARA FUTURAS REFERENCIAS del dispositivo no los ha aflojado. Asegúrese de que el cable no pueda ser pisado, causar traspiés, o esté sujeto a estrés o daños. SÍMBOLOS DE SEGURIDAD Los siguientes símbolos de seguridad pueden aparecer en este producto. Por favor, asegúrese de que entiende sus significados antes de operar esta herramienta. -
Seite 50: Especificaciones Técnicas
ESPECIFICACIONES TÉCNICAS CAPACIDAD TIEMPO BATERíA BATERÍA VELOCIDAD DE CORTE CARGA Horas Li-Ion 1500mAh 1400 1. Cubierta Cuchilla 2. Cuchilla 3. Botón rotacional 4. Cubierta Pin 5. Tira para el hombro 5A. Asa auxiliar 6. Interruptor de seguridad 7. Interruptor 8. Palanca extensora 9. -
Seite 51: Cargando La Batería
CARGANDO LA BATERÍA Conecte el Cargador de batería (12) en una toma de corriente adecuada. Inserte el extremo opuesto en la parte superior de la Batería para empezar a cargar. El indicador verde de la Batería le indicará que se está... - Seite 52 INSTALAR Y RETIRAR LA BATERÍA ¡ADVERTENCIA! Desconecte la herramienta antes de insertar o retirar la Batería. Alinee las muescas de la base del mango posterior de la Podadora de Altura, y deslice la Batería y la Podadora de Altura conjuntamente hasta que la Batería encaje en su sitio.
-
Seite 53: Ajuste Del Ángulo
EXTENDER LA PODADORA Para extender la Podadora, suelte la Palanca de extensión y tire del palo hasta la longitud deseada. Re-asegúrelo devolviendo la Palanca a su posición original. NOTA: Es aconsejable ajustar la longitud de la Podadora al arbusto que deba podar. Extender Soltar AJUSTE DEL ÁNGULO... - Seite 54 ASA AUXILIAR Y TIRA PARA EL HOMBRO Para adjuntar el Asa Auxiliar (11) empuje el Mango auxiliar (5A) en la Podadora de Altura. Empuje el Asa Auxiliar (11) en la Montura y ajuste el ángulo deseado. Inserte el clavo a través del Asa Auxiliar y asegúrela apretando la hembra en el extremo opuesto.
-
Seite 55: Limpieza Y Mantenimiento
OPERACIÓN PRECAUCIÓN: Sujete siempre la Podadora de Altura APAGAR LA PODADORA DE ALTURA con ambas manos al usarla. Para apagar la Podadora de Altura suelte el Interruptor (7) Al usar la posición de extensión use siempre el Espere hasta que las Cuchillas se detengan por ASA AUXILIAR (11) y la TIRA DEL HOMBRO completo antes de realizar tareas de mantenimiento o (10) para mantener el equilibrio. -
Seite 56: Mantenimiento De La Cuchilla
MANTENIMIENTO DE LA CUCHILLA ¡ADVERTENCIA! Use siempre guantes al usar o limpiar las Cuchillas de Acción Dual. Limpie siempre las Cuchillas de Acción Dual tras operar y recúbralas con aceite lubricante o spray. Esto evitará que las Cuchillas se oxiden durante el almacenaje. - Seite 57 GARANTIA Para registrar su producto y consultar si califica para una garantia extendida gratis por favor diríjase a Vonhaus.com/warranty. Conserve un comprobante de recibo de compra o extracto como prueba de la fecha de compra. La garantía solo se aplica si el producto es utilizado únicamente de la manera indicada en la página de Advertencias de este manual, y todas las demás instrucciones se han seguido con precisión.
- Seite 58 INDICE Istruzioni di sicurezza Istruzioni di sicurezza Istruzioni di sicurezza Istruzioni di sicurezza, Simboli di sicurezza Specifiche tecniche Ricarica della batteria, Note importanti per la ricarica...
- Seite 59 Installazione e rimozione della batteria, Montaggio del rasafilo Estensione dell’asta, Regolazione dell’angolo Impugnatura accessoria e tracolla, Equilibrio e Posizione di lavoro Funzionamento, Pulizia e Manutenzione Manutenzione della lama, Risoluzione dei problemi Garanzia...
- Seite 60 ATTENZIONE SI PREGA DI LEGGERE ATTENTAMENTE QUESTE ISTRUZIONI E CONSERVARLE PER UNA FUTURA CONSULTAZIONE INFORMAZIONI GENERALI DI vestiti larghi o gioielli. Tenere i capelli, i SICUREZZA DELL’ATTREZZO vestiti e i guanti lontani dalle parti mobili ELETTRICO per evitare che si impiglino. Prima di utilizzare questo attrezzo, Usare dei dispositivi di protezione leggere ed essere sicuri di comprendere...
- Seite 61 ATTENZIONE SI PREGA DI LEGGERE ATTENTAMENTE QUESTE ISTRUZIONI E CONSERVARLE PER UNA FUTURA CONSULTAZIONE UTILIZZO E CURA DELL’ATTREZZO in cui sia caduto, danneggiato, lasciato ELETTRICO. all’esterno oppure immerso in liquidi, non Non forzare il Decespugliatore senza filo. utilizzarlo, contattare il Servizio Clienti di DOMU Brands.
- Seite 62 ATTENZIONE SI PREGA DI LEGGERE ATTENTAMENTE QUESTE ISTRUZIONI E CONSERVARLE PER UNA FUTURA CONSULTAZIONE dell’attrezzo elettrico per operazioni incendio. diverse da quelle previste può provocare Non esporre la batteria alla luce diretta situazioni pericolose. del sole per lunghi periodi di tempo. Usare solo gli accessori forniti e/o Proteggere la batteria e il carica batteria dall’acqua e dall’umidità.
-
Seite 63: Simboli Di Sicurezza
ATTENZIONE SI PREGA DI LEGGERE ATTENTAMENTE QUESTE ISTRUZIONI E CONSERVARLE PER UNA FUTURA CONSULTAZIONE in contatto con gli occhi, consultare un asciutto e secco. medico. Non conservare, né utilizzare l’attrezzo Il liquido espulso dalla batteria può e il pacco batteria in luoghi in cui la causare irritazione o ustioni. -
Seite 64: Specifiche Tecniche
SPECIFICHE TECNICHE CAPACITÀ TEMPO DI REGIME BATTERIA DI TAGLIO BATTERIA RICARICA MASSIMO MASSIMA Li-Ion 1500mAh 1400 1. Protezione della lama 2. Lama 3. Pulsante di rotazione 4. Copertura del perno 5. Supporto per tracolla 5A. Supporto per impugnatura accessoria 6. Interruttore di sicurezza 7. -
Seite 65: Ricarica Della Batteria
RICARICA DELLA BATTERIA Inserire il Carica batterie (12) in una presa elettrica idonea. Inserire l’estremità opposta nella parte superiore della Batteria per iniziare a ricaricare. L’indicatore luminoso verde sulla Batteria indica la ricarica. LIVELLO DI RICARICA Premendo il Pulsante dell’indicatore della carica (15) verrà... - Seite 66 INSTALLAZIONE E RIMOZIONE DELLA BATTERIA ATTENZIONE! Prima di rimuovere o inserire la Batteria, spegnere sempre l’attrezzo. Allineare le tacche della base del Decespugliatore a quelle della Batteria e far scorrere la Batteria e il Decespugliatore insieme fino a bloccare la Batteria in posizione.
- Seite 67 ESTENSIONE DELL’ASTA Per allungare il Decespugliatore, rilasciare la Leva di rilascio della prolunga e tirarla alla lunghezza desiderata, fissare riposizionando la Leva di rilascio nella posizione originale. NOTA: Si consiglia di regolare la lunghezza del Decespugliatore in base al bordo da tagliare. Allunga Rilascia REGOLAZIONE DELL’ANGOLO...
- Seite 68 IMPUGNATURA ACCESSORIA E TRACOLLA Per agganciare l’Impugnatura accessoria (11) premere il Supporto dell’impugnatura accessoria (5A) nel Decespugliatore. Premere l’Impugnatura accessoria (11) nel Supporto e regolare l’angolo desiderato. Far passare il Bullone attraverso l’Impugnatura accessoria e fissare stringendo il dado sul lato opposto.
-
Seite 69: Pulizia E Manutenzione
FUNZIONAMENTO ATTENZIONE: Mantenere sempre il Decespugliatore SPEGNIMENTO DEL DECESPUGLIATORE con entrambe le mani quando si utilizza. Per spegnere il Decespugliatore lasciare entrambe il Pulsante di avviamento (7). Quando si utilizza in posizione allungata, usare Aspettare fino a quando le Lame si arrestano sempre l’IMPUGNATURA ACCESSORIA (11) e la completamente prima di effettuare qualsiasi tipo di TRACOLLA (10) per bilanciarsi. -
Seite 70: Manutenzione Della Lama
MANUTENZIONE DELLA LAMA ATTENZIONE! Quando si manovrano le Lame di taglio a doppia azione o durante la pulizia, indossare sempre i guanti di protezione. Pulire sempre le Lame di taglio a doppia azione dopo ogni utilizzo e ricoprire con dell’olio lubrificante o spray. -
Seite 71: Informazioni Sullo Smaltimento
GARANZIA Per registrare il prodotto e capire se hai diritto all’estensione di garanzia, vai su Vonhaus.com/warranty. Si prega di conservare la ricevuta del pagamento quale prova della data d’acquisto. La garanzia si applica solo se il prodotto viene utilizzato esclusivamente come indicato nella pagina delle Avvertenze del presente manuale e se tutte le altre informazioni vengano accuratamente seguite. -
Seite 72: Declaration Of Conformity
M3 7BF Déclarons, sous notre responsabilité exclusive, que le produit SKU : 8100002 Description : Taille-haie sur perche 20 V Max VonHaus Auquel se rapporte ce certificat, est en conformité avec les directives suivantes : 2014/30/EU, 2006/42/EC, 2014/35/EU, 2011/65/EU, 2006/66/EU, 2013/56/EU KONFORMITÄTSERKLÄRUNG... -
Seite 73: Declaración De Conformidad
M3 7BF Declaramos bajo nuestra única responsabilidad que el producto: SKU: 8100002 Descripción: VonHaus Podadora de Altura 20V Max. A la cual se refiere esta declaración, en conformidad con las siguientes directivas: 2014/30/EU, 2006/42/EC, 2014/35/EU, 2011/65/EU, 2006/66/EU, 2013/56/EU DICHIARAZIONE DI CONFORMITÀ... - Seite 74 VonHaus est une marque déposée de DOMU Brands Ltd. ® Fabriqué en Chine pour DOMU Brands Ltd M24 2RW Vielen Dank, dass Sie den 20V Max Stab-Trimmer gekauft haben. VonHaus ist eine registrierte Handelsmarke von DOMU Brands Ltd ® Hergestellt in China für DOMU Brands Ltd M24 2RW Gracias por comprar la Podadora de Altura 20V Max.