Inhaltsverzeichnis
Werbung
Verfügbare Sprachen
Verfügbare Sprachen
Quicklinks
Installations- und Bedienungsanleitung
Installation and operating manual
Notice d'installation et mode d'emploi
Manual de instalación y uso
Istruzioni per l'installazione e l'uso
Installatie- en bedieningshandleiding
Wiegand-Schnittstelle
DE
EN
Wiegand Interface
Interface Wiegand
FR
Interfaz Wiegand
ES
IT
Interfaccia Wiegand
NL
Wiegand interface
HmIP-FWI
S. 2
p. 20
p. 33
P. 47
pag. 61
Pag. 75
Werbung
Inhaltsverzeichnis
Fehlerbehebung

Verwandte Anleitungen für eQ-3 homematic IP Wiegand HmIP-FWI

Inhaltszusammenfassung für eQ-3 homematic IP Wiegand HmIP-FWI
- Seite 1 Installations- und Bedienungsanleitung Installation and operating manual Notice d’installation et mode d’emploi Manual de instalación y uso Istruzioni per l’installazione e l’uso Installatie- en bedieningshandleiding Wiegand-Schnittstelle S. 2 Wiegand Interface p. 20 Interface Wiegand p. 33 Interfaz Wiegand P. 47 Interfaccia Wiegand pag.
-
Seite 2: Lieferumfang
Bezeichnung Homematic IP Wiegand-Schnittstelle Bedienungsanleitung Dokumentation © 2022 eQ-3 AG, Deutschland Alle Rechte vorbehalten. Ohne schriftliche Zustimmung des Herausgebers darf diese Anleitung auch nicht auszugsweise in irgendeiner Form reproduziert werden oder unter Verwendung elektronischer, mechanischer oder chemischer Verfahren vervielfältigt oder verarbeitet werden. - Seite 3 +12V Bell Sab. 12 V Klingel Door bell Sonnette +12V Bell Sab. Code-Schloss Key pad Serrure à code...
- Seite 4 3 min...
- Seite 5 Homematic IP...
-
Seite 7: Inhaltsverzeichnis
Inhaltsverzeichnis Hinweise zur Anleitung ................8 Gefahrenhinweise ..................8 Funktion und Geräteübersicht ..............9 Allgemeine Systeminformationen ............10 Inbetriebnahme ..................10 Auswahl der Spannungsversorgung ..........10 Installationshinweise ................11 Installation ....................12 Anlernen ....................13 Fehlerbehebung ..................14 Befehl nicht bestätigt .................14 Duty Cycle ...................14 Fehlercodes und Blinkfolgen ............16 Wiederherstellung der Werkseinstellungen ........ -
Seite 8: Hinweise Zur Anleitung
Hinweise zur Anleitung Hinweise zur Anleitung Lesen Sie diese Anleitung sorgfältig, bevor Sie Ihr Homematic IP Gerät in Betrieb nehmen. Bewahren Sie die Anleitung zum späteren Nachschlagen auf! Wenn Sie das Gerät anderen Personen zur Nutzung überlassen, überge- ben Sie auch diese Anleitung. Benutzte Symbole: Achtung! Hier wird auf eine Gefahr hingewiesen. -
Seite 9: Funktion Und Geräteübersicht
Funktion und Geräteübersicht Bei Sach- oder Personenschäden, die durch unsachgemäße Hand- habung oder Nichtbeachten der Gefahrenhinweise verursacht wer- den, übernehmen wir keine Haftung. In solchen Fällen erlischt jeder Gewährleistungsanspruch! Für Folgeschäden übernehmen wir kei- ne Haftung! Das Gerät ist nur für den Einsatz in wohnungsähnlichen Umgebun- gen geeignet. -
Seite 10: Allgemeine Systeminformationen
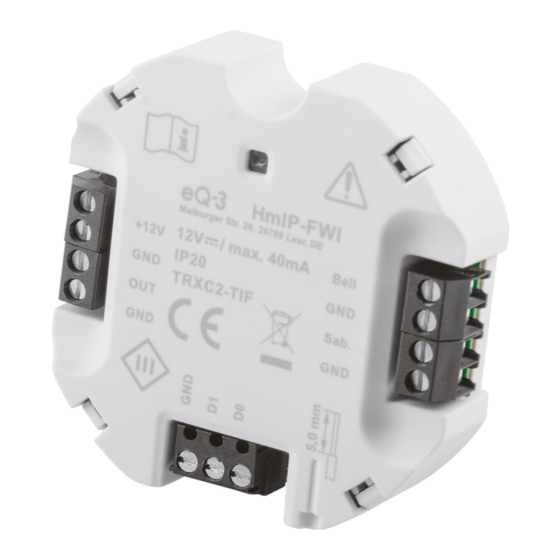
Allgemeine Systeminformationen Geräteübersicht (s. Abbildung 1): (A) Systemtaste (Anlerntaste und LED) (B) Versorgungsspannung (C) Anschlussklemme für Open-Drain-Ausgang (D) Anschlussklemme für Wiegand-Schnittstelle (E) Antenne (F) Anschlussklemme für Sabotagekontakt (G) Anschlussklemme für Klingeltaster Allgemeine Systeminformationen Dieses Gerät ist Teil des Homematic IP Smart-Home-Systems und kom- muniziert über das Homematic IP Funkprotokoll. -
Seite 11: Installationshinweise
Inbetriebnahme Installationshinweise Bitte lesen Sie diesen Abschnitt erst vollständig, bevor Sie mit der Installation beginnen. Bitte notieren Sie sich vor der Installation die auf dem Gerät ange- brachte Gerätenummer (SGTIN) und den Installationsort, damit Sie das Gerät im Nachhinein leichter zuordnen können. Alternativ steht die Gerätenummer auch auf dem beiliegenden QR-Code-Aufkleber. -
Seite 12: Installation
Inbetriebnahme • Art des Versorgungsnetzes (TN-System, IT-System, TT-System) und die daraus folgenden Anschlussbedingungen (klassische Nullung, Schutzerdung, erforderliche Zusatzmaßnahmen etc.). Die Installation darf nur in handelsüblichen Schalterdosen (Geräte- dosen) gemäß DIN 49073-1 oder Aufputzdosen gemäß DIN 60670- 1 (z. B. Abox 025 oder Abox 040) erfolgen. Beachten Sie bei der Installation die Gefahrenhinweise gemäß... -
Seite 13: Anlernen
Inbetriebnahme • Setzen Sie den Aktor in eine geeignete Unterputzdose (s. Abbil- dung 3). • Versorgen Sie das Gerät über das vorgesehene Netzteil mit Span- nung (12 V), um den Anlernmodus des Geräts zu aktivieren (s. Abbildung 4) (s. „5.3 Anlernen“ auf Seite 15). Anlernen Bitte lesen Sie diesen Abschnitt erst vollständig, bevor Sie mit dem Anlernen beginnen. -
Seite 14: Fehlerbehebung
Fehlerbehebung • Das Gerät erscheint automatisch in der Homematic IP App. • Zur Bestätigung geben Sie in der App die letzten vier Ziffern der Gerätenummer (SGTIN) ein oder scannen Sie den QR-Code. Die Gerätenummer finden Sie auf dem Aufkleber im Lieferumfang oder direkt am Gerät. - Seite 15 Fehlerbehebung In dem von uns genutzten Frequenzbereich 868 MHz beträgt die maxi- male Sendezeit eines jeden Geräts 1 % einer Stunde (also 36 Sekunden in einer Stunde). Die Geräte dürfen bei Erreichen des 1 %-Limits nicht mehr senden, bis diese zeitliche Begrenzung vorüber ist. Gemäß dieser Richtli- nie, werden Homematic IP-Geräte zu 100 % normenkonform entwickelt und produziert.
-
Seite 16: Fehlercodes Und Blinkfolgen
Fehlerbehebung Fehlercodes und Blinkfolgen Blinkcode Bedeutung Lösung Kurzes oranges Funkübertragung/Sen- Warten Sie, bis die Übertra- Blinken deversuch/Datenüber- gung beendet ist. tragung 1x langes Vorgang bestätigt Sie können mit der Bedie- grünes nung fortfahren. Leuchten 1x langes rotes Vorgang fehlgeschla- Versuchen Sie es erneut („6.1 Leuchten gen oder Duty Cycle- Befehl nicht bestätigt“... -
Seite 17: Wiederherstellung Der Werkseinstellungen
Wiederherstellung der Werkseinstellungen Wiederherstellung der Werkseinstellungen Die Werkseinstellungen des Geräts können wiederhergestellt werden. Dabei gehen alle Einstellungen verloren. Um die Werkseinstellungen des Geräts wiederherzustellen, gehen Sie wie folgt vor: • Drücken Sie für 4 s mit einem Stift auf die Systemtaste (A), bis die LED (A) schnell orange zu blinken beginnt (s. -
Seite 18: Allgemeine Hinweise Zum Funkbetrieb
Umwelteinflüsse Luftfeuchtigkeit neben baulichen Gegebenheiten vor Ort eine wichtige Rolle. Hiermit erklärt die eQ-3 AG, Maiburger Str. 29, 26789 Leer, Deutsch- land, dass der Funkanlagentyp Homematic IP HmIP-FWI der Richt- linie 2014/53/EU entspricht. Der vollständige Text der EU-Konfor- mitätserklärung ist unter der folgenden Internetadresse verfügbar: www.homematic-ip.com... - Seite 19 Technische Daten Umgebungstemperatur: -10 bis +55 °C Abmessungen (B x H x T): 52 x 52 x 14 mm Gewicht: 20 g Funk-Frequenzband: 868,0-868,6 MHz 869,4-869,65 MHz Max. Funk-Sendeleistung: 10 dBm Empfängerkategorie: SRD category 2 Typ. Funk-Freifeldreichweite: 210 m Duty Cycle: <...
-
Seite 20: Package Contents
Homematic IP Wiegand interface Operating manual Documentation © 2022 eQ-3 AG, Germany All rights reserved. Translation from the original version in German. This manual may not be reproduced in any format, either in whole or in part, nor may it be duplicated or edited by electronic, mechanical or chemical means, without the written consent of the publisher. - Seite 21 Table of contents Information about this manual .............22 Hazard information .................22 Function and device overview ..............23 General system information ..............24 Start-up ..................... 24 Selecting the supply voltage ............24 Installation instructions ..............24 Installation ................... 26 Pairing ....................26 Troubleshooting ..................
-
Seite 22: Information About This Manual
Information about this manual Information about this manual Please read this manual carefully before beginning operation with your Homematic IP device. Keep the manual so you can refer to it at a later date if you need to. If you hand over the device to other persons for use, please hand over this manual as well. -
Seite 23: Function And Device Overview
Function and device overview The device must only be operated within residential buildings. Using the device for any purpose other than that described in this operating manual does not fall within the scope of intended use and will invalidate any warranty or liability. Function and device overview With the Homematic IP Wiegand interface, you can integrate devices that have a Wiegand interface (e.g. -
Seite 24: General System Information
General system information General system information This device is part of the Homematic IP smart home system and works with the Homematic IP radio protocol. All devices in the Homematic IP system can be configured easily and individually with a smartphone using the Homematic IP app. - Seite 25 Start-up Incorrect installation also means that you are running the risk of serious damage to property, e.g. from fire. You risk personal liability for personal injury and property damage. Consult an electrician! *Specialist knowledge required for installation: The following specialist knowledge is particularly important during instal- lation: •...
-
Seite 26: Installation
Start-up It is absolutely essential to ensure that all connecting cables are laid so that they are physically separate from cables carrying mains volt- age (e.g. in separate cable ducts or wiring conduits). Permitted cable cross sections for connecting to the device are: Rigid cable [mm Flexible cable without ferrule [mm 0.2 –... - Seite 27 Start-up You can connect the device either to the access point or to the Homematic Central Control Unit CCU3. For detailed information, please refer to the Homematic IP User Guide, available for download in the download area of www.homematic-ip.com. To integrate the device into your system and enable it to communicate with other Homematic IP devices, you must first add the device to your Homematic IP access point.
-
Seite 28: Troubleshooting
Troubleshooting Troubleshooting Command not confirmed If at least one receiver does not confirm a command, the device LED (A) lights up red at the end of the failed transmission process. The failed transmission may be caused by radio interference (see see „9 General information about radio operation“... -
Seite 29: Error Codes And Flashing Sequences
Troubleshooting Error codes and flashing sequences Flashing code Meaning Solution Short orange Radio transmission/ Wait until the transmission is flashing attempting to transmit/ completed. data transmission 1x long green Transmission con- You can continue operation. lighting firmed 1x long red Transmission failed Please try again (see „6.1 flash... -
Seite 30: Restoring Factory Settings
Restoring factory settings Restoring factory settings The device’s factory settings can be restored. If you do this, you will lose all your settings. To restore the factory settings of the device, please proceed as follows: • Press and hold down the system button (A) using a pen for 4 sec- onds until the LED (A) quickly starts flashing orange (see figure 7). -
Seite 31: General Information About Radio Operation
AG, Maiburger Straße 29, 26789 Leer, Germany hereby declares that the radio equipment type Homematic IP HmIP-FWI is compliant with Directive 2014/53/EU. The full text of the EU declaration of conformity is available at www.homematic-ip.com... - Seite 32 Technical specifications Protection class: Pollution degree: Ambient temperature: -10 to +55 °C Dimensions (W x H x D): 52 x 52 x 14 mm Weight: 20 g Radio frequency band: 868.0-868.6 MHz 869.4-869.65 MHz Max. radio transmission power: 10 dBm Receiver category: SRD category 2 Type radio free-field range:...
-
Seite 33: Contenu De La Livraison
Homematic IP Interface Wiegand Mode d’emploi Documentation © 2022 eQ-3 AG, Allemagne Tous droits réservés. Le présent manuel ne peut être reproduit, en totalité ou sous forme d’extraits, de manière quelconque sans l’accord écrit de l’éditeur, ni copié ou modifié par des procédés électroniques, mécaniques ou chimiques. - Seite 34 Table des matières Remarques sur la notice .................35 Mises en garde ..................35 Fonction et aperçu de l’appareil ............36 Informations générales sur le système ..........37 Mise en service ..................37 Choix de l’alimentation ..............37 Instructions d’installation ..............38 Installation ...................40 Apprentissage ..................40 Correction des erreurs ................
-
Seite 35: Remarques Sur La Notice
Remarques sur la notice Remarques sur la notice Lisez attentivement la présente notice avant de mettre votre appareil Homematic IP en service. Conservez la notice pour pouvoir vous y référer ultérieurement ! Si vous laissez d’autres personnes utiliser l’appareil, n’oubliez pas de leur remettre également cette notice d’utilisation. -
Seite 36: Fonction Et Aperçu De L'appareil
Fonction et aperçu de l’appareil Notre responsabilité ne saurait être engagée en cas de dommages matériels ou de dommages corporels dus au maniement inappro- prié ou au non-respect des mises en garde. Dans de tels cas, tout droit à la garantie est annulé ! Nous ne pouvons être tenus respon- sables des dommages indirects occasionnés ! L’appareil convient uniquement pour l’utilisation dans des environ- nements d’habitat. -
Seite 37: Informations Générales Sur Le Système
Informations générales sur le système Aperçu de l’appareil (voir figure 1) : (A) Touche système (touche d’apprentissage et LED) (B) Tension d’alimentation (C) Borne de raccordement pour sortie Open Drain (D) Borne de raccordement pour interface Wiegand (E) Antenne (F) Borne de raccordement pour contact anti-sabotage (G) Borne de raccordement pour bouton de sonnette Informations générales sur le système Cet appareil fait partie du Homematic IP Système Smart-Home et com-... -
Seite 38: Instructions D'installation
Mise en service Instructions d’installation Merci de lire attentivement cette section avant de procéder à l’ins- tallation. Avant l’installation, veuillez noter le numéro de l’appareil (SGTIN) inscrit sur l’appareil et le lieu d’installation afin que vous puissiez ul- térieurement attribuer plus facilement l’appareil. Le numéro de l’ap- pareil se trouve également sur l’étiquette ci-jointe portant le code QR. - Seite 39 Mise en service • classes de protection IP ; • montage du matériel d’installation électrique ; • type du réseau d’alimentation (systèmes TN/IT/TT) et conditions de raccordement directement associées (mise au neutre clas- sique, mise à la terre, autres mesures nécessaires, etc.). L’appareil doit être installé uniquement dans des boîtiers d’interrup- teurs (boîtiers d’encastrement) du commerce selon la norme DIN ...
-
Seite 40: Installation
Mise en service Installation Procédez comme suit pour l’installation de l’appareil dans un un boîtier encastré : • Débranchez le bloc d’alimentation prévu. • Raccordez l’appareil conformément aux schémas de connexion de la figure 2. Vous pouvez effectuer les raccordement suivants : - Tension d’alimentation (B) - Sortie Open Drain (C) - Interface Wiegand (D) - Seite 41 Mise en service Procédez de la manière suivante pour l’apprentissage de l’appareil : • Ouvrez l’application Homematic IP sur votre smartphone. • Sélectionnez le point de menu « Procéder à l’apprentissage de l’appareil ». • Après l’installation, le mode d’apprentissage est actif pendant 3 minutes (voir figure 5)..
-
Seite 42: Correction Des Erreurs
Correction des erreurs Correction des erreurs Commande non confirmée Si au moins un récepteur ne confirme pas une commande, la LED (A) s’al- lume de couleur rouge à la fin de la transmission défectueuse. La raison pour la transmission défectueuse peut être un dysfonctionnement (voir v. « ... -
Seite 43: Codes D'erreur Et Séquences De Clignotement
Correction des erreurs Codes d’erreur et séquences de clignotement Code de cli- Signification Solution gnotement Bref clignote- Transmission radio/ Attendez jusqu’à ce que la ment orange essai d’émission/trans- transmission soit achevée. mission des données 1 long éclairage Opération confirmée Vous pouvez poursuivre vert avec la commande. -
Seite 44: Restauration Des Réglages D'usine
Restauration des réglages d’usine Restauration des réglages d’usine Les réglages d’usine de l’appareil peuvent être rétablis. Dans ce cadre, tous les réglages antérieurs sont perdus. Afin de rétablir les réglages d’usine de l’appareil, procédez comme suit : Appuyez pendant 4 s sur la touche système (A) avec un stylo •... -
Seite 45: Remarques Générales Sur Le Fonctionnement Radio
Par la présente, eQ-3 AG, basée à Maiburger Str. 29, 26789 Leer, en Alle- magne, déclare que l’équipement radioélectrique Homematic IP HmIP- FWI est conforme à... - Seite 46 Caractéristiques techniques Installation : uniquement dans des boîtiers d’in- terrupteurs (boîtiers d’encastrement) selon la norme DIN 49073-1 ou des boîtiers apparents selon la norme DIN 60670-1 (par ex. Abox 025/ Abox 040) Type de protection : IP20 Classe de protection : Degré de contamination : Température ambiante : de -10 à +55 °C Dimensions (l x H x P) : 52 x 52 x 14 mm Poids :...
-
Seite 47: Volumen De Suministro
Cantidad Componente Homematic IP Interfaz Wiegand Instrucciones de uso Documentación © 2022 eQ-3 AG, Alemania Todos los derechos reservados. Queda prohibida la reproducción total o parcial de estas instrucciones en todas las formas posibles o utilizando procedimientos electrónicos, mecánicos o químicos, así como su divulgación, sin el consentimiento por escrito del editor. - Seite 48 Índice Advertencias sobre estas instrucciones ..........49 Advertencias de peligro ................. 49 Funciones y esquema del dispositivo ..........50 Información general del sistema ............51 Puesta en servicio ..................51 Selección de la alimentación ............51 Instrucciones de instalación ............52 Instalación ................... 53 Conexión .....................
-
Seite 49: Advertencias Sobre Estas Instrucciones
Advertencias sobre estas instrucciones Advertencias sobre estas instrucciones Lea atentamente estas instrucciones antes de poner en servicio su dispositivo Homematic IP. ¡Conserve estas instrucciones para consultas posteriores! Si cede este dispositivo para que lo utilicen otras personas, entregue también estas Instrucciones junto con el dispositivo. Símbolos empleados ¡Atención! Esta palabra señala un peligro. -
Seite 50: Funciones Y Esquema Del Dispositivo
Funciones y esquema del dispositivo Se declina toda responsabilidad por lesiones o daños materiales causados por un uso indebido o por incumplimiento de las adver- tencias de peligro. ¡En esos casos se anula el derecho a garantía! ¡No se asume ninguna responsabilidad por daños indirectos! El dispositivo solo es apto para entornos domésticos. -
Seite 51: Información General Del Sistema
Información general del sistema Esquema del dispositivo (v. figura 1): (A) Botón del sistema (botón de conexión y LED) (B) Tensión de alimentación (C) Borne de conexión para salida drenaje abierto (D) Borne de conexión para interfaz Wiegand (E) Antena (F) Borne de conexión para contacto de sabotaje (G) Borne de conexión para pulsadores de timbre Información general del sistema... -
Seite 52: Instrucciones De Instalación
Puesta en servicio Instrucciones de instalación Por favor, lea íntegramente este capítulo antes de realizar la instala- ción. Antes de realizar la instalación, por favor, anote el número de apara- to aplicado sobre el mismo (SGTIN) y el punto de instalación para facilitar su identificación más tarde. -
Seite 53: Instalación
Puesta en servicio • Montaje del material de instalación electrónica • Tipo de red de suministro (sistema TN, sistema IT, sistema TT) y las condiciones de conexión correspondientes (ajuste a cero clá- sico, toma a tierra, medidas adicionales necesarias, etc.) La instalación debe efectuarse con cajas de conmutación (cajas de dispositivo) que cumplan con la norma DIN 49073-1 o cajas de montaje en superficie que cumplan con la norma DIN 60670-1 (p. -
Seite 54: Conexión
Puesta en servicio • Coloque el actuador en el cajetín empotrado adecuado (v. figura • Enchufe el dispositivo con el cable de alimentación previsto (12 V), para activar el modo de conexión del dispositivo (v. figura 4) (v. „5.3 Conexión“ en pág. 15). Conexión Por favor, lea íntegramente este capítulo antes de realizar la cone- xión. -
Seite 55: Reparación De Fallos
Reparación de fallos • El dispositivo se muestra automáticamente en la aplicación Ho- mematic IP. • Para confirmarlo tiene que introducir en la aplicación las cua- tro últimas cifras del número de aparato (SGTIN) o escanear el código QR. El número de aparato se encuentra en el adhesivo incluido en el volumen de suministro o bien directamente sobre el aparato. -
Seite 56: Duty Cycle
Reparación de fallos Duty Cycle Duty Cycle describe una limitación del tiempo de transmisión regulada por ley para dispositivos en la banda de 868 MHz. El objeto de esta regu- lación es garantizar el funcionamiento de todos los aparatos que trabajan en la banda de 868 MHz. -
Seite 57: Códigos De Errores Y Secuencias Intermitentes
Reparación de fallos Códigos de errores y secuencias intermitentes Secuencia in- Significado Solución termitente Luz naranja Transmisión inalámbri- Espere hasta que finalice la intermitente ca, intento de transmi- transmisión. corta sión o transmisión de datos 1 vez luz verde Confirmación de una Puede continuar con el larga operación... -
Seite 58: Restablecimiento De La Configuración De Fábrica
Restablecimiento de la configuración de fábrica Restablecimiento de la configuración de fábrica Se puede restablecer la configuración de fábrica del dispositivo. Al hacerlo se pierden todos los ajustes. Modo de proceder para restablecer la configuración de fábrica del dis- positivo: •... -
Seite 59: Indicaciones Generales Sobre El Modo Inalámbrico
AG, Maiburger Str. 29, 26789 Leer, Alemania, declara que el tipo de instalación por radio Homematic IP HmIP-FWI, cumple la Directiva 2014/53/UE. El texto íntegro de la declaración UE de conformidad está... - Seite 60 Datos técnicos Instalación: solo con cajas de conmutación (cajas de dispositivo) que cumplan con DIN 49073-1 o cajas de montaje en super- ficie que cumplan con DIN 60670-1 (p. ej. Abox 025 o Abox 040). Tipo de protección: IP20 Clase de protección: Grado de suciedad: Temperatura ambiente: de -10 a +55 °C...
- Seite 61 Homematic IP Interfaccia Wiegand Istruzioni per l'uso Documentazione © 2022 eQ-3 AG, Germania Tutti i diritti riservati. Senza l’approvazione scritta del produttore è vietata la riproduzione di questo manuale o di sue parti in qualsiasi forma o la sua duplicazione o modifica con l’utilizzo di processi elettronici, meccanici o chimici.
- Seite 62 Indice Indicazioni su queste istruzioni ............63 Indicazioni di pericolo ................63 Funzioni e vista d’insieme dell’apparecchio ........64 Informazioni generali sul sistema ............65 Messa in funzione ................... 65 Scelta del tipo di alimentazione ............. 65 Avvertenze per l’installazione ............66 Installazione ..................68 Inizializzazione ...................68 Risoluzione dei guasti ................
-
Seite 63: Indicazioni Su Queste Istruzioni
Indicazioni su queste istruzioni Indicazioni su queste istruzioni Leggere attentamente queste istruzioni prima di mettere in funzione questo dispositivo Homematic IP. Conservare questo manuale per poterlo consultare anche in futuro! Se si affida l’utilizzo dell’apparecchio ad altre persone consegnare anche queste istruzioni per l’uso. -
Seite 64: Funzioni E Vista D'insieme Dell'apparecchio
Funzioni e vista d’insieme dell’apparecchio L’azienda declina qualsiasi responsabilità per danni a cose o persone causati da un utilizzo improprio o dalla mancata osservanza delle indicazioni di pericolo. In casi simili decade il diritto alla garanzia! Si declina qualsiasi responsabilità per danni indiretti! L’apparecchio è... -
Seite 65: Informazioni Generali Sul Sistema
Informazioni generali sul sistema Vista d’insieme dell’apparecchio (v. figura 1): (A) Tasto di sistema (tasto di inizializzazione e LED) (B) Tensione di alimentazione (C) Morsetto di collegamento per uscita open drain (D) Morsetto di collegamento per interfaccia Wiegand (E) Antenna (F) Morsetto di collegamento per contatto anti-sabotaggio (G) Morsetto di collegamento per pulsante del campanello Informazioni generali sul sistema... -
Seite 66: Avvertenze Per L'installazione
Messa in funzione Avvertenze per l’installazione Leggere interamente questo paragrafo prima di iniziare ad installare l’apparecchio. Prima dell’installazione prendere nota del numero (SGTIN) riportato sull’apparecchio e del punto previsto per l’installazione, in modo da riuscire più facilmente ad assegnare l’apparecchio nella fase succes- siva. - Seite 67 Messa in funzione • selezionare il materiale per l’installazione elettrica così da garan- tire le condizioni di disattivazione; • gradi di protezione IP; • montare il materiale per l’installazione elettrica; • tipo di rete di alimentazione (sistema TN, sistema IT, sistema TT) e conseguenti condizioni di allaccio (classica messa a terra del neutro, messa a terra di protezione, misure supplementari ne- cessarie etc.).
-
Seite 68: Installazione
Messa in funzione Installazione Per installare il dispositivo in una presa sotto intonaco procedere nel modo seguente: • Disattivare il sistema di alimentazione elettrica previsto. • Collegare il dispositivo così ome indicato nello schema di colle- gamento nella figura 2. I collegamenti possibili sono: - Tensione di alimentazione (B) - Uscita open drain (C) - Interfaccia Wiegand (D) - Seite 69 Messa in funzione Per l’inizializzazione del dispositivo procedere nel modo seguente: • Aprire l’app Homematic IP sullo smartphone. Nel menu selezionare la voce “Inizializzazione dell’apparec- • chio”. • Completata l’installazione, la modalità Inizializzazione dell’attua- tore resta attiva per 3 minuti (v. figura 5). La modalità...
-
Seite 70: Risoluzione Dei Guasti
Risoluzione dei guasti Risoluzione dei guasti Comando non confermato Se un comando non viene confermato da almeno un ricevitore, al ter- mine della trasmissione difettosa si accende la luce rossa del LED (A). Il motivo della trasmissione difettosa potrebbe essere un disturbo radio (v. “9 Informazioni generali sul funzionamento via radio“... -
Seite 71: Codici Di Errore E Sequenze Di Spie Lampeggianti
Risoluzione dei guasti Codici di errore e sequenze di spie lampeggianti Codice di se- Significato Soluzione gnalazione Luce arancione Trasmissione radio/ten- Attendere che la trasmissio- lampeggian- tativo d'invio/trasmis- ne sia conclusa. te per breve sione dati tempo Luce verde Procedura confermata Si può... -
Seite 72: Ripristino Delle Impostazioni Di Fabbrica
Ripristino delle impostazioni di fabbrica Ripristino delle impostazioni di fabbrica L’utente può ripristinare le impostazioni di fabbrica dell’apparecchio. In questo caso tutte le impostazioni andranno perdute. Per ripristinare le impostazioni di fabbrica dell’apparecchio procedere nel modo seguente: • Con una penna premere per 4 s il tasto di sistema (A) finché la spia a LED (A) non inizia a lampeggiare velocemente con luce arancione (v. -
Seite 73: Informazioni Generali Sul Funzionamento Via Radio
Con la presente la eQ-3 AG, Maiburger Str. 29, 26789 Leer, Germa- nia, dichiara che l’apparecchio radio Homematic IP modello HmIP-FWI è conforme alla Direttiva 2014/53/UE. Il testo integrale della dichia- razione di conformità... - Seite 74 Dati tecnici Installazione: solo in prese sotto intonaco (scatole di supporto apparecchio) secondo DIN 49073-1 oppure in scatole di de- rivazione sopra intonaco secondo DIN 60670-1 (ad es. Abox 025/Abox 040) Grado di protezione: IP20 Classe di protezione: Grado di contaminazione: Temperatura ambiente: tra -10 e +55 °C Dimensioni (L x A x P):...
- Seite 75 Naam Homematic IP Wiegand interface Handleiding Documentatie © 2022 eQ-3 AG, Duitsland Alle rechten voorbehouden. Zonder schriftelijke toestemming van de uitgever mogen deze handleiding of fragmenten ervan op geen enkele manier worden gereproduceerd of met behulp van elektronische, mechanische of chemische middelen worden verveel- voudigd of verwerkt.
- Seite 76 Inhoudsopgave Instructies bij deze handleiding ............77 Gevarenaanduidingen ................77 Werking en overzicht van het apparaat ..........78 Algemene systeeminformatie ...............79 Inbedrijfstelling ..................79 Keuze van de elektrische voeding..........79 Installatie-instructies .................80 Installatie ....................81 Aanleren ....................82 Storingen oplossen ................. 83 Commando niet bevestigd .............. 83 Duty cycle ..................84 Foutcodes en knipperreeksen ............
-
Seite 77: Instructies Bij Deze Handleiding
Instructies bij deze handleiding Instructies bij deze handleiding Lees deze handleiding zorgvuldig door voordat u uw Homematic IP apparaat in gebruik neemt. Bewaar de handleiding, om ze ook later nog te kunnen raadplegen! Als u het apparaat door andere personen laat gebruiken, geef dan ook deze handleiding mee. -
Seite 78: Werking En Overzicht Van Het Apparaat
Werking en overzicht van het apparaat Voor zaak- of personenschade die door een onjuist gebruik of niet-naleving van de gevarenaanduidingen veroorzaakt is, stellen wij ons niet aansprakelijk. In dergelijke gevallen vervalt ieder garantie- recht! Voor gevolgschade stellen wij ons niet aansprakelijk! Het apparaat is uitsluitend geschikt voor gebruik in woonruimten en soortgelijke omgevingen. -
Seite 79: Algemene Systeeminformatie
Algemene systeeminformatie Overzicht van het apparaat (zie afbeelding 1): (A) Systeemtoets (aanleertoets en led) (B) Voedingsspanning (C) Aansluitklem voor Open-Drain uitgang (D) Aansluitklem voor Wiegand interface (E) Antenne (F) Aansluitklem voor sabotagecontact (G) Aansluitklem voor belknop Algemene systeeminformatie Dit apparaat is een onderdeel van het Homematic IP Smart Home sys- teem en communiceert via het Homematic IP Zendprotocol. -
Seite 80: Installatie-Instructies
Inbedrijfstelling Installatie-instructies Lees dit hoofdstuk volledig door, voordat u met de installatie begint. Noteer a.u.b. vóór de installatie het op het apparaat aangebrachte apparaatnummer (SGTIN) en de plaats van de installatie, zodat u het apparaat achteraf eenvoudiger kunt toewijzen. Het apparaatnum- mer staat als alternatief ook op de bijgeleverde QR-sticker. -
Seite 81: Installatie
Inbedrijfstelling • aard van het voedingsnet (TN-systeem, IT-systeem, TT-systeem) en de hieruit volgende aansluitvoorwaarden (klassieke nulleider, aarding, noodzakelijke extra maatregelen enz.). De installatie is alleen toegestaan in normale schakelaardozen (ap- paraatdozen) volgens DIN 49073-1 of opbouwdozen volgens DIN 60670-1 (bijv. Abox 025 of Abox 040). Neem bij de installatie de gevarenaanduidingen overeenkomstig ‘2 Gevarenaanduidingen’... -
Seite 82: Aanleren
Inbedrijfstelling • Verzorg het apparaat via de dienovereenkomstige voeding met spanning (12 V) om de aanleermodus van het apparaat te active- ren (zie afbeelding 4) (zie ‘5.3 Aanleren’ op pagina 15). Aanleren Lees dit hoofdstuk volledig door, voordat u met het aanleren be- gint. -
Seite 83: Storingen Oplossen
Storingen oplossen • Wacht tot het aanleerproces voltooid is. • Ter bevestiging van een succesvol aanleerproces brandt de led (A) groen. Het apparaat is nu gebruiksklaar. • Indien de led rood brandt, dient u het opnieuw te proberen. • Selecteer in welke toepassing het apparaat moet worden ge- bruikt. -
Seite 84: Duty Cycle
Storingen oplossen Duty cycle De duty cycle beschrijft een wettelijk geregelde begrenzing van de zend- tijd van apparaten in het 868MHz-bereik. Het doel van deze regeling is om de werking van alle in het 868MHz-bereik werkende apparaten te garanderen. In het door ons gebruikte frequentiebereik van 868 MHz bedraagt de maximale zendtijd van een apparaat 1% van een uur (dus 36 seconden per uur). -
Seite 85: Foutcodes En Knipperreeksen
Storingen oplossen Foutcodes en knipperreeksen Knippercode Betekenis Oplossing Kort oranje Draadloze overdracht, Wacht tot de overdracht knipperen zendpoging, gegevens- beëindigd is. overdracht 1x lang groen Proces bevestigd U kunt met de bediening oplichten doorgaan. 1x lang rood Proces mislukt of du- Probeer het opnieuw (‘6.1 oplichten ty-cycle-limiet bereikt... -
Seite 86: Herstellen Van De Fabrieksinstellingen
Herstellen van de fabrieksinstellingen Herstellen van de fabrieksinstellingen De fabrieksinstellingen van het apparaat kunnen worden hersteld. Hierbij gaan alle instellingen verloren. Om de fabrieksinstellingen van het apparaat te herstellen, gaat u als volgt te werk: • Druk gedurende 4 sec. met een pen op de systeemtoets (A), tot- dat de led (A) snel oranje begint te knipperen (zie afbeelding 7). -
Seite 87: Algemene Instructies Voor Het Draadloze Bedrijf
Hierbij verklaart eQ-3 AG, Maiburger Str. 29, 26789 Leer, Duitsland, dat het draadloze apparaattype Homematic IP HmIP-FWI in overeenstem- ming is met de richtlijn 2014/53/EU. De volledige tekst van de EU-confor- miteitsverklaring is beschikbaar onder het volgende internetadres: www. - Seite 88 Technische gegevens Beschermklasse: Verontreinigingsgraad: Omgevingstemperatuur: -10 tot +55 °C Afmetingen (b x h x d): 52 x 52 x 14 mm Gewicht: 20 g Zendfrequentieband: 868,0-868,6 MHz 869,4-869,65 MHz Max. zendvermogen: 10 dBm Ontvangersklasse: SRD class 2 Typisch bereik in het vrije veld: 210 m Duty cycle: <...
- Seite 89 Kostenloser Download der Homematic IP App! Free download of the Homematic IP app! Bevollmächtigter des Herstellers: Manufacturer’s authorised representative: eQ-3 AG Maiburger Straße 29 26789 Leer / GERMANY www.eQ-3.de...