WolfVision EYE-10 Bedienungsanleitung

Verwandte Anleitungen für WolfVision EYE-10


Inhaltszusammenfassung für WolfVision EYE-10
-
Seite 17: Vorsichtsmaßnahmen
Bitte darauf achten, dass eine ausreichende Luftzirkulation zur Kühlung des Gerätes möglich ist! Bei jeder Art von Störungsanzeichen (abnormale Geräusche, Geruch, Rauchentwicklung etc.) das Gerät abschalten. Setzen Sie sich bitte in solchen Fällen umgehend mit Ihrem WolfVision- Händler in Verbindung! Niemals ein beschädigtes Netzkabel verwenden. - Seite 18 Ganzes noch in Teilen mit irgendwelchen Mitteln kopiert, reproduziert oder übertragen werden. Ausgenommen sind Kopien, die vom Benutzer zu Sicherungszwecken aufbewahrt werden. Im Interesse einer ständigen Produktverbesserung behält sich WolfVision das Recht vor, die Produktspezifikationen ohne Ankündigung zu ändern. Änderungen an diesem Dokument bleiben vorbehalten.
-
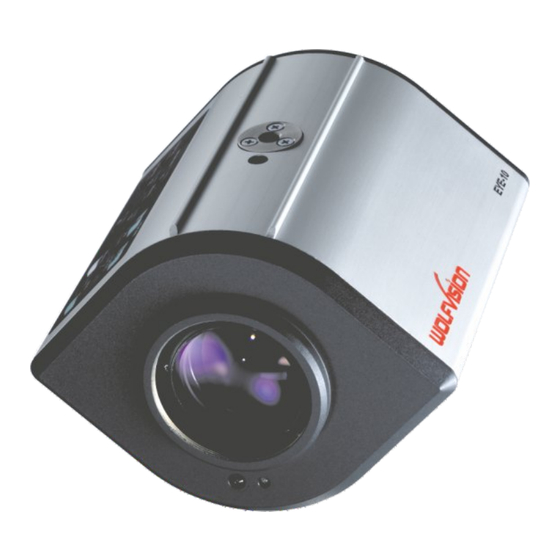
Seite 19: Grundeinstellungen
#1 IR-Fernbedienung #2 Tastaturfeld #3 Spannungsanzeige (Power LED) #4 IR-Empfänger #5 Anschluss für Zubehörlinse (M46x0,75) #6 Stativgewinde (1/4” UNC-20) (oben und unten) #7 Spannungsanschluss 12V DC (siehe Seite 9) #8 Externer IR-Empfänger (siehe Seite 9) #9 RS-232 serieller Steuereingang (siehe Seite 8) #10 RGB-Ausgang #11 RGB-Ausgang - 2 3... -
Seite 20: Infrarot-Fernbedienung
Rückseite und ersetzen beide 1.5 V AA Batterien durch Neue. Auf richtige Polung achten! FREEZE POWER Wenn Sie mit mehr als einer EYE-10 im selben Raum arbeiten möchten, dann sollte der IR-Code auf verschiedene Codes gestellt werden, um vorne hinten (offen) die Geräte individuell steuern zu können. -
Seite 21: Auto Fokus / Manueller Fokus
DIGITAL ZOOM Die EYE-10 hat ein optisches 12x Zoom. Das digitale 2x Zoom vergrößert den Zoombereich auf ein 24x Zoom. Beim Einzoomen stoppt das Zoom beim Erreichen des kleinsten Abtastbereiches des optischen Zooms automatisch. Wird die ZOOM IN-Taste erneut gedrückt, wird das digitale Zoom automatisch aktiviert. -
Seite 22: Preset Funktion
Drücken einer MEMORY-Taste (#20). PRESET FUNKTION Die EYE-10 bietet die Möglichkeit, die momentanen Einstellungen als Preset abzuspeichern und wieder aufzurufen. Um einen Preset zu speichern, drücken Sie eine der 3 PRESET-Tasten (#22) auf der Fernbedienung für 2 Sekunden. Sobald der Preset gespeichert wurde, erscheint eine Meldung auf dem Bildschirm. -
Seite 23: Zurücksetzen Der On-Screen Menü Einstellungen
ON-SCREEN MENU - LAYOUT Bitte beachten Sie, dass sich das abgebildete Layout des On-Screen Menüs nach Einspielen einer neuen Firmware ändern kann. (Das Layout bezieht sich auf die Firmware v1.10c) EYE-10 Menu Exposure Settings Shutter STEP FLICKERLESS (1/50 to 1/3000) -
Seite 24: Rs-232, Serieller Anschluss
Updates werden mit der Camera Control Software durchgeführt. RS-232, SERIELLER ANSCHLUSS Mit dem RS-232 Anschluss (#9) kann die EYE-10 über einen Computer bzw. eine Raumsteuerung eine Konferenzraumes gesteuert werden. Es können auch Bilder über diese Schnittstelle übertragen werden, hiefür kann das Camera Control Programm verwendet werden (dieses ist auf der WolfVision Homepage: www.wolfvision.com/support zum Download verfügbar). -
Seite 25: Stecker - Spannungsversorgung
Lichtquellen kompensiert - siehe Seite 5. Details unter: www.wolfvision.com Deckenhalterung - Tile Bridge (optional) Die Tile Bridge ist eine Halterung, um die EYE-10 in ein Standard Deckenelement mit 60 x 60 cm oder 60 x 120 cm einzubauen. Sie ist aus Aluminium gefertigt und somit sehr leicht und robust. -
Seite 26: U-Förmige Halterung Und Deckenhänger
Diese sind z.B. für kürzere Objektabstände als der MOD nötig (Minimum Object Distance = minimaler Objektabstand, WIDE: 50mm und TELE: 500mm). Bei Einbau der EYE-10 in ein Gehäuse oder in die Decke muss der für die Kabel benötigte Platz berücksichtigt werden (ca. 50 bis 100 mm, hängt von den verwendeten Kabel ab) Für den Einbau in abgehängte Decken benutzen Sie bitte den optional erhältlichen Stützträger für... - Seite 27 Bildgrößen Chart (Reguläre Distanz von 0,5 bis 10 Meter) Objektdistanz in Meter Horizontale Bildgröße * Vertikale Bildgröße = Rechenprogramm Eine sehr komfortable Methode die exakte Positionierung und die möglichen Bildgrößen zu berechnen bietet ein Rechenprogramm auf der WolfVision Homepage: www.wolfvision.com/wolf/indexdistance_d.html...
-
Seite 28: Empfohlene Lichtpositionierung
Schattenbildung zu groß. Die unten abgebildete Grafik zeigt die empfohlene Lichtposition für die EYE-10. Die Distanz von der Mitte der EYE-10 zur Mitte des Lichtes sollte mit der MAXIMALEN Bildgröße (z.B. vertikalen Bildgröße) identisch sein. Beispiel: Wenn die Kamera 1400mm über der Arbeitsfläche montiert wird, dann ist die maximale vertikale Bildgröße 893mm (siehe "Länge"... -
Seite 29: Technsche Daten
TECHNSCHE DATEN Active Pixel 1024 (H) x 768 (V) Aufnahme System Progressive Scan 1/3" CCD, RGB Bilder pro Sekunde 30 ( kann bei Bedarf auf 12, 15, 20 oder 25 Bilder/Sek. reduziert werden - alle bei voller Auflösung !) Horizontale / Vertikale Auflösung 640 Linien ( mit perfektem Randfokus ) Optik / Zoom Integrierte 12-fach Zoomoptik, f = 5,8-69,6 mm, F = 2,8-3,0 Digital Zoom... -
Seite 30: Abmessungen Der Optionalen Arbeitsplatte
Abmessungen M 46x0,75 Ø 54 mm 124,55mm 1/4-20 UNC Abmessungen der optionalen Arbeitsplatte 434,2 323,2... -
Seite 31: Diebstahlschutz - T-Schloss
CODES IR-Fernbedienung Preset speichern: Drücken Sie eine der PRESET-Tasten (#22) für 2 Sekunden. Bilder speichern: Drücken Sie eine der MEMORY-Tasten (#20) für 2 Sekunden Aktivieren des On-Screen Menüs: WIDE TELE Drücken Sie die MENU-Taste (#19) für 1 Sekunde. IR-Code wechseln: PRESETS Ändern Sie im On-Screen Menü...