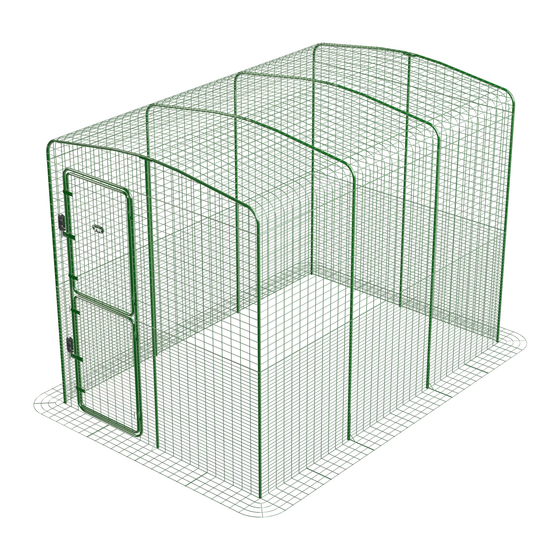
omlet outdoor pet run Bedienungsanleitung
Vorschau ausblenden
Andere Handbücher für outdoor pet run:
- Bedienungsanleitung (21 Seiten) ,
- Bedienungsanleitung (92 Seiten)
Quicklinks
outdoor
pet run
Watch the 'How to Build' video now
www.omlet.co.uk/how_to_build
Sehen Sie sich jetzt das 'Wie baut man?' Video an
Regardez maintenant le tutoriel d'assemblage
Bekijk nu de instructievideo
Guarda adesso il video di montaggio
Puedes ver el vídeo de montaje ahora
Titta på instruktionsvideon nu
Se instruktionsvideoen nu
Se instruksjonsvideoen nå
Obejrzyj teraz film instruktażowy

Verwandte Anleitungen für omlet outdoor pet run


Inhaltszusammenfassung für omlet outdoor pet run
- Seite 1 Watch the ‘How to Build’ video now www.omlet.co.uk/how_to_build pet run Sehen Sie sich jetzt das ‘Wie baut man?’ Video an Regardez maintenant le tutoriel d’assemblage Bekijk nu de instructievideo Guarda adesso il video di montaggio Puedes ver el vídeo de montaje ahora Titta på...
- Seite 2 United Kingdom 01295 500900 hello@omlet.co.uk www.omlet.co.uk United States 646-434-1104 info@omlet.us www.omlet.us Australia 02 8103 4124 info@omlet.com.au www.omlet.com.au Ireland 01 513 7973 hello@omlet.co.uk www.omlet.ie hallo@omlet.de www.omlet.de Deutschland 0451 8118 9058 Austria +43 720 115240 hallo@omlet.de www.omlet.de France 04 11 92 12 80 info@omlet.fr...
- Seite 3 Informazioni importanti! Leggere prima dell’utilizzo Controllare regolarmente le clip per verificare che non siano danneggiate o da sostituire. Le clip danneggiate rischiano di compromettere l’integrità del vostro recinto. Potete acquistare delle clip di ricambio sul nostro sito web. Eseguite una manutenzione regolare sui prodotti. Alcune componenti sono in metallo e il rivestimento potrebbe necessitare di una revisione ogni tanto.
- Seite 4 2 x 2 x 1 Diagram showing all Run Clip (810.0135) positions DE Das Diagramm zeigt alle Positionen der Run Clip (810.0135) · FR Diagramme indiquant les positions de tous les Run Clips (810.0135) NL Diagram met posities van alle Run Clips (810.0135) · IT Il diagramma mostra tutte le posizioni delle Run Clip (810.0135) ES El diagrama muestra todas las posiciones del Run Clip (810.0135) ·...
- Seite 5 Button Clip MK3 041.0297 041.0096 041.1244 041.1118 800.0002 041.0130 041.0132 041.0025: Bolt Assembly Fixings 041.0246: Hinge Fixings Pack 810.0138: Bagged Pack Omlet Badge Bolt Assembly Screw Hinge Cap Hinge Pin Omlet Badge 041.0024 3.5 x 12mm 041.1045 041.1046 810.0137 800.0002...
- Seite 6 Ground Level 2 x 2 x 1 DE Erste Ebene · FR Premier niveau · NL Grondniveau · IT Piano terra · ES Nivel del suelo · SE Bottenvåning · DK Grundniveau · NO Første etasje PL Poziom pierwszy 041.0233 041.1043 800.0066 041.0132...
- Seite 7 Lay the parts for the ground level on the floor. Clip the skirt panels 041.1002 and 041.1003 together. See page 07 for clip types and positions. DE Legen Sie die Teile der ersten Ebene auf den Boden. Befestigen Sie die Elemente der Gitter-Schürze 041.1002 und 041.1003 mit Hilfe der Clips aneinander.
- Seite 8 PL Zamontuj Roof Poles (041.1011 + 041.1012). Po prostu nasuń jeden na drugi. Slide the arches you have just assembled onto the ground level of your Outdoor Pet Run. DE Stecken Sie die soeben zusammengesetzten Bögen auf die Gitterplatten der ersten Ebene des Auslaufgeheges FR Installez les arches que vous venez d’assembler au premier niveau de l’enclos.
- Seite 9 Roof Level 2 x 2 x 1 DE Dachebene · FR Niveau supérieur · NL Dakniveau · IT Ultimo piano · ES Nivel del techo · SE Takvåningen · DK Tagniveau NO Taknivå · PL Poziom dachu 041.1005 041.1007 041.0201 Clip Infill Panels (041.1007) and Gable Side Panels (041.1005) to level below.
- Seite 10 Tip: Warm your clips in warm water to make them easier to use DE Tipp: In warmen Wasser werden die Clips ein wenig weicher und sind dann einfacher zu benutzen FR Astuce: réchauffez les clips dans de l’eau chaude pour faciliter leur mise en place NL Tip: het verwarmen van de clips in warm water vergroot het gebruiksgemak IT Aiuto: immergi le clip in acqua tiepida per ammorbidire temporaneamente la plastica ES Consejo: caliente los enganches en agua caliente para que sean más fáciles de usar...
- Seite 11 Attach Bolt (041.0024) to door frames DE Befestigen Sie den Bolt (041.0024) am Türrahmen · FR Attachez le Bolt (041.0024) aux cadres de porte NL Bevestig Bolt (041.0024) aan deurframes · IT Attach Bolt (041.0024) al telaio della porta ES Enganche el Bolt (041.0024) a los marcos de la puerta · SE Montera Bolt (041.0024) på dörrkarmen DK Montér Bolt (041.0024) på...
- Seite 12 Attach the door to the frame at the hinges DE So wird die Tür an den Scharnieren im Rahmen befestigt · FR Comment installer la porte dans le cadre et sur les gonds NL Het bevestigen van de deur aan de scharnieren in het frame · IT Come attaccare la porta al telaio e ai cardini ES Como sujetar la puerta al marco con las bisagras ·...
- Seite 13 810.0137...
- Seite 14 · Do’s and Don’ts · Do’s Don’ts Follow the assembly instructions to make sure that the product works Don’t let children use any tools unsupervised. as intended. Make sure the run is secured and fully assembled before allowing your pet to use it. The run is designed to be used outdoors for Do not allow children to climb.
-
Seite 15: Cosa Non Fare
· Wat wel en wat niet? · Do’s Don’ts Volg de montagehanleiding om ervoor te zorgen dat het product Laat kinderen nooit zonder toezicht gebruik maken van werk zoals bedoeld. Zorg ervoor dat de ren veilig is en volledig is gereedschap. - Seite 16 · Co robić i czego nie robić · Co robić Czego nie robić Podążaj za instrukcją montażu, aby mieć pewność, że produkt Nie pozwól dzieciom korzystać z narzędzi bez nadzoru. działa zgodnie z przeznaczeniem. Upewnij się, że wybieg jest stabilny i w pełni zmontowany, zanim pozwolisz swojemu Nie pozwalaj dzieciom wspinać...
- Seite 17 © Copyright Omlet Ltd. 2022 Design Registered, Patent Pending Please Reuse, Omlet WIR is a Registered Trademark of Hebe Studio Ltd Omlet is a Registered Trademark of Hebe Studio Ltd Compost, Recycle. 820.2017_Instruction Manual WIR Mk3_12/01/2022...