Inhaltsverzeichnis
Werbung
Verfügbare Sprachen
Verfügbare Sprachen
Quicklinks
Werbung
Kapitel
Inhaltsverzeichnis

Verwandte Anleitungen für Atag KD85178BF


Inhaltszusammenfassung für Atag KD85178BF
- Seite 1 Gebruiksaanwijzing Koelvriescombinatie KD85178BF KD85178BFC KD84178BFC...
-
Seite 2: Inhaltsverzeichnis
INHOUDSOPGAVE Uw koelvriescombinatie Inleiding Veiligheidsvoorschriften Installeren en aansluiten De keuze van de ruimte Toestel aansluiten Draairichting deur wijzigen / toestel inbouwen in een kast Voor het eerste gebruik Voordat u het toestel de eerste keer gebruikt Advies om energie te besparen Toestelbeschrijving Toestel Bedieningspaneel... - Seite 3 INHOUDSOPGAVE Voedsel bewaren en invriezen Aanbevolen indeling Voorkom het bederven van voedsel Vers voedsel bewaren in de koelkast Invriezen en bewaren van voedsel in de vriezer Bevroren voedsel ontdooien Onderhoud Het toestel ontdooien Het toestel reinigen Storingen Storingstabel Milieuaspecten Verpakking en toestel afdanken Gebruikte pictogrammen Belangrijk om te weten Waarschuwing;...
-
Seite 4: Uw Koelvriescombinatie
UW KOELVRIESCOMBINATIE Inleiding Gefeliciteerd met uw keuze voor deze koelvriescombinatie van Atag. In het ontwerp van dit product heeft eenvoudige bediening en optimale gebruiksvriendelijkheid centraal gestaan. In deze handleiding leest u hoe u dit toestel het best kunt gebruiken. Naast informatie over de bediening, vindt u hier ook achtergrondinformatie die u tijdens het gebruik van het toestel van pas kan komen. -
Seite 5: Veiligheidsvoorschriften
VEILIGHEIDSVOORSCHRIFTEN Lees zorgvuldig de meegeleverde instructies voor installatie en gebruik van het apparaat. De fabrikant is niet verantwoordelijk voor letsel en schade veroorzaakt door een foutieve installatie. Bewaar de instructies van het apparaat voor toekomstig gebruik. Veiligheid van kinderen en kwetsbare mensen •... -
Seite 6: Algemene Veiligheid
VEILIGHEIDSVOORSCHRIFTEN Algemene veiligheid • De lamp in dit huishoudelijke apparaat is uitsluitend bedoeld voor verlichting van dit apparaat. De lamp is niet geschikt voor de verlichting van een huishoudelijke ruimte. • WAARSCHUWING! Dit apparaat is bestemd voor huishoudelijk of daarmee vergelijkbaar gebruik, zoals: –... -
Seite 7: Elektrische Aansluiting
VEILIGHEIDSVOORSCHRIFTEN Installatie • WAARSCHUWING! Dit apparaat mag uitsluitend door een erkende monteur worden geïnstalleerd. • Verwijder alle verpakkingsmaterialen. • Controleer het apparaat op transportschade. Sluit het apparaat niet aan als het beschadigd is. • Volg altijd de installatie-instructies in de bijgeleverde installatiehandleiding. - Seite 8 VEILIGHEIDSVOORSCHRIFTEN • Controleer of de elektrische informatie op het typeplaatje overeenkomt met de stroomvoorziening. Zo niet, neem dan contact op met een elektromonteur. • Gebruik altijd een correct geïnstalleerd, schokbestendig stopcontact. • Gebruik niet meerdere stekkers of verlengsnoeren. • Zorg dat u de elektrische onderdelen (hoofdstekker, kabel, compressor) niet beschadigt.
- Seite 9 VEILIGHEIDSVOORSCHRIFTEN na installatie van het apparaat. Door het toepassen van een meerpolige schakelaar met een contactafstand van ten minste 3 mm in de vaste bedrading van het elektriciteitsnet naar het apparaat wordt aan deze eis voldaan. Gebruik • WAARSCHUWING! Gevaar voor letsel, brandwonden, elektrische schokken of brand.
-
Seite 10: Onderhoud En Reiniging
VEILIGHEIDSVOORSCHRIFTEN Onderhoud en reiniging • WAARSCHUWING! Gevaar voor letsel of schade aan het apparaat. • Schakel het apparaat uit en trek de stekker uit het stopcontact voordat u onderhoudshandelingen verricht. • Het koelcircuit van dit apparaat bevat koolwaterstoffen. Enkel bevoegde personen mogen de eenheid onderhouden en herladen. -
Seite 11: Installeren En Aansluiten
INSTALLEREN EN AANSLUITEN De keuze van de ruimte • Plaats het toestel in een droge en regelmatig geventileerde ruimte. De toegestane temperatuur van de omgeving voor de juiste werking van het toestel is afhankelijk van de uitvoering (klasse) van het toestel, die op het typeplaatje van het toestel vermeld is. •... -
Seite 12: Toestel Aansluiten
INSTALLEREN EN AANSLUITEN • De afstand tot de muur, achter en aan de zijkanten van de kast, moet ongeveer 5 cm te bedragen. Een keukenkastje boven de koelkast moet aan de achterzijde een ruimte van tenminste 5 cm hebben. Daardoor wordt een voldoende koeling van de condensor gewaarborgd. -
Seite 13: Draairichting Deur Wijzigen / Toestel Inbouwen In Een Kast
INSTALLEREN EN AANSLUITEN Gevaar van bevriezing Steek bevroren voedsel nooit in uw mond en voorkom aanraking van bevroren voedsel, omdat dit bevriezing kan veroorzaken. Open het vriescompartiment niet als er een fout is opgetreden of de stroomvoorziening is uitgevallen, tenzij het toestel langer buiten werking is dan de uren die staan aangegeven op het typeplaatje (temperatuurstijgingstijd). -
Seite 14: Voor Het Eerste Gebruik
VOOR HET EERSTE GEBRUIK Voordat u het toestel de eerste keer gebruikt Sluit het toestel pas aan op het elektriciteitsnet nadat u de aanwijzingen over een correct en veilig gebruik van het toestel zorgvuldig hebt doorgelezen. De aanwijzingen zijn van toepassing op verschillende types en modellen;... -
Seite 15: Toestelbeschrijving
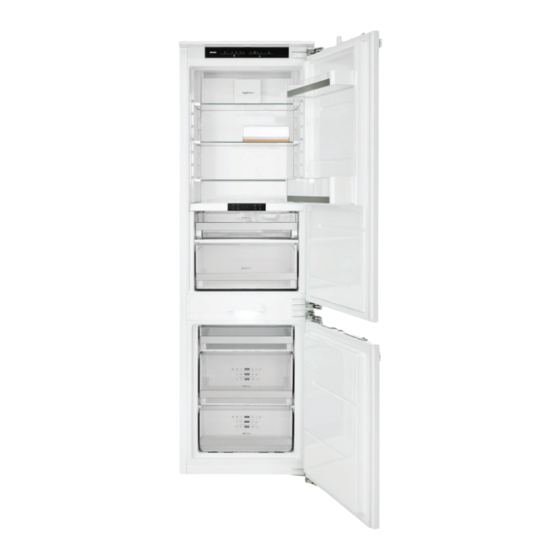
TOESTELBESCHRIJVING Toestel Koelkast 1. Bedieningspaneel 2. CoolFlow+ 3. Glazen draagplateaus 4. Houten flessenplateau (BottleTray) 5. Bedieningspaneel DuraFresh 6. DuraFresh laden 7. Deurvakken Vriezer 8. Vriesladen 9. Glazen draagplateau Beste locatie voor het invriezen van vers voedsel. CoolFlow+ Dit systeem zorgt voor een optimale verdeling van de lucht, waardoor de temperatuur binnen het gehele koelcompartiment constant blijft. - Seite 16 TOESTELBESCHRIJVING Laden Een aantal laden zijn geplaatst op volledig uittrekbare telescooprails en voorzien van een soft-close systeem. Om de lade van de rails af te nemen, trekt u eerst de lade op de rails zo ver mogelijk naar buiten. Til de achterkant van de lade omhoog (1). Trek de lade naar u toe (2) en haal de lade van de rails.
- Seite 17 TOESTELBESCHRIJVING Houten flessenplateau (BottleTray) Plaats het plateau op een van de glazen draagplateaus en leg de flessen er direct op. De vorm van het plateau voorkomt dat de flessen van hun plaats kunnen rollen. Er is plaats voor drie flessen of zes blikjes.
-
Seite 18: Bedieningspaneel
Toestel inschakelen (kort aanraken); beide compartimenten schakelen in. ▷ Koelcompartiment uitschakelen (drie seconden aanraken). B. Alarmtoets / WiFi-toets (afhankelijk van het model: zie ‘Atag Connect Life’) C. SuperCool toets (intensieve koelfunctie) D. Insteltoetsen temperatuur (koelcompartiment) E. Weergave ingestelde temperatuur (koelcompartiment) -
Seite 19: Bedieningspaneel Durafresh
Sommige toestellen kunnen op afstand worden bediend met behulp van een smart phone of tablet. Deze toestellen zijn voorzien van een WiFi-toets. Instructies om de verbinding tot stand te brengen staan beschreven in een separate gebruiksaanwijzing (Atag Connect Life). Overal waar in deze handleiding wordt aangegeven dat de alarmtoets gaat knipperen, is dat niet van toepassing op de WiFi-toets. -
Seite 20: Bediening Van Het Toestel
BEDIENING VAN HET TOESTEL Alle compartimenten inschakelen en de temperatuur instellen 1. Raak de aan-/uittoets van het koelcompartiment aan. Alle compartimenten schakelen in. ▷ 2. Gebruik de insteltoetsen om de temperatuur van de compartimenten in te stellen. De temperatuur van het koelcompartiment kan worden ingesteld van +3 °C tot +8 °C. De temperatuur van de bovenste DuraFresh lade kan ingesteld worden op -2, 0, 2 of 5 °C. -
Seite 21: Alleen Het Koel- En Durafresh Compartiment Uitschakelen
BEDIENING VAN HET TOESTEL Alleen het koel- en DuraFresh compartiment uitschakelen 1. Raak gedurende drie seconden de aan-/uittoets van het koelcompartiment aan. ▷ Het koelcompartiment en het DuraFresh compartiment schakelen uit. Het vriescompartiment blijft ingeschakeld. DuraFresh Het DuraFresh koelsysteem zorgt ervoor dat de kwaliteit van verse producten beter bewaard blijft. - Seite 22 BEDIENING VAN HET TOESTEL De temperatuur in de DuraFresh laden kiezen De temperatuur van de bovenste DuraFresh lade kan ingesteld worden op -2, 0, 2 of 5 °C. De temperatuur onderin hangt af van de temperatuurinstelling van de bovenste lade en is circa 1 à...
- Seite 23 BEDIENING VAN HET TOESTEL Bewaren van voedsel in de DuraFresh laden Vlees Temperatuur in °C Bewaartijd Rundvlees 0 tot 4 tot 3 weken Varkensvlees -1 tot 4 3 dagen Gevogelte 0 tot 4 3 dagen Lamsvlees 0 tot 4 14 dagen 0 tot 4 3 tot 10 dagen Vis, schaal- en schelpdieren...
-
Seite 24: Intensief Koelen (Supercool)
BEDIENING VAN HET TOESTEL Intensief koelen (SuperCool) Dit toestel beschikt over een intensieve koelfunctie. Deze functie zorgt ervoor dat de temperaturen in het koelcompartiment en in het DuraFresh compartiment zo snel mogelijk dalen. Dit is ideaal voor de afkoeling van recent in de koelkast geplaatste producten. Gebruik deze instelling wanneer u een grote hoeveelheid voedsel in het toestel legt. -
Seite 25: Intensief Vriezen (Fastfreeze)
BEDIENING VAN HET TOESTEL Intensief vriezen (FastFreeze) Dit toestel beschikt over een intensieve vriesfunctie. Deze functie zorgt ervoor dat de temperatuur in het vriescompartiment zo snel mogelijk daalt. Schakel deze functie 24 uur van tevoren in voordat u een grote hoeveelheid vers voedsel in het toestel legt. Als de intensieve vriesfunctie actief is, werkt het toestel met maximaal vermogen. -
Seite 26: Eco-Functie
BEDIENING VAN HET TOESTEL ECO-functie Dit toestel beschikt over een ECO-functie. Als deze functie actief is, werkt het toestel met optimale instellingen. Deze instellingen worden weergegeven in de displays (5 °C / 2 °C / -18 °C). De ECO-functie heeft geen tijdslimiet en blijft actief totdat de functie wordt uitgeschakeld. De ECO-functie in-/uitschakelen 1. -
Seite 27: Alarm Bij Open Deur
BEDIENING VAN HET TOESTEL Alarm bij open deur Als de deur van een compartiment te lang open staat, hoort u een geluidssignaal. De alarmtoets knippert in de display. Na enkele minuten gaat de verlichting van het desbetreffende compartiment knipperen. Het alarm uitschakelen 1. -
Seite 28: Alarm Bij Een Stroomstoring
BEDIENING VAN HET TOESTEL Alarm bij een stroomstoring Tijdens een stroomstoring kan het toestel niet koelen/vriezen. Is de stroomstoring verholpen, dan wordt de temperatuur in het toestel gemeten. Als de temperatuur in het toestel te hoog is, hoort u een geluidssignaal. -
Seite 29: Voedsel Bewaren En Invriezen
VOEDSEL BEWAREN EN INVRIEZEN Aanbevolen indeling Delen van het koelcompartiment • Bovenste deel: voedsel in blik, brood, wijn, deegwaren etc. • Middelste deel: zuivel, kant-en-klaarmaaltijden, toetjes, frisdrank, bier, gekookt voedsel etc. • DuraFresh-laden: vlees, vleeswaren, zuivel, delicatessen, vers fruit, groenten, wortelgroenten, salades, uien, knoflook, kool, rapen, etc. -
Seite 30: Voorkom Het Bederven Van Voedsel
VOEDSEL BEWAREN EN INVRIEZEN Voorkom het bederven van voedsel Volg de onderstaande instructies om het bederven van voedsel te voorkomen: • Als u de deur gedurende lange tijd opent, kan de temperatuur in de compartimenten van het toestel aanzienlijk stijgen. •... -
Seite 31: Invriezen En Bewaren Van Voedsel In De Vriezer
VOEDSEL BEWAREN EN INVRIEZEN Invriezen en bewaren van voedsel in de vriezer Belangrijke aanwijzingen bij het invriezen van vers voedsel • De maximale hoeveelheid vers voedsel die u in een keer in de vriezer kunt plaatsen, is op het typeplaatje aangegeven. Wanneer de hoeveelheid in te vriezen voedsel groter is dan de aangegeven hoeveelheid, neemt de kwaliteit van het invriezen af. -
Seite 32: Bevroren Voedsel Ontdooien
VOEDSEL BEWAREN EN INVRIEZEN Aanbevolen bewaartijd van ingevroren voedsel in de vriezer Soort voedsel Bewaartijd Fruit, rundvlees 10 tot 12 maanden Groenten, kalfsvlees, gevogelte 8 tot 10 maanden Hert 6 tot 8 maanden Varkensvlees 4 tot 6 maanden Fijngesneden of gemalen vlees 4 maanden Brood, deegwaren, gekookte gerechten, magere vis 3 maanden... -
Seite 33: Onderhoud
ONDERHOUD Het toestel ontdooien Automatisch ontdooien van het koelcompartiment Het koelcompartiment ontdooit van tijd tot tijd geheel automatisch. Ontdooien van de NoFrost vriezer Ontdooien van de NoFrost vriezer gaat automatisch. Rijp dat zich af en toe afzet zal vanzelf verdwijnen. Als er toch ijs of rijpafzetting in de vriesruimte aanwezig is, kan dat het gevolg zijn van een ongewoon gebruik van het toestel (te vaak en te lang de deur openen, slechte sluiting van de deur, etc.). -
Seite 34: Het Toestel Reinigen
ONDERHOUD Het toestel reinigen Schakel het toestel uit en haal de stekker uit het stopcontact voordat u het gaat schoonmaken. Gebruik geen reinigingsmiddelen die schurende bestanddelen bevatten; hierdoor kan het oppervlak beschadigd raken. Activeer de intensieve vriesfunctie 24 uur voordat u de vriezer gaat schoonmaken. •... -
Seite 35: Storingen
STORINGEN Storingstabel Wanneer u twijfelt over de goede werking van uw toestel betekent dit niet automatisch dat er een defect is. Controleer in elk geval de volgende punten in onderstaande tabel. Probleem Oorzaak/Oplossing Het toestel is Controleer of er spanning op het stopcontact staat en of het toestel is aangesloten op de ingeschakeld. - Seite 36 STORINGEN Probleem Oorzaak/Oplossing De alarmtoets • De deur is te lang of te vaak geopend. en/of temperatuur- • De deur sluit niet goed (vervuiling op de afdichting, de deur zit scheef, weergave knippert. de afdichting is beschadigd, etc.). • Te veel vers voedsel tegelijk toegevoegd. De deur gaat U probeert een deur van het toestel te openen nadat u de deur net moeilijk open.
- Seite 37 STORINGEN Probleem Oorzaak/Oplossing Foutcode E1, E2 of Een temperatuursensor is defect. Bel het servicecentrum voor reparatie. E3 in de display. Zolang het toestel nog niet is gerepareerd, staat het in de veilige modus. Het toestel houdt de meest geschikte temperatuur voor elk compartiment aan.
-
Seite 38: Milieuaspecten
MILIEUASPECTEN Verpakking en toestel afdanken Dit toestel is gemaakt van duurzame materialen. Het toestel moet aan het einde van zijn levensduur op verantwoorde wijze worden afgedankt. Informeer bij de plaatselijke autoriteiten hoe u dit kunt doen. Zie ook het hoofdstuk ‘Verwijdering’ in de veiligheidsvoorschriften. De verpakking van het toestel is recyclebaar. - Seite 39 NL 39...
- Seite 40 De gebruiksaanwijzing is ook te vinden op onze website: www.atag.nl www.atag.be *600142* 600142...
- Seite 41 Mode d’emploi Réfrigérateur avec congélateur KD85178BF KD85178BFC KD84178BFC...
- Seite 42 SOMMAIRE Votre réfrigérateur avec congélateur Introduction Consignes de sécurité Sécurité des enfants et personnes vulnérables Sécurité d’ordre général Installation Branchement électrique Utilisation Entretien et nettoyage Mise au rebut Installation et raccordement Choix de l’emplacement Branchement de l’appareil Changement du sens d’ouverture de la porte / encastrement de l’appareil dans un meuble Avant la première utilisation de l'appareil Avant d’utiliser l’appareil pour première fois...
- Seite 43 SOMMAIRE Refroidissement rapide (SuperCool) Congélation rapide (FastFreeze) Fonction ECO Sécurité enfant (verrouillage) Alarme d’ouverture de porte Alarme haute température Alarme de coupure de courant Conservation et congélation d’aliments Répartition recommandée Éviter la contamination des aliments Conservation d’aliments frais dans le réfrigérateur Congélation et stockage des aliments dans le congélateur Décongélation des aliments congelés Entretien...
-
Seite 44: Votre Réfrigérateur Avec Congélateur
VOTRE RÉFRIGÉRATEUR AVEC CONGÉLATEUR Introduction Félicitations pour l’acquisition de ce réfrigérateur avec congélateur Atag. La souplesse et la simplicité de l’utilisation sont les principes qui ont guidé son développement. Ce mode d’emploi vous explique comment utiliser votre appareil de manière optimale. Il contient des informations relatives au fonctionnement de l'appareil ainsi que des informations d’ordre... -
Seite 45: Consignes De Sécurité
CONSIGNES DE SÉCURITÉ Veuillez lire attentivement toutes les consignes fournies avant l’installation et l’utilisation de l’appareil. Le fabricant décline toute responsabilité en cas de blessures et de dommages résultant d’une installation et d'une utilisation inappropriées. Conservez toujours ces consignes avec l’appareil pour consultation ultérieure. -
Seite 46: Sécurité D'ordre Général
CONSIGNES DE SÉCURITÉ Sécurité d’ordre général • La lampe intégrée dans cet appareil ménager sert uniquement pour l’éclairage de ce dernier. Elle n'est pas conçue pour éclairer une pièce. • MISE EN GARDE ! Cet appareil a été conçu pour un usage domestique ou similaire, notamment : –... -
Seite 47: Installation
CONSIGNES DE SÉCURITÉ • MISE EN GARDE ! Si le câble d'alimentation est endommagé, il doit uniquement être remplacé par le fabricant, son agent de maintenance ou une autre personne qualifiée afin d'éviter toute situation dangereuse. Installation • MISE EN GARDE ! Seul un installateur agréé est autorisé à brancher cet appareil. -
Seite 48: Branchement Électrique
CONSIGNES DE SÉCURITÉ Branchement électrique • MISE EN GARDE ! Risque d'incendie et d’électrocution. • L’appareil doit être mis à la terre. • Tous les branchements électriques doivent être réalisés par un électricien qualifié. • Assurez-vous que les caractéristiques électriques figurant sur la plaque signalétique de l'appareil sont compatibles avec celles du réseau électrique. -
Seite 49: Utilisation
CONSIGNES DE SÉCURITÉ s’applique également aux appareils munis d’un cordon d’alimentation et d’une fiche lorsque la fiche n’est pas accessible après l’installation de l’appareil. L’utilisation d’un interrupteur omnipolaire avec une séparation des contacts d’au moins 3 mm monté dans le câblage fixe répond à cette exigence. -
Seite 50: Entretien Et Nettoyage
CONSIGNES DE SÉCURITÉ Entretien et nettoyage • MISE EN GARDE ! Risque de blessures corporelles ou de dommages matériels. • Avant toute opération d'entretien, éteignez l'appareil et débranchez la fiche de la prise secteur. • Le groupe de refroidissement de cet appareil contient des hydrocarbures. -
Seite 51: Installation Et Raccordement
INSTALLATION ET RACCORDEMENT Choix de l’emplacement • Placez l'appareil dans un lieu sec et bien ventilé. La plage de températures ambiantes autorisée pour l’appareil dépend de sa classe climatique qui est indiquée sur la plaque signalétique. • Ne placez pas l’appareil à proximité d'une source de chaleur telle qu’une cuisinière, un radiateur, une chaudière, etc. -
Seite 52: Branchement De L'appareil
INSTALLATION ET RACCORDEMENT • L’appareil doit être placé à une distance d’environ 5 cm du mur, de la paroi arrière et des parois latérales d’un meuble de cuisine. Lorsqu’un meuble de cuisine est situé au-dessus de l’appareil, il est impératif de prévoir un espace d’au moins 5 cm entre l’arrière du meuble et le mur. -
Seite 53: Changement Du Sens D'ouverture De La Porte / Encastrement De L'appareil Dans Un Meuble
INSTALLATION ET RACCORDEMENT Danger de brûlure par le froid Afin d’éviter les brûlures par le froid, ne placez jamais des aliments congelés dans votre bouche et abstenez-vous d’y toucher. En cas de dysfonctionnement ou de coupure de courant, n’ouvrez pas le compartiment congélation sauf si l’appareil a été... -
Seite 54: Avant La Première Utilisation De L'appareil
AVANT LA PREMIÈRE UTILISATION DE L'APPAREIL Avant d’utiliser l’appareil pour première fois Ne raccordez pas l’appareil à l’alimentation secteur avant d’avoir lu attentivement toutes les instructions afin de vous garantir une utilisation correcte et en toute sécurité de l’appareil. Ces instructions s’appliquent à des types et modèles d’appareils différents, il est donc possible qu’elles fassent référence à... -
Seite 55: Description De L'appareil
DESCRIPTION DE L'APPAREIL Appareil Réfrigérateur 1. Panneau de commande 2. CoolFlow+ 3. Clayettes en verre 4. Support pour bouteilles en bois (BottleTray) 5. Panneau de commande DuraFresh 6. Tiroirs DuraFresh 7. Balconnets de porte Congélateur 8. Tiroirs du congélateur 9. Clayette en verre Zone optimale pour congeler les aliments frais. - Seite 56 DESCRIPTION DE L'APPAREIL Tiroirs Les tiroirs sont montés sur des rails télescopiques entièrement extensibles et sont équipés d’un système de fermeture en douceur SoftClose. Pour extraire un tiroir des rails, tirez le tiroir jusqu’à la butée. Soulevez l’arrière du tiroir (1). Tirez le tiroir vers vous (2), puis soulevez-le hors des rails.
- Seite 57 DESCRIPTION DE L'APPAREIL Support pour bouteilles en bois (BottleTray) Posez le support pour bouteilles sur l’une des clayettes en verre et placez les bouteilles sur le support. La forme du support empêche les bouteilles de rouler sur les côtés. Le support est conçu pour recevoir trois bouteilles ou six canettes maximum.
-
Seite 58: Panneau De Commande
▷ Éteindre le compartiment réfrigération (appuyer pendant trois secondes). B. Touche Alarme / touche Wi-Fi (selon le modèle, voir également « Atag Connect Life ») C. Touche SuperCool (fonction de refroidissement rapide) D. Touches de réglage de la température (compartiment réfrigération) E. -
Seite 59: Panneau De Commande Durafresh
Certains appareils sont réglables à distance à l’aide d’un smartphone ou d’une tablette. Ils sont alors équipés d’une touche Wi-Fi. Les instructions pour la connexion sont fournies dans un mode d’emploi séparé (Atag Connect Life). Les références dans ce mode d’emploi à la touche Alarme qui commence à clignoter ne s’appliquent pas à... -
Seite 60: Utilisation De L'appareil
UTILISATION DE L’APPAREIL Mise en marche de tous les compartiments et réglage de la température 1. Appuyez sur la touche Marche/arrêt du compartiment réfrigération. Tous les compartiments sont mis en marche. ▷ 2. Utilisez les touches de réglage pour régler la température des compartiments. -
Seite 61: Arrêt Des Compartiments Réfrigération Et Durafresh Uniquement
UTILISATION DE L’APPAREIL Arrêt des compartiments réfrigération et DuraFresh uniquement 1. Appuyez sur la touche Marche/arrêt du compartiment réfrigération pendant trois secondes. ▷ Les compartiments réfrigération et DuraFresh sont éteints. Le compartiment congélation n’est pas éteint. DuraFresh Avec le système de réfrigération DuraFresh, les aliments restent frais plus longtemps. Les vitamines et les minéraux sont préservés plus longtemps, de même que la saveur et la structure. - Seite 62 UTILISATION DE L’APPAREIL Sélection de la température dans les tiroirs DuraFresh La température du tiroir DuraFresh du haut est réglable sur -2, 0, 2 ou 5 °C. La température du tiroir DuraFresh du bas dépend du réglage de la température du tiroir du haut et est d’environ 1 à...
- Seite 63 UTILISATION DE L’APPAREIL Conservation d’aliments dans les tiroirs DuraFresh Viande Température, °C Durée de conservation Bœuf 0 à 4 Jusqu’à 3 semaines Porc -1 à 4 3 jours Volaille 0 à 4 3 jours Agneau 0 à 4 14 jours Poisson 0 à...
-
Seite 64: Refroidissement Rapide (Supercool)
UTILISATION DE L’APPAREIL Refroidissement rapide (SuperCool) Cet appareil possède une fonction de refroidissement rapide (intense). Cette fonction abaisse la température dans les compartiments réfrigération et DuraFresh le plus rapidement possible. Ce qui est idéal pour refroidir des produits tout juste placés dans le réfrigérateur. Utilisez cette fonction lorsque vous introduisez une grande quantité... -
Seite 65: Congélation Rapide (Fastfreeze)
UTILISATION DE L’APPAREIL Congélation rapide (FastFreeze) Cet appareil possède une fonction de congélation rapide (intense). Cette fonction abaisse la température dans le compartiment congélation le plus rapidement possible. Activez cette fonction 24 heures avant d’introduire une grande quantité d’aliments frais dans l’appareil. Lorsque la fonction de congélation rapide est sélectionnée, l’appareil fonctionne au maximum de sa capacité. -
Seite 66: Fonction Eco
UTILISATION DE L’APPAREIL Fonction ECO Cet appareil possède une fonction ECO. Lorsque la fonction ECO est sélectionnée, l’appareil fonctionne avec les réglages optimaux. Ces réglages sont affichés à l’écran (5 °C / 2 °C / -18 °C). La fonction ECO n’est pas limitée dans le temps et reste active jusqu’à sa désactivation. Activation/désactivation de la fonction ECO 1. -
Seite 67: Alarme D'ouverture De Porte
UTILISATION DE L’APPAREIL Alarme d’ouverture de porte Un signal d’alarme est émis lorsque la porte d’un compartiment reste ouverte trop longtemps. La touche Alarme clignote à l’écran. L’éclairage du compartiment concerné commence à clignoter après quelques minutes. Arrêt de l’alarme 1. -
Seite 68: Alarme De Coupure De Courant
UTILISATION DE L’APPAREIL Alarme de coupure de courant L’appareil n’est pas en mesure de refroidir/congeler durant une coupure de courant. Dès que le courant est rétabli, la température de l’appareil est mesurée. Un signal sonore est émis lorsque la température est trop élevée à... -
Seite 69: Conservation Et Congélation D'aliments
CONSERVATION ET CONGÉLATION D’ALIMENTS Répartition recommandée Sections du compartiment réfrigération • Section du haut : conserves, pain, vin, pâtes, etc. • Section du milieu : produits laitiers, plats tout prêts, desserts, sodas, bière, aliments cuisinés, etc. • Tiroirs DuraFresh : viande, produits à base de viande, produits laitiers, produits traiteur, fruits frais, légumes, légumes-racines, salades, oignons, ail, chou, rutabagas/navets, etc. -
Seite 70: Éviter La Contamination Des Aliments
CONSERVATION ET CONGÉLATION D’ALIMENTS Éviter la contamination des aliments Pour éviter la contamination des aliments, veuillez respecter les instructions suivantes : • L’ouverture de la porte pendant de longues périodes peut provoquer une augmentation significative de la température dans les compartiments de l’appareil. •... -
Seite 71: Congélation Et Stockage Des Aliments Dans Le Congélateur
CONSERVATION ET CONGÉLATION D’ALIMENTS Congélation et stockage des aliments dans le congélateur Recommandations importantes pour la congélation d’aliments frais • La quantité maximale d’aliments que vous pouvez introduire en même temps dans le congélateur est indiquée sur la plaque signalétique. Au-delà de cette quantité, le processus de congélation est ralenti et la qualité... -
Seite 72: Décongélation Des Aliments Congelés
CONSERVATION ET CONGÉLATION D’ALIMENTS Durée recommandée pour la conservation d’aliments congelés dans le congélateur Type d’aliments Durée de conservation Fruits, bœuf 10 à 12 mois Légumes, veau, volaille 8 à 10 mois Chevreuil 6 à 8 mois Porc 4 à 6 mois Viande émincée ou hachée 4 mois Pain, pâtes, plats cuisinés, poisson blanc... -
Seite 73: Entretien
ENTRETIEN Dégivrage de l’appareil Dégivrage automatique du compartiment réfrigération Le compartiment réfrigération dégivre automatiquement de temps en temps. Dégivrage du congélateur NoFrost Le congélateur NoFrost se dégivre automatiquement. Tout dépôt de givre est alors éliminé. Tout dépôt de glace ou de givre se formant néanmoins dans le compartiment congélation peut résulter d’un usage anormal de l’appareil (ouverture de la porte trop fréquemment ou trop longtemps, ou mauvaise fermeture de la porte, etc.). -
Seite 74: Nettoyage De L'appareil
ENTRETIEN Nettoyage de l'appareil Éteignez l’appareil et retirez la fiche de la prise murale avant d’entreprendre le nettoyage. N'utilisez pas de détergents abrasifs, car ils peuvent endommager la surface. Activez la fonction de congélation rapide 24 heures avant de nettoyer le congélateur. •... -
Seite 75: Tableau Des Problèmes
PROBLÈMES Tableau des problèmes En cas de doutes quant au bon fonctionnement de votre appareil, n’en déduisez pas systématiquement qu'il est défectueux. Nous vous recommandons dans tous les cas de vérifier les points figurant dans le tableau suivant. Problème Cause/solution L’appareil est Vérifiez que la prise secteur est sous tension et que l’appareil est allumé. - Seite 76 PROBLÈMES Problème Cause/solution Condensation • Vérifiez que la porte ferme correctement et hermétiquement. sur la clayette • C’est un problème passager qui ne peut être évité à 100 % durant au-dessus des les périodes de températures ambiantes et d'humidité élevées. tiroirs dans le Le problème disparaît lorsque la température et l’humidité...
- Seite 77 PROBLÈMES Problème Cause/solution Le code « LL » La fonction Sécurité enfant (verrouillage) a été activée. Voir le chapitre s'affiche. « Sécurité enfant ». Le code « PF » Coupure de courant prolongée. Voir le chapitre « Alarme de coupure de s'affiche.
-
Seite 78: Aspects Environnementaux
ASPECTS ENVIRONNEMENTAUX Mise au rebut de l’appareil et de l’emballage Cet appareil est fabriqué à partir de matériaux durables. Il doit être mis au rebut de manière responsable à la fin de son cycle de service. Prenez contact avec les autorités locales pour en savoir plus sur la manière de procéder. - Seite 79 FR 39...
- Seite 80 La notice d’utilisation est également disponible sur notre site web : www.atag.nl www.atag.be *600134* 600134...
- Seite 81 Bedienungsanleitung Kühl-Gefrier-Kombination KD85178BF KD85178BFC KD84178BFC...
- Seite 82 INHALT Ihre Kühl-Gefrier-Kombination Einführung Sicherheitshinweise Kinder und schutzbedürftige Personen Allgemeine Sicherheitshinweise Einbau Elektroanschluss Verwendung Pflege und Reinigung Entsorgung Installation und Anschluss Auswählen eines geeigneten Standorts Anschließen des Geräts Anschlagseite der Gerätetür ändern / Gerät in Schrank einbauen Vor der ersten Verwendung des Geräts Vor der ersten Verwendung des Geräts Hinweise zum Sparen von Energie Beschreibung des Geräts...
- Seite 83 INHALT Schnellgefrieren (FastFreeze) ECO-Funktion Kindersicherung Alarm „Tür offen“ Alarm „Hohe Temperatur“ Alarm bei Stromausfall Lagern und Einfrieren von Lebensmitteln Empfohlene Verteilung Verderben von Lebensmitteln vermeiden Lagern frischer Lebensmittel im Kühlschrank Einfrieren von Lebensmitteln im Gefrierschrank Auftauen von Gefriergut Pflege Abtauen des Geräts Gerät reinigen Störungen Störungstabelle...
-
Seite 84: Ihre Kühl-Gefrier-Kombination
IHRE KÜHL-GEFRIER-KOMBINATION Einführung Herzlichen Glückwunsch zum Kauf Ihrer Atag Kühl-Gefrier-Kombination. Bei der Entwicklung dieses Produkts stand optimale Benutzerfreundlichkeit im Mittelpunkt. In dieser Anleitung erfahren Sie, wie Sie das Gerät optimal verwenden. Sie enthält Informationen zur Bedienung sowie Hintergrundinformationen zur Funktionsweise. -
Seite 85: Sicherheitshinweise
SICHERHEITSHINWEISE Vor Installation und Inbetriebnahme des Geräts mitgelieferte Anweisungen sorgfältig durchlesen. Der Hersteller übernimmt keinerlei Haftung für Schäden und Verletzungen infolge fehlerhafter Installation oder Nutzung. Heben Sie alle Anweisungen zum späteren Nachlesen gut auf. Kinder und schutzbedürftige Personen • Das Gerät ist nicht zum Gebrauch durch hilfsbedürftige Personen, Kleinkinder oder Personen ohne entsprechende Erfahrung/Kenntnisse geeignet. -
Seite 86: Allgemeine Sicherheitshinweise
SICHERHEITSHINWEISE Allgemeine Sicherheitshinweise • Die Leuchtmittel in diesem Haushaltsgerät sind ausschließlich für die Beleuchtung dieses Geräts ausgelegt. Sie sind nicht zur Raumbeleuchtung im Haushalt geeignet. • WARNUNG! Dieses Gerät ist für den Einsatz im Haushalt oder in vergleichbaren Umgebungen vorgesehen, zum Beispiel: –... -
Seite 87: Einbau
SICHERHEITSHINWEISE Einbau • WARNUNG! Dieses Gerät darf nur von einem anerkannten Installateur angeschlossen werden! • Alle Verpackungsteile entfernen. • Wenn Gerät beschädigt sein sollte: Gerät nicht installieren und nicht in Betrieb nehmen. • Mitgelieferte Installationsanweisungen befolgen. • Das Gerät ist schwer! Berücksichtigen Sie dies, wenn Sie das Gerät bewegen. -
Seite 88: Elektroanschluss
SICHERHEITSHINWEISE Elektroanschluss • WARNUNG! Gefahr eines Brandes und eines elektrischen Schlages! • Das Gerät muss geerdet sein. • Elektroarbeiten müssen von einem Elektriker durchgeführt werden. • Stellen Sie sicher, dass die Netzstromversorgung mit den Spannungsangaben auf dem Typenschild übereinstimmt. Ist dies nicht der Fall, wenden Sie sich an einen Elektriker. -
Seite 89: Verwendung
SICHERHEITSHINWEISE Verkabelungsregeln eingebaut werden. Dies gilt auch für Geräte mit Netzkabel und Stecker, wenn der Stecker nach der Installation des Geräts nicht zugänglich ist. Die Verwendung eines allpoligen Schalters mit einem Kontaktabstand von mindestens 3mm in der festen Verkabelung erfüllt diese Anforderung. -
Seite 90: Pflege Und Reinigung
SICHERHEITSHINWEISE Pflege und Reinigung • WARNUNG! Gefahr von Personen- und Sachschäden. • Gerät ausschalten und durch Ziehen des Steckers von der Stromversorgung trennen, bevor Sie mit Wartungsarbeiten beginnen. • Das Gerät enthält in seiner Kühleinheit Kohlenwasserstoffe. Wartung und Befüllung dürfen nur von qualifizierten Servicetechnikern durchgeführt werden. -
Seite 91: Installation Und Anschluss
INSTALLATION UND ANSCHLUSS Auswählen eines geeigneten Standorts • Stellen Sie das Gerät in einem trockenen und gut belüfteten Raum auf. Der zulässige Umgebungstemperaturbereich für das Gerät hängt von der Klimaklasse des Geräts ab, die auf dem Typenschild angegeben ist. • Positionieren Sie das Gerät nicht in der Nähe von Wärmequellen wie Gaskoch an, Heizer oder Boilern. -
Seite 92: Anschließen Des Geräts
INSTALLATION UND ANSCHLUSS • Stellen Sie das Gerät mit einem Abstand von mindestens 5 cm zur Wand und zu seitlich benachbarten Möbeln auf. Befindet sich ein Küchenschrank oberhalb des Kühlschranks, muss zwischen Regal und Wand eine Lücke von mindestens 5 cm frei bleiben. Dies ist notwendig für eine ausreichende Luftzirkulation um den Kondensator. -
Seite 93: Anschlagseite Der Gerätetür Ändern / Gerät In Schrank Einbauen
INSTALLATION UND ANSCHLUSS Gefahr durch Kälteverbrennung Um Kälteverbrennung zu verhindern, Gefriergut niemals in den Mund nehmen und niemals berühren. Bei einem Defekt oder Stromausfall das Gefrierfach nicht öffnen, es sei denn, das Gerät war länger als die auf dem Typenschild des Geräts angegebenen Stunden (Temperaturanstiegszeit) außer Betrieb. -
Seite 94: Vor Der Ersten Verwendung Des Geräts
VOR DER ERSTEN VERWENDUNG DES GERÄTS Vor der ersten Verwendung des Geräts Lesen Sie die vollständigen Anweisungen für die korrekte und sichere Verwendung des Geräts, bevor Sie das Gerät an die Stromversorgung anschließen. Weil die mitgelieferte Dokumentation für mehrere unterschiedliche Typen und Modelle gleichzeitig konzipiert ist, lässt sich im Einzelfall nicht ausschließen, dass sich bestimmte Anweisungen auf Einstellungen oder Teile beziehen, die an Ihrem Gerät nicht vorhanden sind. -
Seite 95: Beschreibung Des Geräts
BESCHREIBUNG DES GERÄTS Gerät Kühlschrank 1. Bedienleiste 2. CoolFlow+ 3. Glasböden 4. Flaschenablage aus Holz (BottleTray) 5. DuraFresh-Bedienleiste 6. DuraFresh-Schubladen 7. Türablagen Gefrierschrank 8. Gefrierraum-Schubladen 9. Glasboden Beste Position für das Einfrieren frischer Lebensmittel. CoolFlow+ Dieses System sorgt für eine optimale Luftzirkulation, um im gesamten Kühlraum eine möglichst gleichmäßige Temperatur zu erreichen. - Seite 96 BESCHREIBUNG DES GERÄTS Schubladen Mehrere Schubladen sind auf Teleskopschienen montiert und mit einem Soft-Close-Schließmechanismus ausgestattet. Um eine Schublade von der Schiene zu lösen, Schublade vollständig herausziehen. Hintere Seite der Schublade anheben (1). Schublade zum Körper ziehen (2), anschließend Schublade aus den Schienen heben. Um die Schublade wieder auf die Schienen zu setzen, Schienen vollständig herausziehen.
- Seite 97 BESCHREIBUNG DES GERÄTS Flaschenablage aus Holz (BottleTray) Legen Sie die Flaschenablage auf einen der Glasböden. Legen Sie die Flaschen auf die Ablage. Durch die spezielle Form der Ablage wird verhindert, dass die Flaschen seitlich wegrollen. In die Ablage passen maximal drei Flaschen oder sechs Dosen. Eiswürfelbehälter (IceTray) Für die Herstellung von Eiswürfeln befüllen Sie den Behälter mit Wasser und legen ihn in den Gefrierraum.
-
Seite 98: Bedienleiste
A. EIN/AUS-Taste (Kühlraum) Gerät einschalten (kurze Berührung). Beide Geräteräume werden eingeschaltet. ▷ Kühlraum ausschalten (3 Sekunden gedrückt halten). ▷ B. Alarmtaste / WLAN-Taste (modellabhängig, siehe auch „Atag Connect Life“) C. SuperCool-Taste (Intensivkühlung) D. Temperatureinstelltasten (Kühlraum) E. Anzeige der eingestellten Temperatur (Kühlraum) Gefrierschrank Temperatureinstelltasten (Gefrierraum) G. -
Seite 99: Durafresh-Bedienleiste
Einige Geräte lassen sich über ein Smartphone oder Tablet steuern. Diese Geräte haben eine WLAN-Taste. Hinweise zur Verbindungsherstellung finden Sie in der entsprechenden Bedienungsanleitung (Atag Connect Life). Hinweise in dieser Anleitung, die sich auf das Blinken der Alarmtaste beziehen, gelten nicht für die WLAN-Taste. -
Seite 100: Bedienung Des Geräts
BEDIENUNG DES GERÄTS Einschalten der Geräteräume und Einstellung der Temperatur 1. Drücken Sie die EIN/AUS-Taste des Kühlraums. ▷ Alle Geräteräume werden eingeschaltet. 2. Stellen Sie mit den Temperatureinstelltasten die Temperaturen der beiden Geräteräume ein. Die Temperatur des Kühlraums kann auf Werte zwischen +3 °C und +8 °C eingestellt werden. -
Seite 101: Nur Kühlraum Und Durafresh-Raum Ausschalten
BEDIENUNG DES GERÄTS Nur Kühlraum und DuraFresh-Raum ausschalten 1. Halten Sie die EIN/AUS-Taste des Kühlraums 3 Sekunden gedrückt. Kühlraum und DuraFresh-Raum werden ausgeschaltet. Der ▷ Gefrierraum wird nicht ausgeschaltet. DuraFresh Das DuraFresh-Kühlsystem hält Lebensmittel länger frisch. Die Vitamine und Mineralien werden länger erhalten, ebenso Geschmack und Konsistenz. - Seite 102 BEDIENUNG DES GERÄTS Temperatur der DuraFresh-Schubladen einstellen Die Temperatur der oberen DuraFresh-Schublade kann auf die Werte -2, 0, +2 oder +5 °C eingestellt werden. Die Temperatur der unteren Schublade hängt von der Temperatureinstellung der oberen Schublade ab und liegt ungefähr 1 °C bis 2 °C höher. Die Temperatur der oberen DuraFresh-Schublade ist ab Werk auf +2 °C eingestellt.
- Seite 103 BEDIENUNG DES GERÄTS Lebensmittel in den DuraFresh-Schubladen lagern Fleisch Temperatur (°C) Lagerdauer Rind 0 bis 4 bis 3 Wochen Schwein -1 bis 4 3 Tage Geflügel 0 bis 4 3 Tage Lamm 0 bis 4 14 Tage Fisch 0 bis 4 3 bis 10 Tage Fisch, Weichtiere und Krebstiere 0 bis 4...
-
Seite 104: Intensivkühlung (Supercool)
BEDIENUNG DES GERÄTS Intensivkühlung (SuperCool) Dieses Gerät ist mit einer Intensivkühlung ausgestattet. Mit dieser Funktion werden die Temperaturen im Kühlraum und im DuraFresh-Raum so schnell wie möglich abgesenkt. Dies ist ideal für das Kühlen von Produkten, die gerade frisch in den Kühlschrank eingelegt wurden. Verwenden Sie diese Funktion, wenn Sie sehr viele Lebensmittel in das Gerät einlegen. -
Seite 105: Schnellgefrieren (Fastfreeze)
BEDIENUNG DES GERÄTS Schnellgefrieren (FastFreeze) Dieses Gerät ist mit einer Funktion zum Schnellgefrieren ausgestattet. Mit dieser Funktion wird die Temperatur im Gefrierraum so schnell wie möglich abgesenkt. Aktivieren Sie die Funktion 24 Stunden bevor Sie voraussichtlich eine größere Menge Lebensmittel in das Gerät einlegen. Nach der Aktivierung des Schnellgefrierens arbeitet das Gerät mit maximaler Leistung. -
Seite 106: Eco-Funktion
BEDIENUNG DES GERÄTS ECO-Funktion Dieses Gerät ist mit der Funktion „ECO“ ausgestattet. Nach der Aktivierung der ECO-Funktion arbeitet das Gerät mit optimierten Einstellungen. Diese Einstellungen werden auf den Displays angezeigt (5 °C / 2 °C / -18 °C). Die ECO-Funktion bleibt zeitlich unbegrenzt aktiviert, solange sie nicht manuell deaktiviert wird. -
Seite 107: Alarm „Tür Offen
BEDIENUNG DES GERÄTS Alarm „Tür offen“ Steht eine Gerätetür zu lange offen, wird ein Tonsignal wiedergegeben. Auf dem Display blinkt die Alarmtaste. Nach einigen Minuten blinkt auch die Beleuchtung des entsprechenden Geräteraums. Stoppen des Alarms 1. Schließen Sie die Tür des Geräts. ▷... -
Seite 108: Alarm Bei Stromausfall
BEDIENUNG DES GERÄTS Alarm bei Stromausfall Bei einem Stromausfall kann das Gerät nicht kühlen und nicht gefrieren. Nach der Wiederherstellung der Stromversorgung wird die Temperatur im Gerät gemessen. Treten im Gerät zu hohe Temperaturen auf, wird ein Tonsignal wiedergegeben. Die Alarmtaste blinkt. Auf dem entsprechenden Display wird „PF“... -
Seite 109: Lagern Und Einfrieren Von Lebensmitteln
LAGERN UND EINFRIEREN VON LEBENSMITTELN Empfohlene Verteilung Bereiche im Kühlraum • Oberer Bereich: Dosenkonserven, Brot, Wein und Teigwaren etc. • Mittlerer Bereich: Milchprodukte, Fertigmahlzeiten, Desserts, Softgetränke, Bier, gekochte Speisen etc. • DuraFresh-Schubladen: Fleisch, Fleischprodukte, Milchprodukte, Feinkost, Frischobst, Gemüse, Wurzelgemüse, Salat, Zwiebeln, Knoblauch, Weißkohl, Rüben usw. (siehe auch die Tabelle im Kapitel „DuraFresh“). -
Seite 110: Verderben Von Lebensmitteln Vermeiden
LAGERN UND EINFRIEREN VON LEBENSMITTELN Verderben von Lebensmitteln vermeiden Um ein verderben von Lebensmitteln zu vermeiden, beachten Sie bitte die folgenden Hinweise: • Wenn Sie die Tür für längere Zeit öffnen, kann dies zu einer erheblichen Temperaturerhöhung in den Kühlfächern des Geräts führen. •... -
Seite 111: Einfrieren Von Lebensmitteln Im Gefrierschrank
LAGERN UND EINFRIEREN VON LEBENSMITTELN Einfrieren von Lebensmitteln im Gefrierschrank Wichtige Hinweise zum Einfrieren frischer Lebensmittel • Die maximale Menge Lebensmittel, die Sie gleichzeitig in den Gefrierschrank einlegen können, ist auf dem Typenschild angegeben. Wenn Sie größere Lebensmittelmengen in den Gefrierschrank legen, wird der Einfrierprozess verzögert, was zu Qualitätseinbußen führen kann. -
Seite 112: Auftauen Von Gefriergut
LAGERN UND EINFRIEREN VON LEBENSMITTELN • Kaufen Sie keine Lebensmittel mit Rauhreifschicht. Eine solche Schicht darauf hin, dass die Lebensmittel mehrfach aufgetaut oder teilweise aufgetaut waren und deshalb von minderwertiger Qualität sind. • Stellen Sie sicher, dass Lebensmittel nicht während des Transports auftauen. Eine Erhöhung der Temperatur verkürzt die Haltbarkeitsdauer und verringert die Qualität der Lebensmittel. -
Seite 113: Abtauen Des Geräts
PFLEGE Abtauen des Geräts Automatisches Abtauen des Kühlraums Der Kühlraum wird automatisch von Zeit zu Zeit abgetaut. Abtauen des NoFrost-Gefrierschranks Der NoFrost-Gefrierschrank wird automatisch abgetaut. Alle Eisreste verschwinden. Wenn sich im Gefrierraum dennoch Eisreste bilden, kann dies durch ungewöhnliche Nutzung des Geräts verursacht sein (zu häufiges und zu langes Öffnen der Gerätetür oder schlechte Abdichtung der Tür usw.). -
Seite 114: Gerät Reinigen
PFLEGE Gerät reinigen Schalten Sie das Gerät aus und ziehen Sie den Netzstecker, bevor Sie mit der Reinigung beginnen. Keine scheuernden Reinigungsprodukte verwenden, da diese die Oberfläche beschädigen können. Aktivieren Sie das Schnellgefrieren 24 Stunden vor dem voraussichtlichen Reinigen des Gefrierschranks. -
Seite 115: Störungen
STÖRUNGEN Störungstabelle Wenn Sie Zweifel an der Funktion des Geräts haben, muss dies nicht automatisch bedeuten, dass es defekt ist. Wir empfehlen, zuerst die Punkte der folgenden Tabelle zu prüfen. Problem Ursache/Maßnahme Gerät ist mit der Vergewissern Sie sich, dass Steckdose mit Strom versorgt wird. Stromversorgung verbunden, bleibt aber... - Seite 116 STÖRUNGEN Problem Ursache/Maßnahme Kondensation auf • Überprüfen Sie, ob die Gerätetür korrekt verschlossen ist und korrekt dem Glasboden abdichtet. oberhalb der • Dies ist ein vorübergehendes Problem, das sich bei hohen Schubladen im Umgebungstemperaturen und hoher Luftfeuchtigkeit nicht vollständig Kühlraum. vermeiden lässt.
- Seite 117 STÖRUNGEN Problem Ursache/Maßnahme Gerät macht • Das Gerät wird mit einem Kühlsystem mit Kompressor gekühlt. Einige Geräusche. Modelle haben auch einen Ventilator. Beide Komponenten arbeiten nicht vollkommen geräuschlos. Der Geräuschpegel hängt von der Aufstellung des Geräts, seiner korrekten Nutzung und seinem Alter ab. •...
-
Seite 118: Umweltschutz
UMWELTSCHUTZ Entsorgung von Gerät und Verpackung Bei der Herstellung dieses Geräts wurden nachhaltige Materialien verwendet. Nach Ablauf seiner Nutzungsdauer muss das Gerät umweltgerecht entsorgt werden. Informationen zur Entsorgung erhalten Sie von den zuständigen Behörden. Siehe auch Abschnitt „Entsorgung“ in den Sicherheitshinweisen. Die Verpackung des Geräts ist wiederverwertbar. - Seite 119 DE 39...
- Seite 120 Die Bedienungsanleitung finden Sie auch auf unserer Internetseite: www.atag.nl www.atag.be *600137* 600137...
- Seite 121 Instructions for use Refrigerator with freezer KD85178BF KD85178BFC KD84178BFC...
- Seite 122 CONTENTS Your refrigerator with freezer Introduction Safety instructions Installation and connection Selecting the location Connecting the appliance Changing the side on which the door opens / building the appliance into a cupboard Before using the appliance for the first time Before you use the appliance for the first time Energy-saving advice Description of the appliance...
- Seite 123 CONTENTS Storing and freezing food Recommended distribution Avoid contamination of food Storing fresh food in the refrigerator Freezing and storing foods in the freezer Thawing frozen food Maintenance Defrosting the appliance Cleaning the appliance Faults Faults table Environmental aspects Disposal of packaging and appliance Pictograms used Important information Warning;...
-
Seite 124: Your Refrigerator With Freezer
YOUR REFRIGERATOR WITH FREEZER Introduction Congratulations on choosing this Atag refrigerator with freezer. This product is designed with simple operation and optimum comfort in mind. These instructions for use explain how you can make best use of this appliance. These instructions contain information about the operation of the appliance and background information that may be of help to you during its use. -
Seite 125: Safety Instructions
SAFETY INSTRUCTIONS Before the installation and use of the appliance, carefully read the supplied instructions. The manufacturer is not responsible if an incorrect installation and use causes injuries and damages. Always keep the instructions with the appliance for future reference. Safety of children and vulnerable people •... -
Seite 126: General Safety
SAFETY INSTRUCTIONS General safety • The lamp in this household appliance is only suitable for illumination of this appliance. The lamp is not suitable for household room illumination. • WARNING! This appliance is intended to be used in household and similar applications such as –... - Seite 127 SAFETY INSTRUCTIONS Installation • WARNING! This appliance should only be connected by a registered installer. • Remove all the packaging. • Do not install or use a damaged appliance. • Obey the installation instruction supplied with the appliance. • Always be careful when you move the appliance because it is heavy.
-
Seite 128: Electrical Connection
SAFETY INSTRUCTIONS Electrical connection • WARNING! Risk of fire and electrical shock. • The appliance must be earthed. • All electrical connections should be made by a qualified electrician. • Make sure that the electrical information on the rating plate agrees with the power supply. -
Seite 129: Care And Cleaning
SAFETY INSTRUCTIONS • WARNING! Risk of injury, burns, electrical shock or fire. • Do not change the specification of this appliance. • Do not put electrical appliances (e.g. ice cream makers) in the appliance unless they are stated applicable by the manufacturer. - Seite 130 SAFETY INSTRUCTIONS Disposal • WARNING! Risk of injury or suffocation • Disconnect the appliance from the mains supply. • Cut off the mains cable and discard it. • Remove the door to prevent children and pets to be closed inside of the appliance. •...
-
Seite 131: Installation And Connection
INSTALLATION AND CONNECTION Selecting the location • Place the appliance in a dry and well aired room. The permitted ambient temperature range for the appliance depends on the appliance's climate class, which is shown on the type plate. • Do not place the appliance near a source of heat, such as a gas cooker, radiator or boiler, etc., and do not expose it to direct sunlight. -
Seite 132: Connecting The Appliance
INSTALLATION AND CONNECTION • The appliance must be placed at a distance of about 5 cm from the wall, back and sides of a cupboard. A kitchen cupboard above the refrigerator must have a gap of at least 5 cm between the back of the cupboard and the wall. -
Seite 133: Changing The Side On Which The Door Opens / Building The Appliance Into A Cupboard
INSTALLATION AND CONNECTION Freeze burn hazard To avoid freeze burn, never put frozen food in your mouth and do not touch frozen food. In the event of a defect or power cut, do not open the freezer compartment unless the appliance has been out of operation for more than the hours indicated on the appliance’s type plate (temperature rise time). -
Seite 134: Before Using The Appliance For The First Time
BEFORE USING THE APPLIANCE FOR THE FIRST TIME Before you use the appliance for the first time Do not connect the appliance to the mains until you have carefully read the instructions for the correct and safe use of the appliance. As these instructions are for various types and models, it is possible that the instructions for use refer to settings or parts that are not available on your appliance. -
Seite 135: Description Of The Appliance
DESCRIPTION OF THE APPLIANCE Appliance Refrigerator 1. Control panel 2. CoolFlow+ 3. Glass shelves 4. Wooden bottle rack (BottleTray) 5. DuraFresh control panel 6. DuraFresh drawers 7. Door compartments Freezer 8. Freezer drawers 9. Glass shelf Best location for freezing fresh food. CoolFlow+ This system creates optimal air circulation to keep the temperature constant throughout the entire refrigerator compartment. - Seite 136 DESCRIPTION OF THE APPLIANCE Drawers A number of drawers are mounted on fully extending telescopic rails and are fitted with a soft-close system. To remove a drawer from the rails, pull the drawer fully out. Lift the back of the drawer (1). Pull the drawer to you (2) and then lift the drawer from the rails.
- Seite 137 DESCRIPTION OF THE APPLIANCE Wooden bottle rack (BottleTray) Lay the bottle rack on one of the glass shelves and put the bottles on the rack. The rack is shaped to stop the bottles rolling sideways. The rack holds a maximum of three bottles or six cans. Ice cube tray (IceTray) To make ice cubes, fill the tray with water and lay it horizontally in the freezer.
-
Seite 138: Control Panel
Switch on the appliance (short touch); both compartments are turned on. ▷ Switch off the refrigerator compartment (touch for three seconds). B. Alarm key / WiFi key (depends on model, see also ‘Atag Connect Life’) C. SuperCool key (intensive cooling function) D. Temperature adjustment keys (refrigerator compartment) E. -
Seite 139: Durafresh Control Panel
Some appliances can be controlled remotely using a smartphone or tablet. These appliances are equipped with a WiFi key. Instructions on making the connection are given in separate instructions for use (Atag Connect Life). References in these instructions to the alarm key that begins to flash are not applicable to the WiFi key. -
Seite 140: Operating The Appliance
OPERATING THE APPLIANCE Switching on all compartments and setting the temperature 1. Touch the On/Off key of the refrigerator compartment. All compartments turn on. ▷ 2. Use the adjustment keys to adjust the temperature of the compartments. The temperature of the refrigerator compartment can be set to between +3 °C and +8 °C. The temperature of the top DuraFresh drawer can be set to -2, 0, 2 or 5 °C. -
Seite 141: Switching Only The Refrigeration And Durafresh Compartments Off
OPERATING THE APPLIANCE Switching only the refrigeration and DuraFresh compartments off 1. Touch the On/Off key of the refrigerator compartment for three seconds. ▷ The refrigerator compartment and DuraFresh compartment turn off. The freezer compartment is not turned off. DuraFresh The DuraFresh refrigeration system keeps food fresh for longer. - Seite 142 OPERATING THE APPLIANCE Selecting the temperature in the DuraFresh drawers The temperature of the top DuraFresh drawer can be set to -2, 0, 2 or 5 °C. The temperature of the bottom drawer depends on the temperature setting of the top drawer and is about 1 to 2 °C higher.
- Seite 143 OPERATING THE APPLIANCE Storing food in the DuraFresh drawers Meat Temperature, °C Storage life Beef 0 to 4 to 3 weeks Pork -1 to 4 3 days Poultry 0 to 4 3 days Lamb 0 to 4 14 days Fish 0 to 4 3 to 10 days Fish, molluscs and crustaceans...
-
Seite 144: Intensive Cooling (Supercool)
OPERATING THE APPLIANCE Intensive cooling (SuperCool) This appliance has an intensive cooling function. This function decreases the temperatures in the refrigeration compartment and DuraFresh compartment as quickly as possible. This is ideal for cooling products that have just been put into the refrigerator. Use this function when you put a large quantity of food in the appliance. -
Seite 145: Intensive Freezing (Fastfreeze)
OPERATING THE APPLIANCE Intensive freezing (FastFreeze) This appliance has an intensive freezing function. This function decreases the temperature in the freezer compartment as quickly as possible. Activate this function 24 hours before you put a large quantity of fresh food in the appliance. When the intensive freezing function is selected, the appliance works at maximum capacity. -
Seite 146: Eco Function
OPERATING THE APPLIANCE ECO function This appliance has an ECO function. When the ECO function is selected, the appliance works with the optimum settings. These settings are shown in the displays (5 °C / 2 °C / -18 °C). The ECO function has no time limit and remains activated until the function is disabled. -
Seite 147: Open Door Alarm
OPERATING THE APPLIANCE Open door alarm An alarm signal sounds when a compartment door is open for too long. The alarm key flashes in the display. The lighting of the relevant compartment will begin to flash after a few minutes. Stopping the alarm 1. -
Seite 148: Power Failure Alarm
OPERATING THE APPLIANCE Power failure alarm The appliance cannot cool/freeze during a power failure. Once the power has been restored, the temperature in the appliance will be measured. A signal will sound when the temperature in the appliance is too high. The alarm key will flash and ‘PF’ (Power Failure) will be shown in the relevant display. -
Seite 149: Storing And Freezing Food
STORING AND FREEZING FOOD Recommended distribution Sections of the refrigeration compartment • Upper section: canned food, bread, wine and pastas, etc. • Middle section: dairy products, ready-to-cook meals, desserts, soft drinks, beer and cooked food, etc. • DuraFresh drawers: meat, meat products, dairy products, delicatessen products, fresh fruit, vegetables, root vegetables, salads, onions, garlic, cabbage and swedes/turnips, etc. -
Seite 150: Avoid Contamination Of Food
STORING AND FREEZING FOOD Avoid contamination of food To avoid contamination of food, please respect the following instructions: • Opening the door for long periods can cause a significant increase of the temperature in the compartments of the appliance. • Regularly clean surfaces that can come in contact with food and accessible drainage systems. -
Seite 151: Freezing And Storing Foods In The Freezer
STORING AND FREEZING FOOD Freezing and storing foods in the freezer Important recommendations for freezing fresh food • The maximum quantity of food that you can put in the freezer in one go is stated on the type plate. Putting more than this maximum quantity of food into the freezer will slow the freezing process and reduce the quality. -
Seite 152: Thawing Frozen Food
STORING AND FREEZING FOOD Recommended storage times of frozen food in the freezer Type of food Storage life Fruit, beef 10 to 12 months Vegetables, veal, poultry 8 to 10 months Venison 6 to 8 months Pork 4 to 6 months Finely chopped or minced meat 4 months Bread, pastas, cooked dishes, whitefish... -
Seite 153: Defrosting The Appliance
MAINTENANCE Defrosting the appliance Automatic defrost of the refrigeration compartment The refrigeration compartment defrosts automatically from time to time. Defrosting of the NoFrost freezer The NoFrost freezer defrosts automatically. Any frost deposits will then disappear. Any ice or frost deposits that nevertheless form in the freezer compartment can be caused by unusual use of the appliance (opening the door too often and too long or poorly sealing door, etc.). -
Seite 154: Cleaning The Appliance
MAINTENANCE Cleaning the appliance Switch off the appliance and remove the plug from the socket before you start cleaning it. Do not use abrasive cleaning agents, as they can damage the surface. Activate the intensive freezing function 24 hours before you plan to clean the freezer. •... -
Seite 155: Faults Table
FAULTS Faults table When you have any doubts about whether your appliance is working properly you should not immediately assume that it is defective. We recommend that you should in any case check the points in the following table. Problem Cause/Solution Appliance is Check that the socket is live and that the appliance is switched on. - Seite 156 FAULTS Problem Cause/Solution Alarm key and/or • The door has been opened for too long or too frequently. temperature • The door does not seal properly (the seal is dirty, the door is display flashing. misaligned or the seal is damaged, etc.). •...
- Seite 157 FAULTS Problem Cause/Solution Error code E1, E2 A temperature sensor is defective. Call the service centre to make an or E3 shown in the appointment for repair work. The appliance operates in the safe mode display. until it has been repaired. The appliance automatically retains the most suitable temperature for each compartment.
-
Seite 158: Environmental Aspects
ENVIRONMENTAL ASPECTS Disposal of packaging and appliance This appliance is made from sustainable materials. This appliance must be disposed of in a responsible manner at the end of its service life. Contact the local authorities for information about the method. See also the chapter ‘Disposal’... - Seite 159 EN 39...
- Seite 160 The instructions for use can also be found on our website: www.atag.nl www.atag.be *600107* 600107...