Mounting Dream MD5402 Bedienungsanleitung
Vorschau ausblenden
Andere Handbücher für MD5402:
- Montageanleitung (17 Seiten) ,
- Installationsanleitung (17 Seiten)

Verwandte Anleitungen für Mounting Dream MD5402


Inhaltszusammenfassung für Mounting Dream MD5402
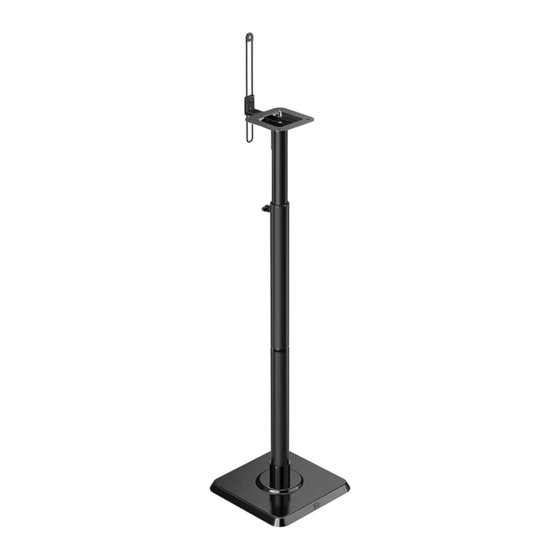
- Seite 1 INSTALLATION INSTRUCTION MODEL : MD5402 Please read this instruction carefully before installation . Weight capacity: 5 kg (11 lbs) . (C1)
- Seite 2 Seguridad Advertencia: ¡Gracias por elegir el montaje soporte sueño altavoz ti. Para la aplicación segura de modelo MD5402, y prevenir a sí mismo oa otros de peligro o pérdida de propiedad, por favor lea este manual antes de usar. Si no entiende estas instrucciones o si tiene alguna duda sobre la seguridad de la instalación, por favor póngase en contacto con el contratista calificado o montaje de servicio al cliente Sueño.
- Seite 3 Installation tools: 2M 2M Band tape Open-end wrench Screwdriver 1/8" Electrodrill Part list : A--Base B--Bottom tube C--Adjusting tube D--Speaker attachment 2 pcs 2 pcs 2 pcs unit 2pcs Hardware for stand assembly F--M6 Carpet Nail G- -M6 Carpet Nut H--M6X12 bolt 8pcs 8pcs...
- Seite 4 Step 1 Choose rubber feet or carpet nails according to your floor type . Option One: Rubber feet for wooden, cement, tile or other hard floor. Adjust the rubber feet to level/adjust the base if the base is not level. Adjustable foot Option Two: If the stand is placed on carpet, spin to loosen and remove the...
- Seite 5 Step 2 Insert bottom tube (B) into base (A), then fasten bolt (I) by using Allen key (J). Step 3 Insert Adjusting tube (C) into bottom tube (B) and use Allen key (J) to fasten bolt (I).
- Seite 6 Step 4 Insert the Speaker attachment unit (D) into the Adjusting tube (C) and fasten it by bolt (H). Wire Step 5 Attach speaker to assembled stand Option 1: Speaker installation hole distance is below 300mm/13in from the bottom According to your speaker's installation hole, choose bolt L/M,washer(P) and spacer (Q) ( as Figure 1 and Figure 2 shows) to attach it .
- Seite 7 Option 2: Speaker with a key hole Attach key hole bolt (N) to the assembled iron wire with butterfly nut (O). Place speaker on stand with key hole bolt (N) inserted in the key hole, then tighten the butterfly nut (O) and plug the wires.
- Seite 8 Option 3: Speaker with a wooden base and has no installation holes at all. Use wood screws (NOT provided in the package) to mount the speaker. Mark holes on bottom of speaker and drill holes, attach speaker onto speaker stand. Electrodrill Screwdriver Step 6...
- Seite 9 Product dimensions: 60 ~ 120mm 41 ~ 330mm 120mm MAX:1078mm 250mm MIN:826mm 250mm...
-
Seite 10: Sicherheitshinweise
Um mögliche Körperverletzungen und Sachschäden zu vermeiden, bitte lesen Sie diese Anleitung vor der Installation sorgfältig durch. ● Wenden Sie dieses Produkt nicht zu einem von Mounting Dream nicht angegebenen Zweck an. ● Unsachgemäße Montage führte möglicherweise zu Verletzung oder Beschädigung an Ihrem Gerät. - Seite 11 Schritt 5 Befestigen Sie den Lautsprecher am Lautsprecherständer Option 1 Der Abstand zwischen die Montagelöcher und die Unterseite des Lautsprechers beträgt weniger als 330mm / 13 zoll Siehe Seite 4 Für Montagelöcher an der Flach Platte: Verwenden Sie bitte die Schraube (L/M), Abstandhalter (Q) zu montieren.
-
Seite 12: Consignes De Sécurité
● N'utilisez pas ce produit pour des autres objectifs non désignés par Mounting Dream. ● L'installation incorrecte causera le dommage matériel ou la blessure corporelle. Mounting Dream n'assumera aucune responsabilité pour le dommage et la blessure causés par l'installation incorrecte ou l'utilisation inadéquate. Instruction d'installation AVERTISSEMENT : Ce produit contient des petites pièces, en cas d'ingestion,... - Seite 13 Pour le trou de vis sur le plan : Utilisez une vis (L/M), une entretoise (Q) pour l'installation. Pour le trou d'insertion : Utilisez une vis (L/M) et une entretoise (Q) une rondelle (P) pour l'installation. Option 2 Haut-parleur avec trou de serrure Voir à...
-
Seite 14: Advertencias De Seguridad
● La instalación incorrecta puede producir daños al producto o lesiones al usuario. Cualquier pérdida o daño debido por la mala instalación o uso indebido, Mounting Dream no asume ninguna responsabilidad. Instrucciones paso a paso de su instalación Advertencia: Este producto contiene piezas pequeñas, si por error se ingiere, puede provocar peligro de asfixia. - Seite 15 Para el orificio del tornillo están en el plano: Instale con tornillo (L/M), separador (Q). Para los avellanados: Instale con tornillo (L/M) y separador (Q) y junta (P). Opción 2 Altavoz con orificio de cucúrbita Ver página 5 ① Instale el tornillo del orificio de cucúrbita (N) en la unidad de conexión del altavoz ensamblada con tuerca (O).
-
Seite 16: Istruzioni Di Installazione
Proteggere te stesso o gli altri dal pericolo o dalla perdita di proprietà. Leggi attentamente le istruzioni prima di installazione. ● Non applicare questo prodotto ad altri scopi non indicati da Mounting Dream. ● L'installazione errata potrebbe causare danni al prodotto o lesioni personali. - Seite 17 Per i fori sulla superficie piana: Montare con vite (L/M), distanziatore (Q) . Per fori di inserto: Montare con vite (L/M) e distanziatore (Q) e rondella (P). Opzione 2 Un altoparlante con un buco di serratura Vedi pagina 5 ① Attaccare la vite per buco di serratura (N) all'unità...