Herunterladen Inhalt Inhalt Diese Seite drucken
Scosche MAGICMOUNT CHARGE CD Anleitung

Scosche MAGICMOUNT CHARGE CD Anleitung

Kabellose magnetische cd-auflade einschubhalterung

Werbung

Verfügbare Sprachen

Verfügbare Sprachen

Register your product onllM at
MAGICMOUNT
WIRELESS CHARGING
MAGNETIC CD SLOT MOUNT
READ INSTRUCTIONS COMPLETELY BEFORE
INSTALLING THIS MOUNT KIT.
WARNING: Do not use the magnetic mount with any hard-drive
based devices such as: iPod classic, iPod video and Zune MP3
players. Use caution whenever removing or handling plastic parts
of any vehicle. Unnecessary force or pressure can cause pieces
to crack or break. Please use a plastic card to remove the metal
plates. Remove adhesive residue w�h a non-abrasive cleaner.
AIRBAG WARNING: Do not place this pad, or any other object,
on or near the airbag. In the event of deployment, objects
placed on or near airbag could cause serious injury.
Caution: This magnetic mount is not a toy. The small magnets are
@
harmful if swallowed. Keep away from children.
IF YOU NEEO ASSISTANCE OR REPLACEMENT PARTS
CALL US TOLL
HOURS MON-FRI 8AM-5:30PM (PS1J
©2019 SCOSCHE INDUSTRIES, INC.
www.scosche.com/register
IMPORTANT!
DO NOT RETURN PRODUCT
TO THE RETAILER
FREE:
1-800-363-4490 X1
SATURDAY 8AM-2PM (PS1J
SI 300MQ2CD/MP02CD 3/19
MQ2CD/
MPQ2CD
CHARGE CD

Werbung

Inhaltsverzeichnis
loading

Inhaltszusammenfassung für Scosche MAGICMOUNT CHARGE CD

  • Seite 1 Keep away from children. IMPORTANT! DO NOT RETURN PRODUCT TO THE RETAILER IF YOU NEEO ASSISTANCE OR REPLACEMENT PARTS FREE: CALL US TOLL 1-800-363-4490 X1 HOURS MON-FRI 8AM-5:30PM (PS1J SATURDAY 8AM-2PM (PS1J ©2019 SCOSCHE INDUSTRIES, INC. SI 300MQ2CD/MP02CD 3/19...
  • Seite 2: Parts Included

    PARTS INCLUDED (1) Magnetic mount with wireless charging and CD slot mount (1) Large single plate with template guide for mounting to device (2) Small metal plates with template guide for mounting to case (1) Car power adapter (1) Micro-USS to USB charge cable (2) Wire clips (1) Cleaning wipe MAGICPLATE...
  • Seite 3 � I ' '; l � a �...
  • Seite 4 . ; � -, , � -c::�� � . � ™ MAGICPLATE MOUNTING OPTIONS NOTE: For mounting directly to device, use the large 1. Remove paper �. backing from the plate. '® � 2. Line up the corresponding arrows on the template guide to the bottom of your phone.
  • Seite 5 Slowly lift up and remove the plate. Do not use any heat or liquids to remove the plate, due to risk of damaging your phone. Contact Scosche Customer Service for any additional assistance at 800.363.4490 Ext. 1 or customerservice@scosche.com.
  • Seite 6 (D), and slide T-notch hitch down (E) to release mounting plate from holder (F). INSTALLING THE CD SLOT MOUNT Note: The MAGICMOUNT CHARGE CD is not recommended for car stereos · \;;; "- with removable faceplates. 1. Insert the mounting base into .__,...
  • Seite 7 WIRELESS CHARGING Plug the magnetic mount into your vehicle's 12V socket using the included micro-USB to USB cable and 12V power adapter as shown (A & B). The LED indicator on the top of the mount (C) illuminates as follows: ..
  • Seite 8: Fcc Statement

    This equipment complies with IC RSS-102 radiation exposure limits set forth for an uncontrolled environment. This transmitter must not be co­ located or operating in conjunction with any other antenna or transmitter. For complete warranty details, please visit us at www.scosche.com or call (800) 363-4490...
  • Seite 9 Enregistrez votre produit en ligne 8 MQ2CD/ MPQ2CD MAGICMOUN1 CHARGE CD SUPPORT MAGNETIQUE DE FENTE CD AVEC CHARGEMENT SANS FIL LISEZ LES INSTRUCTIONS COMPLETEMENT AVANT D'INSTALLER CET ENSEMBLE DE SUPPORT. MISE EN GARDE : Ne pas employer la fixation magnetique avec...
  • Seite 10 LES PIECES COMPRENNENT (1) Support magnetique avec chargement sans fil et support pour fente CD (1) Grande plaque unique avec guide gabarit destinee au montage d'un appareil (2) Petites plaques metalliques avec guide gabarit pour le montage a l'etu (1) Adaptateur d'alimentation pour voiture (1) Micro-USB to USB charge cable (1) Pellicule de protection (2) Serre-fils...
  • Seite 11 � I ' '; l � a �...
  • Seite 12 OPTIONS DE MONTAGE MAGICPLATE REMARQUE : Pour le montage directement sur l'appareil, utilisez la grande plaque unique avee le guide garabit comme illustre. protectrice de la plaque. ',�=•�"� ��.,,--- � 2. Alignez les fleches correspondantes sur le guide gabarit au bas de votre telephone. 3.
  • Seite 13 Soulevez lentement puis enlevez la plaque. Ne pas utiliser de chaleur ou de liquides pour eliminer la plaque, en raison du risque d'endommager votre telephone. Contactez le service la clientele de Scosche pour toute assistance supplementaire au 800.363.4490 Ext 1 ou customerservice@scosche.com. RECOMMANDATIONS POUR...
  • Seite 14 FIXER LE SUPPORT UNIVERSEL lnserez l'attelage avec entaille en T dans l'ouverture de l'entaille en T sur l'arriere du support (A). Glissez l'entaille en T vers l'avant et vers le haul dans la fente (8) pour verrouiller la plaque de montage en place.
  • Seite 15: Chargement Sans Fil

    CHARGEMENT SANS FIL Branchez le support magnetique dans la prise de 12 V de votre vehicule l'aide du cable Micro-USS USS et de l'adaptateur de 12 V tel qu'illustre En option : Fixez les (A et 8). L'indicateur attaches adhesives DEL sur le haut du incluses (0) sur le tableau support (C) s'allume...
  • Seite 16 Ce materiel est conforme aux llmltes de dose d'exposltlon aux rayonnements le rss-102 enoncees pour un autre envlronnement.cet emetteur ne dolt pas lltre sltuees ou operant conjointement avec toute autre antenne ou I'801etteur. Pour les details complets de la garantie, veuillez visiter noire site www.scosche.com ou composer le (800) 363-4490...
  • Seite 17 Registre su producto por internet en MQ2CD/ @ SCDSCI-IE' MPQ2CD MAGICMOUNT" CHARGE CD SOPORTE MAGNETICO PARA RANURA CD CON CARGADOR INALAMBRICO LEA LAS INTRUCCIONES COMPLETAMENTE ANTES DE INSTALAR ESTE SOPORTE. ADVERTENCIA: No utilice el soporte magnetico con todos los dispositivos de disco duro basado tales coma: iPod classic, iPod de video y reproductores de MP3 Zune.
  • Seite 18 PARTES INCLUIDAS (1) Montaje magn8tico con cargador inalAmbrico y montaje para ranura de CD (1) Placa grande con plant a gufa para montar al dispositivo (2) Pequef\as placas metalicas con plantilla gufa para montarlas en la funda (1) Adaptador de alimentaci6n para auto (1) Cable de carga micro-USB a USB (2) Ganchos para cable (1) Paiio de limpieza...
  • Seite 19 � I ' '; l � a �...
  • Seite 20 OPCIONES DE MONTAJE MAGICPLATE NOTA: Para instalarlo directamente en el dispositivo, utilice la placa grande con la plantilla gufa como se indica. � 1. Remueva el papal protector de la placa. '® 2. Ahnee las flechas correspond,entes de la plant,lla guia con la parte ,nfenor del telefono. 3.
  • Seite 21 Levante lentamente la placa y remuevala. No utilice calor o Jfquidos para remover la placa, debido al riesgo de dai\ar el telefono. P6ngase en contacto con el Servicio de Atenci6n al Cliente de Scosche para cualquier asistencia adicional al 800.363.4490 Ext. 1 o customerservice@scosche.com. RECOMENDACIONES...
  • Seite 22 INSTALACION DEL MONTAJE PARA RANURA CD · \;;; " Nota: No le recomendarnos el .__, MAGICMOUNT CHARGE CD para estereos con el frente removible. � 1. lnserte la base de , '.___.- montaje dentro de la ranura para CD del estereo de su auto (A).
  • Seite 23 CARGADOR INALAMBRICO Enchufe la base magnetica en el enchufe de 12 V de su vehiculo con el cable micro-USS a USB y el adaptador de 12 V incluidos como se muestra (A y B). El LED Opclonal: Coloque los indicador de la parte ganchos autoadhesivos superior de la base (C) se incluidos (D) en el...
  • Seite 24 Esta equipo cumple con los limites de exposici6n a la radiaci6n IC RSS- 102 establecidos para un entorno no controlado. Este transmisor no debe ubicarse ni funcionar conjuntamente con ninguna otra antena o transmisor. Por detalles acerca de la garantia completa, visite www.scosche.com o Harne al (800) 363-4490...
  • Seite 25: Wichtiger Hinweis

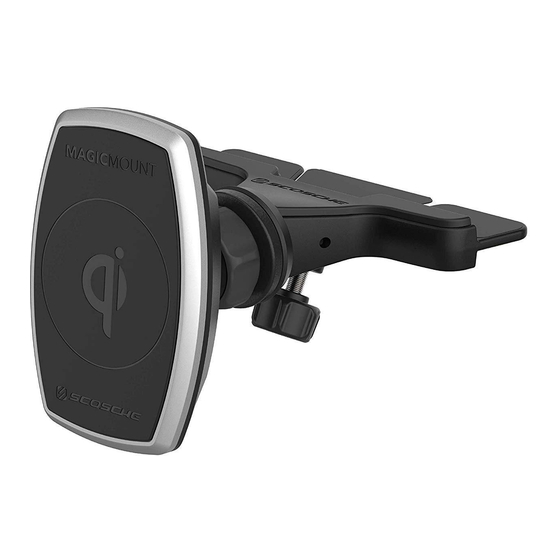
    Reglstrleren Sle 1hr Produkt onllne unter MQ2CD/ MPQ2CD ™ MAGICMOUNT CHARGE CD KABELLOSE MAGNETISCHE CD­ AUFLADE EINSCHUBHALTERUNG LESEN SIE DIE ANLEITUNGEN VOLLSTA.NDIG DURCH BEVOR SIE DAS MONTAGE-KIT ANBRINGEN. WARNUNG: Verwenden Sie nicht die Magnethaiterung mil alien Festplatten-basierten Geriiten wie: iPod classic, iPod Video•und MP3•Player Zune.
  • Seite 26 MITGELIEFERTE TEILE (1) Magnethal t erung mit kabel l osem Aufl a den und CD-Einschubhalterung GroBe Einzel p l a tte m� VorlagenfOhrung zur Befestigung am Gerlit (2) Kleine Metal p l a tten m� Vorl a genfOhrung zur Befestigung am Gehause (1) Fahrzeug-Netzadapter Mik ro-USB zu USB-Ladekabel (2) Drahtclips...
  • Seite 27 � I ' '; l � a �...
  • Seite 28 MAGICPlATE™ BEFESTIGUNGSMOGLICHKEITEN ANMERKUNG: Zur direkten Befestigung am Geriit, verwenden Sie die groBe Einzelplatte mit Vorlagenfiihrung, wie abgebildet. ' � =���1: 2. Richten Sie die entsprechenden Pfe,le an der '� Vorlagenfiihrungauf die Unterseite lhres Telefons aus. 3. Wenn die Platte aufliegt, heften Sie sie sicher durch krilftiges Drucken an.
  • Seite 29: Entfernen Der Metalplatte

    Die Platte langsam abheben und entfernen. Verwenden Sie zum Entfernen der Platte keine Hitze oder Flussigkeiten, um ein Beschiidigen lhres Telefons zu vermeiden. Wenden Sie sich fiir weitere Unterstiitzung an den Scosche Kundendienst unter 800.363.4490 Ext. 1 oder customersetvice@scosche.com. MAGICMOUNT ™...
  • Seite 30: Anbringen Der Universalhalterung

    (E), um die � Befest1gungsplatte von der Halterung zu 16sen (F). INSTALLIEREN DER MAGNETISCHEN CD-EINSCHUBHALTERUNG Hinweis: Die MAGICMOUNT CHARGE CD wird nicht fOr Autoradios mit abnehmbaren Frontplatten empfohlen. 1. Schieben Sie die Montageplatte in den C---' CD-Einschub lhres Autoradios (A).
  • Seite 31 DRAHTLOSES LADEN Stacken Sie die Magnethalterung in die 12V Steckdose lhres Fahrzeugs, indem Sie das mijgelieferte Micro-USB zu USB-Kabel und I: Befestigen das 12V-Netzteil, wie ie mijgelieferten angezeigt (A & B) ftklammern (D) am benutzen. Die LED-Anzeige maturenbrett oder oben auf der Halterung (C) r Bedienkonsole, um leuchtet folgendermallen auf: as Kabel zu sichern.
  • Seite 32: Fcc-Bestimmungen

    Diese Vorrichtung entspricht den IC RSS-102 Strahlungsgrenzwerten tor eine unkontrollierte Umgebung. Dieser Sender dart nicht gemeinsam mit anderen Antennen oder Sendern aufgestellt oder betrieben werden. Fiir vollstandige Garantiedetails, besuchen www.scosche.com Sie uns bitte unter oder kontaktieren Sie uns unter (800) 363-4490...

Diese Anleitung auch für:

Magicmount mq2cdMagicmount mpq2cd

Inhaltsverzeichnis