Nice HK7024 Gebrauchsanweisung
Vorschau ausblenden
Andere Handbücher für HK7024:
- Installierungs-und gebrauchsanleitungen und hinweise (120 Seiten) ,
- Installierungs-und gebrauchsanleitungen und hinweise (120 Seiten) ,
- Installations- und bedienungsanleitung (44 Seiten)
Inhaltsverzeichnis
Verfügbare Sprachen
Verfügbare Sprachen
Quicklinks
HYKE
HK7024
HK7224
HK7024HS
HK7224HS
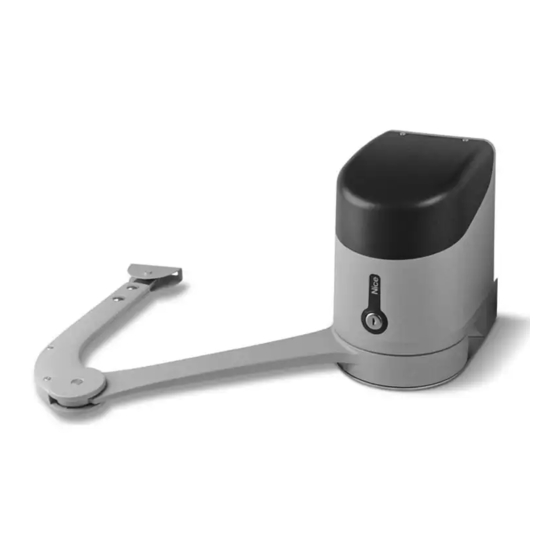
Swing gate opener
EN - Instructions and warnings for installation and use
IT - Istruzioni ed avvertenze per l'installazione e l'uso
FR - Instructions et avertissements pour l'installation et l'utilisation
ES - Instrucciones y advertencias para la instalación y el uso
DE - Installierungs-und Gebrauchsanleitungen und Hinweise
PL - Instrukcje i ostrzeżenia do instalacji i użytkowania
NL - Aanwijzingen en aanbevelingen voor installatie en gebruik
Kapitel
Inhaltsverzeichnis

Verwandte Anleitungen für Nice HK7024


Inhaltszusammenfassung für Nice HK7024
- Seite 1 HYKE HK7024 HK7224 HK7024HS HK7224HS Swing gate opener EN - Instructions and warnings for installation and use IT - Istruzioni ed avvertenze per l’installazione e l’uso FR - Instructions et avertissements pour l’installation et l’utilisation ES - Instrucciones y advertencias para la instalación y el uso DE - Installierungs-und Gebrauchsanleitungen und Hinweise PL - Instrukcje i ostrzeżenia do instalacji i użytkowania...
- Seite 2 210 mm 290 mm...
- Seite 3 90°-95° 95°-100° 100°-105° 90°-95° 95°-105° 105°-110°...
- Seite 4 90° 90°...
- Seite 6 12-A 12-B 90° 90° 90°...
- Seite 7 24V 4W NC NO NO NC P.P. STOP – 24 Vcc FLASH S.C.A. BLUEBUS P.P. STOP OPEN CLOSE...
- Seite 9 L1 L2 L3 L4 L5 L6 L7 L8 OPEN STOP CLOSE...
- Seite 69 3.3 - Vorbereitungen für die Installation ......2 der Arbeiten auf der Abtrennvorrichtung ein Schild mit der Schrift “ACH- 3.4 - Installation des Torantriebs Mod. HK7024 - HK7224 - HK7024HS - TUNG! LAUFENDE WARTUNG” angebracht werden.
-
Seite 70: Installation
3.3 - Vorbereitungen für die Installation • Im Umfeld, in dem das Getriebe installiert wird, muss ausreichend Platz für Die Abb. 3 zeigt ein Beispiel einer Automatisierungsanlage, die mit Nice- die komplette Rotation seines Auslegers sein (siehe Abb. 7). Bestandteilen ausgeführt wurde (einige Bestandteile könnten nicht im Bausatz •... - Seite 71 s) Die Befestigungen der mechanischen Endanschläge platzieren; siehe gezeigt zusammensetzen; 02. Die Position des Torantriebs VERTIKAL festsetzen: Kap. 3.5; Auf dem Pfeiler eine waagrechte Linie auf derselben Höhe anzeichnen, auf t) Phase 10: Dann den Torflügel von Hand auf ca. Laufhälfte verschieben der sich der Befestigungsbügel des Arms am Flügel nach der Installation und den Torantrieb mit dem passenden Schlüssel blockieren (siehe Kap.
-
Seite 72: Einstellung Der Mechanischen Endanschläge
Transponder-Kartenlesegeräte usw.) in der Automatisierung mit – um Gefahren zu vermeiden - über ein System verfügen, das eine unbeabsich- Ste uerung muss über das Nice-Bluebus-System ausgeführt werden. tigte oder nicht autorisierte Einschaltung der Spannungsversorgung blockiert. Die Abtrennvorrichtung wird nicht mit dem Produkt geliefert. -
Seite 73: Verbindung Sonstiger Vorrichtungen
4.5 - Ersteinschaltung und Prüfung der Anschlüsse (motor 2) mechanischen Öffnungsanschlag stößt Nachdem die Steuerung mit Strom gespeist wurde, die folgenden Prüfungen 4.7.1 - Automatisches Einlernen der Steuerung HKA2: Mod. HK7024 vornehmen: und HK7024HS • Nach einigen Sekunden prüfen, ob die Led “Bluebus” (Abb. 16) regelmäßig 01. -
Seite 74: Überprüfung Der Bewegung Der Torflügel
Taste “” oder “u” drücken. zu stoppen. Dann am Torantrieb, der die Öffnungsbewegung ausgeführt hat, die 4.7.3 - Gemischtes Einlernen der Steuerung HKA2: Mod. HK7024 und Polaritäten der beiden Kabel des Torantriebs M1 umkehren (Klemmen 7 und 9), ebenso bei M2 (Klemmen 10 und 12), dann das Verfahren ab Punkt 01 beginnen. -
Seite 75: Programmierung Des Steuergerätes
Anschlüsse, die Analyse der vorhandenen Gefahren und die hierfür noch vorhandenen Restgefahren informiert werden. angewandten Lösungen und die Konformitätserklärung des Herstellers, die Für alle genannten Unterlagen stellt Nice über den eigenen technischen Kun- vom Installateur ausgefüllt wurde. dendienst folgendes zur Verfügung: Gebrauchsanweisungen, Leitfäden und 2 Am Tor ein Schild anbringen, auf dem mindestens die folgenden Daten vorgedruckte Formulare. -
Seite 76: Zweites Niveau: Programmierung (Einstellbare Parameter)
6.2 - Zweites Niveau: Programmierung (einstellbare Parameter) Die Parameter sind auf einer Wertskala von 1 bis 8 einstellbar, zur Prüfung des jeder Led entsprechenden Werts siehe Tabelle 8. WICHTIG – Das Program- Alle Parameter des zweiten Niveaus sind werkseitig programmiert, wie grau in mierungsverfahren weist eine Höchstzeit von 10 Sekunden zwischen dem Druck der Tabelle 5 angegeben ist, und können jederzeit geändert werden, indem einer Taste und dem Druck der nächsten auf. -
Seite 77: Spezielle Funktionen
Wartungsanzeige Regelt die Bewegungsanzahl Wenn diese Nummer über- 1000 schritten wird, ze i gt die Steue- 1500 rung die Anforderung zur War- tung der Automatisierung an, 2500 siehe Abschnitt 6.3.2. - War- 5000 tungsanzeige. 10000 15000 20000 Liste der Störungen Ergebnis 1. - Seite 78 TABELLE 8 - Meldungen der Blinkleuchte (FLASH) Blinken Problem Lösung 1-Mal kurzes Blinken Fehler im System Bluebus Die Überprüfung der an BlueBUS angeschlossenen Vorrichtungen, die zu 1 Sekunde Pause Beginn der Bewegung ausgeführt wird, entspricht nicht den während der Erler- 1-Mal kurzes Blinken nung gespeicherten Vorrichtungen.
-
Seite 79: Weitere Auskünfte
TABELLE 10 - Archiv der aufgetretenen Störungen 01. Mindestens 3 Sekunden lang auf die Taste “Set” drücken und gedrückt halten 02. Die Taste loslassen, wenn die LED “L1” zu blinken beginnt; 03. Die Taste “” oder “u” drücken, um das Blinken auf die LED L8, die “Eingangs-LED” des Parameters oder “Alarmhistorik“... -
Seite 80: Wartung Des Produktes
Für die anderen Vorrichtungen der Anlage, den Angaben der betreffenden War- dukt beim Neukauf eines gleichwertigen Produkt dem Händler. tungspläne folgen. Für die Getriebe HK7024, HK7224, HK7024HS, HK7224HS muss maximal Achtung! – die örtlichen gesetzlichen Regelungen können bei innerhalb 6 Monaten oder nach 20.000 Manövern seit der letzten Instandset- einer gesetzeswidrigen Entsorgung diese Produkts schwere zung eine programmierte Wartung vorgenommen werden. -
Seite 81: Technische Merkmale Des Produkts
TECHNISCHE MERKMALE DES PRODUKTS HINWEISE: • Alle angegebenen technischen Merkmale beziehen sich auf eine Temperatur von 20°C (± 5°C). • Nice S.p.a. behält sich das Recht vor, jederzeit als nötig betrachtete Änderungen am Produkt vorzunehmen, wobei Funktionalitäten und Einsatzzweck beibehalten werden. -
Seite 82: Ce-Konformitätserklärung
Erklärung in Übereinstimmung mit den folgenden Richtlinien: 2006/95/CE (LVD); 2004/108/CE (EMC); 2006/42/CE (MD) Anlage II, Teil B Anmerkun - Der Inhalt dieser Erklärung entspricht den Erklärungen der letzten verfügbaren Revision vor dem Druck dieses Handbuchs des offiziellen Dokuments, das im Sitz Nice Spa hinterlegt ist. -
Seite 115: Anweisungen Und Hinweise Für Den Benutzer
Anweisungen und Hinweise für den Benutzer Bevor man zum ersten Mal die Automatisierung benutzt, sich vom Installateur • Wartung: Um das Sicherheitsniveau immer beizubehalten und die maximale die Ursache der Restgefahren erklären lassen und die Zeit zum Durchlesen die- Haltbarkeit zu gewährleisten ist eine regelmäßige Wartung notwendig (mindes- ser Gebrauchsanweisung und der Hinweise für den Benutzer finden, die vom tens alle 6 Monate). - Seite 120 Nice SpA Oderzo TV Italia www.niceforyou.com info@niceforyou.com...