Herunterladen Inhalt Inhalt Diese Seite drucken

Nice WL1024C Gebrauchsanleitung

Walky serie; elektromechanische getriebe
Vorschau ausblenden Andere Handbücher für WL1024C:
Inhaltsverzeichnis

Werbung

Verfügbare Sprachen
  • DE

Verfügbare Sprachen

  • DEUTSCH, seite 51
WL1024
WALKY
WL1024C
Swing gate opener
EN -
Instructions and warnings for installation and use
IT -
Istruzioni ed avvertenze per l'installazione e l'uso
FR -
Instructions et avertissements pour l'installation et l'utilisation
ES -
Instrucciones y advertencias para la instalación y el uso
DE -
Installierungs-und Gebrauchsanleitungen und Hinweise
PL -
Instrukcje i ostrzeżenia do instalacji i użytkowania
NL -
Aanwijzingen en aanbevelingen voor installatie en gebruik

Werbung

Inhaltsverzeichnis
loading

Inhaltszusammenfassung für Nice WL1024C

  • Seite 1 WL1024 WALKY WL1024C Swing gate opener EN - Instructions and warnings for installation and use IT - Istruzioni ed avvertenze per l’installazione e l’uso FR - Instructions et avertissements pour l’installation et l’utilisation ES - Instrucciones y advertencias para la instalación y el uso...
  • Seite 3: Inhaltsverzeichnis

    WL1024C ........
  • Seite 4: Installation

    - Multi-purpose lamp mod. WLT (to be installed on the gearmotor with con- the environment in which it is to be installed. trol unit mod. WL1024C); see chapter 3.5 and the lamp’s own instruction • Check that all the material to be used is in excellent condition and suitable for manual its intended use.
  • Seite 5: Installation Of The Gearmotor Mod. Wl1024C - Wl1024

    3.4 - Installation of the gearmotor mod. WL1024C - WL1024 5 - Release the gearmotor with the dedicated key (see chapter 3.8). WARNINGS 3.4.2 - Installation of a gearmotor with a STANDARD LENGTH ARM • Failure to install correctly can cause serious injury to the person carry- Important! - This part of the installation can only be carried out after 3.4.1...
  • Seite 6: Installation Of A Gearmotor With A Shortened Arm

    3.5 - Installation of the multi-purpose lamp mod. WLT on the 04. Shorten the slotted arm (fig. 14): gearmotor model WL1024C a) To reduce the length of the slotted arm to value C (as established in point 02-d), unscrew the nut, remove the stop, adjust the two pins so that Warning –...
  • Seite 7: How To Remove The Control Unit

    Nice “Bluebus” system. This system makes it possible to 02. Using a Phillips screwdriver, undo the 4 screws of the cable sleeve support carry out the electrical connections with the use of just 2 wires along which (fig.
  • Seite 8: Initialisation And Connection Check

    4.5 - Addressing the photocells and other BlueBus devices TABLE 2 To allow the control unit to recognise the photocells connected to the Bluebus system, these need to be addressed: correctly position the electric jumper of each device, as shown in fig. 31. To address other devices, refer to the respective instruction manual.
  • Seite 9: Testing

    “gearmotor force” is used as an aid to the system to reduce For all the documentation mentioned, the Nice technical support service the force of impact, try and then find the adjustment that achieves the best provides the following: instruction manuals, guides and precompiled forms.
  • Seite 10: Level Two Programming (Adjustable Parameters)

    6.2 - Level two programming (adjustable parameters) gramming procedure has a maximum time of 10 seconds between one key and another being pressed. After this time, the procedure ends automatically, stor- All level two parameters are programmed at the factory as highlighted in grey in ing the changes made up until that moment.
  • Seite 11: What To Do If

    WHAT TO DO IF... (troubleshooting guide) Some devices are designed to emit signals which help you recognise their pause. Table 10 describes the cause and solution for each type of signal. operating status or any problems. The LEDs on the control unit also emit signals; Table 11 describes the cause If the WLT multi-purpose lamp is connected to the FLASH output on the power and solution for each type of signal.
  • Seite 12: Further Information

    Apartment Building respective maintenance schedules. Step-Step Command even with automation system secured or com- For gearmotors WL1024C, WL1024, scheduled maintenance is required at the high priority mands activated latest 6 months or 20,000 manoeuvres after the previous maintenance work. Partial opening 2...
  • Seite 13: Disposing Of The Product

    PRODUCT TECHNICAL SPECIFICATIONS WARNINGS: • All technical specifications are referred to a room temperature of 20°C (± 5°C). • Nice S.p.a. reserves the right to make any changes deemed nec- essary to the product at any time while maintaining the same functions and intended use.
  • Seite 14: Product Life Span

    Note - The contents of this declaration correspond to the declarations contained in the latest available revision, prior to printing of this manual, of the official document on file at the headquarters of Nice S.p.a. This text was readapted for editorial purposes.
  • Seite 15 è necessario attaccare sul di - motoriduttore modello WL1024C ....... . . 4 spositivo di sconnessione un cartello con la scritta “ATTENZIONE! MANU-...
  • Seite 16: Installazione

    80 mm. • Il braccio del motoriduttore deve essere collocato nella parte alta dell’anta Sul motoriduttore con centrale (mod. WL1024C) è possibile installare la lampa- del cancello. da multifunzione mod. WLT (vedere capitolo 3.5), che può funzionare come luce di segnalazione lampeggiante o luce di cortesia, secondo la programma- ATTENZIONE! - È...
  • Seite 17: Installazione Del Motoriduttore Mod. Wl1024C - Wl1024

    3.4 - Installazione del motoriduttore mod. WL1024C - WL1024 3.4.2 - Installazione del motoriduttore con BRACCIO DI LUNGHEZ- ZA STANDARD AVVERTENZE Attenzione! - Questa installazione può essere eseguita esclusivamente • Un’installazione errata può causare gravi ferite alla persona che esegue dopo aver completato la procedura 3.4.1.
  • Seite 18: Installazione Del Motoriduttore Con Braccio Di Lunghezza Ridotta

    3.5 - Installazione della lampada multifunzione mod. WLT al punto 02-d), svitare il dado, togliere il fermo, distanziare i due perni sul motoriduttore modello WL1024C secondo la quota C e, infine, chiudere il dado in modo provvisorio. 05. Verificare la quota C del braccio asolato rispetto al contesto (fig. 15 - 16): Avvertenza –...
  • Seite 19: Come Estrarre La Centrale Di Comando

    - mostrato in fig. 19, fase 1-2; mando, avviene tramite il sistema “Bluebus” di Nice. Questo sistema, permette 02. Svitare con un cacciavite a stella le 4 viti del supporto passacavi (fig. 20) e di effettuare i collegamenti elettrici con l’utilizzo di soli 2 conduttori sui quali...
  • Seite 20: Prima Accensione E Verifica Dei Collegamenti

    sui morsetti “P.P. (positivo)” e “STOP (negativo)” (fig. 23). La tensione di alimen- 06. Al termine della manovra di chiusura dei 2 motori (d), i led “L3” e “L4” si tazione va da 18 a 31 Vdc con funzionamento alla tensione di rete o solemyo e spengono ad indicare che la procedura è...
  • Seite 21: Collaudo

    EN 12445 ed Per tutta la documentazione citata, Nice attraverso il proprio servizio di eventualmente, se il controllo della “forza motoriduttore” viene usato come assistenza tecnica, mette a disposizione: manuali d’istruzioni, guide e...
  • Seite 22: Programmazione Secondo Livello (Parametri Regolabili)

    6.2 - Programmazione secondo livello (parametri regolabili) I parametri, sono regolabili su una scala di valori da 1 a 4; per verificare il valore corrispondente ad ogni Led vedere Tabella 8. IMPORTANTE – La procedura di Tutti i parametri del secondo livello sono programmati di fabbrica come eviden- programmazione presenta un tempo massimo di 10 secondi tra la pressione di ziato in colore grigio nella Tabella 8 e possono essere modificate in qualsiasi un tasto e l’altro.
  • Seite 23: Cosa Fare Se

    COSA FARE SE... (guida alla risoluzione dei problemi) Alcuni dispositivi sono predisposti per emettere delle segnalazioni con il quale è vengono ripetuti due volte divisi da una pausa di 1 secondo. Nella Tabella 10 possibile riconoscere lo stato di funzionamento oppure di eventuali anomalie. sono descritte la causa e la soluzione per ogni tipo di segnalazione.
  • Seite 24: Approfondimenti

    Apre parziale 2 Apre parziale (apertura dell’anta M2, pari a metà dell’aper- Per i motoriduttori WL1024C, WL1024 è necessaria una manutenzione pro- tura totale) grammata al massimo entro 6 mesi o 20.000 manovre dalla precedente manu- Apre parziale 3 Apre parziale (apertura delle due ante, pari a metà...
  • Seite 25: Smaltimento Del Prodotto

    CARATTERISTICHE TECNICHE DEL PRODOTTO AVVERTENZE: • Tutte le caratteristiche tecniche riportate, sono riferite ad una temperatura ambientale di 20°C (± 5°C). • Nice S.p.a. si riserva il diritto di appor- tare modifiche al prodotto in qualsiasi momento lo riterrà necessario, mantenendone comunque la stessa funzionalità e destinazione d’uso.
  • Seite 26: Durabilità Del Prodotto

    Nota - Il contenuto di questa dichiarazione corrisponde a quanto dichiarato nell’ultima revisione disponibile, prima della stampa di questo manuale, del documento ufficiale depo- sitato presso la sede di Nice Spa. Il presente testo è stato riadattato per motivi editoriali.
  • Seite 27: Recommandations Et Précautions Générales

    WL1024C ........
  • Seite 28: Installation

    • Le bras de l’opérateur doit être placé dans la partie haute du vantail du portail. Sur l’opérateur avec centrale (mod. WL1024C) il est possible d’installer la lam- ATTENTION ! - Il est interdit de monter l’opérateur dans une position renver- pe multifonctions mod.
  • Seite 29: Installation De L'opérateur Mod. Wl1024C - Wl1024

    3.4 - Installation de l’opérateur mod. WL1024C - WL1024 3.4.2 - Installation de l’opérateur avec BRAS DE LONGUEUR STANDARD RECOMMANDATIONS Attention ! - Cette installation ne peut être effectuée qu’après avoir com- • Une installation incorrecte peut causer de graves blessures aux per- plété...
  • Seite 30: Installation De L'opérateur Avec Bras De Longueur Réduite

    3.5 - Installation de la lampe multifonctions mod. WLT sur trouvée au point 02-d), dévisser l’écrou, retirer la butée, écarter les pivots l’opérateur modèle WL1024C selon la cote C et, enfin, fermer l’écrou de manière provisoire. Recommandation – WLT peut fonctionner comme lumière de signalisation cli- 05.
  • Seite 31: Comment Extraire La Centrale De Commande

    “Bluebus” (fig. 20) et le retirer (attention ! - ne pas perdre les 2 entretoises). de Nice. Ce système permet d’effectuer les branchements électriques avec l’utilisation de seulement 2 connecteurs sur lesquels transite aussi bien l’ali- 03.
  • Seite 32: Premier Allumage Et Contrôle Des Branchements

    4.5 - Adressage des photocellules et d’autres dispositifs TABLEAU 2 BlueBus Afin de permettre à la centrale de reconnaître les photocellules branchées au bornier Bluebus, il est nécessaire d’effectuer leur adressage : positionner cor- rectement la connexion volante électrique présente sur chaque dispositif, com- me montré...
  • Seite 33: Essai

    EN 12445 et éventuellement si le Pour toute la documentation citée, Nice à travers son propre service d’as- contrôle de la “force opérateur” est utilisé comme aide au système pour la sistance technique met à...
  • Seite 34: Programmation Deuxième Niveau (Paramètres Réglables)

    6.2 - Programmation deuxième niveau (paramètres réglables) trô ler la valeur correspondant à chaque Led voir Tableau 8. IMPORTANT – La procédure de programmation présente un temps maximal de 10 secondes Tous les paramètres du deuxième niveau sont programmés en usine et mis en entre chaque pression de touche.
  • Seite 35: Que Faire Si

    QUE FAIRE SI... (guide de résolution des problèmes) Certains dispositifs sont prédéfinis pour émettre des signalisations grâce aux- pétés deux fois avec une pause d1 seconde. Dans le Tableau 10 sont décrites quelles il est possible de reconnaître l’état de fonctionnement ou les éventuelles la cause et la solution pour chaque type de signalisation.
  • Seite 36: Approfondissements

    Ouverture partielle (ouverture des deux vantaux, égale à la moitié de l’ouverture totale) dans les respectifs plans de maintenance. Pour les opérateurs WL1024C, WL1024 est nécessaire une maintenance pro- Ouverture et Provoque une manœuvre d’ouverture et à la fin de celle-ci grammée au maximum dans les 6 mois ou 20.000 manœuvres qui suivent la...
  • Seite 37: Mise Au Rebut Du Produit

    CARACTÉRISTIQUES TECHNIQUES DU PRODUIT RECOMMANDATIONS : • Toutes les caractéristiques techniques reportées se réfèrent à une température ambiante de 20°C (± 5°C). • Nice S.p.a. se réserve le droit d'apporter des modifications au produit, à tout moment et si considérées nécessaires, tout en maintenant les mêmes fonctionnalités et l'utilisation pour laquelle celui-ci est prévu.
  • Seite 38: Durabilité Du Produit

    Remarque - Le contenu de cette déclaration correspond à ce qui est déclaré dans la dernière révision disponible, avant l’impression de ce manuel, du document officiel dépo- sé auprès du siège de Nice Spa. Le présent texte a été réadapté pour des raisons éditoriales.
  • Seite 39: Advertencias Y Precauciones Generales

    WL1024C ........
  • Seite 40: Instalación

    “SM” (SMXI, OXI, etc.). debe ser de 80 mm. En el motorreductor con central (mod. WL1024C) se puede instalar la lámpara • El brazo del motorreductor debe colocarse en la parte alta de la hoja de la multifunción mod. WLT (véase el capítulo 3.5), que puede funcionar como luz puerta.
  • Seite 41: Instalación Del Motorreductor Mod. Wl1024C - Wl1024

    3.4 - Instalación del motorreductor mod. WL1024C - WL1024 3.4.2 - Instalación del motorreductor con BRAZO DE LONGITUD ESTÁNDAR ADVERTENCIAS ¡Atención! - Esta instalación puede realizarse únicamente tras completar • Una instalación incorrecta puede causar graves lesiones a la persona el procedimiento 3.4.1.
  • Seite 42: Instalación Del Motorreductor Con Brazo De Longitud Reducida

    3.5 - Instalación de la lámpara multifunción mod. WLT en los dos pernos según la medida C y, por último, apriete la tuerca de mane- el motorreductor modelo WL1024C ra provisional. Advertencia - La WLT puede funcionar como luz de señalización intermitente o 05.
  • Seite 43: Cómo Extraer La Central De Mando

    19, fase 1-2; central de mando se realiza mediante el sistema “Bluebus” de Nice. Este siste- 02. Desenrosque con un destornillador de estrella los 4 tornillos del soporte pa - ma permite efectuar las conexiones eléctricas usando tan solo 2 conductores...
  • Seite 44: Primer Encendido Y Comprobación De Las Conexiones

    ximadamente con funcionamiento mediante batería compensadora PS424. La TABLA 2 corriente máxima disponible es de 200 mA. Nota – La tensión disponible en los bornes “P.P.” y “STOP” sigue presente incluso cuando se activa la función “Stand By” en la tarjeta. 4.5 - Direccionamiento de las fotocélulas y de otros dispo- Central Hoja que queda superpuesta...
  • Seite 45: Ensayo

    Para toda la documentación citada, Nice pone a su disposición, a través medición de la fuerza conforme a lo previsto por la norma EN 12445 y, en de su servicio de asistencia: manuales de instrucciones, guías y formula-...
  • Seite 46: Programación De Segundo Nivel (Parámetros Regulables)

    6.2 - Programación de segundo nivel (parámetros regulables) comprobar el valor correspondiente a cada Led véase la Tabla 8. IMPORTAN- TE – El proceso de programación presenta un tiempo máximo de 10 segundos Todos los parámetros del segundo nivel vienen programados de fábrica de la entre la presión de un botón y la siguiente.
  • Seite 47: Qué Hacer Si

    QUÉ HACER SI... (guía de resolución de problemas) Algunos dispositivos están preparados para emitir indicaciones que permiten separados por una pausa de 1 segundo. En la Tabla 10 se describen la causa conocer el estado de funcionamiento o de posibles anomalías. y la solución para cada tipo de indicación.
  • Seite 48: Información Detallada

    Abrir parcial (apertura de la hoja M2, equivalente a la mitad en los respectivos planes de mantenimiento. de la apertura total) Para los motorreductores WL1024C, WL1024 es necesario efectuar un mante- Abrir parcial 3 Abrir parcial (apertura de las dos hojas, equivalente a la nimiento programado antes de que transcurran 6 meses o se realicen 20.000...
  • Seite 49: Eliminación Del Producto

    CARACTERÍSTICAS TÉCNICAS DEL PRODUCTO ADVERTENCIAS: • Todas las características técnicas indicadas se refieren a una temperatura ambiente de 20°C (± 5°C). • Nice S.p.a. se reserva el derecho a modificar el producto en cualquier momento que lo considere necesario, manteniendo inalteradas sus funcionalidades y uso previsto.
  • Seite 50: Durabilidad Del Producto

    Nota - El contenido de esta declaración se ajusta a lo declarado en la última revisión disponible, antes de la impresión de este manual, del documento oficial depositado en la sede de Nice Spa. Este texto ha sido readaptado por motivos editoriales.
  • Seite 51: Produktbeschreibung Und Bestimmungszweck

    Modell WL1024C WL1024C ........
  • Seite 52: Installation

    • Prüfen, dass das gesamte zu verwendende Material in einem optimalen Zustand ist und sich für den vorgesehenen Zweck eignet. Die Abb. 2 zeigt das Beispiel einer Automatisierungsanlage mit Bauteilen Nice • Prüfen, dass in der Anlage die mechanischen Arretierungen sowohl bei der (einige Komponenten können auch nicht im Bausatz enthalten sein):...
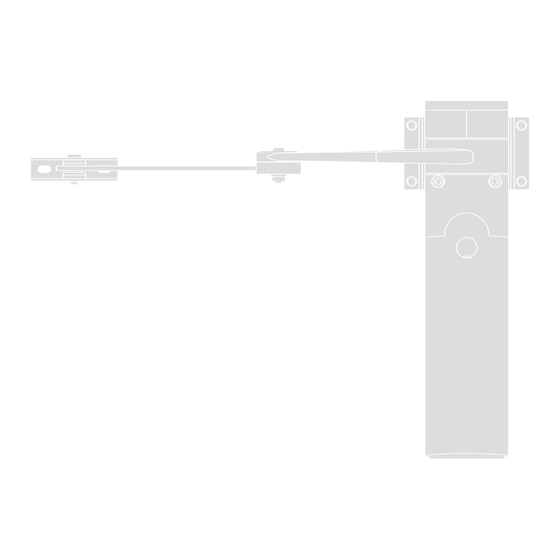
  • Seite 53: Installation Des Getriebes Mod. Wl1024C - Wl1024

    3.4 - Installation des Getriebes Mod. WL1024C - WL1024 3.4.2 - Installation des Getriebes mit AUSLEGER IN STANDARDLÄNGE Achtung! - Diese Installation kann erst nach dem Beenden des Vorgangs HINWEISE 3.4.1 durchgeführt werden. • Eine falsche Installation kann zu schweren Verletzungen der Person, die 01.
  • Seite 54: Installation Des Getriebes Mit Ausleger In Gekürzter Länge

    Punkt 02-d gefunden wurde), die Mutter ausschrauben, die Arretierung 3.5 - Installation der Multifunktionsleuchte Mod. WLT am wegnehmen, die zwei Stifte entsprechend dem Maß C auseinander rücken Getriebe Modell WL1024C und die Mutter provisorisch schließen. Hinweis – WLT kann als Blinklicht oder als Notbeleuchtung eingesetzt werden, 05.
  • Seite 55: Herausnahme Des Steuergerätes

    Schaltkreise beeinträchtigen. rung mit Steuergerät vorhanden sind, erfolgt mit dem “Bluebus”-System von Nice. Dieses System erlaubt die elektrischen Anschlüsse mit Hilfe von nur 2 Lei- 4.3 - Anschluss des Getriebes ohne Steuergerät Mod. WL1024 tern, auf denen die elektrische Versorgung und die Kommunikationssignale wei- tergeleitet werden.
  • Seite 56: Anschluss Der Übrigen Vorrichtungen

    4.4 - Anschluss der übrigen Vorrichtungen • Wenn der erste Motor, der eine Schließung veranlasst nicht M1 ist, eine beliebige Taste drücken, um das Erlernen abzubrechen und die Stellung Wenn noch weitere Vorrichtungen in der Anlage versorgt werden sollen, zum der elektrischen Überbrückungen JA und JB prüfen, dabei die Tabelle 2 Beispiel ein Lesegerät für Transponderausweiskarten oder die Beleuchtung für beachten.
  • Seite 57: Endabnahme

    Vorrichtung blinkt die Led “BLUEBUS” auf dem Steuergerät zur noch vorhandenen Restgefahren informiert werden. Bestätigung der Erkennung zweimal schnell. Für alle genannten Unterlagen stellt Nice über den eigenen technischen Wenn die Gefahrensituationen, die durch die Flügelbewegung entstanden Kundendienst folgendes zur Verfügung: Gebrauchsanweisungen, Leitfäden sind, durch die Herabsetzung der Aufprallkraft beseitigt wurden, muss die und vorgedruckte Formulare.
  • Seite 58: Programmierung Erstes Niveau (Einstellbare Parameter)

    6.2 - Programmierung erstes Niveau (einstellbare Parameter) Die Parameter sind auf einer Skala 1 bis 4 einstellbar; zum Kontrollieren des Wert jeder Led siehe Tabelle 8. WICHTIG – Die Programmierung hat eine Alle Parameter des zweiten Niveaus wurden werkseitig so programmiert, wie es Höchstzeit von 10 Sekunden zwischen einem Tastendruck und dem nächsten.
  • Seite 59: Was Tun Wenn

    WAS TUN WENN... (Leitfaden zur Problembeseitigung) Einige Vorrichtungen sind für die Anzeige des Betriebsstatus oder eventueller In der Tabelle 10 sind die Ursache und Behebung einer jeden Anzeigenart Störungen vorgerüstet. beschrieben. Wenn die WLT-Multifunktionsleuchte mit eingestellter Blinkfunktion am Ausgang Auch die Leds am Steuergerät geben Signale aus; in der Tabelle 11 sind die FLASH des Netzgerätes angeschlossen ist, blinkt sie während eines Manövers Ursache und Behebung einer jeden Anzeigenart beschrieben.
  • Seite 60: Eingehende Erklärungen

    Teilweise öffnen 3 Öffnet teilweise (Öffnung beider Flügel, entspricht der Hälf- Für die Getriebe WL1024C, WL1024 muss maximal innerhalb 6 Monaten oder te der vollen Öffnung) nach 20.000 Manövern seit der letzten Instandsetzung eine programmierte Wartung vorgenommen werden.
  • Seite 61: Entsorgung Des Produkts

    TECHNISCHE MERKMALE DES PRODUKTS HINWEISE: • Alle genannten technischen Merkmale beziehen sich auf eine Raumtemperatur von 20°C (± 5°C). • Nice S.p.a. behält sich vor, in jedem beliebigen Moment Änderungen, die als notwendig angesehen werden, unter Beibehalt der Funktionen und des Bestimmungszwecks am Produkt vorzunehmen.
  • Seite 62: Haltbarkeit Des Produkts

    Installation in windiger Zone EU-KONFORMITÄTSERKLÄRUNG nmerkung - Der Inhalt dieser Erklärung entspricht dem des offiziellen Dokumentes, das im Firmensitz der Fa.Nice S.p.a. nach seiner letzten Revision und vor dem Druck dieser Gebrauchsanleitung hinterlegt wurde. Der vorliegende Text wurde aus verlagstechnischen Gründen neu abgefasst.
  • Seite 63 WL1024C ........
  • Seite 64: Montaż

    Uwaga! - Jeśli linie krzyżują się Na siłowniku z centralą (mod. WL1024C) można zainstalować wielofunkcyjną na białym obszarze, użycie niniejszego produktu do zautomatyzowania bramy lampę...
  • Seite 65: Ostrzeżenia

    3.4 - Instalacja siłownika mod. WL1024C - WL1024 3.4.2 - Instalacja siłownika o STANDAROWEJ DŁUGOŚCI RAMIENIA Uwaga! - Ta instalacja może zostać przeprowadzona tylko, jeśli zakoń- OSTRZEŻENIA czona została procedura 3.4.1. • Nieprawidłowa instalacja może skutkować poważnymi obrażeniami dla osoby wykonującej pracę jak i osób, które będą używać instalacji.
  • Seite 66: Instalacja Siłownika O Zredukowanej Długości Ramienia

    3.5 - Instalacja wielofunkcyjnej lampy mod. WLT na 04. Zmniejszyć długość ramienia ze szczeliną (rys. 14): siłowniku model WL1024C a) Aby zmniejszyć długość ramienia ze szczeliną do wymiaru C (określo- Ostrzeżenie – WLT może działać jako migające światło sygnalizacyjne lub nego w punkcie 02-d), zdjąć...
  • Seite 67: Jak Wyjąć Centralę Sterującą

    01. Zdjąć dolną pokrywę siłownika bez centrali tak, jak ukazano na rys 19, faza 1-2; tralą sterującą, jest realizowane przy pomocy systemu “Bluebus” firmy Nice. To system, który pozwala połączyć urządzenia za pomocą tylko dwóch przewo- 02. Odkręcić za pomocą śrubokręta krzyżakowego 4 śruby suportu prowadni- dów zapewniających zasilanie i jednocześnie przekazujących sygnały do cen-...
  • Seite 68: Pierwsze Włączenie I Sprawdzenie Podłączeń

    pomiędzy 11 a 14 Vdc przy działaniu z akumulatorkiem rezerwowym PS424. 06. Po zakończeniu manewru zamknięcia 2 silników (d), diody led “L3” i “L4” Maksymalna wartość prądu wynosi 200 mA. wyłączą się, co oznacza, iż procedura została wykonana prawidłowo. Uwaga – Napięcie w zaciskach “P.P.” i “STOP”, jest obecne również, gdy na karcie aktywowana zostaje funkcja “Stand By”.
  • Seite 69: Odbiór

    EN 12445 i ewentualnie, by pomóc systemowi w Odnośnie powyższej dokumentacji, firma Nice dzięki serwisowi obsługi ograniczeniu uderzenia, należy spróbować znaleźć regulację dającą najlep- technicznej oddaje do dyspozycji Klientów: instrukcje obsługi, przewodniki sze rezultaty.
  • Seite 70: Programowanie Drugiego Poziomu (Parametry Regulowane)

    6.2 - Programowanie drugiego poziomu wartość odpowiadającą każdej diodzie Led, zob. Tabela 8. WAŻNE – Proce- (parametry regulowane) dura programowania przewiduje maksymalnie przerwę 10 sekund pomiędzy naciśnięciem pierwszego i drugiego przycisku. Po upływie tego czasu, proce- Wszystkie parametry drugiego poziomu są programowane fabrycznie tak, jak dura zostaje automatycznie zakończona, zapamiętując zmiany przeprowadzo- zaznaczono szarym kolorem w Tabeli 8 i mogą...
  • Seite 71: Co Zrobić, Gdy

    CO ZROBIĆ, GDY... (przewodnik do rozwiązywania problemów) Niektóre urządzenia są przygotowane do wydawania sygnałów, za pomocą coraz krótsze sygnały; są one powtarzane dwukrotnie z 1-sekundową przerwą. których można rozpoznać ich stan roboczy lub ewentualne nieprawidłowości. W Tabeli 10 opisano przyczyny i rozwiązania odnoszące się do każdego typu Jeśli do wyjścia FLASH znajdującym się...
  • Seite 72: Informacje Dodatkowe

    Otwiera częściowo 2 Otwiera częściowo (otwarcie skrzydła M2, równego poło- Dla siłowników WL1024C, WL1024 konieczna jest konserwacja planowa, mak- wie otwarcia całkowitego) symalnie co 6 miesięcy lub 20 000 manewrów od poprzedniej konserwacji. Otwiera częściowo 3 Otwiera częściowo (otwarcie obu skrzydeł, równych poło-...
  • Seite 73: Utylizacja Produktu

    CHARAKTERYSTYKA TECHNICZNA PRODUKTU OSTRZEŻENIE: • Niniejsza charakterystyka techniczna odnosi się do temperatury środowiskowej równej 20°C (± 5°C). • Nice S.p.a. zastrzega sobie prawo do dokonywania zmian w produkcie, gdy tylko uzna to za konieczne, zawsze zachowując cechy i przeznaczenie użytkowe produktu.
  • Seite 74: Trwałość Produktu

    DEKLARACJA ZGODNOŚCI CE Uwaga - Treść niniejszej deklaracji odnosi się do danych zadeklarowanych w ostatniej dostępnej wersji, przed oddaniem do druku niniejszej instrukcji obsługi, oficjalnego doku- mentu zdeponowanego w siedzibie firmy Nice Spa. Niniejszy tekst został dopasowany do celów wydawniczych. Numer: 322/WL..
  • Seite 75: Beschrijving Van Het Product En Gebruiksbestemming

    WL1024C ........
  • Seite 76: Installatie

    • Controleer of de mechanische aanslagen op de grond (niet bijgeleverd), Fig. 2 toont een voorbeeld van een automatisch systeem dat met Nice onder- zowel bij het sluiten als bij het openen in de installatie aanwezig zijn.
  • Seite 77: Installatie Van De Reductiemotor Mod. Wl1024C - Wl1024

    3.4 - Installatie van de reductiemotor mod. WL1024C - WL1024 3.4.2 - Installatie van de reductiemotor met ARM MET STANDAARDLENGTE WAARSCHUWINGEN Let op! - Deze installatie kan uitsluitend worden verricht na procedure • Een verkeerde installatie kan de persoon, die het werk verricht, en de 3.4.1 te hebben voltooid.
  • Seite 78: Installatie Van De Reductiemotor Met Ingekorte Arm

    3.5 - Installatie van de multifunctionele lamp mod. WLT op provisorisch. de reductiemotor model WL1024C 05. Controleer afmeting C van de arm met slobgat in dit verband (fig. 15 - 16): Waarschuwing – WLT kan afhankelijk van de programmering van de bestu- a) Zet de hekdeur op de maximaal gesloten stand;...
  • Seite 79: De Besturingseenheid Verwijderen

    WL1024 aansluiten met besturingseenheid aanwezig zijn, vindt plaats via het “Bluebus” systeem van Nice. Met dit systeem kunnen elektrische aansluitingen worden verricht 01. Verwijder het onderste deksel van de reductiemotor zonder besturingseen- met gebruik van slechts 2 geleiders, waarover zowel de elektrische voeding als heid, zoals in fig.
  • Seite 80: Andere Inrichtingen Aansluiten

    4.4. - Andere inrichtingen aansluiten toetsen enz.) tijdens de herkenningsfase ingrijpt, wordt ze meteen gestopt. De herkenningsfase moet dus helemaal herhaald worden. Als nog meer inrichtingen in de installatie moeten worden gevoed, bijvoorbeeld 06. Na de sluitingsmanoeuvre van de 2 motoren (d) gaan de leds “L3” en “L4” een lezer van transponderkaarten of de verlichting van de sleutelschakelaar, uit, wat aangeeft dat de procedure goed is verricht.
  • Seite 81: Testen

    Voor de geciteerde documentatie stelt Nice via haar technische service- worden gemeten volgens norm EN 12445. Als de controle van de “kracht dienst het volgende ter beschikking: handleidingen, leidraden en reeds van de reductiemotor”...
  • Seite 82: Programmering Van Het Tweede Niveau (Afstelbare Parameters)

    6.2 - Programmering van het tweede niveau iedere led behorende waarde te controleren, raadpleegt u tabel 8. BELANG- (afstelbare parameters) RIJK – De programmeringsprocedure heeft maximum 10 seconden tijd tussen de druk op de ene toets en de andere. Na deze tijd wordt de procedure auto- Alle parameters van het tweede niveau zijn in de fabriek geprogrammeerd, vol- matisch afgesloten en worden de wijzigingen opgeslagen, die tot dan zijn ver- gens de grijze kleur in tabel 8 en kunnen op elk willekeurig moment worden...
  • Seite 83: Wat Te Doen Als

    WAT TE DOEN ALS... (probleemoplossingen) Sommige inrichtingen kunnen meldingen geven, waarmee de werkstaat, of de keer herhaald, met een pauze van 1 seconde ertussen. In tabel 10 worden de eventuele storingen te herkennen zijn. oorzaak en de oplossing van iedere soort melding beschreven. Als de multifunctionele lamp WLT met ingestelde knipperfunctie op de FLASH Ook de Leds op de besturingseenheid geven meldingen.
  • Seite 84: Uitdiepen

    Gedeeltelijk Gedeeltelijk openen (opening van hekdeur M2, gelijk aan Bij de reductiemotoren WL1024C, WL1024 is maximaal binnen 6 maanden of openen 2 halverwege de volledige opening) 20.000 manoeuvres na het vorige onderhoud een geprogrammeerd onderhoud Gedeeltelijk Gedeeltelijk openen (opening van de twee hekdeuren, nodig.
  • Seite 85: Het Product Afdanken

    Snelheid onbelast: 0,20 rad/s - 0,3 rad/s Snelheid bij de nominale koppel: 0,16 rad/s - 0,24 rad/s Maximumfrequentie van de cycli: 100 complete cycli per dag (de besturingseenheid van WL1024C beperkt tot een maximum van ongeveer 50 cycli/uur) Maximumduur continue cyclus: ongeveer 10 minuten Gebruiksbeperkingen: het product kan worden gebruikt op hekken met een gewicht tot 180 kg (hekdeur van 0,8 m), of met een lengte van de hekdeur tot 1,8 m en een openingshoek tot 110°...
  • Seite 86: Duurzaamheid Van Het Product

    Opmerking - De inhoud van deze verklaring stemt overeen met hetgeen verklaard is in de laatste revisie die beschikbaar was voor het ter perse gaan van deze handleiding, van het officiële document dat is neergelegd bij het hoofdkantoor van Nice Spa. De hier geschreven tekst is om redactionele redenen aangepast.
  • Seite 87: Apéndice

    Appendix • Instructions and warnings for the user • Images Appendice • Istruzioni ed avvertenze destinate all’utilizzatore • Immagini Appendice • Instructions et recommandations destinées à lutilisateur • Images Apéndice • Instrucciones y advertencias destinadas al usuario • Imágenes Anhang •...
  • Seite 89 Instructions and warnings for the user Before using the automation system for the first time, allow the installer to • If the automation system was secured with the command "Secure explain the origin of the residual risks and take a few minutes to read this automation system”: after a command is sent, the gate does not move and instruction manual and the warnings for the user which the installer has handed the flashing light emits 9 brief flashes.
  • Seite 90: Sbloccare E Bloccare Manualmente Il Motoriduttore

    Istruzioni ed avvertenze destinate all’utilizzatore Prima di usare per la prima volta l’automazione, fatevi spiegare dall’installatore • Smaltimento: al termine della vita dell’automazione, assicuratevi che lo l’origine dei rischi residui e dedicate qualche minuto alla lettura di questo smantellamento sia eseguito da personale qualificato e che i materiali vengano manuale d’istruzioni ed avvertenze per l’utilizzatore, consegnatovi dall’installa- riciclati o smaltiti secondo le norme valide a livello locale.
  • Seite 91 Instructions et recommandations destinées à l’utilisateur Avant d’utiliser pour la première fois l’automatisation, se faire expliquer par l’ins- • Mise au rebut : à la fin de la vie de l’automatisation, s’assurer que le dé - tallateur l’origine des risques résiduels et dédier quelques minutes à la lecture mantèlement soit effectué...
  • Seite 92: Instrucciones Y Advertencias Destinadas Al Usuario

    Instrucciones y advertencias destinadas al usuario Antes de utilizar el automatismo por primera vez, solicite al instalador que le revisión, mantenimiento o reparación deberá ser efectuada solo por per- explique el origen de los riesgos residuales, y dedique algunos minutos a la lec- sonal cualificado.
  • Seite 93: Anweisungen Und Hinweise Für Den Benutzer

    Anweisungen und Hinweise für den Benutzer Bevor man zum ersten Mal die Automatisierung benutzt, sich vom Installateur • Wartung: Um das Sicherheitsniveau immer beizubehalten und die maximale die Ursache der Restgefahren erklären lassen und die Zeit zum Durchlesen die- Haltbarkeit zu gewährleisten ist eine regelmäßige Wartung notwendig (mindes- ser Gebrauchsanweisung und der Hinweise für den Benutzer finden, die vom tens alle 6 Monate).
  • Seite 94 Instrukcje i wskazówki dla użytkownika Przed pierwszym użycie automatyki zaleca się poproszenie osoby, która doko- kontrolne, konserwacyjne lub naprawcze muszą być wykonane jedynie nała montażu o wyjaśnienie, jakie zagrożenia mogą pojawić się w czasie użyt- przez wykwalifikowany personel. kowania bramy oraz zaleca się przeznaczenie kilku minut na przeczytanie instrukcji i ostrzeżeń...
  • Seite 95 Instructies en waarschuwingen voor de gebruiker Voordat u de automatisering voor de eerste keer gebruikt, moet de installateur Alle controles, onderhoud, of reparaties mogen alleen door vakmensen u de oorsprong van de restrisico’s uitleggen. Wijd enkele minuten aan het lezen worden verricht.
  • Seite 96 85 mm 125 mm...
  • Seite 98 ~45° ~45°...
  • Seite 99 XIII...
  • Seite 103 XVII...
  • Seite 104 XVIII XVIII...
  • Seite 105 11-A 11-B...
  • Seite 107 Connector for battery / Solemyo photovoltaic power • Connettore per batteria / alimentazione fotovoltaica So - lemyo • Connecteur pour batterie / alimentation phovol ta - ï que Solemyo • Conector para batería / ali men tación fo tovoltaica Solemyo • Steckverbinder für Batterie / Ver- sorgung durch Solarzellen Solemyo •...
  • Seite 108 XXII XXII...
  • Seite 109 XXIII XXIII...
  • Seite 110 EN - TABLE 2: PHOTOCELL ADDRESSES TABLE 2 - PHOTOCELL ADDRESSES Photocell Jumper Photocell Jumper PHOTO PHOTO 2 Photocell h = 50 Photocell With activation on closing With activation on opening PHOTO II PHOTO 2 II Photocell h = 100 Photocell With activation on closing With activation on opening...
  • Seite 111 ES - TABLA 2: DIRECCIONES DE LAS FOTOCÉLULAS TABLA 2 - DIRECCIONES DE LAS FOTOCÉLULAS Fotocélula Puentes de conexión FotocélulaPuentes de conexión Puentes de conexión FOTO FOTO 2 Fotocélula h = 50 Fotocélula con accionamiento en el cierre con accionamiento en la apertura FOTO II FOTO 2 II Fotocélula h = 100...
  • Seite 112 Ph. +351.21.922.82.10 Ph. +39.049.87.01.05.1 Nice Australia infomarseille@fr.niceforyou.com Fax +351.21.922.82.19 Fax +39.049.87.07.63.8 Wetherill Park Australia info@pt.niceforyou.com infopd@niceforyou.com Ph. +61.(0)2.96.04.25.70 Nice France Rhône Alpes Fax +61.(0)2.96.04.25.73 Nice Roma Decines Charpieu France Nice Romania info@au.niceforyou.com Roma Italia Cluj Napoca Romania Ph. +33.(0)4.78.26.56.53 Ph. +39.06.72.67.17.61 Ph./Fax +40.(0)264.453.127...

Diese Anleitung auch für:

Wl1024

Inhaltsverzeichnis