Herunterladen Inhalt Inhalt Diese Seite drucken
STIEBEL ELTRON WK 2 Installationsanleitung

STIEBEL ELTRON WK 2 Installationsanleitung

Wandkonsole
Vorschau ausblenden Andere Handbücher für WK 2:

Werbung

Verfügbare Sprachen
  • DE

Verfügbare Sprachen

  • DEUTSCH, seite 1
INSTALLATION
INSTALLATIE
INSTALLAZIONE
INSTALACE
ASENNUS
Wandkonsole | Wall mounting bracket | Console murale | Wandconsole | Console a parete | Nástěnná konzola | Seinäkannatin
» WK 2

Werbung

Inhaltsverzeichnis
loading

Inhaltszusammenfassung für STIEBEL ELTRON WK 2

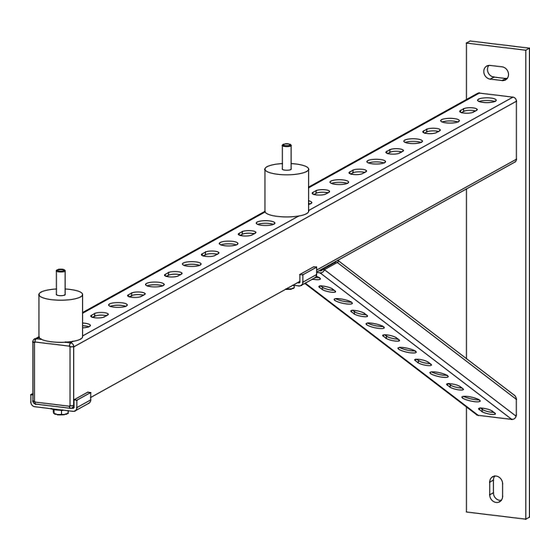
  • Seite 1 INSTALLATION INSTALLATIE INSTALLAZIONE INSTALACE ASENNUS Wandkonsole | Wall mounting bracket | Console murale | Wandconsole | Console a parete | Nástěnná konzola | Seinäkannatin » WK 2...
  • Seite 2: Allgemeine Hinweise

    Wählen Sie geeignete Schrauben und Dübel, um die Wandkonsole an der Wand zu befestigen. Sachschaden Beachten Sie für die nachfolgenden Montageschritte die notwendigen Abstandsmaße. Hinweise finden Sie in der Bedienungs- und Installa- tionsanleitung des Außengerätes (Kapitel „Maße und Anschlüsse“). WK 2...
  • Seite 3: Montage

    Lassen Sie die Installation von einem Fachhandwerker prüfen, um sicherzustellen, dass eine dauerhafte und sichere Aufstellung des Gerätes gewährleistet ist. 5. Technische Daten Datentabelle WK 2 Hinweis 234722 Tragegurte zum Transportieren des Gerätes können Schenkellänge Sie an den grau markierten Bereichen unten am Ge- Gewichtsbelastung Geeignet für...
  • Seite 4: General Information

    Select suitable screws and rawl plugs to secure the wall mounting bracket on the wall. Material losses For the following installation steps observe the re- quired clearance dimensions. For information, see the operating and installation in- structions of the outdoor unit (chapter "Dimensions and connections"). WK 2...
  • Seite 5: Specification

    Material losses Have a qualified contractor check the installation to ensure that the appliance is permanently and securely installed. 5. Specification Data table WK 2 Note 234722 Lifting straps to transport the appliance can be hooked Support length Weight into the area highlighted in grey at the bottom of the...
  • Seite 6: Remarques Générales

    Dommages matériels Veuillez respecter la suite des étapes de pose et les côtes de dégagement nécessaires. Vous trouverez des indications dans les instructions d’utilisation et d’installation de l’appareil extérieur (chapitre « Cotes et raccordements »). WK 2...
  • Seite 7: Données Techniques

    Faites vérifier l’installation par un professionnel pour vous assurer que l’appareil est placé de manière du- rable et sure. 5. Données techniques Tableau des données WK 2 Remarque 234722 Vous pouvez accrocher les sangles pour le transport Longueur de la console Charge admissible de l’appareil dans les zones grisées, dans la partie in-...
  • Seite 8: Algemene Voorschriften

    Kies de juiste schroeven en pluggen om het wandsysteem aan de wand te bevestigen. Materiële schade Neem voor de volgende installatiestappen de nodige afstanden in acht. Info hieromtrent vindt u in de bedienings- en installa- tiehandleiding van het buitentoestel (hoofdstuk "Af- metingen en aansluitingen"). WK 2...
  • Seite 9: Technische Gegevens

    Laat de installatie controleren door een vakman om zeker te zijn dat het toestel op een duurzame en vei- lige wijze opgesteld is. 5. Technische gegevens Gegevenstabel WK 2 Info 234722 Draagbanden voor het transport van het toestel kunt Beenhoogte...
  • Seite 10: Avvertenze Generali

    Scegliere viti e tasselli a muro idonei per fissare la mensola alla parete. Danni materiali Quando si eseguono le operazioni di montaggio se- guenti, rispettare le distanze necessarie. Le informazioni sono indicate nelle Istruzioni di instal- lazione e uso dell'unità esterna (capitolo "Dimensioni e allacciamenti"). 10 | WK 2...
  • Seite 11: Dati Tecnici

    Fare controllare l'installazione da uno specialista, per poter garantire la longevità e sicurezza dell'unità in- stallata. 5. Dati tecnici Tabella dei dati WK 2 Avvertenza 234722 Le cinghie per il trasporto dell'apparecchio possono Lunghezza del fianco essere agganciate nei punti contrassegnati in blu sotto...
  • Seite 12: Obecné Pokyny

    Vyberte vhodné šrouby a hmoždinky k upevnění nástěn- né konzoly na stěně. Věcné škody Pro následující montážní kroky dodržte nezbytné od- stupy. Upozornění naleznete v návodu k obsluze a instalaci venkovního přístroje (kapitola „Rozměry a přípojky“). 12 | WK 2...
  • Seite 13: Technické Údaje

    Krytky nasaďte na konce nástěnné konzoly. Věcné škody Instalaci nechejte zkontrolovat autorizovaným servi- sem, abyste zajistili trvalou a bezpečnou instalaci pří- stroje. 5. Technické údaje Tabulka údajů WK 2 234722 Délka ramena Hmotnostní zatížení Upozornění Vhodné pro 15/20/25 AC(S), HPA-O Premium Nosné...
  • Seite 14: Laitteen Kuvaus

    Jos seinän kantavuutta ei voida taata, älä käytä seinä- kannatinta. f Valitse sopivat ruuvit ja vaarnat seinäkonsolin kiinnittämi- seksi seinään. Aineelliset vahingot Noudata seuraavissa asennusvaiheissa asianmukaisia etäisyysmittoja. Ohjeet löytyvät ulkoyksikön käyttö- ja asennusohjees- ta (luku "Mitat ja liitännät"). 14 | WK 2...
  • Seite 15 Aseta päätylevyt seinäkonsolin päihin. Aineelliset vahingot Tarkastuta asennus varmistuaksesi, että laite on asen- nettu kestävästi ja turvallisesti. Anna tarkastus ammat- tilaisen tehtäväksi. 5. Teknisiä tietoja Taulukko WK 2 234722 Ohje Sivupituus Nostohihnat voidaan kiinnittää laitteen rungon alle Painokuormitus harmaalla merkitylle alueelle.
  • Seite 16 STIEBEL ELTRON GmbH & Co. KG tecalor GmbH Dr.-Stiebel-Str. 33 | 37603 Holzminden Lüchtringer Weg 3 | 37603 Holzminden Tel. 05531 702-0 | Fax 05531 702-480 Tel. 05531 99068-95700 | Fax 05531 99068-95712 info@stiebel-eltron.de info@tecalor.de www.stiebel-eltron.de www.tecalor.de 4 < A M H C M O = c a a c e g >...

Inhaltsverzeichnis