Bresser 7002571 Bedienungsanleitung
Vorschau ausblenden
Andere Handbücher für 7002571:
- Bedienungsanleitung (57 Seiten) ,
- Bedienungsanleitung (32 Seiten)

Verwandte Anleitungen für Bresser 7002571


Inhaltszusammenfassung für Bresser 7002571
- Seite 1 Wetterstation · Weather Station · PC Weather Station + 5-in-1 Sensor Bedienungsanleitung Instruction manual...
- Seite 2 Desidera ricevere informazioni esaustive su questo prodotto in una lingua specifica? Venga a visitare il nostro sito Web al seguente link (codice QR Code) per conoscere le versioni disponibili. www.bresser.de/P7002571 GARANTIE · WARRANTY · GARANTÍA · GARANZIA www.bresser.de/warranty_terms Weather Tool Software for Windows ® DOWNLOAD: http://www.bresser.de/download/7002571/software...
- Seite 3 Deutsch ......................... English........................
-
Seite 4: Inhaltsverzeichnis
Inhaltsverzeichnis 1 Impressum .............................. 5 2 Gültigkeitshinweis............................ 5 3 Zu dieser Anleitung ............................ 5 4 Allgemeine Sicherheitshinweise........................ 6 5 Teileübersicht Basisstation und Lieferumfang ................... 7 6 Teileübersicht Multisensor .......................... 8 7 Display-Anzeigen............................ 9 8 Vor der Inbetriebnahme .......................... 10 9 Stromversorgung herstellen ........................ 10 10 Gummibeläge anbringen .......................... 11 11 Multifunktions-Funksensor montieren und anbringen ................ 11 12 Signalübertragung............................ 12 13 Zeitsynchronisierung mit dem PC ...................... 12 14 Manuelle Zeiteinstellung.......................... 12... -
Seite 5: Impressum
„Garantie“ und „Service“ in dieser Dokumentation. Wir bitten um Verständnis, dass direkt an die Her- steller-Anschrift gerichtete Anfragen oder Einsendungen nicht bearbeitet werden können. Irrtümer und technische Änderungen vorbehalten. © 2021 Bresser GmbH Alle Rechte vorbehalten. Die Reproduktion dieser Dokumentation – auch auszugsweise – in irgendeiner Form (z.B. Fotokopie, Druck, etc.) sowie die Verwendung und Verbreitung mittels elektronischer Systeme (z.B. -
Seite 6: Allgemeine Sicherheitshinweise
4 Allgemeine Sicherheitshinweise GEFAHR Erstickungsgefahr! Bei unsachgemäßer Verwendung dieses Produkts besteht Erstickungsgefahr, insbesondere für Kin- der. Beachten Sie deshalb unbedingt die nachfolgenden Sicherheitsinformationen. • Verpackungsmaterialien (Plastiktüten, Gummibänder, etc.) von Kindern fernhalten! Es besteht Er- stickungsgefahr! • Dieses Produkt beinhaltet Kleinteile, die von Kindern verschluckt werden können! Es besteht Ersti- ckungsgefahr! GEFAHR Gefahr eines Stromschlags! -
Seite 7: Teileübersicht Basisstation Und Lieferumfang
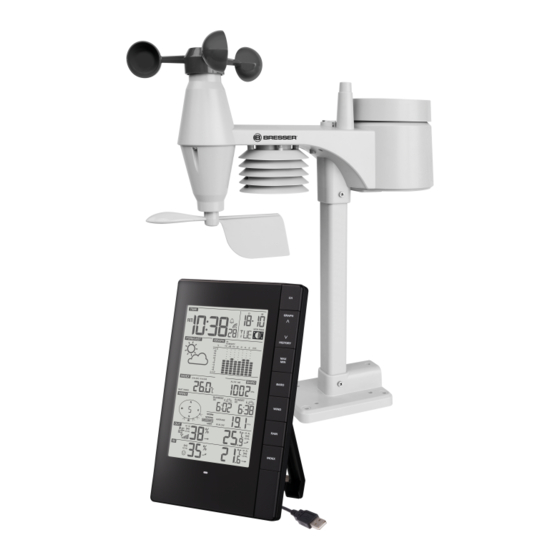
HINWEIS Gefahr von Spannungsschäden! Für Spannungsschäden in Folge falsch eingelegter Batterien übernimmt der Hersteller keine Haftung! 5 Teileübersicht Basisstation und Lieferumfang Abb. 1: Alle Teile der Basisstation 1 Display 2 Gehäuse 3 SNOOZE/LIGHT-Taste (Schlummerfunkti- 4 CHANNEL-Taste (Kanalwahl) on und temporäre Hintergrundbeleuch- tung) 5 GRAPH/UP-Taste (Normale Anzeige: His- 6 HISTORY/DOWN-Taste (Normale Anzei-... -
Seite 8: Teileübersicht Multisensor
15 ALERT-Taste (Temperaturalarmeinstel- 16 RESET-Knopf (alle Einstellungen zurück- lung oder Anzeigenwahl) setzen) 17 TIME SYNC-Knopf (Zeitsynchronisierung* 18 Batteriefach mit PC initiieren) 19 Batteriefachdeckel 20 Standfuß, ausklappbar 21 DATA-Knopf (Datenübertragung* zum PC 22 °C/°F-Knopf (Wahl der Temperatureinheit) initiieren) 23 SENSOR-Taste (Funksensor suchen) 24 CLOCK SET-Taste (manuelle Zeiteinstel- lung) 25 USB-Kabel mit microUSB- (Basisstation) -
Seite 9: Display-Anzeigen
3 Dosenlibelle 4 Windschalen (Windgeschwindigkeit) 5 Windfahne (Windrichtung) 6 Thermo-/Hygrometer 7 Rohrschelle 8 Montageschuh 9 Montagestange 10 Batteriefach(-abdeckung) 11 RESET-Knopf 12 LED-Funktionsleuchte 13 Montageschrauben mit -muttern 7 Display-Anzeigen Abb. 3: Display-Anzeige der Basisstation 1 Aktuelle Uhrzeit oder Weckzeit (Stunden:Mi- 2 Weckruf aktiv nuten:Sekunden) 3 Synchronisierungssymbol (Uhrzeit) 4 Datum (Tag-Monat oder umgekehrt) -
Seite 10: Vor Der Inbetriebnahme
7 Balkendiagramm zur Werteanzeige 8 Luftdruckalarm aktiv 9 Luftdruck 10 Sonnenaufgangszeit 11 Sonnenuntergangszeit 12 Windgeschwindigkeitsalarm aktiv 13 Windgeschwindigkeit 14 Alarm für hohen (HI AL) oder niedrigen (LO AL) Wert aktiv 15 Außentemperatur 16 Alarm für hohen (HI AL) oder niedrigen (LO AL) Wert aktiv 17 Innentemperatur 18 Außenluftfeuchtigkeit... -
Seite 11: Gummibeläge Anbringen
5. Batterien in das Batteriefach einsetzen. Dabei die korrekte Ausrichtung der Batteriepole (+/-) be- achten. 6. Batteriefachdeckel wieder aufsetzen und anschrauben. 10 Gummibeläge anbringen Die mitgelieferten selbstklebenden Gummibeläge an den Rohrschellen wie abgebildet anbringen, um einen festeren Sitz der Montagestange zu gewährleisten. 11 Multifunktions-Funksensor montieren und anbringen Abhängig vom gewünschten Standort kann der Funksensor auf verschiedene Weise montiert werden. -
Seite 12: Signalübertragung
12 Signalübertragung Die Basisstation verbindet sich automatisch mit dem Multi-Außensensor und (wenn verfügbar) mit an- deren kabellosen Sensoren. Sie können außerdem die SENSOR SYNC-Taste drücken, um direkt nach den Sensoren zu suchen. Bei erfolgreicher Verbindung werden das Symbol für Außenbereich (OUT) und/oder der Kanal auf dem Display angezeigt. -
Seite 13: Weckrufeinstellung
15 Weckrufeinstellung 1. ALARM-Taste ca. 3 Sekunden drücken um in den Weckzeiteinstellungsmodus zu gelangen. 2. Die einzustellenden Ziffern blinken. 3. UP- oder DOWN-Taste drücken, um den Wert zu verändern. 4. ALARM-Taste drücken, um die Eingabe zu bestätigen und zur nächsten Einstellung zu wechseln. 5. -
Seite 14: Klimaindikator (Innen)
17 Klimaindikator (innen) 1 Zu kalt 2 Optimal 3 Zu warm Der Klimaindikator ist eine bildliche Anzeige, die auf der Innenlufttemperatur und -luftfeuchtigkeit ba- siert, um das Komfortniveau zu bestimmen. Hinweis: • Die Komfortanzeige kann bei gleicher Temperatur unterschiedlich ausfallen, abhängig von der Luftfeuchtigkeit. -
Seite 15: Wettertrend
19 Wettertrend Aus den gemessenen Werten wird ein Wettertrend für die nächsten 12-24 Stunden errechnet und fol- gendermaßen grafisch dargestellt: 1 Sonnig 2 Teilweise bewölkt 3 Bewölkt 4 Regen 5 Regen/Stürmisch 6 Schnee Hinweis: • Die Genauigkeit einer druckbasierten Wettervorhersage liegt bei etwa 70% bis 75%. •... -
Seite 16: Windgeschwindigkeit Und -Richtung
1. Den Wert für den relativen Luftdruck an Ihrem Standort (oder möglichst nah dazu) über den loka- len Wetterdienst, das Internet oder andere Quellen in Erfahrung bringen. 2. Die BARO-Taste ca. 3 Sekunden drücken bis ABS oder REL blinkt. 3. Die UP- oder DOWN-Taste drücken bis REL blinkt. 4. -
Seite 17: Beaufort-Skala
Eine schnelle Übersicht über die gegenwärtigen Windbedingungen wird durch folgende Textinforma- tionen dargestellt: Windbedingung Leicht (LIGHT) Mäßig (MODERA- Stark Stürmisch (STRONG) (STORM) Geschwindigkeit 1 – 19 km/h 20 – 49 km/h 50 – 88 km/h > 88 km/h Maßeinheit für die Windgeschwindigkeit wählen 1. -
Seite 18: Windkühlfaktor
41-47 knots | 20.8-24.4 m/s schwerer Sturm 89-102 km/h | 55-63 mph 48-55 knots | 24.5-28.4 m/s orkanartiger Sturm 103-117 km/h | 64-73 mph 56-63 knots | 28.5-32.6 m/s Orkan > 118 | > 74 mph > 64 knots | 32.7 m/s 24 Windkühlfaktor Drücken Sie die INDEX-Taste mehrmals bis WIND CHILL (Windkühle) auf dem Display angezeigt wird. -
Seite 19: Einrichtung Der Station Zur Übertragung Von Wetterdaten
Um Wetterdaten von der Wetterstation zu einem Computer oder in die Weather Underground Commu- nity zu übertragen, sind folgende vorbereitende Schritte erforderlich: 1. Die Software ‚Weather Tool‘ als zip-Datei unter http://archive.bresser.de/download/7002571/soft- ware herunterladen. 2. Die zip-Datei auf dem Computer entpacken. -
Seite 20: Eg-Konformitätserklärung
Gewicht 1096g 31 EG-Konformitätserklärung Eine „Konformitätserklärung“ in Übereinstimmung mit den anwendbaren Richtlinien und entsprechenden Normen ist von der Bresser GmbH erstellt worden. Der vollständige Text der EG-Konformitätserklärung ist unter der folgenden Internetadresse verfügbar: www.bresser.de/download/7002571/CE/7002571_CE.pdf 32 Garantie Die reguläre Garantiezeit beträgt 5 Jahre und beginnt am Tag des Kaufs. Die vollständigen Garantie- bedingungen und Serviceleistungen können Sie unter www.bresser.de/garantiebedingungen einse-... -
Seite 21: Entsorgung
Der Lamellenaufsatz besteht aus einzelnen ineinander gesteckten Elementen. Die beiden untersten sind geschlossen. Ändern Sie nicht die Reihenfolge! Der Sensor im Inneren des Gehäuses darf nicht mit Wasser in Berührung kommen! • Reinigen Sie die Lamellen und entfernen Sie Schmutz und Insekten. •... - Seite 43 (de preferencia por Telephone*: +44 1342 837 098 e-mail). BRESSER UK Ltd e-mail: servicio.iberia@bresser-iberia.es Customer Support Teléfono*: +34 91 67972 69 Suite 3G, Eden House Enterprise Way...