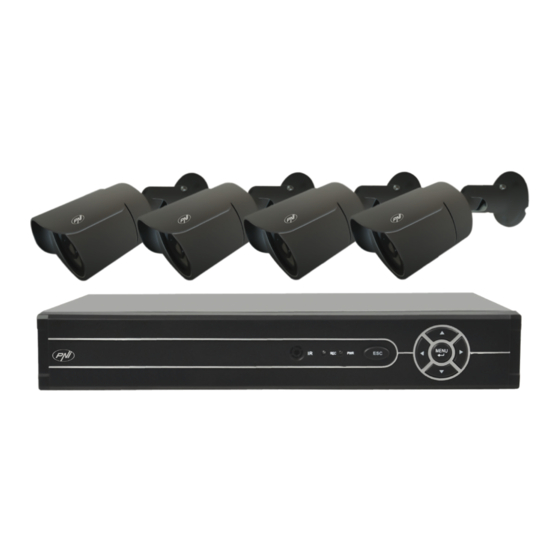
Herunterladen Inhalt Inhalt Diese Seite drucken

Werbung

Verfügbare Sprachen
  • DE

Verfügbare Sprachen

  • DEUTSCH, seite 52
Video surveillance system / Система за видеонаблюдение / Videoüberwachungssystem
Sistema de video vigilancia / Système de surveillance vidéo / Videófelügyeleti rendszer
Sistema di videosorveglianza / System nadzoru wideo / Kit supraveghere video
EN
BG
DE
ES
FR
HU
IT
PL
RO
PNI HOUSE AHD1250
User manual .............................................
Ръководство за потребителя ................
Benutzerhandbuch ...................................
Manual de usuario ....................................
Manuel utilisateur .....................................
Használati utasítás ...................................
Manuale utente ........................................
Instrukcja obsługi .....................................
Manual de utilizare ...................................
2
27
52
77
102
127
152
177
202

Werbung

Inhaltsverzeichnis
loading

Inhaltszusammenfassung für PNI HOUSE AHD1250

  • Seite 1 PNI HOUSE AHD1250 Video surveillance system / Система за видеонаблюдение / Videoüberwachungssystem Sistema de video vigilancia / Système de surveillance vidéo / Videófelügyeleti rendszer Sistema di videosorveglianza / System nadzoru wideo / Kit supraveghere video User manual ..........Ръководство за потребителя ....
  • Seite 2: Main Functions

    MAIN FUNCTIONS Real time surveillance Surveillance via monitor: Analog output interface, VGA or HDMI Storage The HDD works only during recording, which reduces energy consumption and extends life Note: The HDD is not included Compression Real-time compression on the storage device, which allows stable audio and video quality Backup Via the USB interface: on USB storage devices Playback...
  • Seite 3 Stopping the device There are two ways to stop the device: 1. Go to the main menu (right-click on the screen) and select the Logout option - Shutdown 2. Turn off the power supply. Special warnings: 1. Restart after power failure: If the device is abnormally shut it can create a backup and restart from that status after the power returns.
  • Seite 4 The menu included: Main menu, Guide), Record mode, Playback, PTZ control, XVI control, High speed PTZ, Color settings, Output adjust, Logout, View 1/4 1. MAIN MENU By accessing the main menu the interface will look like in the image below. 1.1 Record The recording operations include: Record config, Playback, and Backup.
  • Seite 5 1.1.1 Record config Go to Main menu - Record - Record config (Record setup) Set recording parameters on each channel or all channels at the same time. The system is set to start recording 24 hours continuously. Note: The HDD must be set to read / write mode. Channel: Choose the channel number for which you want to set up the recording.
  • Seite 6 • Alarm: The alarm recording function includes: Motion detection, lack of image, loss of video signal. • Manual recording: Click the button and the corresponding channel will record regardless of the current status. • Stop: Click the button and the corresponding channel will stop recording regardless of the current status.
  • Seite 7 Note: For frame-by-frame playback, the movie will have to pause. Main functions: Local Zoom: When the system displays a single channel on the screen, you can select a portion of the screen with a mouse to enlarge it by clicking the left mouse button. You can then return to the normal screen by double-clicking.
  • Seite 8 1.2.1 Motion detect When the system detects the move that reaches the set sensitivity threshold then it will start the recording Note: The Advanced button opens the following menu: Up Window, Show desktop, Copy, Paste, Default config, Record config (shortcut to the interface configuration of the recording). Channel: Choose the channel to be configured Enable: means that the motion detection function is on Sensitivity: Choose one of 6 levels of sensitivity...
  • Seite 9 In case of motion detection, you can choose the warning mode: displays message, sounds, uploads to FTP server, sends email, saves the event in history. 1.2.2 Video blind When the video image is influenced by environmental conditions such as illumination or reaching the sensitivity threshold, an alarm will be triggered in the system.
  • Seite 10 Settings are the same as motion detection. Note: The Advanced button opens the following menu: Up Window, Show desktop, Copy, Paste, Default config, Record config (shortcut to the interface configuration of the recording). 1.2.4 Abnormality When an abnormal situation occurs, such as lack of storage, lack of storage space, IP conflict or no network connection, the device will alert you by a message or sound.
  • Seite 11 1.3.1 General Time zone: Set the time zone System time: Set the system date and time Date format: choose the date format YMD (year, month, day), MDY (month, day, year), DMY (day, month, year) Separator data: Choose a separator type for the date format Time format: Choose the time format: 12 or 24 hours.
  • Seite 12 Channel: Choose the channel number you want to set up Compression: Compression standard H.264 Resolution (resolution): D1 / 960H / 1080N Frame Rate: 1 to 25fps Bit Rate Type: You can choose either limited flow or variable flow. When choosing variable flow, you have 6 image quality options Rate: The higher the flow value, the better the image quality is: D1 1000 ~ 1500kbps, CIF 384 ~ 1500kbps, QCIF (64 ~ 512kbps)
  • Seite 13 Subnet mask: The default address is: 255.255.255.0 Gateway: The default address is 192.168.1.1 setup: The domain name of the server transforms the domain name into the IP address. The IP address is provided by the network administrator. This address must be set then restarted the system to work.
  • Seite 14 Email If the alarm is on or the connections are made, the system will send an email with alarm and photo information to the set address. SMTP server: the email server address. It can be an IP address or a domain name. The domain name can only be used if the DNS settings are correct.
  • Seite 15 DDNS Enable check to enable this option DDNS: represents the dynamic domain name of the server. Domain name: enter the domain name registered by DDNS. User name: enter the user name registered by DDNS. Password: enter the user password registered by DDNS. When DDNS is successfully configured and turned on, you can enter the domain name in the Internet Explorer browser to access it.
  • Seite 16 UPNP The UPNP protocol is used to make automatic forwarding to the router. To use this feature make sure this option is also enabled on the router. Enable select the option to enable UPNP settings HTTP Port: Routing will automatically distribute the device’s HTTP port, but monitoring via Internet Explorer will also need to enter this port.
  • Seite 17 Analog Hybrid 4 x 1080N 8 x 1080P 4 x 720P 12 x 960P 2 x 720P + 2 x 720P 4 x 960H 8 x 720P 1.3.10 XVI Settings The menu allows image control (brightness, contrast, saturation, etc.) on each channel. 1.4 Advanced The menu includes: HDD management, user account, online users, video output settings, self- maintenance, factory default settings, updates, device information, import / export.
  • Seite 18 1.4.1 Storage The interface displays information about the internal HDD: its number, type, status, and storage capacity. Choose your storage device and then click on the function you want to run. Read / Write: The equipment can be written or read Read-only: The equipment can only be read Redundant: The function is not active Format...
  • Seite 19 Channel title: assign a channel title. Up to 25 letters. Time display: Displays the date and time of the system Channel title: Displays the channel number Record status: displays the status of the recording Alarm status: Displays the status of the system alarm Transparency: Choose the transparency of the on-screen menu: value between 128 and 255 Resolution: Set the screen resolution Channel: Enter the channel number...
  • Seite 20 Modify user: Modify the name and rights of the selected user Modify group: Modify group name and rights Modify password: Modify the user password. You can set a password of up to 6 characters. Pre-empty and word-free spaces are not valid. Spaces between words are valid. Note: The admin user can change his or her own password and password for other users.
  • Seite 21: Record Mode

    1.4.8 Device info 1.5 Info The interface provides detailed information about the storage device, BPS (displays the Kb / s transfer stream and the MB / h storage capacity in real time), event history, and software version. 2. GUIDE The interface displays a series of basic configuration steps for your device, such as date, time, network testing, and xmeye download link 3.
  • Seite 22 4. PLAYBACK Shortcut for accessing the recordable playback interface. The same interface can be accessed by going into the Main menu - Record - Playback 5. PTZ CONTROL The function is not active for this kit 6. XVI CONTROL Shortage for accessing the image control interface. The same interface can be accessed by going into the Main menu -System (System) -XVI Settings (XVI Settings) -XVI Control.
  • Seite 23 10. OUTPUT ADJUST The same interface can be accessed by going into the Main menu - Advanced - Output adjustment,...
  • Seite 24 FREQUENTLY ASKED QUESTIONS AND MENTENANCE If the problems do not appear in the list below, we recommend that you contact a local service or call the service department. The device does not start normally Possible reasons can be: 1. Power is not appropriate. 2.
  • Seite 25 Possible reasons can be: 1. Setup issues: The audio option is not selected 2. The channel has no audio Time is wrong Possible reasons can be: 1. Settings are wrong 2. The battery on the motherboard is not properly connected or discharged Motion detection does not work Possible reasons can be: 1.
  • Seite 26 NVR TECHNICAL SPECIFICATIONS Video Video compression H.264 (High Profile) Audio Audio compression G.711A Registration mode Manual, motion detection, scheduled Recording & Playback Playback 1 ch / 4 ch Backup Backup type Network, U-disk, disc USB, disc SATA Video input 4 x BNC Video output 1 x VGA, 1 x HDMI Audio input...
  • Seite 27: Основни Функции

    ОСНОВНИ ФУНКЦИИ Наблюдение в реално време Наблюдение чрез монитора: аналогов изходен интерфейс, VGA или HDMI Съхранение HDD-то функционира само по време на записването, което намалява консумацията на енергия и увеличава времето на животa Забележка: HDD-то не е включено в пакетаt Компресиране...
  • Seite 28 устройството. Захранващото напрежение е 230V±10% / 50 Hz. 2. Предлагаме Ви да използвате UPS устройство, за да предпазите устройството от промени в напрежението. Изключване на устройството Има два начина за изключване на устройството: 1. Влезте в главното меню (кликнете вдясно на екрана) и изберете опция Logout (Излизане) - Shutdown (Затваряне) 2.
  • Seite 29 Улавяне на Блокирана камера движение Меню В режим предварителен преглед можете да влезете в менюто на екрана като кликнете вдясно, както на изображението по-долу. Менюто включва: Основно меню (Main menu), бързо ръководство (Guide), режим на записване (Record mode), възпроизвеждане (Playback), PTZ контрол (PTZ control), XVI контрол, PTZ ускорено (High speed PTZ), цветови...
  • Seite 30 1.1.1 Конфигуриране на записа (Record config) Влезте в Главното меню (Meniu principal) - Record (Записване) - Record config (Конфигуриране запис) Задайте параметрите на записване във всеки канал отделно или във всички канали едновременно. За начало системата е настроена да записва 24 часа непрекъснато. Забележка: HDD-то...
  • Seite 31 интервал между 0:00 и 24:00 ч.) и 3 режима (нормално записване, при улавяне на движение и в случай на аларма): Regular (нормално записване): устройството записва в настроения времеви интервал Видът на видео файла е “R”. Detect (улавяне на движение): устройството записва при улавяне на движение. Видът...
  • Seite 32 Стоп Б а в н о възпроизвеждане Бързо превъртане Бързо връщане напред назад Следващ кадър Предишен кадъл Следващ файл Предишен файл Цял екран Циклично възпроизвеждане Забележка: за възпроизвеждане на кадър по кадър, филмът трябва да се включи на пауза. Специални функции: Zoom local: когато...
  • Seite 33 1.2 Alarm (Аларма) Функцията записване при аларма включва: улавяне на движението, липсата на изображение, изгубване на видео сигнала нередности. 1.2.1 Улавяне на движение (Motion detect) Когато системата улови движение, което достигне зададения праг на чувствителност, тогава записването ще започне Забележка: бутон Advanced отваря следното меню: Up Window (назад), Show desktop (показва...
  • Seite 34 Channel (canal): изберете канала за конфигуриране Enable (работи): означава, че функцията улавяне на движение е включена Sensitivity (чувствителност): изберете едно от 6 нива на чувствителност Period (период): задейства улавянето на движение в специфицирания интервал. Можете да настроите различни часови интервали в зависимост от деня през седмицата. Всеки ден е...
  • Seite 35 Настройките са като при улавяне на движение. Забележка: бутон Advanced отваря следното меню: Up Window (Назад), Show desktop (показва интерфейса на предварителен преглед на каналите), Copy (копира настройки), Paste (поставя настройки), Default (възстановява настройките по подразбиране), Record config (кратък път до интерфейса на конфигуриране на записа). 1.2.3 Липса...
  • Seite 36 устройството ще Ви предупреди със съобщение или звук. 1.3 Настройки на системата (System) Ще се появи следният интерфейс: 1.3.1 Общи настройки (General)
  • Seite 37 Time zone: задайте часовия пояс System time: задайте датата и часа на системата Data format: изберете формата на датата YMD (година, месец, ден), MDY (месец, ден, година), DMY (ден, месец, година) Date separator: изберете вид сепаратор за формата на датата Time format: изберете...
  • Seite 38 1.3.3 Настройки мрежа (Network) Net Card: изберете опцията Wire Netcard DHCP: получавате IP адрес автоматично (не е препоръчително). IP address: задайте IP адреса. Адресът по подразбиранеa е 192.168.1.10 Subnet mask: адресът по подразбиранеa е: 255.255.255.0 Gateway: адресът по подразбиранеa е 192.168.1.1 DNS setup: името...
  • Seite 39 NTP setup Enable: отбележете, за да активирате тази опция Server IP: въведете IP адреса на NTP сървъра. Port: 123 по подразбиране. Можете да настроите порта в зависимост от настройките на NTP сървъра. Update period: периодът на актуализиране е същият като периода на NTP сървъра. Интервалът...
  • Seite 40 DDNS Enable отбележете, за да активирате тази опция DDNS: е динамичното име на домейна на сървъра. Domain name: въведете името на домейна, регистриран от DDNS. User name: въведете името на потребителя, регистриран от DDNS. Password: въведете паролата на потребителя, регистриран от DDNS. Когато...
  • Seite 41 Enable отбележете, за да активирате тази опция Server IP: IP адрес на FTP сървъра Port: порт на домейна за FTP; по подразбиране е 21 User name: FTP Password: име на потребителя за parola на потребителя Anonymous: активира анонимен режим – не е необходимо повече да задавате потребителското...
  • Seite 42 1.3.9 Digital Интерфейсът Digital показва номера и вида на камерите, поддържани от този модел: Аналогови Хибрид 4 x 1080N 8 x 1080P 4 x 720P 12 x 960P 2 x 720P + 2 x 720P 4 x 960H 8 x 720P 1.3.10 Настройки...
  • Seite 43 1.4 Разширени настройки (Advanced) Менюто включва: HDD управление, потребителски профил, онлайн потребители, изходни видео настройки, автоматично поддържане, връщане към фабричните настройки, актуализации, информация за устройството, импорт/експорт. 1.4.1 Управление на устройството за съхранение (Storage) Интерфейсът показва информация за вътрешното HDD: неговия номер, вид, статус и капацитет...
  • Seite 44 Read/Write: оборудването може да бъде написано или прочетено Read-only: оборудването може да бъде само разчитано Redundant: функцията не е активна Format storage: форматира HDD-то Recover: възстановява информацията от HDD Partition: създава прегради на HDD 1.4.2 Графичен интерфейс на потребителя (Display) В...
  • Seite 45 Resolution: задайте резолюцията на екрана Channel: Въведете номера на канала 1.4.3 Управление потребители (Account) Забележка: 1. Дължината на името на даден потребител може да бъде от максимум 8 символа. Свободните места, пред или след името са невалидни. Свободното място в средата...
  • Seite 46 1.4.6 Настройка на системата (Restore) Системата може да бъде върната до фабричните настройки по подразбиране. Можете да изберете от менюто функциите, които да нулирате. 1.4.7 Актуализация на фърмуера (Upgrade) Изберете пътя към файла за актуализиране. Забележка: файлът трябва да бъде запазен в основната директория на дадена USB памет 1.4.8 Информация...
  • Seite 47 1.5 Информация (Info) Интерфейсът предлага подробна информация за устройството за съхранение, BPS (показва потока на трансфер Kb/s и капацитета на устройството за съхранение MB/h в реално време), историята на събитията и софтуерна версия. 2. БЪРЗО РЪКОВОДСТВО (GUIDE) Интерфейсът показва редица основни стъпки за конфигуриране на устройството, като настройки...
  • Seite 48 7. XVI&AHD Изберете вида видео сигнел на всеки канал отделно. Препоръчваме избор на опция ”Auto” когато не сте сигурни какъв вид камери имате. 8. HIGH SPEED PTZ Функцията не е активна за този модел 9. ЦВЕТОВИ НАСТРОЙКИ (COLOR SETTINGS) Интерфейсът позволява персонализиране на параметрите яркост, наситеност, контраст и др.
  • Seite 49 ЧЕСТО ЗАДАВАНИ ВЪПРОСИ И ПОДДРЪЖКА Често задавани въпроси Ако не откриете проблемите в списъка по-долу, Ви препоръчваме да се обърнете към местен сервиз или да позвъните в отдел „Обслужване”. Устройството не се включва нормално Възможните причини могат да бъдат следните: 1.
  • Seite 50 3. Аудио кабелите са повредени 4. Електронната част на устройството е повредена. Има аудио сигнал в прозореца за проследяване, но няма аудио сигнал в режим на възпроизвеждане Възможните причини могат да бъдат следните: 1. Проблеми с настройката: не е избрана аудио опцията 2.
  • Seite 51 ТЕХНИЧЕСКИ СПЕЦИФИКАЦИИ NVR В и д е о Видео H.264 (High Profile) компресиране ръчно, улавяне на движение, Режим записване Записване & програмирано възпроизвеждане Възпроизвеждане 1 канал / 4 канала Съхранение Вид backup Network, U-disk, disc USB, disc SATA & Backup Видео...
  • Seite 52 HAUPTFUNKTIONEN Überwachung in Echtzeit Überwachung mittels Bildschirms: analogisches Ausgang Interface, VGA oder HDMI Speichern HDD funktioniert nur während der Aufnahme, das reduziert den Energieverbrauch und verlängert die Lebensdauer. Hinweis: HDD ist nicht im Paket eingeschlossen. Kompression Kompression in Echtzeit auf dem Speichergerät, das ermöglicht eine konstante Video und Audio Qualität.
  • Seite 53 Versorgungsspannung ist 230V±10% / 50 Hz. 2. Wir empfehlen Ihnen ein UPS Gerät zu benutzen, um das Gerät vom Spannungsunterschied zu schützen. Gerät ausschalten Dafür gibt es 2 Methoden: 1. Rufen Sie das Hauptmenü (Klick rechts auf dem Bildschirm) ab und wählen Sie die Option Logout (Ausgehen) - Shutdown (Schließen) 2.
  • Seite 54 Menü Im Modus Vorschauen können Sie das Menü im Bildschirm durch Klicken rechts, abrufen, sowie das Bild unten. Das Menü schließt ein: Das Hauptmenü (Main menu), schnelles Handbuch (Guide), Modus Aufnahme (Record mode), Wiedergabe (Playback), Kontrolle PTZ (PTZ control), XVI Kontrolle, PTZ schnell (High speed PTZ), Farbeinstellungen (Color settings), Einstellungen Video Ausgänge (Output adjust), Konto verlassen, siehe Sender 1/4 (View 1/4) 1.
  • Seite 55 1.1.1 Die Aufnahme konfigurieren (Record config) Rufen Sie das Hauptmenü ab - Record (Aufnahme) - Record config (Aufnahme konfigurieren) Stellen Sie die Eintragungsparameter für jeden Sender oder gleichzeitig für alle Sender ein. Das System ist eingestellt 24 Stunden ununterbrochen aufzunehmen. Hinweis: HDD muss im Modus Lesen/Schreiben eingestellt werden.
  • Seite 56 24:00 Uhr) und 3 Modi (normale Aufnahme, bei Detektion Bewegung und bei Alarm) Regular (normale Aufnahme): das Gerät nimmt im eingestellten Zeitraum auf. Videodatei “R”. Detect (Detektion Bewegung): das Gerät detektiert die Bewegung. Videodatei “M”. Alarm (Alarm): die Funktion Alarm Aufnahme schließt ein: Detektion der Bewegung, kein Bild, Verlust Videosignal.
  • Seite 57 Nächstes Vorheriges Nächste Datei Vorherige Datei Vollbild Z y k l i s c h e Wiedergabe Hinweis: Wenn Sie Bild mit Bild wiedergeben möchten, müssen Sie den Film unterbrechen. Sonderfunktionen: Zoom lokal: Wenn das System einen einzigen Sender im Bildschirm anzeigt, können Sie mit der Mouse ein Teil im Bildschirm auswählen, den Sie mit Klick links vergrößern können.
  • Seite 58 1.2 Alarm (Alarm) Die Funktion Alarm-Aufnahme schließt ein: Detektion Bewegung, kein Bild, Verlust Video Signal, Nichtübereinstimmungen. 1.2.1 Detektion Bewegung (Motion detect) Wenn das System die Bewegung detektiert, die die Sensibilitätsschwelle erreicht, dann startet die Aufnahme. Hinweis: der Knopf Advanced öffnet das folgende Menü: Up Window (Zurück), Show Desktop (zeigt das Interface Sender Vorschau), Copy (kopiert Einstellungen), Paste (fügt Einstellungen ein), Default (Wiederherstellung der impliziten Einstellungen), Record config (Abkürzung an das Interface für Konfiguration der Aufnahme).
  • Seite 59 Channel (Sender): wählen Sie den Sender, den Sie konfigurieren möchten Enable (aktiviert): die Funktion Detektion Bewegung ist eingeschaltet Sensitivity (sensibilitate): wählen Sie einen der 6 Sensibilitätsschwellen aus Period (Zeitraum): aktiviert die Detektion Bewegung im eingegebenen Zeitraum. Sie können verschiedene Zeiträume auswählen, abhängig vom Wochentag. Jeder Tag ist in 4 Zeitabschnitten geteilt.
  • Seite 60 Die Einstellungen sind gleich wie bei der Detektion Bewegung. Hinweis: der Knopf Advanced öffnet das folgende Menü: Up Window (Zurück), Show desktop (zeigt das Interface für Sender Vorschau), Copy (kopiert die Einstellungen), Paste (fügt die Einstellungen ein), Default (Wiederherstellung der impliziten Einstellungen), Record config (Abkürzung an das Interface für die Konfiguration der Aufnahme).
  • Seite 61 Nachricht oder durch einen Laut. 1.3 Systemeinstellungen (System) Es erscheint das folgende Interface: 1.3.1 Allgemeine Einstellungen (General)
  • Seite 62 Time zone: Einstellung Zeitzone System time: Einstellung Datum und Uhrzeit Data format: wählen Sie das Datum Format (Jahr, Monat, Tag), MDY (Monat, Tag, Jahr), DMY (Tag, Monat, Jahr) Date separator: Wählen Sie einen Trennzeichen für das Datumformat aus Time format: Wählen Sie das Uhrzeitformat: 12 oder 24 Stunden Language: wählen Sie die Menüsprache aus...
  • Seite 63 1.3.3 Netzwerk Einstellungen (Network) Net Card: wählen Sie die Option Wire Netcard DHCP: IP Adresse automatisch erwerben (nicht empfohlen) IP address: IP Adresse einstellen. Die implizite Adresse ist 192.168.1.10 Subnet mask: die implizite Adresse ist: 255.255.255.0 Gateway: die implizite Adresse ist 192.168.1.1 DNS setup: der Domänennamen-Server verwandelt den Domänennamen in IP Adresse.
  • Seite 64 NTP setup Enable: hacken Sie, um diese Option zu aktivieren Server IP: geben Sie die IP Adresse des NTP Servers ein. Port: 123 implizit. Sie können den Port einstellen, laut Einstellungen in NTP Server. Update period: der Update Zeitraum entspricht dem Zeitraum im NTP Server. der implizite Zeitraum ist 60 Minuten.
  • Seite 65 DDNS Enable hacken Sie, um diese Option zu aktivieren DDNS: ist der dynamische Domänennamen des Servers Domain name: geben Sie den Domänenamen eingetragen in DDNS ein. User name: geben Sie den Nutzernamen eingetragen in DDNS ein. Password: geben Sie das Passwort des Nutzers in DDNS ein. Wenn DDNS erfolgreich konfiguriert und eingeschaltet ist, geben Sie den Domänennamen im Browser ein und rufen es ab.
  • Seite 66 Enable hacken Sie, um diese Option zu aktivieren Server IP: IP Adresse im Server FTP Port: Domänen-Port für FTP; implizit ist 21 User name: Nutzername für FTP Password: Nutzer Passwort Anonymous: aktiviert den Modus anonym - sie brauchen keinen Nutzernamen und kein Passwort einzustellen Max file length: Höchste Länge der Dateien, die archiviert werden können.
  • Seite 67 1.3.9 Digital Interface Digital zeigt die Zahl und den Typ der Kameras für dieses Modell: Analogisch Hybrid 4 x 1080N 8 x 1080P 4 x 720P 12 x 960P 2 x 720P + 2 x 720P 4 x 960H 8 x 720P 1.3.10 Einstellungen XVI (XVI Settings) Das Menü...
  • Seite 68 1.4 Fortgeschrittene Einstellungen (Advanced) Das Menü schließt ein: HDD Verwaltung, Nutzerkonto, Online Nutzer, Video Ausgang Einstellungen, Selbstwartung, Rückkehr zur Werkeinstellungen, Updates, Infos über das Gerät, Import/Export. 1.4.1 Verwaltung Speichergerät (Storage) Das Interface zeigt Infos über den internen HDD an: die Nummer, den Typ, den Status und die Speicherkapazität.
  • Seite 69 Read/Write: die Ausstattung kann geschrieben oder gelesen werden Read-only: die Ausstattung kann nur gelesen werden Redundant: die Funktion ist nicht aktiv Format storage: formatiert das HDD Recover: Wiederherstellung der Infos von HDD Partition: macht Partitionen auf den HDD 1.4.2 Graphisches Interface des Nutzers (Display) Im Modus Vorschau befinden sich: Uhrzeitanzeige, Sendernamen, Status Aufnahme, Status Alarm, Transparenz und Bereich.
  • Seite 70 Resolution: Einstellung Resolution Bildschirm Channel: Geben Sie die Sendernummer ein. 1.4.3 Nutzer Verwaltung (Account) Hinweis: 1. Namenlänge für einen Nutzer kann höchstens 8 Zeichen haben. Die freien Räumen vor oder nach dem Namen sind nicht gültig. Der freie Raum in der Mitte des Namens ist gültig. Die zugelassenen Zeichen sind: Buchstaben, Ziffern, Unterstrich, Minus, Punkt.
  • Seite 71 1.4.6 System Wiederherstellung (Restore) Das System kann zur Werkeinstellungen eingestellt werden. Sie können im Menü die Funktionen wählen, die Sie neu einstellen. 1.4.7 Firmware Update (Upgrade) Wählen Sie den Weg zur Update Datei. Hinweis: Die Datei muss im Wurzelverzeichnis der USB Speicher gespeichert werden. 1.4.8 Infos über das Gerät (Device info)
  • Seite 72: Modus Aufnahme (Record Mode)

    1.5 Infos (Info) Das Interface bietet detaillierte Infos über das Speichergerät, BPS (zeigt den Übertragungsfluss Kb/s und die Speicherkapazität MB/h in Echtzeit, die Historie und die Software Version. 2. SCHNELLES HANDBUCH (GUIDE) Das Interface zeigt die Schritte für die Grundkonfiguration des Gerätes, so wie Datumeinstellungen, Uhrzeit, Netzwerk testen und Link für Herunterladen der XMEye App.
  • Seite 73: Farbeinstellungen (Color Settings)

    7. XVI&AHD Wählen Sie das Videosignal für jeden Sender. Wählen Sie bitte Option “Audio” wenn Sie nicht sicher sind, welchen Kameratyp Sie haben. 8. HIGH SPEED PTZ Funktion nicht verfügbar für dieses Modell. 9. FARBEINSTELLUNGEN (COLOR SETTINGS) Das Interface ermöglicht die Personalisierung der Parameter: Lichtstärke, Sättigung, Bildkontrast. 10.
  • Seite 74 FAQ UND WARTUNG Wenn Ihre Probleme unten nicht beschrieben werden, bitte kontaktieren Sie einen lokalen autorisierten Service Das Gerät schaltet nicht normal ein Mögliche Gründe: 1. Die Versorgung entspricht nicht. 2. Der Versorgungsadapter ist kaputt. 3. Programm Update ist falsch. 4.
  • Seite 75 3. Die Audiokabeln sind kaputt. 4. Der elektronische Teil des Gerätes ist kaputt. Es gibt Audiosignal im Folgefenster aber es gibt kein Audiosignal im Modus Wiedergabe Mögliche Gründe: 1. Einstellungsprobleme: die Option Audio wurde nicht ausgewählt 2. Der Sender hat kein Audio Die Uhrzeit wurde falsch eingestellt Mögliche Gründe: 1.
  • Seite 76: Technische Spezifikationen Nvr

    TECHNISCHE SPEZIFIKATIONEN NVR Video Video Kompression H.264 (High Profile) manuell, Detektion Bewegung, Modus Aufnahme Aufnahme & programmiert Wiedergabe Wiedergabe 1 Sender / 4 Sender Speichern & Backup Typ backup Network, U-Disk, Disk USB, Disk SATA Eingang Video 4 x BNC Ausgang Video 1 x VGA, 1 x HDMI Eingang Audio...
  • Seite 77: Principales Funciones

    PRINCIPALES FUNCIONES Vigilancia en tiempo real Vigilancia a través del monitor: interfaz de salida analógica, VGA o HDMI Almacenamiento La unidad de disco duro solo funciona durante la grabación, lo que reduce el consumo de energía y prolonga la vida útil Nota: la unidad de disco duro no está...
  • Seite 78 2. O sugerimos a que utilicéis un dispositivo UPS para proteger el aparato de eventuales variaciones de tensión. Apagar el dispositivo Hay dos métodos de apagar el dispositivo: 1. En el menú principal (clic derecha en la pantalla) seleccionando la opción Logout (Salida) - Shutdown (Apagar) 2.
  • Seite 79: Menu Principal (Main Menu)

    Menú En el modo de vista previa tiene acceso al menú de la pantalla haciendo clic derecha como se muestra en la imagen siguiente. El menú incluye: Menú principal (Main menu), guía rápida (Guide), modo de grabación (Record mode), reproducción (Playback), control PTZ (PTZ control), XVI control, PTZ acelerado (High speed PTZ), configuración del color (Color settings), configuración salida video (Output adjust), salida de la cuenta, Visualización canal 1/4 (View 1/4) 1.
  • Seite 80 1.1.1 Configuración de la grabación i (Record config) Acceda la menú principal (Meniu principal) - Record (Grabación) - Record config (Configuración de la grabación) Establezca los parámetros de grabación en cada canal o en todos los canales al mismo tiempo. Al principio, el sistema está...
  • Seite 81 • Grabación programada: Puedes elegir cuatro horarios de grabación (en el intervalo horario entre 0:00 y 24:00) y 3 modos (grabación normal, detección de movimiento y en caso de alarma): Regular (grabación normal): el dispositivo graba en el horario establecido. El tipo de archivo de video es ”R”.
  • Seite 82 Reproducción rápida Reproducción hacia delante rápida hacia atrás Cuadro siguiente Cuadro anterior Archivo siguiente Archivo anterior Pantalla completa Reproducción cíclica Nota: para reproducción cuadro con cuadro, la película tendrá que ser establecida en modo. Funciones especiales: Zoom local: cuando el sistema muestra un solo canal en la pantalla, puede seleccionar con el ratón una parte de la pantalla para agrandarla haciendo clic izquierda.
  • Seite 83 1.2 Alarm (Alarma) La función de la grabación de la alarma incluye: la detección de movimiento, la pérdida de imagen, la perdida de la señal video, anomalías. 1.2.1 Detección de movimiento (Motion detect) Cuando el sistema detecta el movimiento que alcanza el límite de sensibilidad establecido, comenzara la grabación Nota: el botón Advanced abre el siguiente menú: Up Window (Atras), Show desktop (aparece la interfaz de pre visualización de los canales), Copy (copia las configuraciones), Paste (Pega las...
  • Seite 84 Channel (canal): elije el canal de configuración Enable (activar): significa que la función de detección de movimiento esta activada Sensitivity (sensibilidad): elige uno de los 6 niveles de sensibilidad Period (periodo): activa la detección de movimiento en el intervalo especificado. Podéis elegir intervalos de tiempo para cada dia de la semana.
  • Seite 85 Los ajustes son los mismos que la detección de movimiento. Nota: El botón Advanced abre el siguiente menú: Up Window (Atras), Show desktop (aparece la interfaz de pre visualización de los canales), Copy (copia configuraciones), Paste (Pega configuraciones), Default (restablece configuraciones implícitas), Record config (atajo hacia la interfaz de configuración de la grabación).
  • Seite 86 le advertirá mediante un mensaje o un pitido. 1.3 1.3 Configuración del sistema (System) Aparecerá la siguiente interfaz: 1.3.1 Configuraciones generales (General)
  • Seite 87 Time zone: establecer la zona horaria System time: establecer la fecha y la hora del sistema Data format: elija el formato de la fecha YMD (año, mes, día), MDY (luna, zi, an), DMY (día, mes, año) Date separator: elija un tipo de separador para el formato de la fecha Time format: elija el formato de la hora: 12 o 24 horas.
  • Seite 88 1.3.3 Configuraciones de la red (Network) Net Card: seleccione la opción Wire Netcard DHCP: obtenga la dirección IP de manera automática (no recomendado). IP address: configure la dirección IP. La dirección implícita es 192.168.1.10 Subnet mask: la dirección implícita es: 255.255.255.0 Gateway: la dirección implícita es 192.168.1.1 DNS setup:...
  • Seite 89 NTP setup Enable: marca para activar esta opción Server IP: ingrese la dirección IP del servidor NTP. Port: 123 predeterminado. Puede configurar el puerto según la configuración del servidor NTP. Update period: el período de actualización es el mismo que el del servidor NTP. El intervalo predeterminado es 60 minutos.
  • Seite 90 DDNS Enable marca para activar esta opción DDNS: representa el nombre de dominio dinámico para el servidor. Domain name: introduzca el nombre del dominio registrado por DDNS. User name: introduzca el nombre del usuario registrado por DDNS. Password: introduzca la contraseña del usuario registrado DDNS.
  • Seite 91 Enable marca para activar esta opción Server IP: la dirección IP del servidor FTP Port: puerto del dominio FTP; el valor predeterminado es este 21 User name: nombre del usuario para FTP Password: contraseña del usuario Anonymous: activa el modo anónimo - no es necesario configurar su nombre de usuario y contraseña Max file length: longitud máxima de los archivos que serán almacenados.
  • Seite 92 1.3.9 Digital La interfaz Digital muestra el número y el tipo de las cámaras compatibles con este modelo: Analogice Hibrid 4 x 1080N 8 x 1080P 4 x 720P 12 x 960P 2 x 720P + 2 x 720P 4 x 960H 8 x 720P 1.3.10 Ajustes XVI (XVI Settings) El menú...
  • Seite 93 1.4 Ajustes avanzadas (Advanced) El menú incluye: administrador HDD, cuenta usuario, usuarios online, ajustes salidas video, auto- mantenimiento, regreso a las configuraciones de fábrica, actualizaciones, informaciones sobre el dispositivo, importe/exportación. 1.4.1 Gestión de almacenamiento (Storage) La interfaz muestra informaciones sobre el disco duro interno: su número, tipo del estatus y capacidad de almacenamiento Elija el dispositivo de almacenamiento y luego haga clic en la función que desea a que se ejecute.
  • Seite 94 Read/Write: el dispositivo puede ser leído o escrito Read-only: el dispositivo solamente puede ser leído Redundant: función no activada Format storage: formatear el disco duro Recover: recuperar la información del disco duro Partition: crea particiones en el disco duro 1.4.2 Administración de los usuarios (Display) El modo de vista previa local incluye: visualización de la hora, nombre del canal, estado de grabación, estado de alarma, transparencia y la región cubierta.
  • Seite 95 Resolution: establecer la resolución de la pantalla Channel: Ingrese el número de canal 1.4.3 Administración de los usuarios (Account) Nota: 1. La longitud del nombre de usuario puede tener como mucho 8 caracteres. Los espacios libres situados antes o después del nombre no son válidos. El espacio libre situado dentro del nombre es válido.
  • Seite 96 1.4.6 Restablecer el sistema (Restore) El sistema puede volver a la configuración predeterminada de fábrica. Puede seleccionar desde el menú las funciones para restablecer. 1.4.7 Actualización de firmware (Upgrade) Seleccione la ruta hacia el archivo de actualización. Nota: el archivo debe guardarse en el directorio raíz de una memoria USB 1.4.8 Informaciones del dispositivo (Device info)
  • Seite 97 1.5 Informaciones (Info) La interfaz proporciona información detallada sobre el dispositivo de almacenamiento, BPS (muestra la secuencia de transferencia Kb/s y la capacidad de almacenamiento MB/h en tiempo real), el historial de los eventos y la versión del software. 2. GUÍA RÁPIDA (GUIDE) La interfaz muestra una serie de pasos para la configuración básica del dispositivo, como la configuración de la fecha, hora, la verificación del estado de la red y del enlace para descargar la aplicación XMEye.
  • Seite 98 7. XVI&AHD Elije el tipo de señal video para cada uno de los canales. Recomendamos elegir la opción ”Auto” cuando no esté seguro de qué tipo de cámaras tiene. 8. HIGH SPEED PTZ La función no está activa para este modelol 9.
  • Seite 99 PREGUNTAS FRECUENTE Y MANTENIMIENTO Preguntas frecuentes Si los problemas no aparecen en la siguiente lista, le recomendamos a que contacte con un centro de servicio local o a que llame al departamento de reparaciones. El dispositivo no arranca bien Los posibles motivos puede ser los siguientes: 1.
  • Seite 100 3. Los cables de audio son defectuosos 4. La parte electrónica del dispositivo está defectuosa. Hay señal de audio en la ventana de seguimiento pero no hay señal de audio en el modo de reproducción Las posibles razones pueden ser las siguientes: 1.
  • Seite 101 ESPECIFICACIONES TÉCNICAS NVR Video Compresión video H.264 (High Profile) Manual, detección movimiento, Modo de grabación Grabación y programado reproducción Reproducción 1 canal / 4 canales Almacenamiento Tipo backup Network, U-disk, disc USB, disc SATA & Backup Entrada video 4 x BNC Salida video 1 x VGA, 1 x HDMI Entrada audio...
  • Seite 102: Fonctions Principales

    FONCTIONS PRINCIPALES Surveillance en temps reel Surveillance par le moniteur: interface analogique de sortie, VGA ou HDMI Stockage HDD fonctionne seulement pendant l'enregistrement, ce qui reduit la consommation d’energie et prolonge la duree de vie. Observation: HDD n’est pas inclu dans le paquet Compression Compression en temps reel sur le dispositif de stockage, ce qui permet une qualite audio et video stable...
  • Seite 103 de tension. Arreter le dispositf Il y a deux methodes pour arreter le dispositif: 1. Accedez au menu principal (click a droite sur l’ecran) et selectez l’option Logout (sortie) - Shutdown (fermer) 2. Arretez la source d’alimentation. Faites attention: 1. Redemarrer apres la chute de la tension: si le dispositif n’est pas arrete normalement, il peut creer une copie de securite et peut redemarrer ensuite de cet etat.
  • Seite 104: Le Menu Principal (Main Menu)

    Le menu Dans le mode de previsualisation vous pouvez acceder au menu de l’ecran par le click a droite, comme dans l’image ci-dessous. Le menu inclut: Le menu principal (Main menu), le guide rapide (Guide), le mode d’enregistrement (Record mode), la reproduction (Playback), le controle PTZ (PTZ control), le controle XVI, le PTZ accelere (High speed PTZ), les reglages de la couleur (Color settings), les reglages de sortie video (Output adjust), la sortie du compte, a voir la chaine 1/4 (View 1/4) 1.
  • Seite 105 1.1.1 Configuration de l’enregistrement (Record config) Accedez au Main menu (au Menu principal) - Record (Enregistrement) - Record config (Configuration de l’enregistrement). Reglez les parametres d’enregistrement sur chaque chaine ou sur toutes les chaines en meme temps. Le systeme est defini pour debut pour enregistrer 24 heures sans pause.
  • Seite 106 • Enregistrement programme: Vous pouvez choisir 4 periodes d’enregistrement (dans l’intervalle horaire entre 0:00 et 24:00) et 3 modes (enregistrement normal, a la detection du mouvement et en cas d’alarme): Regulier (enregistrement normal): le dispositif enregistre dans l’intervalle de temps regle.
  • Seite 107 Stop Redare lenta Derouler rapidement Rendre lentement en avanse Le cadre suivant Derouler rapidement a l'envers Le fichier suivant Le cadre anterieur L'ecran entier Rendre cycliquement Observation: pour reproduire cadre par cadre, le film doit etre regle sur pause. Les fonctions speciales: Le Zoom local: lorsque le systeme affiche une seule chaine sur l’ecran vous pouvez selecter avec la souris une partie de l’ecran que vous pouvez augmenter par le click a gauche.
  • Seite 108 1.2 Alarm (Alarme) La fonction d’enregistrement a l’alarme inclut: détection du mouvement, absence de l’image, perte du signal video, anormalités. 1.2.1 Détection du mouvement (Motion detect) Quand le systeme detecte le mouvement a la limite de sensibilité reglée, il va demarrer l’enregistrement Observation: le bouton Advanced ouvre le menu suivant: Up Window (a l’envers), Show desktop (affiche l’interface de previsualisation des chaines), Copy (copie les reglages), Paste (colle...
  • Seite 109 Channel (chaine): choisissez la chaine a configurer Enable (activer): signifie, que la fonction de détection du mouvement a ete demarrée Sensitivity (sensibilite): choisissez un des 6 niveaux de sensibilité Period (perioada): active la détection du mouvement pendant la periode specifiée. Vous pouvez regler des periodes differentes en fonction du jour de la semaine.
  • Seite 110 Il y a les memes reglages comme dans le cas de la détection du mouvement. Observation: le bouton Advanced ouvre le menu suivant: Up Window (a l’envers), Show desktop (affiche l’interface de previsualisation des chaines), Copy (copie les reglages), Paste (colle les reglages), Default (reetablit les reglages par defaut), Storage (raccourci vers l’interface de configuration de l’unité...
  • Seite 111 par un message ou son. 1.3 Les reglages du systeme (System) Vous allez voir l’interface suivante: 1.3.1 Les reglages generaux (General)
  • Seite 112 Time zone: reglez le fuseau horaire System time: regler la date et l’heure du systeme Data format: choisir le format de la date YMD (annee, mois, jour), MDY (mois, jour, annee), DMY (jour, mois, annee) Date separator: choisir un type du separateur pour le format de la date Time format: choisir le format de l’heurei: 12 ou 24 heures.
  • Seite 113 1.3.3 Les reglages du reseau (Network) Net Card: selectez l’option Wire Netcard DHCP: vous recevez l’adresse IP automatiquement (cela n’est pas recommande). IP address: reglez l’adresse IP. Par defaut 192.168.1.10 Subnet mask: Par defaut l’adresse est: 255.255.255.0 Gateway: Par defaut l’adresse est 192.168.1.1 DNS setup: le nom du domaine du serveur transforme le nom du domaine en adresse IP.
  • Seite 114 NTP setup Enable: cochez pour activer cette option Server IP: introduisez l’adresse IP du serveur NTP Port: 123 par defaut. Vous pouvez regler le port en fonction des reglages du serveur NTP Update period: la periode d’actualisation est la meme avec la periode du serveur NTP. L’intervalle par defaut est de 60 minutes Email Si l’alarme est demarré...
  • Seite 115 DDNS Enable cochez pour activer cette option DDNS: represente le nom du domaine dynamique du serveur. Domain name: introduisez le nom du domaine enregistre par DDNS. User name: introduisez le nom de l’utilisateur enregistre par DDNS. Password: introduisez le mot de passe de de l’utilisateur enregistre par DDNS Si DDNS a ete correctement configure et a demarre, vous pouvez introduire le nom du domaine dans le browser Internet Explorer pour acceder a celui-ci.
  • Seite 116 Enable cochez pour activer cette option Server IP: adresse IP du serveur FTP Port: le port du domaine pour FTP; par defaut 21 User name: nom de l’utilisateur pour FTPP Password: mot de passe de l’utilisateur Anonymous: activer le mode anonyme, il n’est plus necessaire de definir le nom de l’utilisateur et le mot de passe Max file length: la longueur maximale des fichiers qui seront stockes.
  • Seite 117 1.3.9 Digital L’interface Digital affiche le numero et le type des cameras supportes par ce modele: Analogiques Hybride 4 x 1080N 8 x 1080P 4 x 720P 12 x 960P 2 x 720P + 2 x 720P 4 x 960H 8 x 720P 1.3.10 Les reglages XVI (XVI Settings) Le menu permet le controle de l’image (eclairage, contraste, saturation, etc.) pour chaque chaine.
  • Seite 118 1.4 Les reglages avances (Advanced) Le menu inclut: administration HDD, compte de l’utilisateur, les utilisateurs online, les reglages des sorties video, la maintenance automatique, retourner aux parametres de l’usine, les actualisations, les informations concernant le dispositif, importation / exportation. 1.4.1 Administration de l’unité de stockage (Storage) L’interface affiche les informations concernant le HDD interne: son numero, type, statut et capacite de stockage.
  • Seite 119 Read/Write: l’equipement peut etre ecrit ou lu Read-only: l’equipement peut etre seulement lu Redundant: la fonction n’est pas active Format storage: formater le HDD Recover: recuperer les informations du HDD Partition: creer les partitions pour HDD 1.4.2 Interface grafique de l’utilisateur (Display) Dans le mode de previsualisation local sont inclus: affichage de l’heure, le nom de la chaine, le statut de l’enregistrement, le statut de l’alarme, la transparence et la region couvertea.
  • Seite 120 Modify user: modifier le nom et les droits de l’utilisateur selecté Modify group: modifier le nom et les droits du groupe Modify password: modifier le mot de passe de l’utilisateur. Vous pouvez definir un mot de passe au maximum 6 caracteres. Les espaces libres avant ou apres le mot sont invalides. Les espaces libres entre les mots sont valides.
  • Seite 121 1.4.7 Actualiser le firmware (Upgrade) Selectez la voie vers le fichier pour l’actualisation. Observation: le fichier doit etre stocke dans le dossier racine d’une memoire USB 1.4.8 Informations concernant le dispositif (Device info) 1.5 Les informations (Info) L’interface offre des informations detaillees concernant le dispositif de stockage, le BPS (affiche...
  • Seite 122 le flux de transfer Kb/s et la capacite du dispositif de stocker MB/h en temps reel), l’historique des evenements et la version software. 2. LE GUIDE RAPIDE (GUIDE) L’interface affiche une serie de pas pour la configuration de base du dispositif, par exemple les reglages de la date, de l’heure, la verification du reseau et le link pour telecharger l’application XMEye.
  • Seite 123 8. HIGH SPEED PTZ La fonction n’est pas active pour ce modelel 9. SETARI CULOARE (COLOR SETTINGS) L’interface permet de personnaliser les parametres d’eclairage, saturation, contraste etc. de l’image. 10. LES REGLAGES DE SORTIE DU VIDEO(OUTPUT ADJUST) La meme interface peut etre accedee par le Main menu (le Menu principal) - Advanced (les Reglages avances) - Output adjust (regler l’image)
  • Seite 124 LES QUESTIONS FREQUENTES ET LA MAINTENANCE Les questions frequentes Si vous ne trouvez pas les problemes dans la liste ci-dessous, on vous recommande de contacter un service local ou appeler le departement de service. Le dispositif ne demarre pas normalement Les possibles raisons peuvent etre les suivantes: 1.
  • Seite 125 3. Les cables audio sont defectueux. 4. La partie électronique du dispositif est defectueuse. Il existe le signal audio dans la fenetre de surveillance, mais il n’existe pas le signal audio dans le mode de reproduction Les possibles raisons peuvent etre les suivantes: 1.
  • Seite 126 LES SPECIFICATIONS TECHNIQUES DU NVR Video Compression video H.264 (High Profile) Manuel, détection du Mode enregistrement Enregistrement mouvement, programme & reproduction Reproduction 1 chaine / 4 chaines Network, U-disque, disque USB, disque Stockage & Backup Type du backup SATA Entree video 4 x BNC Sortie video 1 x VGA, 1 x HDMI...
  • Seite 127: Használati Utasítás

    FŐBB JELLEMZŐK Távfelügyelet valós időben Felügyelet képernyőn keresztül : analóg interfész kimenet, VGA vagy HDMI Tárolás HDD csak a vételezés folyamán működik , ami azt jelenti, hogy csökkenti az energiafogyasztást és meghosszabítja az élettartamot. Megjegyzés: HDD nincs mellékelve a csomagba Tömörítés Valós idejű...
  • Seite 128 Két metódus van a készülék leállításáshoz: 1. Lépjen be a főmenübe (kattintva a jobb egérgombbal a képernyőre) és válassza ki a Logout lehetőséget (Kimenet) - Shutdown (Lezárása) 2. Kapcsolja ki a tápegységet. Különleges figyelmeztetések: 1. Újraindítás rövidzárlat után: ha a készülék nem rendesen kapcsolt ki ez egy biztonsági másolatot fog elvégezni és újraindulhat az áramszünet visszatérése után.
  • Seite 129 A menü tartalmazza: Főmenü (Main menu), gyors tájékoztatás (Guide), vételezési mód (Record mode), lejátszás (Playback), PTZ ellenőrzés (PTZ control), XVI ellenőrzés, PTZ gyorsjtás (High speed PTZ), színbeállítás (Color settings), videókimenet beállítások (Output adjust), kilépés a fiókból, lásd 1/4 csatorna (View 1/4) 1.
  • Seite 130 1.1.1 Rögzítés beállítása (Record config) Lépjen be a főmenübe Main menu (Meniu principal) - Record (Rögzítés) - Record config (Rögzítési beállítások) Állítsák be a rögzítési paramétereket mindegyik csatornához külön külön vagy egyszerre az összes csatornának. Rendszer úgy van beállítva, hogy első alkalomkor 24 úrán keresztül folyamatosan rögzítsen.
  • Seite 131 Mode (vételezési mód): állítsa be a vételezés típusát: programozott , manuális vagy leállított. Programozott rögzítés: Kiválaszthat 4 periódikus vételezést (0:00 és 24:00 óraidőintervallum között ) és 3 módon (normál rögzítés , mozgásérzékelésre és riasztás esetén): Regular (normál vételezés): a készülék a beállított időintervallum között vételez. Videó fálj típusa “R”.
  • Seite 132 Gyors előrevivés Gyors visszavivés Következő keret Elöző keret Következő fáljl Elöző fáljl Teljes képernyő Ciklikus lejátszás Megjegyzés : Ahhoz, hogy keret keret után lejátszhassa a filmet akkor szünetelési módba kell beállítani. Különleges funkciók: Helyi zoom: amikor a rendszer egyetlen csatornát jelenit meg a képernyőn az egérrel ki tudja választani a képernyő...
  • Seite 133 1.2 Alarm (Riasztó) Rögzitési funkció a riasztáshoz tartalmaz : mozgásérzékelést , képhiányoság, videójel elvesztése, rendellenességek. 1.2.1 Mozgásérzékelés (Motion detect) Amikor a rendszer felismeri a mozgást amely eléri a beállított érzékenységi küszöböt akkor el fog indulni a rögzités Megjegyzés : Advanced gomb a következő menüt fogja megnyitni: Up Window (Vissza), Show desktop (megjeleniti a csatornák előnézeti felületét), Copy (lemásolja a beállításokat), Paste (Beilleszti a beállításokat), Default (visszaállítja az alapértelmezett beállításokat ), Record config (rövidités a vételezett beállítások felületéhez).
  • Seite 134 Channel (csatorna): válassza ki a beállított csatornát Enable (aktiválja): azt jelenti, hogy a mozgásérzékelési funkció el van indítva Sensitivity (érzékenység): válassza ki az egyiket 6 érzékenységi szintből. Period (időszakos): aktiválja a mozgásérzékelést a megadott intervallumban. A hét napjától függően különböző időintervallumokat állíthat be. Minden nap 4 időszakaszra oszlik. Mozgásérzékelés esetén kiválaszthatja a figyelmeztetési módot : megjeleniti az üzenetet, hangot ad ki, feltöltés az FTP szerverre, e-mail küldése, esemény mentése.
  • Seite 135 Beállítások ugyanolyanok mint a mozgásérzékelésnél. Megjegyzés: Advanced gomb következő menüt fogja megnyitni : Up Window (Vissza), Show desktop (megjeleniti a csatornák felületét), Copy (lemásolja a beállításokat ), Paste (Beilleszti a beállításokat ), Default (visszaállítja az alapértelmezett beállításokat ), Record config (rövidités a vételezési konfigurálás felületéhez).
  • Seite 136 1.3 Rendszerbeállítás (System) Következő felület fog megjeleni : 1.3.1 Általános beállítások (General)
  • Seite 137 Time zone: állítsa be az időzónát System time: állítsa be az órát és dátumot Data format: válassza ki a dátum formátumját YMD (év, hónap, nap), MDY (hónap, nap, év), DMY (nap, hónap, év) Date separator: válassza ki a szétválasztó típust a dátumformátumhoz Time format: válassza ki az óraformátumot : 12 vagy 24 óra.
  • Seite 138 1.3.3 Hálózati beállítások (Network) Net Card: válassza ki Wire Netcard opciót DHCP: megkapja az IP címet automatikus módon (nem ajánlott ). IP address: állítsa be az IP címet .Alapértelmezett cím 192.168.1.10 Subnet mask: Alapértelmezett cím: 255.255.255.0 Gateway: Alapértelmezett cím 192.168.1.1 DNS setup: szerver domain neve átalakítja a domain nevet IP címé.
  • Seite 139 NTP setup Enable: jelőlje ki, hogy aktiválódjon ez a lehetőség Server IP: írja be az NTP szerver IP címjét. Port: 123 alapértelmezett . Be tudja állítani a portot az NTP szerver beállításai szerint Update period: frissítési periódus ugyanaz mint az NTP szerver periódusa. Az alapértelmezett intervallum 60 perc.
  • Seite 140 DDNS Enable jelölje ki, hogy aktiválja ezt a lehetőséget DDNS: a dinamikus szerver domain nevét jelenti Domain name: Adja meg a DDNS által regisztrált domain nevet. User name: Adja meg a DDNS által regisztrált felhasználónevet. Password: Adja meg a DDNS által regisztrált jelszót. Amikor a DDNS sikeresen volt beállítva és elindítva , be tudja írni a domain nevet az Internet Explorer browserébe, hogy hozzáférjen.
  • Seite 141 Enable jelölje ki, hogy aktiválja ezt az opciót Server IP: FTP szerver IP címe Port: domain port az FTP-hez; alapértelmezett 21 User name: felhasználónév az FTP-hez Password: felhasználó jelszava Anonymous: aktiválja az anonim módot – nem szükséges beállítani a felhasználónevet és jelszót Max file length: a fáljlok maximális hossza amelyek arhiválva lesznek.
  • Seite 142 1.3.9 Digital Digitális felület megjeleniti a kamerák típusát és számát amit ez a módel támogat: Analóg Hibrid 4 x 1080N 8 x 1080P 4 x 720P 12 x 960P 2 x 720P + 2 x 720P 4 x 960H 8 x 720P 1.3.10 Beállítások XVI (XVI Settings) A menü...
  • Seite 143 1.4 Speciális beállítások (Advanced) Menü tartalmaz: HDD adminisztrálás , felhasználói fiókot, online felhasználót , videó kimeneti beállításokat, önfenntartás, gyári beállítások, frissítések, eszközinformációk, import / exportálás. 1.4.1 Tárolási egység adminisztrálása (Storage) A felület megjelenit információkat a belső HDD-ről: enek a számát, típusát, állapotát és a tárolási kapacitást.
  • Seite 144 Read/Write: a berendezés írható vagy olvasható Read-only: a berendezés csak olvasható Redundant: ez a funkció nem aktív Format storage: formatálja a HDD Recover: visszaszerzi az információkat a HDDről recupereaza informatiile de pe HDD Partition: partíciókat hoz létre a HDDén 1.4.2 Felhasználói grafikus felülete(Display) A helyi megtekintési módban tartóznak : óra megjelenitése , csatorna neve, vételezés állapota, riasztás állapota, az átláthatóság és az érintett régió.
  • Seite 145 Modify user: Módosítsa a kiválasztott felhasználó nevét és jogait Modify group: Módosítsa a csoport nevét és jogait Modify password: módosítsa a felhasználó jelszavát. Legfeljebb 6 karakter hosszúságú jelszó állítható be. Az üres szóközök nem érvényesek. A szavak közötti szóközök érvényesek. Megjegyzés : az admin felhasználó...
  • Seite 146 1.4.7 Firmware frissítése (Upgrade) Válassza ki a frissítési fájl elérési útját. Megjegyzés: a fájlt el kell menteni az USB memória gyökérkönyvtárába 1.4.8 Készülék információ (Device info) 1.5 Információk (Info) Az interfész részletes információkat nyújt a tárolóeszközről, BPS (megjeleníti a Kb / s átviteli folyamat és az MB / h tárolóeszköz kapacitását valós időben), régi események és szoftver verziók.
  • Seite 147 2. GYORS HASZNÁLATI UTASÍTÁS (GUIDE) A kezelőfelületen egy sor alapvető konfigurációs lépést jelenít meg az eszközről , például dátum, idő, hálózati tesztelés és xmeye letöltési link 3. VÉTELEZÉSI MÓD (RECORD MODE) Rövidítés mindegyik csatorna beállítási módjához. Részletesebb regisztrációs beállítások érhetők el Main meniu (Főmenü) - Főmenü (Vételezés) - Record conf (Vételezés beállítása). 4.
  • Seite 148 10. VIDEÓKIMENET BEÁLLÍTÁS (OUTPUT ADJUST) Ugyanaz a felület érhető el, ha belép a Main menu (Főmenü)- Advanced (Speciális beállítások) - Output adjust (Képbeállítás)
  • Seite 149 GYAKORI KÉRDÉSEK ÉS KARBANTARTÁS Gyakori kérdések Ha problémák nem jelenek meg a lenti listán , kérjük forduljanak egy helyi szervízhez vagy hivják fel a szervíz osztályt Készülék nem indul el rendesen Az okok a küvetkezők lehetnek : 1. Tápellátás nem megfelelő. 2.
  • Seite 150 A nyomkövető ablakban hang van de nem létezik audió jel lejátszási módban. Az okok következők lehetnek : 1. Beállítási problémák : audió opció nincs kiválasztva 2. Csatornának nics audió része Az óra hibás Az okok következők lehetnek : 1. Beállítások hibásak 2.
  • Seite 151 NVR MŰSZAKI ADATOK Videó Videó tömörités H.264 (High Profile) Manuális, mozgásérzékelés, Vételezési mód programozpott Vételezés & lejátszás Lejátszás 1 csatorna / 4 csatorna Backup Backup típus Network, U-disk, disc USB, disc SATA Bemeneti videó 4 x BNC Kimeneti videó 1 x VGA, 1 x HDMI Audió...
  • Seite 152: Funzioni Principali

    FUNZIONI PRINCIPALI Sorveglianza in tempo reale Sorveglianza tramite monitor: interfaccia di uscita analogica, VGA o HDMI Archiviazione L’HDD funziona solo durante la registrazione, il che riduce il consumo di energia e prolunga la vita Nota: Il HDD non è incluso Compressione Compressione in tempo reale sul dispositivo di archiviazione, che consente una qualità...
  • Seite 153 tensione di alimentazione è 230V±10% / 50 Hz. 2. Si consiglia di utilizzare un UPS per proteggere il dispositivo da variazioni di tensione. L’arresto del dispositivo Ci sono due modi per fermare il dispositivo: 1. Andare al menu principale (fare clic con il tasto destro sullo schermo) e selezionare l’opzione Logout - Arresto 2.
  • Seite 154 Il menu In modalità anteprima, è possibile accedere al menu facendo clic con il tasto destro sullo schermo Il menu include: Menu principale (Main menu), guida rapida (Guide), modalità di registrazione (Record mode), riproduzione (Playback), controllo PTZ (PTZ control), controllo XVI, PTZ accelerato (High speed PTZ), impostazioni del colore (Color settings), impostazioni di uscita video (Output adjust), uscita dall’account, vedi il canale 1/4 (View 1/4) 1.
  • Seite 155 1.1.1 Configurare la registrazione (Record config) Accedere Main menu (Menu principale) - Record (Registrazione) - Record config (Configurazione registrazione) Impostare i parametri di registrazione su ciascun canale o su tutti i canali contemporaneamente. Il sistema è impostato per iniziare a registrare 24 ore in modo continuo. Nota: L’HDD deve essere impostato in modalità...
  • Seite 156 • Registrazione programmata: È possibile scegliere 4 periodi di registrazione (tra 0:00 e 24:00 ore) e 3 modalità (registrazione normale, rilevamento del movimento e allarme): Regular (registrazione normale): il dispositivo registra durante il tempo impostato. Il tipo di file video è ”R”. Detect (rilevamento del movimento): il dispositivo rileva il rilevamento del movimento.
  • Seite 157 Fotogramma Cadrul anterior successiva File successivo Fisierul anterior Schermo intero Redare ciclica Nota: Per la riproduzione frame dopo frame, il film dovrà essere messo in pausa. Funzioni speciali: Zoom locale: quando il sistema visualizza un singolo canale sullo schermo, è possibile selezionare una parte dello schermo con il mouse per ingrandirla facendo clic con il pulsante sinistro del mouse.
  • Seite 158 1.2 Alarme (Alarma) La funzione di registrazione degli allarmi include: rilevamento del movimento, perdita di immagini, perdita di video, anomalie. 1.2.1 Rilevamento del movimento (Motion detect) Quando il sistema rileva la mossa che raggiunge la soglia di sensibilità impostata, inizierà la registrazione Nota: il pulsante Advanced apre il seguente menu: Finestra su, Mostra desktop, Copia, Incolla, Configurazione di default, Registra config (il collegamento all’interfaccia di configurazione di...
  • Seite 159 Channel (canale): scegli il canale da configurare Enable (attiva): significa che la funzione di rilevamento del movimento è attiva Sensitivity (sensibilità): scegli uno dei 6 livelli di sensibilità Period (periodo): attiva il rilevamento del movimento all’interno dell’intervallo specificato. È possibile impostare intervalli di tempo diversi a seconda del giorno della settimana. Ogni giorno è...
  • Seite 160 Le impostazioni sono le stesse del rilevamento del movimento. Nota: il pulsante Advanced apre il seguente menu: Finestra su, Mostra desktop, Copia, Incolla, Configurazione di default, Registra config (il collegamento all’interfaccia di configurazione di registrazione). 1.2.3 Nessun segnale video (Video loss) Quando l’apparecchiatura non riceve un segnale video, verrà...
  • Seite 161 1.3 Impostazioni sistema (System) Apparirà la seguente interfaccia: 1.3.1 Impostazioni generali (General) Time zone: impostare il fuso orario...
  • Seite 162 System time: impostare la data e l’ora del sistema Data format: scegliere il formato della data YMD (anno, mese, giorno), MDY (mese, giorno, anno), DMY (giorno, mese, anno) Date separator: scegli un tipo di separatore per il formato della data Time format: scegliere il formato dell’ora: 12 o 24 ore.
  • Seite 163 1.3.3 Impostazioni di rete (Network) Net Card: selezionare l’opzione Wire Netcard DHCP: ottenere automaticamente l’indirizzo IP (non consigliato). IP address: impostare l’indirizzo IP. L’indirizzo predefinito è 192.168.1.10 Subnet mask: l’indirizzo predefinito è: 255.255.255.0 Gateway: l’indirizzo predefinito è 192.168.1.1 DNS setup: il nome di dominio del server trasforma il nome di dominio nell’indirizzo IP.
  • Seite 164 NTP setup Enable: Selezionare per abilitare questa opzione Server IP: Inserire l’indirizzo IP del server NTP. Port: 123 predefinito. È possibile impostare la porta in base alle impostazioni del server NTP. Update period: il periodo di aggiornamento è uguale al periodo del server NTP. L’intervallo predefinito è...
  • Seite 165 DDNS Enable Selezionare per abilitare questa opzione DDNS: nome di dominio dinamico del server. Domain name: Inserire il nome del dominio registrato da DDNS. User name: Inserire il nome utente registrato da DDNS. Password: inserire la password utente registrata da DDNS. Quando DDNS è...
  • Seite 166 Enable Seleziona per abilitare questa opzione Server IP: l’indirizzo IP del server FTP Port: porta di dominio per FTP; il valore predefinito è 21 User name: il nome utente per FTP Password: password utente Anonymous: attiva la modalità anonima - non è più necessario impostare il nome utente e la password Max file length: la lunghezza massima dei file da archiviare.
  • Seite 167 1.3.9 Digital L’interfaccia Digital visualizza il numero e il tipo di fotocamere supportate da questo modello: Analogico Ibrido 4 x 1080N 8 x 1080P 4 x 720P 12 x 960P 2 x 720P + 2 x 720P 4 x 960H 8 x 720P 1.3.10 Impostazioni XVI (XVI Settings) Il menu consente il controllo dell’immagine (luminosità, contrasto, saturazione, ecc.) su ciascun...
  • Seite 168 1.4 Impostazioni avanzate (Advanced) Il menu include: gestione HDD, account utente, utenti online, impostazioni di uscita video, auto manutenzione, impostazioni predefinite, aggiornamenti, informazioni sul dispositivo, importazione / esportazione. 1.4.1 Gestione delle unità di archiviazione (Storage) L’interfaccia mostra le informazioni sull’HDD interno: numero, tipo, stato e capacità di archiviazione.
  • Seite 169 Read/Write: il dispositivo può essere scritto o letto Read-only: il dispositivo può essere solo letto Redundant: la funzione non è attiva Format storage: formattare l’HDD Recover: recupera le informazioni dall’HDD Partition: creare partizioni su HDD 1.4.2 Gestisci gli utenti (Account) Nota: 1.
  • Seite 170 massimo 6 caratteri. Gli spazi liberi prima o dopo il nome non sono validi. Gli spazi tra le parole sono validi. Nota: l’utente amministratore può modificare la propria password e password per altri utenti. Add user: aggiungere utente. Imposta il nome, la password, il gruppo e i relativi diritti Add group: aggiungere un gruppo di utenti e assegna i diritti Delete user:...
  • Seite 171 1.4.6 Ripristino del sistema (Restore) Il sistema può essere riportato alle impostazioni predefinite di fabbrica. È possibile selezionare dal menu le funzioni da ripristinare. 1.4.7 Agiornamento firmware (Upgrade) Seleziona il percorso per il file di aggiornamento. Nota: il file deve essere salvato nella directory principale di una memoria USB 1.4.8 Informazioni sul dispositivo (Device info)
  • Seite 172 1.5 Informazioni (Info) L’interfaccia fornisce informazioni dettagliate sul dispositivo di archiviazione, BPS (visualizza il flusso di trasferimento Kb/s e la capacità di memorizzazione MB / h in tempo reale), la cronologia degli eventi e la versione del software. 2. GUIDA RAPIDA (GUIDE) L’interfaccia visualizza una serie di passaggi di configurazione di base per il dispositivo, ad esempio data, ora, test di rete e collegamento per il download dell’applicazione XMEye 3.
  • Seite 173 7. XVI&AHD Scegli il tipo di segnale video su ciascun canale. Ti consigliamo di scegliere l’opzione ”Auto” quando non sei sicuro di quale tipo di fotocamera hai. 8. HIGH SPEED PTZ La funzione non è attiva per questo modello 9. IMPOSTAZIONI COLORE (COLOR SETTINGS) L’interfaccia consente di personalizzare i parametri di luminosità, saturazione, contrasto, ecc.
  • Seite 174: Domande Frequenti

    DOMANDE FREQUENTI Domande frequenti Se i problemi non compaiono nell’elenco di seguito, ti consigliamo di contattare un servizio locale o chiamare il servizio assistenza. Il dispositivo non si avvia normalmente I possibili motivi possono essere: 1. La potenza non è appropriata. 2.
  • Seite 175 C’è audio nella finestra di tracciamento ma non c’è segnale audio in modalità riproduzione I possibili motivi possono essere: 1. Problemi di installazione: l’opzione audio non è selezionata 2. Il canale non ha audio L’ora è sbagliata I possibili motivi possono essere: 1.
  • Seite 176 SPECIFICHE TECNICHE NVR Video Compressione video H.264 (High Profile) Modalità di Manuale, rilevamento del Registrazione e registrazione movimento, programmato riproduzione Giocare 1 canal / 4 canale Archiviazione Tipo di backup Network, U-disk, disc USB, disc SATA e backup Ingresso video 4 x BNC Uscita video 1 x VGA, 1 x HDMI...
  • Seite 177: Główne Funkcje

    GŁÓWNE FUNKCJE GŁÓWNE FUNKCJE Nadzór za pośrednictwem monitora: analogowy interfejs wyjściowy, VGA lub HDMI Pamięć Dysk twardy działa tylko podczas nagrywania, co zmniejsza zużycie energii i wydłuża żywotność Uwaga: Dysk twardy nie jest zawarty w pakiecie Kompresja Kompresja w czasie rzeczywistym na urządzeniu pamięci masowej, która zapewnia stabilną jakość...
  • Seite 178 Wyłączenie urządzenia Istnieją dwa sposoby zatrzymania urządzenia: 1. Przejdź do menu głównego (kliknij prawym przyciskiem myszy na ekranie) i wybierz opcję Logout - Shutdown 2. Wyłącz zasilanie. Uwagi specjalne: 1. Uruchom ponownie po zaniku zasilania: Jeśli urządzenie zostanie nieprawidłowo wyłączone, może utworzyć...
  • Seite 179 Menu zawiera: Menu główne, przewodnik, tryb nagrywania, odtwarzanie, sterowanie PTZ, sterowanie XVI, wysoka prędkość PTZ, ustawienia kolorów, , Regulacja wyjścia, Wyjście, Wyświetlanie kanału 1/4 (Widok 1/4) 1. MENU GŁÓWNE (MAIN MENU) Po wejściu do głównego menu interfejs będzie wyglądał jak na poniższym obrazku. 1.1 Record (nagrywanie) Operacje nagrywania obejmują: Record config, Playback i Backup.
  • Seite 180 1.1.1 Konfiguracja nagrywania (Record config) Idź do Menu główne - Record - Record config (Record setup) Ustaw parametry nagrywania dla każdego kanału lub wszystkich kanałów w tym samym czasie. System jest ustawiony na ciągłe nagrywanie przez 24 godziny. Uwaga: Dysk twardy musi być ustawiony w trybie odczytu / zapisu. Channel (canal): wybierz numer kanału, dla którego chcesz ustawić...
  • Seite 181 wideo to “R”. Detect (detekcja ruchu): urządzenie nagrywa w wykrywaniu ruchu. Typ pliku wideo to “M”. Alarm (alarma): funkcja nagrywania alarmów obejmuje: wykrywanie ruchu, utratę obrazu, utratę wideo. • Nagrywanie ręczne: kliknij przycisk, a odpowiedni kanał zostanie nagrany niezależnie od bieżącego statusu.
  • Seite 182 Następny plik Poprzedni plik Pełny ekran Odtwarzanie cykliczne Uwaga: W przypadku odtwarzania klatki po klatce film musi zostać wstrzymany. Funkcje specjalne: Lokalny zoom: Gdy system wyświetla pojedynczy kanał na ekranie, możesz wybrać część ekranu za pomocą myszy, aby powiększyć go, klikając lewym przyciskiem myszy. Następnie możesz powrócić...
  • Seite 183 1.2 Alarm (Alarma) Funkcja nagrywania alarmów obejmuje: wykrywanie ruchu, utratę obrazu, utratę sygnału wideo, nieprawidłowości. 1.2.1 Detekcja ruchu (Motion detect) Gdy system wykryje ruch, który osiągnie naruszy próg czułości, rozpocznie się nagrywanie Uwaga: przycisk Advanced otwiera następujące menu: Up Window (wstecz), Show desktop (Pokaż...
  • Seite 184 W przypadku wykrywania ruchu można wybrać tryb ostrzegania: wyświetla komunikat, dźwięki, ładuje na serwer FTP, wysyła wiadomość e-mail, zapisuje wydarzenie w historii. 1.2.2 Brak obrazu (Video blind) Gdy na obraz wideo mają wpływ warunki otoczenia, takie jak oświetlenie lub czułość dotykowa, w systemie zostanie uruchomiony alarm.
  • Seite 185 Ustawienia są takie same jak w wykrywaniu ruchu. Uwaga: przycisk Advanced otwiera następujące menu: Up Window (wstecz), Show desktop (Pokaż pulpit), Copy (Kopiuj ustawienia), Paste (Wklej ustawienia), Default (Domyślne), Storage (Przywróć pamięć w interfejsie konfiguracyjnym jednostka pamięci). 1.2.4 Niewłaściwe zachowanie (Abnormality) W przypadku wystąpienia nietypowej sytuacji, takiej jak brak pamięci, brak miejsca w pamięci, konflikt IP lub brak łączności z siecią, urządzenie wyświetli ostrzeżenie w wiadomości lub sygnał...
  • Seite 186 1.3.1 Ustawienia główne (General) Time zone: ustaw strefę czasową System time: ustaw datę i godzinę systemu Data format: wybierz format daty YMD (rok, miesiąc, dzień), MDY (miesiąc, dzień, rok), DMY (dzień, miesiąc, rok) Date separator: wybierz typ separatora dla formatu daty Time format: wybierz format godziny: 12 lub 24 godziny.
  • Seite 187 Channel (kanał): wybierz numer kanału, który chcesz skonfigurować Compression (compresie): standardowa kompresja H.264 Resolution (rezolutie): D1 / 960H / 1080N Frame Rate: od 1 do 25fps Bit Rate Type: możesz wybrać ograniczony przepływ lub zmienny przepływ. Wybierając zmienny przepływ, masz 6 opcji jakości obrazu Bit Rate: im wyższa wartość...
  • Seite 188 IP address: wybierz adres IP. Domyślny adres to 192.168.1.10 Subnet mask: Domyślny adres to: 255.255.255.0 Gateway: Domyślny adres to 192.168.1.1 DNS setup: nazwa domeny serwera przekształca nazwę domeny na adres IP. Adres IP jest dostarczany przez administratora sieci. Ten adres należy ustawić, a następnie ponownie uruchomić system do pracy.
  • Seite 189 Email Jeśli alarm jest włączony lub połączenia są wykonane, system wyśle wiadomość e-mail z informacją o alarmie i obraz o ustawionym adresie. SMTP server: adres serwera e-mail. Może to być adres IP lub nazwa domeny. Nazwy domeny można używać tylko wtedy, gdy ustawienia DNS są poprawne. Port: port serwera poczty e-mail.
  • Seite 190 DDNS Enable Zaznacz, aby włączyć tę opcję DDNS: to dynamiczna nazwa domeny serwera. Domain name: Wprowadź nazwę domeny zarejestrowaną przez DDNS. User name: Wprowadź nazwę użytkownika zarejestrowaną przez DDNS. Password: wprowadź hasło użytkownika zarejestrowane przez DDNS. Gdy DDNS zostanie pomyślnie skonfigurowany i włączony, możesz wprowadzić nazwę domeny w przeglądarce Internet Explorer, aby uzyskać...
  • Seite 191 UPNP Protokół UPNP służy do automatycznego przekazywania do routera. Aby korzystać z tej funkcji, upewnij się, że ta opcja jest również włączona na routerze. Enable wybierz opcję włączania ustawień UPNP HTTP Port: routing automatycznie rozprowadzi port urządzenia HTTP, ale w celu monitorowania Internet Explorer będzie również...
  • Seite 192 Analogowe Hybrida 4 x 1080N 8 x 1080P 4 x 720P 12 x 960P 2 x 720P + 2 x 720P 4 x 960H 8 x 720P 1.3.10 Ustawienia XVI (XVI Settings) Menu umożliwia kontrolę obrazu (jasność, kontrast, nasycenie itp.) Na każdym kanale. 1.4 Ustawienia zaawansowane (Advanced) Menu obejmuje: zarządzanie dyskami twardymi, konto użytkownika, użytkowników online, ustawienia wyjścia wideo, samodzielną...
  • Seite 193 1.4.1 Zarządzanie jednostkami pamięci (Storage) Interfejs wyświetla informacje o wewnętrznym dysku twardym: jego liczbie, typie, statusie i pojemności. Wybierz urządzenie pamięci masowej, a następnie kliknij funkcję, którą chcesz wykonać. Read/Write: sprzęt można zapisać lub odczytać Read-only: sprzęt można tylko odczytać Redundant: funkcja nie jest aktywna Format storage:...
  • Seite 194 Channel title: przypisz tytuł do kanałów. Do 25 liter. Time display: wyświetla datę i godzinę systemu Channel title: wyświetla numer kanału Record status: wyświetla stan nagrania Alarm status: wyświetla status alarmu systemowego Transparency: wybierz przezroczystość menu ekranowego: wartość od 128 do 255 Resolution: ustaw rozdzielczość...
  • Seite 195 Modify user: Zmodyfikuj nazwę i prawa wybranego użytkownikat Modify group: Zmodyfikuj nazwę i prawa grupy Modify password: zmodyfikuj hasło użytkownika. Możesz ustawić hasło składające się maksymalnie z 6 znaków. Puste i wolne od słów spacje są niedozwolone. Odstępy między wyrazami są dozwolone. Uwaga: administrator może zmienić swoje hasło i hasło dla innych użytkowników Add user: dodaj użytkownika.
  • Seite 196 1.4.7 Resetowanie systemu (Upgrade) System można przywrócić do domyślnych ustawień fabrycznych. Możesz wybrać z menu funkcje do zresetowania 1.4.8 Informacje o urządzeniu (Device info) 1.5 Informacje (Info) Interfejs zawiera szczegółowe informacje na temat urządzenia pamięci masowej, BPS (wyświetla strumień transferu Kb / s i pojemność pamięci MB / h w czasie rzeczywistym), historię zdarzeń i...
  • Seite 197 wersję oprogramowania. 2. SZYBKI PRZEWODNIK (GUIDE) Interfejs wyświetla serię kroków dla podstawowej konfiguracji urządzenia, takich jak ustawienia data, godzina, testowanie sieci i link do pobrania aplikacji XMeye. 3. TRYB NAGRYWANIA (RECORD MODE) Brak do ustawienia trybu nagrywania na każdym kanale. Bardziej szczegółowe ustawienia nagrywania można uzyskać, wchodząc do Menu głównego (Menu główne) - Menu główne (Nagrania) - Record conf (Konfiguracja nagrywania).
  • Seite 198 9. USTAWIENIA KOLORU (COLOR SETTINGS) Interfejs umożliwia dostosowanie parametrów jasności, nasycenia, kontrastu itp. obrazu. 10. USTAWIENIA WYJŚĆ WIDEO (OUTPUT ADJUST) Dostęp do tego samego interfejsu można uzyskać wchodząc do menu głównego - zaawansowane - dopasowanie wyjścia)
  • Seite 199 NAJCZĘŚCIEJ ZADAWANE PYTANIA I ROZWIĄZANIA Najczęściej zadawane pytania Jeśli problemy nie pojawiają się na poniższej liście, zalecamy skontaktowanie się z lokalną obsługą lub skontaktowanie się z działem serwisu. Urządzenie nie uruchamia się normalnie Możliwe przyczyny: 1. Moc nie jest właściwa. 2.
  • Seite 200 2. Nie ma aktywnego głośnika 3. Kable audio są uszkodzon 4. Elektroniczna część urządzenia jest wadliwa. W oknie śledzenia istnieje dźwięk, ale w trybie odtwarzania nie ma sygnału dźwiękowego Możliwe przyczyny: 1. Problemy z instalacją: Opcja audio nie jest wybrana 2.
  • Seite 201 SPECYFIKACJE TECHNICZNE NVR Video Kompresja wideo H.264 (High Profile) Tryb nagrywania Ręczne, detekcja ruchu, programowane Nagrywanie i odtwarzanie Odczyt 1 canal / 4 canale Przechowywanie i tworzenie kopii Typ backup Network, U-disk, disc USB, disc SATA zapasowych Wejście wideo 4 x BNC Wyjście wideo 1 x VGA, 1 x HDMI Wejście audio...
  • Seite 202: Instructiuni De Utilizare

    FUNCTII PRINCIPALE Supraveghere in timp real Supraveghere prin intermediul monitorului: interfata analogica de iesire, VGA sau HDMI Stocare HDD-ul functioneaza doar pe durata inregistrarii ceea ce reduce consumul de energie si extinde timpul de viata Nota: HDD-ul nu este inclus in pachet Compresie Compresie in timp real pe dispozitivul de stocare, ceea ce permite o calitate audio si video stabila Copie de siguranta...
  • Seite 203 Tensiunea de alimentare este de 230V±10% / 50 Hz. 2. Va sugeram sa folositi un dispozitiv UPS pentru a proteja dispozitivul de variatiile de tensiune. Oprirea dispozitivului Sunt doua metode de oprire a dispozitivului: 1. Accesati meniul principal (click dreapta pe ecran) si selectati optiunea Logout (Iesire) - Shutdown (Inchidere) 2.
  • Seite 204 imaginea de mai jos. Meniul include: Meniul principal (Main menu), ghid rapid (Guide), modul de inregistrare (Record mode), redare (Playback), control PTZ (PTZ control), XVI control, PTZ accelerat (High speed PTZ), setari culoare (Color settings), setari iesiri video (Output adjust), iesire din cont, Vezi canal 1/4 (View 1/4) 1.
  • Seite 205 1.1.1 Configurarea inregistrarii (Record config) Accesati Main menu (Meniu principal) - Record (Inregistrare) - Record config (Configurare inregistrare) Setati parametrii de inregistrare pe fiecare canal in parte sau pe toate canalele simultan. Sistemul este setat pentru inceput sa inregistreze 24 de ore in continuu. Nota: HDD-ul trebuie sa fie setat in modul citire/scriere.
  • Seite 206 intre ora 0:00 si 24:00) si 3 moduri (inregistrare normala, la detectie miscare si in caz de alarma): Regular (inregistrare normala): dispozitivul inregistreaza in intervalul de timp setat. Tipul fisierului video este “R”. Detect (detectie miscare): dispozitivul inregistreaza la detectia miscarii. Tipul fisierului video este “M”.
  • Seite 207 Derulare rapida Derulare rapida inainte inapoi Cadrul urmator Cadrul anterior Fisierul urmator Fisierul anterior Ecran intreg Redare ciclica Nota: pentru redarea cadru cu cadru filmul va trebui pus pe pauza. Functii speciale: Zoom local: cand sistemul afiseaza un singur canal pe ecran puteti selecta cu mouse-ul o portiune de ecran pe care sa o mariti apasand click stanga.
  • Seite 208 1.2 Alarm (Alarma) Functia de inregistrare la alarma include: detectarea miscarii, lipsa imagine, pierderea semnalului video, anormalitati. 1.2.1 Detectie miscare (Motion detect) Cand sistemul detecteaza miscarea care atinge pragul de sensibilitate setat atunci va porni inregistrarea Nota: butonul Advanced deschide urmatorul meniu: Up Window (Inapoi), Show desktop (afiseaza interfata de previzualizare a canalelor), Copy (copiaza setari), Paste (Lipeste setari), Default (restabileste setarile implicite), Record config (scurtatura catre interfata de configurare a inregistrarii).
  • Seite 209 Channel (canal): alegeti canalul de configurat Enable (activeaza): inseamna ca functia de detectia miscarii e pornita Sensitivity (sensibilitate): alegeti unul din cele 6 nivele de sensibilitate Period (perioada): activeaza detectia miscarii in intervalul specificat. Puteti seta intervale orare diferite in functie de ziua saptamanii. Fiecare zi este impartita in 4 sectiuni de timp. In caz de detectie miscare, puteti alege modul de avertizare: afiseaza mesaj, emite sunet, urcare pe server FTP, trimite email, salveaza evenimentul in istoric.
  • Seite 210 Setarile sunt la fel ca la detectia miscarii. Nota: butonul Advanced deschide urmatorul meniu: Up Window (Inapoi), Show desktop (afiseaza interfata de previzualizare a canalelor), Copy (copiaza setari), Paste (Lipeste setari), Default (restabileste setarile implicite), Record config (scurtatura catre interfata de configurare a inregistrarii).
  • Seite 211 sunet. 1.3 Setari sistem (System) Va aparea urmatoarea interfata: 1.3.1 Setari generale (General)
  • Seite 212 Time zone: setati fusul orar System time: setati data si ora sistemului Data format: alegeti formatul datei YMD (an, luna, zi), MDY (luna, zi, an), DMY (zi, luna, an) Date separator: alegeti un tip de separator pentru formatul datei Time format: alegeti formatul orei: 12 sau 24 de ore.
  • Seite 213 1.3.3 Setari retea (Network) Net Card: selectati optiunea Wire Netcard DHCP: obtineti adresa IP in mod automat (nu este recomandat). IP address: setati adresa IP. Adresa implicita este 192.168.1.10 Subnet mask: adresa implicita este: 255.255.255.0 Gateway: adresa implicita este 192.168.1.1 DNS setup: numele domeniului serverului transforma numele domeniului in adresa IP.
  • Seite 214 NTP setup Enable: bifati pentru a activa aceasta optiune Server IP: introduceti adresa IP a serverului NTP. Port: 123 implicit. Puteti seta portul in functie de setarile serverului NTP. Update period: perioada de actualizare este aceeasi cu perioada serverului NTP. Intervalul implicit este de 60 minute.
  • Seite 215 DDNS Enable bifati pentru a activa aceasta optiune DDNS: reprezinta nume de domeniu dinamic al serverului. Domain name: introduceti numele de domeniu inregistrat de DDNS. User name: introduceti numele de utilizator inregistrat de DDNS. Password: introduceti parola utilizatorului inregistrat de DDNS. Cand DDNS este configurat cu succes si pornit, puteti introduce numele domeniului in browserul Internet Explorer pentru a-l accesa.
  • Seite 216 Enable bifati pentru a activa aceasta optiune Server IP: adresa IP a serverului FTP Port: portul domeniului pentru FTP; implicit este 21 User name: numele utilizatorului pentru FTP Password: parola utilizatorului Anonymous: activeaza modul anonim – nu mai este nevoie sa setati numele de utilizator si parola Max file length: lungimea maxima a fisierelor ce vor fi arhivate.
  • Seite 217 1.3.9 Digital Interfata Digital afiseaza numarul si tipul camerelor suportate de acest model: Analogice Hibrid 4 x 1080N 8 x 1080P 4 x 720P 12 x 960P 2 x 720P + 2 x 720P 4 x 960H 8 x 720P 1.3.10 Setari XVI (XVI Settings) Meniul permite controlul imaginii (luminozitate, contrast, saturatie etc.) pe fiecare canal in parte.
  • Seite 218 1.4 Setari avansate (Advanced) Meniul include: administrare HDD, cont utilizator, utilizatori online, setari iesiri video, auto- mentenanta, intoarcerea la setarile din fabrica, actualizari, informatii despre dispozitiv, import/ export. 1.4.1 Administrare unitate de stocare (Storage) Interfata afiseaza informatii despre HDD-ul intern: numarul acestuia, tipul, statusul si capacitatea de stocare.
  • Seite 219 Read/Write: echipamentul poate fi scris sau citit Read-only: echipamentul poate fi doar citit Redundant: functia nu este activa Format storage: formateaza HDD-ul Recover: recupereaza informatiile de pe HDD Partition: creaza partitii pe HDD 1.4.2 Interfata grafica a utilizatorului (Display) In modul de previzualizare local sunt incluse: afisare ora, numele canalului, statusul inregistrarii, statusul alarmei, transparenta si regiunea acoperita.
  • Seite 220 Resolution: setati rezolutia ecranului Channel: Introduceti numarul canalului 1.4.3 Administrare utilizatori (Account) Nota: 1. Lungimea numelui unui utilizator poate fi de maxim 8 caractere. Spatiile libere dinainte sau de dupa nume sunt invalide. Spatiul liber din mijlocul numelui este valid. Caracterele permise sunt: litere, cifre, liniuta jos, minus, punct.
  • Seite 221 1.4.6 Resetarea sistemului (Restore) Sistemul poate fi adus la setarile implicite din fabrica. Puteti selecta din meniu functiile pe care sa la resetati. 1.4.7 Actualizare firmware (Upgrade) Selectati calea catre fisierul pentru actualizare. Nota: fisierul trebuie salvat in directorul radacina al unei memorii USB 1.4.8 Informatii dispozitiv (Device info)
  • Seite 222 1.5 Informatii (Info) Interfata ofera informatii detaliate despre dispozitivul de stocare, BPS (afiseaza fluxul de transfer Kb/s si capacitatea dispozitivului de stocare MB/h in timp real), istoric evenimente si versiune software. 2. GHID RAPID (GUIDE) Interfata afiseaza o serie de pasi pentru configurarea de baza a dispozitivului, cum ar fi setarile de data, ora, testarea retelei si link pentru descarcarea aplicatiei XMEye 3.
  • Seite 223 7. XVI&AHD Alegeti tipul de semnal video pe fiecare canal in parte. Recomandam alegerea optiunii ”Auto” cand nu sunteti sigur ce tip de camere aveti. 8. HIGH SPEED PTZ Functia nu este activa pentru acest model 9. SETARI CULOARE (COLOR SETTINGS) Interfata permite personalizarea parametrilor de luminozitate, saturatie, contrast etc.
  • Seite 224 INTREBARI FRECVENTE SI MENTENANTA Intrebari frecvente Daca problemele nu se regasesc in lista de mai jos, va recomandam sa va adresati unui service local sau sa sunati departamentul de service. Dispozitivul nu porneste normal Motivele posibile pot fi urmatoarele: 1. Alimentarea nu este corespunzatoare. 2.
  • Seite 225 4. Partea electronica a dispozitivului este defecta. Exista semnal audio in fereastra de urmarire dar nu exista semnal audio in modul de redare Motivele posibile pot fi urmatoarele: 1. Probleme de setare: optiunea audio nu este selectata 2. Canalul respectiv nu are audio Ora este gresita Motivele posibile pot fi urmatoarele: 1.
  • Seite 226 SPECIFICATII TEHNICE NVR Video Compresie video H.264 (High Profile) Mod inregistrare Manual, detectie miscare, programata Inregistrare & redare Redare 1 canal / 4 canale Stocare & Backup Tip backup Network, U-disk, disc USB, disc SATA Intrare video 4 x BNC Iesire video 1 x VGA, 1 x HDMI Intrare audio...
  • Seite 227 Declaración UE de conformidad simplificada SC ONLINESHOP SRL declara que el Kit de video vigilancia AHD PNI House AHD1250 cumple con la Directiva EMC 2014/30/EU y la Directiva LVD 2014/35/EU. El texto completo de la declaración de conformidad de la UE está disponible en la siguiente dirección de Internet: https://www.mypni.eu/products/5591/download/certifications...

Inhaltsverzeichnis