Inhaltsverzeichnis
Werbung
Verfügbare Sprachen
Verfügbare Sprachen
Quicklinks
Werbung
Inhaltsverzeichnis

Verwandte Anleitungen für Pulox 540-00192-00


Inhaltszusammenfassung für Pulox 540-00192-00
- Seite 1 Checkme Health Monitor Lite User’s Manual………………….…….English 1-19 Manuel de l'utilisateur ..Français 20-35 Benutzerhandbuch …………...Deutsch 36-51 Manuale d’uso……………………Italiano 52-66...
-
Seite 2: Intended Use
Checkme Lite Health Monitor User’s Manual Warnings and Cautionary Advices We recommend not to use this device if you have a pacemaker or other implanted devices. Follow the advice given by your doctor, if applicable. Do not use this device with a defibrillator. ... -
Seite 3: Main Screen
1.2 Outline Touch Screen Internal SpO2 sensor Micro-D connector - It connects with mirco-D cable for charging. Home button When the monitor is off, press this button to power it on. When the monitor is on, press and hold it for 2 seconds to turn it off. ... - Seite 4 Press an icon in the Main Screen will start a measurement, activate a function, or open corresponding menu. The device will enter Main Screen when: No operation is detected for 60 seconds in result screen, the device will automatically switch to Main Screen. ...
-
Seite 5: Getting Started
2. Getting Started 2.1 Power On/Off Press the Home button to power on the device. Press and hold Home button for 2 seconds to power off the device. 2.2 Initial Settings The first time when the Checkme is powered on, you can set up your Checkme step by step. - Seite 6 About Daily Check Warnings and Cautionary Advices To ensure better tracking of your health status, it is strongly suggested that every Daily Check measurement is made at the same time period when your body is in the relative same situation. E.g., every morning when get up, or every night before go to bed.
- Seite 7 When the bar is fully filled, the device will analysis your data, and then show the measurement result. 3.3 ECG Recorder Different methods of taking the ECG measurement are available on Checkme. The ECG recorder offers two different methods to measuring ECG: ...
- Seite 8 If the device is power off, press the Home button. In the Main Screen, tap the <ECG Recorder> icon. Choose the method C or D. Follow the instructions to connect the ECG cable and place the ECG electrodes. Sit down or stand, stay calm; ...
- Seite 9 When the device detects stable waveform, it will automatically start the measurement. The countdown bar moves from left to right. When the bar is fully filled, the device will analysis your data, and then show the measurement result. Measuring with Cable (Optional) Connect the external SpO2 sensor to the multi-functional connector.
- Seite 10 4. Settings 4.1 Opening Settings Menu To open the Settings menu, tap the <Settings> icon to open the menu as below. 4.2 Changing Sound Volume In the Settings menu, tap the <Volume> area to change the volume directly. Or use the quick setting by tapping the area on the left side of the screen.
-
Seite 11: Bluetooth Connection
4.9 Bluetooth connection Install the latest APP on your smartphone (support BLE Bluetooth) from App Store (iOS) or Google Play (Android). Switch on the device bluetooth in Setting-Bluetooth and run the APP, then the data will be downloaded automatically. 5. Review To open the <Data Review>... -
Seite 12: Care And Cleaning
Warnings and Cautionary Advices Use accessories specified in this chapter. Using other accessories may cause damage to the device or not meet the claimed specifications. Part Number Description 540-00192-00 ECG cable with 2 leadwires, snap 540-00194-00 USB charging cable, micro D... - Seite 13 560-00198-00 ECG electrode, 10 pcs 8. Specifications Environmental Item Operating Storage Temperature 5 to 45°C -25 to 70°C Relative humidity (noncondensing) 10% to 95% 10% to 95% Barometric 700 to 1060 hPa 700 to 1060 hPa Degree of dust & water resistance IP22 Physical Size...
- Seite 14 Measurement accuracy verification: The SpO2 accuracy has been verified in human experiments by comparing with arterial blood sample reference measured with a CO-oximeter. Pulse oximeter measurement are statistically distributed and about two-thirds of the measurements are expected to come within the specified accuracy range compared to CO-oximeter measurements.
-
Seite 15: Electromagnetic Compatibility
9. Electromagnetic Compatibility The device meets the requirements of EN 60601-1-2. All the accessories also meet the requirements of EN 60601-1-2 when in use with this device. Warnings and Cautionary Advices Using accessories other than those specified in this manual may result in increased electromagnetic emission or decreased electromagnetic immunity of the equipment. - Seite 16 ± 6 kV contact ± 6 kV contact Electrostatic Floors should be wood, ± 8 kV air ± 8 kV air discharge (ESD) concrete or ceramic tile. If IEC 61000-4-2 floors are covered with synthetic material, the relative humidity should be at least 30 %.
- Seite 17 Conduced 3 Vrms 150 3 Vrms 150 kHz Portable and mobile RF communications kHz to equipment should be used no closer to any IEC61000- 80 MHz 80 MHz part of the system, including cables, than outside ISM Outside ISM the recommended separation distance bands bands calculated from the equation appropriate...
- Seite 18 Recommended separation distances between portable and mobile RF communications equipment and the device The Health Monitor is intended for use in an electromagnetic environment in which radiated RF disturbances are controlled. The customer or the user of the Health Monitor can help prevent electromagnetic interference by maintaining a minimum distance between portable and mobile RF communications equipment (transmitters) and the monitor as recommended below, according to the maximum output power of the communications equipment.
-
Seite 19: Usage Prévu
Mode d'emploi du moniteur de santé Checkme Lite Avertissements et mises en garde Nous vous recommandons de ne pas utiliser cet appareil si vous avez un stimulateur cardiaque ou un autre dispositif implanté. Demandez alors conseil à votre médecin. ... -
Seite 20: Écran Principal
1.2 Schéma Écran tactile Capteur interne SpO2 Connexion micro-D: Rechargeable à l'aide d'un câble D. Bouton Accueil Quand l'écran est éteint, appuyez sur ce bouton pour l'allumer. Quand l'écran est allumé, appuyez sur ce bouton pendant deux secondes pour l'éteindre. - Seite 21 En appuyant sur l'une des icônes de l'écran principal, vous lancez une mesure, activez une fonction ou ouvrez le menu correspondant. L'écran principal s'affiche : automatiquement si aucune opération n'est effectuée pendant soixante secondes sur l'écran des résultats. Si vous appuyez sur le bouton Accueil à...
-
Seite 22: Réglages De Base
2. Guide de démarrage 2.1 Allumer/éteindre Pour allumer l'appareil, appuyez sur le bouton Accueil. Gardez le bouton Accueil appuyé pendant deux secondes pour éteindre l'appareil. 2.2 Réglages de base Lors de la première mise en service de Checkme, vous pouvez configurer votre appareil pas à... -
Seite 23: Avertissements Et Mises En Garde
Avertissements et mises en garde Évitez autant que possible de bouger le doigt lors de l'utilisation des fonctions Contrôle journalier et Oxymètre : les données affichées ou l'analyse pourraient être faussées. 3.2 Contrôle journalier À propos du Contrôle journalier Avertissements et mises en garde ... - Seite 24 stable. La barre de progression défile de gauche à droite. Une fois que la barre est pleine, l'appareil analyse vos données, puis affiche les résultats des mesures. 3.3 Enregistreur ECG Checkme propose différentes méthodes pour réaliser l'ECG. L'enregistreur ECG propose deux méthodes de mesure : ...
- Seite 25 Mesurer avec le câble Pour démarrer un enregistrement d'ECG avec câble: Choisissez la méthode C ou D. Suivez les instructions pour connecter le câble d'ECG et placer les électrodes d'ECG. Asseyez-vous et restez calme ; Les paumes des mains dirigées vers le haut, placez une électrode au milieu du poignet droit ;...
- Seite 26 3.4 Oxymètre Le moniteur de santé Checkme mesure la teneur en oxygène de votre sang (SpO2), la fréquence de votre pouls (FP) et l’index du pouls (IP). Mesurer sans câble Pour démarrer une mesure de l'oxymètre sans câble : Dans l'écran principal, appuyez sur l'icône « Oxym. pouls ». Insérez l'index dans le capteur de SpO intégré, comme indiqué...
- Seite 27 Position de l'ongle Appuyez sur l'icône <Oxym. pouls>. L'écran affichera alors votre forme d'onde PLETH, la SpO et la fréquence du pouls. Le dispositif contrôlera en continu, mais aucune des données ne sera sauvegardée jusqu'à ce que vous appuyiez sur le bouton Appuyez sur le bouton pour démarrer le recueil de vos données de SpO .
- Seite 28 Vous pouvez aussi utiliser les réglages rapides en appuyant sur la zone du côté gauche de l'écran. 4.4 Réglage de la date et de l'heure Choisissez <Date & heure>. Appuyez sur les boutons + ou - pour régler la date et l'heure. 4.5 Activation/désactivation du Guide voix Dans le menu Réglages, appuyez sur <Guide voix>...
-
Seite 29: Entretien Et Nettoyage
5.2 Consultation des ECG Pour consulter les ECG sauvegardés, sélectionnez <Enregistreur ECG> dans le menu <Résultats>. Vous pouvez quasiment effectuer les mêmes opérations qu’avec les contrôles journaliers. 5.3 Consultation des données oxymétriques Pour consulter des données oxymétriques enregistrées, sélectionnez <Oxymètre> dans le menu <Résultats>. - Seite 30 Aucune valeur 1. Votre doigt n'est peut-être 1. Retirez votre doigt et n'apparaît pour la SpO pas correctement inséré dans insérez-le à nouveau ou pour la fréquence le capteur. dans le capteur, comme du pouls, ou ces indiqué. 2. Peut-être bougez-vous le valeurs fluctuent.
- Seite 31 Méthodes de branchement Dérivation I, Dérivation II Durée de l'enregistrement 30 s Échantillonnage 500 Hz/16 bits 1,25 mm/mV, 2,5 mm/mV, 5 mm/mV Affichage 10 mm/mV, 20 mm/mV Vitesse de balayage 25 mm/s Bande passante 0,67 à 40 Hz Écart potentiellement toléré ±300 mV par l'électrode Plage de mesure de la FC...
-
Seite 32: Einsatzbereich
Checkme Lite Health Monitor – Benutzerhandbuch Warnungen und Sicherheitshinweise Wenn Sie einen eingesetzten Herzschrittmacher oder ein anderes implantiertes Gerät tragen, sollten Sie dieses Gerät nicht verwenden. Konsultieren Sie dann zuerst Ihren Arzt. Verwenden Sie dieses Gerät nicht mit einem Defibrillator. ... -
Seite 33: Das Gerät
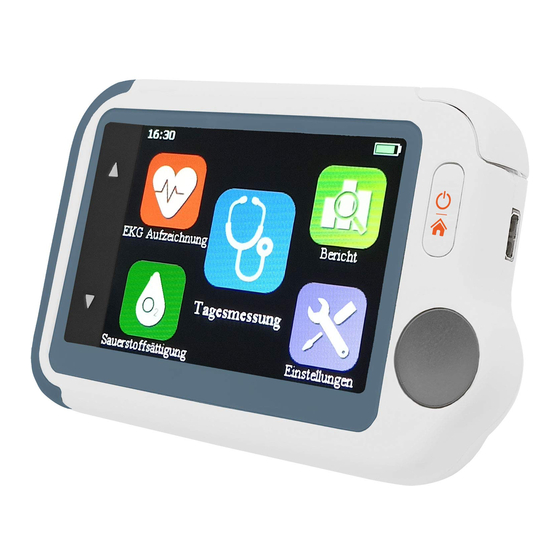
1.2 Das Gerät Touchscreen Interner SpO2-Sensor Micro-D-Buchse -Anschluss eines D-Kabels zum Aufladen Starttaste Wenn der Monitor ausgeschaltet ist, drücken Sie diese Taste, um ihn einzuschalten. Wenn der Monitor eingeschaltet ist, halten Sie die Taste 2 Sekunden gedrückt, um ihn auszuschalten. ... -
Seite 34: Erste Schritte
Tippen Sie auf ein Symbol im Hauptbildschirm, um mit der entsprechenden Messung zu beginnen, eine Funktion zu aktivieren oder ein Menü aufzurufen. Das Gerät zeigt den Hauptbildschirm in folgenden Fällen: Wenn 60 Sekunden lang keine Aktivitäten in der Ergebnisanzeige vorgenommen werden –... -
Seite 35: Checkme - So Wird Das Gerät Verwendet
schrittweise konfigurieren: Die Einstellungen können Sie auch im Menü „Einstellungen“ vornehmen. 3. Checkme – So wird das Gerät verwendet 3.1 Vor der Verwendung Vor der Verwendung der EKG-Funktion Um präzise Messergebnisse zu erhalten, sollten vor der Verwendung der Funktionen „Tagesmessung“ oder „EKG-Aufzeichnung“ die folgenden Punkte beachtet werden: ... -
Seite 36: Tagesmessung
die Genauigkeit der Messungen oder die Auswertungen haben kann. 3.2 Tagesmessung Tagesmessung – die Funktion Warnungen und Sicherheitshinweise Um Ihren Gesundheitszustand besser zu protokollieren, sollten Sie jede Tagesmessung zur gleichen Tageszeit und in stets ähnlicher Situation Ihres Körpers durchführen. Beispielsweise immer morgens, wenn Sie aufstehen oder immer abends, bevor Sie ins Bett gehen.... -
Seite 37: Ekg-Aufzeichnung
Nachdem der Balken vollständig gefüllt wurde, analysiert das Gerät Ihre Daten und zeigt anschließend das Messergebnis an. 3.3 EKG-Aufzeichnung Checkme bietet verschiedene Methoden für die EKG-Aufzeichnung. Für die EKG- Aufzeichnung gibt es zwei verschiedene Methoden: Ableitung I: rechte Hand zu linker Hand ... -
Seite 38: Messungen Mit Kabel
Messungen mit Kabel So aktivieren Sie die EKG-Aufzeichnung mit Kabel: Wählen Sie die Methode C oder D aus. Befolgen Sie die Anweisungen zum Anschließen des EKG-Kabels und zur Anbringung der EKG-Elektroden. Setzten Sie sich oder stehen Sie - und bleiben Sie ruhig und entspannt; ... -
Seite 39: Messungen Mit Kabel (Optional)
Nachdem der Balken vollständig gefüllt wurde, analysiert das Gerät Ihre Daten und zeigt anschließend das Messergebnis an. 3.4 Oxymeter Der Checkme-Monitor misst die Menge des Sauerstoffs im Blut (SpO ), Ihren Puls (PR) und Ihren Pulsindex (PI). Messungen ohne Kabel So beginnen Sie mit einer Oxymeter-Messung ohne Kabel, Drücken Sie auf dem Hauptbildschirm auf die Fläche „Pulsoxymeter“. -
Seite 40: Einstellungen
Drücken Sie auf das Symbol <Pulsoxymeter>. Auf dem Bildschirm erscheinen dann Ihre PLETH-Kurve und Ihre SpO2 und Pulswerte. Das Gerät führt die Überwachung durchgehend durch. Jedoch werden die Daten erst gespeichert nachdem Sie die Taste gedrückt haben. Drücken Sie die Taste , um mit der Aufzeichnung der SpO -Daten zu beginnen. - Seite 41 linken Rand des Bildschirms tippen. 4.4 Datum und Uhrzeit einstellen Wählen Sie „Datum und Uhrzeit“. Tippen Sie auf die Symbole „+“ oder „-“, um das Datum oder die Uhrzeit zu ändern. 4.5 Audioanleitung ein-/ausschalten Tippen Sie im Menü „Einstellungen“ auf den Bereich „Audioanleitung“, um die Audioanleitung direkt ein- und auszuschalten.
-
Seite 42: Wartung
Wählen Sie , um diese Messung zu löschen. Wählen Sie , um die EKG-Kurve wie nachstehend gezeigt erneut anzuzeigen. Wählen Sie , um die Tagesmessung-Liste zurückzukehren. 5.2 Anzeigen der EKG-Aufzeichnung Um die EKG-Aufzeichnungen anzuzeigen, wählen Sie im Menü „Datenbericht“ die Option „EKG“. - Seite 43 Warnungen und Sicherheitshinweise Verwenden Sie nur das in diesem Abschnitt aufgelistete Zubehör. Die Verwendung anderer Komponenten kann das Gerät beschädigen oder seine Funktionsfähigkeit einschränken. Teilenummer Beschreibung 540-00192-00 EKG-Kabel mit 2 Elektroden, Schnellverschluss 540-00194-00 USB-Ladekabel, Mikro D 560-00198-00 EKG-Elektrode, 10 Stück...
-
Seite 44: Technische Daten
8. Technische Daten Umgebung Element Betrieb Lagerung Temperatur 5 bis 45 °C -25 bis 70 °C Relative Luftfeuchte (nicht 10 % bis 95 % 10 % bis 95 % kondensierend) Barometrie 700 bis 1060 hPa 700 bis 1060 hPa Staub- und Wasserfestigkeit IP22 Physisch Größe... - Seite 45 Verifizierung der Messgenauigkeit: Die SpO2-Genauigkeit wurde im Rahmen von Tests mit Menschen verifiziert, indem Stichproben mit den mit einem CO-Oxymeter gemessenen Blut-Referenzwerten verglichen wurden. Pulsoxymeter-Messwerte sind statistisch verteilt und ca. zwei Drittel der Messwerte sollen innerhalb eines bestimmten Genauigkeitsbereichs liegen im Vergleich zu Co-Oxymeter-Messwerten. SpO2-Bereich 70 % bis 100 % SpO2-Genauigkeit (Arme)
-
Seite 46: Uso Previsto
Manuale d'uso del monitor multiparametrico Checkme Lite Avvertenze e precauzioni Il dispositivo non deve essere utilizzato da persone con pacemaker o altri dispositivi impiantati. Seguire il parere del medico, se applicabile. Non utilizzare il dispositivo con un defibrillatore. ... -
Seite 47: Schermata Principale
1.2 Panoramica Touch screen Sensore interno SpO2 Connettore micro D - Si collega al cavo D per ricaricare la batteria. Pulsante Home Per accendere il monitor, premere il pulsante Home. Per spegnerlo, premere il pulsante Home e tenerlo premuto per 2 secondi. ... -
Seite 48: Operazioni Preliminari
Premendo le icone nella Schermata principale sarà possibile avviare una misurazione, attivare una funzione o aprire il menu corrispondente. Sul dispositivo apparirà la Schermata principale ogni volta che: Non vengono rilevate operazioni per 60 secondi nella schermata dei risultati, quini il dispositivo passa automaticamente alla Schermata principale. -
Seite 49: Impostazioni Iniziali
2.1 Impostazioni iniziali La prima volta che si accende Checkme è possibile impostarlo in tutte le sue funzioni. Si possono modificare le impostazioni anche nel menu <Impostazioni>. 3. Utilizzo di Checkme 3.1 Prima dell'utilizzo Prima di utilizzare l'ECG Prima di utilizzare la funzione Controllo giornaliero o Registratore ECG, seguire attentamente i seguenti punti al fine di ottenere misurazioni precise. - Seite 50 Per ottenere un quadro ottimale delle condizioni di salute si consiglia vivamente di effettuare le misurazioni del Controllo giornaliero sempre nello stesso momento della giornata, quando il fisico si trova più o meno nella stessa situazione. Ad esempio, ogni mattina al risveglio, oppure ogni sera prima di coricarsi.
- Seite 51 Una volta arrivata in fondo, il dispositivo analizza i dati e mostra i risultati della misurazione. 3.3 Registratore ECG Checkme dispone di due metodi di misurazione dell'ECG. Il registratore ECG misura la frequenza cardiaca in due diversi modi: Derivazione I: da mano destra a mano sinistra ...
- Seite 52 Misurazione con cavo Per iniziare una misurazione ECG con cavo, Scegliere il Metodo C o D. Seguire le istruzioni per collegare il cavo ECG e per posizionare gli elettrodi. Sedersi o stare in piedi , rimanere calmi; Con il palmo delle mani rivolto verso l’alto, posizionare un elettrodo al centro del polso destro;...
- Seite 53 Misurazione senza cavo Per iniziare una misurazione si saturimetria senza cavo, Nella Schermata principale selezionare l’icona “Pulsossimetro”. Inserire il dito indice nel sensore SpO2. Rilassare il dito esercitare pressione. Nel momento in cui il dispositivo rileva una forma d’onda stabile, inizia automaticamente la misurazione. La barra di conto del tempo si sposta da sinistra a destra.
- Seite 54 4. Impostazioni 4.1 Apertura del menu Impostazioni Per aprire il menu Impostazioni, toccare l'icona <Impostazioni>; apparirà il menu riportato qui sotto. 4.2 Modificare il volume Per modificare il volume, toccare la voce <Volume> nel menu Impostazioni oppure usare l'impostazione rapida toccando il simbolo a sinistra dello schermo.
- Seite 55 Scegliere <Informazioni> nel menu <Impostazioni> per visualizzare la versione del software installato nel dispositivo. Conoscere la versione del software può essere utile per individuare e risolvere eventuali problemi. 5. Verificare i risultati Per aprire il menu <Risultati>, toccare l'icona <Risultati> nella Schermata principale. 5.1 Verificare il Controllo giornaliero Per vedere i dati in memoria del Controllo giornaliero, Selezionare <Controllo giornaliero>...
-
Seite 56: Cura E Pulizia
Per ricaricare la batteria, collegare il cavo USB, come nell'immagine. Mentre la batteria si ricarica, il dispositivo non può essere utilizzato per effettuare misurazioni. I dispositivi di ricarica USB sono conformi alle norme sulla sicurezza elettrica dei prodotti, come la IEC 60950. 6.2 Cura e pulizia Per pulire il dispositivo, tamponare delicatamente la superficie con un panno morbido inumidito con acqua o alcool. -
Seite 57: Caratteristiche Tecniche
Part Number Descrizione 540-00192-00 Cavo ECG con 2 derivazioni, bottone 540-00194-00 Cavo di ricarica USB , micro D 560-00198-00 Elettrodi ECG, 10 pcs 8. Caratteristiche tecniche Ambientali Elemento Funzionamento Conservazione Temperatura 5 - 45°C -25 - 70°C... - Seite 58 Frequenza cardiaca, durata QRS, analisi dei ritmi (Ritmo ECG regolare, Frequenza cardiaca elevata, Frequenza Riepilogo delle misurazioni cardiaca bassa, Valore QRS alto, Ritmo ECG irregolare, Impossibile analizzare) Standard Conforme agli standard ISO 80601-2-61 Verifica precisione misurazione: la precisione dei valori SpO2 è stata verificata in esperimenti condotti sull'uomo facendo il confronto con valori di campioni di sangue arterioso misurati con un co-ossimetro.
- Seite 59 Shenzhen Viatom Technology Co., Ltd. 4E,Building 3,Tingwei industrial Park,No.6 Liufang Road,Block 67,Xin’an Street,Baoan District,Shenzhen, 518101, Guangdong China www.viatomtech.com | Email: info@viatomtech.com MedNet GmbH Borkstrasse 10 · 48163 Muenster · Germany TEL: +49 251 32266-0 FAX: +49 251 32266-22 PN:255-00425-00 Version: A Dec, 2017 Contents of this manual are subject to changes without prior notice.