Inhaltsverzeichnis
Werbung
Verfügbare Sprachen
Verfügbare Sprachen
Quicklinks
Werbung
Inhaltsverzeichnis

Verwandte Anleitungen für Klipsch JAMO J 10 SUB


Inhaltszusammenfassung für Klipsch JAMO J 10 SUB
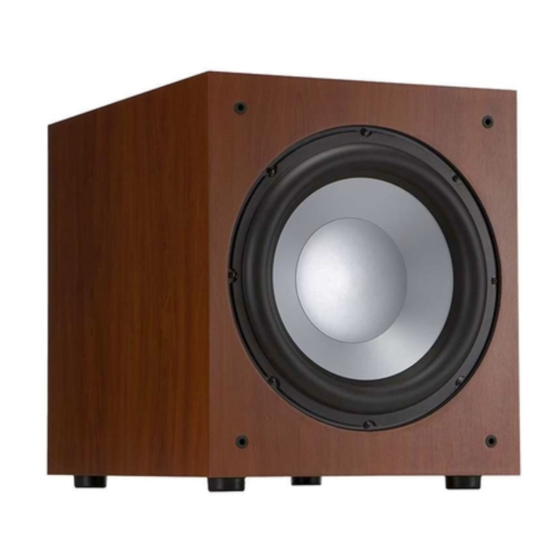
- Seite 1 USER MANUAL J 10 SUB J 12 SUB...
-
Seite 2: Care And Cleaning
INSPECTION We want your new speaker system to look as good as it did leaving the factory! Please check promptly for any transit damage. Carefully unpack your new speaker system and verify the components against the packing list. In extreme circumstances, items may have become damaged in transit. - Seite 3 ENGLISH 6 ’ - 15 ’ + Optional X=Y=Z + Optional + Optional Figure 1 Speaker Placement in Listening Area...
-
Seite 4: Connections And Controls
CONNECTIONS AND CONTROLS CAUTION: Ensure that the subwoofer is unplugged from the AC wall outlet before making between 50Hz-90Hz. If using small bookshelf or “satellite” speakers for the mains, set the any connections. crossover point between 90Hz-150Hz. The smaller the speaker, the higher the setting until the bass frequencies blend well between the speakers and your subwoofer once your system is completely hooked up. - Seite 5 LINE IN LINE IN LINE IN LINE IN L/LFE L/LFE L/LFE L/LFE Processor/Pre-Amp/Receiver Processor/Pre-Amp/Receiver LFE OUTPUT PRE • OUT LFE Output on Processor/Pre-Amp/Receiver connected to LFE input on Left and Right pre-outs on Processor/Pre-Amp/Receiver connected to Left subwoofer amplifier and Right line inputs on subwoofer amplifier Figure 2 Line Level Connections...
-
Seite 6: Entretien Et Nettoyage
INSPECTION Nous voulons que votre nouvelle enceinte soit aussi belle qu’à sa sortie de l’usine ! Si tel est le cas, avisez le livreur et le revendeur auprès duquel vous avez acheté le système. Veuillez vérifier sans attendre qu’ e lle n’a pas été endommagée lors du transport. Déballez Faites une demande d’inspection, et suivez leurs instructions pour l’... - Seite 7 FRENCH 6 ’ - 15 ’ Cassion de Optionnel Graves X=Y=Z Positionnement optionnel à l’arrière Figure 1 Positionnement Des Encientes Dans la Zone D’ é coute...
-
Seite 8: Branchements Et Réglages
BRANCHEMENTS ET RÉGLAGES ATTENTION : Veillez à ce que le caisson de graves soit débranché de la prise murale avant d’ e ffectuer la taille des enceintes gauche/droite principales que vous utilisez avec le système. En règle générale, tout raccordement. pour des enceintes de grande taille, de type colonne, réglez la fréquence de coupure entre 50 et 90 Hz. - Seite 9 LINE IN LINE IN LINE IN LINE IN L/LFE L/LFE L/LFE L/LFE Récepteur A/V surround Récepteur A/V surround PRE • OUT Figure 2 Branchement D’un Caisson De Graves J 110, J 112...
-
Seite 10: Pflege Und Reinigung
INSPEKTION Wir wollen sicherstellen, dass Ihr neues Lautsprechersystem fabrikneu aussieht! Prüfen Sie Falls Schäden festgestellt werden, müssen Sie die Spedition und den Fachhändler bitte gleich, ob etwaige Transportschäden vorliegen. Packen Sie Ihr neues Lautsprechersystem benachrichtigen, bei dem Sie das System gekauft haben. Verlangen Sie eine Inspektion und sorgfältig aus und vergleichen Sie die Komponenten mit der Packliste. - Seite 11 GERMAN 6 ’ - 15 ’ Subwoofer Optionale X=Y=Z Optionale hintere Platzierung Abbildung 1 Lautsprecherplatzierung Im Hörbereich...
-
Seite 12: Anschlüsse Und Regler
ANSCHLÜSSE UND REGLER ACHTUNG: Stellen Sie vor der Herstellung von Anschlüssen sicher, dass der Subwoofer nicht an eine rechten Hauptlautsprecher ein. Als Faustregel gilt, dass man bei größeren Standlautsprechern Steckdose angeschlossen ist. den Crossover-Punkt zwischen 50 und 90 Hz einstellt. Wenn Sie kleinere Regallautsprecher oder Satellitenlautsprecher als Hauptlautsprecher verwenden, stellen Sie den Crossover-Punkt zwischen 90 und 150 Hz ein. - Seite 13 LINE IN LINE IN LINE IN LINE IN L/LFE L/LFE L/LFE L/LFE ODER Surround-A/V-Receiver Surround-A/V-Receiver PRE • OUT Abbildung 2 Anschluss Für Den Subwoofer J 110, J 112...
-
Seite 14: Cuidado Y Limpieza
INSPECCIÓN Deseamos que su nuevo sistema de altavoces se vea tan bien como se veía cuando salió de la fábrica. Vea rápidamente si se han producido daños durante el transporte. Desempaque cuidadosamente su nuevo sistema de altavoces y vea si en el paquete vienen todos los componentes indicados en la lista de empaque. - Seite 15 SPANISH 6 ’ - 15 ’ Subwoofer Opcional X=Y=Z Ubicación posterior opcional Figura 1 Ubicación Del Altavoz En El Área De Audición...
-
Seite 16: Conexiones Y Controles
CONEXIONES Y CONTROLES PRECAUCIÓN: Desenchufe el subwoofer del enchufe de corriente alterna de la pared antes de crossover entre 90 Hz y 150 Hz. Mientras más pequeño sea el altavoz, más alto debe ser el ajuste hacer conexiones. hasta que las frecuencias de bajos se combinen bien entre los altavoces y el subwoofer una vez que el sistema quede completamente cableado. - Seite 17 LINE IN LINE IN LINE IN LINE IN L/LFE L/LFE L/LFE L/LFE O BIEN Surround A/V Surround A/V (Audio y video Surround) (Audio y video Surround) PRE • OUT Figura 2 Cableado De Los Subwoofers J 110, J 112...
-
Seite 18: Cuidado E Limpeza
INSPEÇÃO Queremos que seu novo sistema de caixas acústicas tenha sempre a aparência de novo! Por Em circunstâncias extremas, alguns componentes podem sofrer danos durante o transporte. isso, inspecione-o imediatamente para verificar se sofreu algum dano durante o transporte. Nesse caso, avise a transportadora e o revendedor onde o sistema foi adquirido. Faça um Desembale com cuidado o novo sistema de caixas acústicas e verifique se foram enviados pedido de inspeção e siga as instruções recebidas para avaliar os danos. - Seite 19 PORTUGUESE 6 ’ - 15 ’ Subwoofer Opcional X=Y=Z Posicionamento traseiro opcional Figura 1 Posicionamento Das Caixas Acústicas No Ambiente...
- Seite 20 CONEXÕES E CONTROLES CUIDADO: Certifique-se de que o subwoofer esteja desconectado da tomada antes de fazer entre 90 e 150 Hz. Quanto menor a caixa acústica, maior o ajuste, até haver uma boa combinação das qualquer conexão. frequências mais baixas (graves) entre as caixas acústicas e o subwoofer quando todas as conexões do sistema estiverem feitas.
- Seite 21 LINE IN LINE IN LINE IN LINE IN L/LFE L/LFE L/LFE L/LFE Receiver A/V Surround Receiver A/V Surround PRE • OUT Figura 2 Conexão Do Subwoofer J 110, J 112...
-
Seite 22: Cura E Pulizia
ISPEZIONE Accertarsi che l’altoparlante sia nelle stesse condizioni di integrità in cui ha lasciato la fabbrica. Controllare subito se ci sono danni causati dal trasporto. Disimballare con cautela l’altoparlante e verificare che tutti i componenti siano presenti consultando la distinta di spedizione. - Seite 23 ITALIAN 6 ’ - 15 ’ Subwoofer Facoltativa X=Y=Z Collocazione posteriore facoltativa Figura 1 Collocazione Degli Altoparlanti Nell’area Di Ascolto...
- Seite 24 CONNESSIONI E COMANDI ATTENZIONE. Accertarsi che il subwoofer sia scollegato dalla presa di corrente prima di eseguire “satelliti” come altoparlanti principali, impostarlo tra 90 e 150 Hz. Quanto più piccolo è l’altoparlante, qualsiasi connessione. tanto maggiore deve essere l’impostazione, finché le basse frequenze non sono “distribuite” bene tra gli altoparlanti e il subwoofer una volta completate le connessioni dell’impianto.
- Seite 25 LINE IN LINE IN LINE IN LINE IN L/LFE L/LFE L/LFE L/LFE OPPURE Ricevitore A/V surround Ricevitore A/V surround PRE • OUT Figura 2 Connessioni Di Un Subwoofer J 110, J 112...
- Seite 26 开箱检查 希望您购买的新音箱看上去如同其出厂时的样子!请及时开箱验货,看 其在运输过程中是否有损坏。开箱时,请谨慎操作并按照装箱单核对箱 内组件。在极端情况下,产品可能在运输过程中受损。若发现有任何损 坏,则请通知送货服务人员和该产品销售方进行检验。请按照他们的说 明来评估该产品。请务必保留该产品的原包装箱。 保养和清洁 低音炮饰面材料采用耐用的乙烯塑料。掸灰或清洁操作应使用干布进 行。请避免使用磨蚀性清洁剂、溶剂型清洁剂或强洗涤剂。吸尘器所附 带的刷子完全可以刷去低音炮外壳的灰尘。 参考系列低音炮的摆放 或远离墙壁,则其低音输出量会降低。请尝试不同的摆放方式和控制设 根据设计,尊宝®有源低音炮可重现深沉的低音效果,因此可栩栩如生 置,从而获得最适合您特定空间和品味的音效。在选择低音炮摆放位置 地再现电影和音乐声音。为了获得最佳效果,您通常应把低音炮摆放在 时,您要考虑到低音炮内置功率放大器是需要连接交流电源插座的。 正前方音箱两侧的房间角落(参见图1 )。请注意,该有源低音炮的摆 放位置和方式对其音效影响很大。若按照上述建议把低音炮放置在角落 位置,则其低音输出量会增加。否则,若将低音炮沿墙壁的中间放置,...
- Seite 27 CHINESE 6 ’ - 15 ’ 音炮 X=Y=Z 后方摆放(候选方案) 图1 聆听区的音箱摆放方式...
- Seite 28 连接和控制 注意:做任何连接之前,请务必把低音炮电源线从墙壁交流电插座上 接收器上没有分频点设定装置,则您可以按照我们推荐的上述方式设 拔掉。 定低音炮上的低通滤波器(请参见接收器说明书,了解音箱的更多设 置信息)。 “ LINE IN(线路输入)”连接:如今,大多数环绕声接收器(和前 置放大器)配有专门用于连接低音炮的线路电平输出,该输出端标 “PHASE” 0/180度:该控制装置用来在声学上把低音炮的输出与主 有:Subwoofer Pre Out, Sub Out, SW Out等字样。若接收器配有这 音箱的输出相互匹配。请选择0度或180度相位,看选择哪个相位能在 样的输出端,则低音炮电缆的一端应连接到接收器上的该输出端,另一 聆听位置获得更多的低音炮输出。 端应连接到低音炮上标有LEFT/LFE字样的低音炮线路输入端。这样, 低音炮可以播放音乐和电影环绕声(请参阅您的接收器设备说明书)。 “电源 (POWER)” AUTO/ON/OFF (自动/开启/关闭):该开关设 若接收器上没有低音炮输出端,但有左、右声道前置放大器输出端,则 到“ON”位置时,低音炮将始终打开。设到“AUTO”位置时,低音炮 您可以将该前置放大器输出端连接到低音炮上的LEFT/ LFE输入端。 将 在感应到信号时自动“打开”。如果没有信号,它将在 -20 分钟内自动转入“待机模式”。设 到“OFF”位置时,低音炮 “LEVEL”控制 :若要把低音炮连接到环绕声接收器上的重低音输出 将始终“关闭”,直到该 开关被手动调回至“ON”或“AUTO”位置。 端,则请首先把接收器上的低音炮音量控制装置调到“一半”或“0 dB”位置,然后增加低音炮音量(或增益),直到低音炮的音量能匹...
- Seite 29 LINE IN LINE IN LINE IN LINE IN L/LFE L/LFE L/LFE L/LFE 或 环绕声视听 环绕声视听 接收器 接收器 图2 J 110、 J 112低音炮连接图...
- Seite 30 الفحص نريد أن يبدو نظام مكبرات الصوت الجديد الخاص بك بحالة جيدة كما خرج من المصنع! ي ُرجى التحقق على الفور من أي ضرر أثناء النقل. قم بفك عبوة نظام مكبرات الصوت الجديد وتحقق من المكونات مقابل قائمة التعبئة. قد تتعرض العناصر في ظل ظروف...
- Seite 31 ARABIC 6 ’ - 15 ’ مضخم + اختياري الصوت X=Y=Z + اختياري + اختياري 1 الشكل وضع مكبرات الصوت في منطقة استماع...
- Seite 32 .أكبر في موضع االستماع 2,4 هي منتج بسرعةWA-2 ”. وصلةWA Port“ التي يوجد بها مدخلJamo وMirage وEnergy لمزيد منklipsch.com جيجا هرتز مصمم لنقل إشارة لمحيط بقطر يصل إلى 05 قدم السلك ي ًا. انظر .التفاصيل ON/AUTO/“ ” (الطاقة) إيقاف/تلقائي/تشغيل - عندما يكون هذا المفتاح في الموضعPOWER“...
- Seite 33 LINE IN LINE IN LINE IN LINE IN L/LFE L/LFE L/LFE L/LFE أو /المعالج/مكبر الصوت األولي /المعالج/مكبر الصوت األولي جهاز االستقبال جهاز االستقبال LFE OUTPUT PRE • OUT المخارج األولية اليسرى واليمنى الموجودة على المعالج/مكبر الصوت األولي/جهاز االستقبال المتصل الموجود علىLFE الموجود على المعالج/مكبر الصوت األولي/جهاز االستقبال إلى مدخلLFE مخرج بالمداخل...
- Seite 35 V06 - 170926 ©2014 Klipsch Group, Inc. All Rights Reserved Jamo is a trademark of Klipsch Group, Inc., registered in the US and other countries. Engineered by Klipsch Group, Inc., USA, Product of China A Wholly-Owned Subsidiary of VOXX International Corporation...