Trust AMI HAND TRACK Kurzanleitung
Quicklinks
AMI HAND TRACK
UK
Introduction
This manual is intended for users of the 'Trust Ami Hand Track'. This Hand Track makes it possible to
operate your computer away from your table. You can use the bag to take the Hand Track with you.
Safety
1.
Clean the Hand Track with a damp cloth. Do not use a liquid cleaner or a spray.
2.
Do not use the Hand Track near water.
3.
Make sure nothing is placed on the power cable. Do not use the Hand Track where the cable
can become worn.
4.
Do not repair the Hand Track yourself. The Hand Track may only be repaired by qualified
personnel.
Installation
Before connecting the Ami Hand Track, remove the software and driver for your old mouse. In most
cases, this can be done using the "Uninstall" program provided with your old mouse. You can also
remove the software via:
"Start – Settings – Control Panel" and then double-clicking on the "Add/Remove Programs" icon.
Also look in the "Device Manager":
"Start – Settings – Control Panel" and then double-click on the "System" icon. Next, select the "Device
Manager" tab. If a specific driver for your mouse can be found in the "Device Manager", this must be
removed.
Your mouse may no longer work. If so, close Windows using your keyboard.
1.
Connect the Hand Track to your computer's PS/2 port.
2.
Turn the computer on.
3.
Windows will add a standard 2-button PS/2 mouse. It is not necessary to install a driver.
4.
If the Hand Track is not added automatically, select "Start – Settings – Control Panel" and then
double-click on the "Add New Hardware" icon. Select a standard PS/2 mouse.
5.
The Hand Track is now ready for use and will function as a standard 2-button PS/2 mouse.
Note:
The Ami Hand track has 3 buttons. Two of these buttons have the same function.
Use
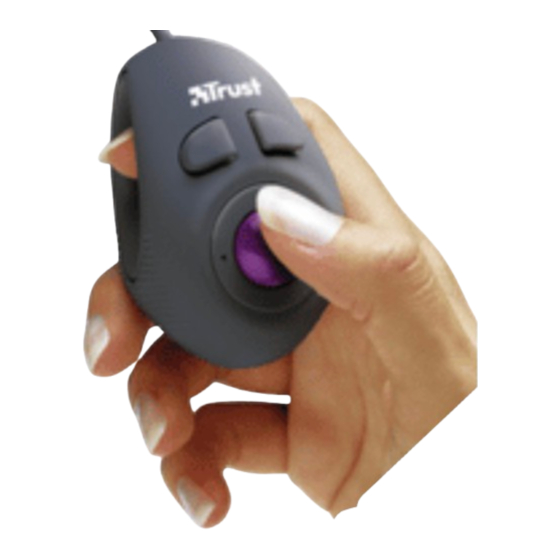
The Ami Hand Track has three buttons. Two of these buttons have the same function. A description of
the buttons on the Ami Hand Track is given in the table below. Use this table in combination with figure
1.
Button
Function
A
Left mouse button function
B
Left mouse button function
C
Right mouse button function
D
Track ball
E
Track ball ring
Bag
You can place the Ami Hand Track in the bag if you wish to take it with you. This will prevent the Hand
Track from being scratched or damaged.
Maintenance
If the operation is no longer smooth, this may be because the track ball is dirty. Remove the ring E
(figure 1) which keeps the track ball in place. Clean the rollers on the inside of the Hand Track.
Troubleshooting
Problem
Cause
Windows displays
The software or driver
a message saying
of your previous
that no mouse is
mouse is still installed.
connected.
The Hand Track has
been connected
incorrectly.
The third button
Buttons A and B have
cannot be
the same function.
programmed.
The track ball
This is correct.
cannot be used to
scroll.
The mouse arrow
The track ball is dirty.
moves in jerks.
The problem is not
The latest FAQ
listed here.
update, drivers and
instruction manual are
available on the
Internet.
Register your product at www.trust.com so that you are able to receive optimal guarantee and service
support, such as up-to-date FAQ's and the latest drivers. You will be automatically informed of
developments to your product and other Trust products. You will also have the chance of winning some
spectacular prizes.
If you still have problems after trying these solutions, please contact one of the Trust Customer Care
Centers (see table in bottom right-hand corner). Please have the following information available: The
article number (in this case 12772) and a good description of what is not working and when the
problem occurs.
Fig. 1
Description
The same as button B.
The same as button A.
The same as a standard right
mouse button.
Operates the mouse arrow.
Keeps the track ball in place
and can also be removed for
maintenance.
Possible solution
Remove the software and driver for your
previous mouse before connecting the Hand
Track (see "Installation").
Connect the Hand Track to your computer's PS/2
port.
Do not use an adapter.
There is no solution.
The track ball is only used for operating the
mouse arrow on the screen.
Clean the track ball (see "Maintenance").
Visit www.trust.com/12772 for FAQ and other
product information.
Einleitung
Diese Bedienungsanleitung wendet sich an Benutzer der Trust Ami Hand Track. Mit dieser Trackmaus
brauchen Sie zum Bedienen Ihres Computers keinen Tisch mehr. Zum Mitnehmen der Hand Track gibt
es eine praktische Tragetasche.
Sicherheitshinweise
1.
Verwenden Sie keine flüssigen Reinigungsmittel oder Sprays. Reinigen Sie die Trackmaus mit
einem feuchten Tuch.
2.
Benutzen Sie die Trackmaus nicht in der Nähe von Wasser.
3.
Achten Sie darauf, das nichts auf dem Kabel steht. Verwenden Sie die Trackmaus nicht an
einer Stelle, wo das Kabel verschleißen kann.
4.
Reparieren Sie die Trackmaus nicht selbst. Reparaturen an dieser Trackmaus dürfen
ausschließlich von qualifizierten Servicetechnikern ausgeführt werden.
Installieren
Deinstallieren Sie die Software und den Treiber Ihrer alten Maus, ehe Sie die Wireless Hand Track
Laser 410 anschließen. In den meisten Fällen wurde dafür ein Deinstallationsprogramm („uninstall
program") mit der alten Maus mitgeliefert. Ansonsten können Sie die Software so entfernen:
Start – Einstellungen – Systemsteuerung – Software.
Sehen Sie auch im Gerätemanager nach:
Start – Einstellungen – Systemsteuerung – System. Wählen Sie hier die Registerkarte
'Gerätemanager'. Wenn sich hier ein spezifischer Treiber für Ihre Maus befindet, müssen Sie ihn
entfernen.
Möglicherweise funktioniert die Maus danach nicht mehr. Schließen Sie in diesem Fall Windows mit
Hilfe der Tastatur ab.
1.
Schließen Sie die Trackmaus an den PS/2-Port des Computers an.
2.
Schalten Sie den Computer ein.
3.
In Windows wird jetzt automatisch eine Standard-PS/2-Maus mit zwei Tasten zugefügt. Sie
brauchen keinen Treiber zu installieren.
4.
Wenn die Trackmaus nicht automatisch zugefügt wird, wählen Sie: Start – Einstellungen –
Systemsteuerung – Neue Hardware zufügen. Markieren Sie hier eine Standard-PS/2-Maus.
5.
Die Trackmaus ist einsatzbereit und funktioniert als Standard-PS/2-Maus mit zwei Tasten.
Hinweis:
Die Ami Hand Track verfügt über drei Tasten, von denen zwei die gleiche Funktion
haben.
Verwendung
Die Ami Hand Track hat drei Tasten, zwei dieser drei Tasten haben dieselbe Funktion. Die Tasten auf
der Ami Hand Track werden in der folgenden Tabelle zusammen mit Abbildung 1 erläutert.
Taste
Funktion
A
Linke-Maustastenfunktion.
B
Linke-Maustastenfunktion.
C
Rechte-Maustastenfunktion.
D
Trackball
E
Haltering
Tragetasche
Wenn Sie die Ami Hand Track mitnehmen möchten, stecken Sie sie einfach in die mitgelieferte
Tragetasche. So beugen Sie Kratzern und anderen kleinen Beschädigungen vor.
Pflege
Wenn die Bedienung nicht mehr reibungslos verläuft, kann es sein, dass die Trackballkugel schmutzig
ist. Entfernen Sie Ring E in Abbildung 1, der die Kugel an der Stelle hält. Reinigen Sie die Rollen im
Inneren der Trackmaus.
Fehlerbehebung
Problem
Mögliche Ursache
In Windows
Die Software oder der
erscheint die
Treiber der alten Maus ist
Meldung, dass keine
noch installiert.
Maus
Die Maus ist falsch
angeschlossen ist.
angeschlossen.
Die dritte Taste kann
Die Funktion von Taste A
nicht programmiert
ist dieselbe wie von
werden.
Taste B.
Mit dem Trackball ist
Kein Fehler.
kein Bildlauf
möglich.
Die Bedienung des
Die Trackballkugel ist
Mauszeigers verläuft
verschmutzt.
mühsam.
Das Problem wird
Die neueste Version der
hier nicht genannt.
FAQ, des Treibers und
der Anleitung stehen im
Internet zur Verfügung.
Sie können Ihr Produkt einfach auf www.trust.com registrieren, um von der Garantie und
Serviceunterstützung, die unter anderem die aktuellen FAQ und die neuesten Treiber umfasst, optimal
genießen zu können. Außerdem werden Sie automatisch über Entwicklungen auf dem Gebiet Ihres
Produkts und anderer Produkte von Trust auf dem Laufenden gehalten. Und Sie können fantastische
Preise gewinnen.
Wenn das Problem damit nicht behoben werden kann, wenden Sie sich an eine der Trust-
Kundenbetreuungsstellen (siehe Tabelle rechts unten). Die folgenden Angaben sollten Sie in jedem
Fall zur Hand haben: die Artikelnummer (in diesem Fall 12772) und eine genaue Beschreibung, die
wiedergibt, was wann nicht funktioniert.
TRUST SERVICE CENTRE
24 HOURS: internet
Office
Open
UK
Mon - fri
8:00 - 16:00
Italia
Lun – ven
9:00 – 17:00
France
Lun – ven
9:00 à 17:00
Deutschland
Mo – Fr
9:00 - 17:00
España
Lun – viernes
9:00 - 17:00
Polska
Pon do pią
9:00 - 17:00
Nederland
Ma – vr
9:00 - 17:00
Other countries
Mon – fri
9:00 - 17:00
DE
Bemerkung
Gleiche Funktion wie Taste B.
Gleiche Funktion wie Taste A.
Genau wie eine normale rechte
Maustaste.
Zur Steuerung des
Mauszeigers.
Hält den Trackball an der Stelle
und kann zu Wartungszwecken
eventuell entfernt werden.
Mögliche Lösung
Entfernen Sie die Software und den Treiber der alten
Maus, ehe Sie diese Trackmaus installieren. Siehe
das Kapitel „Installation".
Schließen Sie die Trackmaus an den PS/2-Port des
Computers an.
Verwenden Sie keinen Adapter.
Nicht zutreffend.
Der Trackball dient nur zur Steuerung des
Mauszeigers auf dem Bildschirm.
Reinigen Sie die Trackballkugel. Siehe das Kapitel
„Pflege".
Gehen Sie zu www.trust.com/12772, wo Sie die FAQ
und andere Produktinformationen nachlesen können.
www.trust.com
Phone
+44-(0)845-6090036
+39-(0)51-6635947
+33-(0)825-083080
+49-(0)2821-58835
+34-(0)902-160937
+48-(0)22-8739812
+31 (0)78-6543387
+31-(0)78-6549999

Verwandte Anleitungen für Trust AMI HAND TRACK


Inhaltszusammenfassung für Trust AMI HAND TRACK
- Seite 1 Trackball Zur Steuerung des Mauszeigers. You can place the Ami Hand Track in the bag if you wish to take it with you. This will prevent the Hand Haltering Hält den Trackball an der Stelle Track from being scratched or damaged.
- Seite 2 à portée de main : le numéro d’article (dans ce cas-ci 12772) et une Assistenza Clienti Trust (vedere la tabella riportata in fondo a destra). Si prega in ogni caso di tenere a portata di description précise du dysfonctionnement et du moment auquel le problème survient.
- Seite 3 Ami Hand Track posiada trzy przyciski, dwa z nich mają identyczną funkcję. Poniższa tabela, wraz z explicación de los botones del ‘Ami Hand Track’ se hace a través del cuadro 1 y de la figura 1. rysunkiem 1, opisuje przyciski Ami Hand Track.
- Seite 4 Draagtasje Wanneer u de Ami Hand Track met u mee wilt nemen stop u deze in het bijgeleverde draagtasje; zo voorkomt u krassen of andere kleine beschadigingen. Onderhoud Wanneer de bediening minder vloeiend verloopt kan het zijn dat de trackball vervuild is. Verwijder de ring E in figuur 1 die de bal op zijn plaats houdt.