Facom BAT.TESTU Original Bedienungsanleitung
Batterie - /ladesystemtester
Inhaltsverzeichnis
Verfügbare Sprachen
Verfügbare Sprachen
Quicklinks
BAT.TESTU
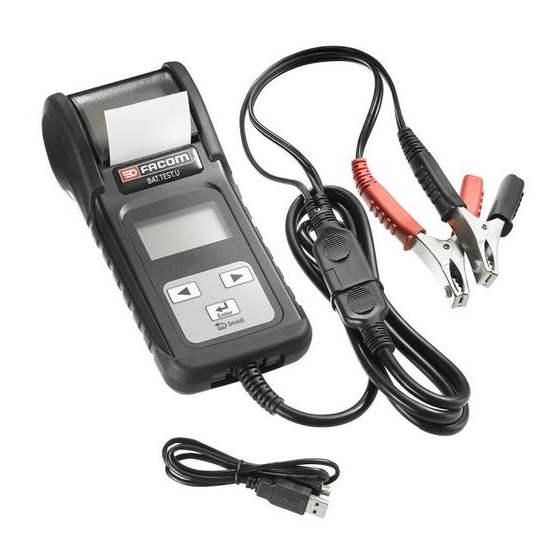
Battery Tester USB
Testeur de batterie USB
Batterie - /Ladesystemtester
Probador de batería
Tester Batterie
Analisador de baterias
Accu/systeem tester
https://www.facom.com/produits/battery-tester.html
• Notice originale
• Original instructions
• Originalbedienungsanleitung
• Oorspronkelijke gebruiksaanwijzing
• Manual original
• Istruzioni originali
• Manual original
Inhaltsverzeichnis

Verwandte Anleitungen für Facom BAT.TESTU


Inhaltszusammenfassung für Facom BAT.TESTU
- Seite 15 REMARK: WHEN RETURNING GOODS, PLEASE SHOW “RETURN GOODS” ON ALL INVOICES & RELATED SHIPPING DOCUMENTS TO PREVENT ANY EXTRA CHARGE.”...
-
Seite 30: Testablauf / Betriensanweisungen
TESTABLAUF / BETRIENSANWEISUNGEN WICHTIG: 1. Zum testen von 12 volt akkus und zum testen von 12 & 24 volt ladesystemen. (NUR für 12V Batterie START & STOP) 2. Zugelassene Betriebstemperatur 0°C (32°F) bis 50°C (122°F) (Umgebungstemperatur). WARNUNG WARNUNG: Dieses Produkt kann Sie an Chemikalien aussetzen, einschl. Arsen, das im Staate Kalifornien als Ursache für Krebs eingestuft wird. -
Seite 31: Einen Test Vorbereiten
7. Tragen Sie beim Arbeiten mit der Batterie keine Ringe, Armbänder, Halsketten, Uhren etc. Ein möglicher Kurzschluss kann Gegenstände schmelzen und zu starken Verbrennungen führen. EINEN TEST VORBEREITEN: 1. Sorgen Sie beim Test für gute Lüftung in der Umgebung der Batterie. 2. - Seite 32 Bedenken Sie, dass nichts auf der Anzeige zu sehen sein wird, solange der Tester nicht mit dem Batterieträger verbunden ist. 3. Prüfen Sie, ob die Batteriepole sauber sind. Bürsten Sie sie gegebe- nenfalls sauber. Klemmen Sie das schwarze Kabel an den negativen Pol der Fahrzeugbatterie und das rote Kabel an den positiven Pol der Fahrzeugbatterie.
-
Seite 33: Das Papier Ersetzen
DAS PAPIER ERSETZEN: A. Den Klarsichtdeckel öffnen. B. Eine neue Papierrolle in das Fach einsetzen. C. Ein kurzes Stück Papier aus dem Fach schauen lassen und zum Schließen auf den Klarsichtdeckel drücken. - Seite 34 HAUPTMENÜ: Sie betrachten die folgenden Bildschirme, wenn SESYSTEM Sie auf / drücken, um zwischen allen Funk- ANALYSEGERÄT tionen und den Einstellungen umzuschalten. AKKUTEST Für den Akkutest auf «ENTER» (Eingabe) XX.XX V drücken. SYSTEMTEST Für den Systemtest auf «ENTER» (Eingabe) XX.XX V drücken.
- Seite 35 Zum Bearbeiten der angepaßten ANPASSEN Informationen auf «ENTER» (Eingabe) drücken. AKKUTEST: AKKUTEST 1. AKKUTEST auswählen. Auf «ENTER» XX.XX V (Eingabe) drücken. 2. Zum Auswählen der REGULÄRE/STD oder zum STARTEN/AN- HALTEN des Akkus auf / drücken. REGULÄRE/STD STARTEN/ANHALTEN * REGULÄRE/STD-AKKU: DURCHFLUTET, PLATTE AGM-SCHEIBE, AGM-SPIRALE, VRLA/GEL * STARTEN/ANHALTEN DES AKKUS:...
-
Seite 36: Hinweis Zur Oberflächenladung
9. Zum Beginnen des Tests auf <<Enter>> (Eingabe) drücken. * Rückkehrfunktion: Vor dem Beginnen des Tests kann durch Drücken während 2 Sekunden auf <<ENTER>> (Eingabe) immer zurück zur vorherigen Einstellseite zurückgekehrt werden. HINWEIS ZUR OBERFLÄCHENLADUNG: Der Akku hat eine Oberflächenladung, wenn der Motor gelaufen ist oder nachdem der Akku geladen wurde. - Seite 37 GUT & BESTANDEN GUT & *Die Batterie ist okay & in der Lage Ladung BESTANDEN halten. VOL: xx.xx V CCA : xxx CCA/SAE xx.xx mΩ GUT & AUFLADEN *Die Batterie okay, muss jedoch aufgeladen GUT & AUFLADEN warden. VOL: xx.xx V CCA : xxx CCA/SAE VORSICHT...
- Seite 38 14. SOC- & SOH-Anzeige: Zum Anzeigen des SOC & SOH auf die Richtungstasten drücken: GUT & GUT & BESTANDEN BESTANDEN SOC: xx.xx V CCA : xxx CCA/SAE ■■■■■■■■■❏ 90% ■■■■■■■■■❏ 90% 15. Zum Auswählen des Ausdruckens auf die DAS RESULTAT AUSDRUCKEN? ...
-
Seite 39: Hoch Ladespannung Bei Test Ohne Belastung
ANLASSS PANNUNG NORMAL Das System zeigt ein normales Ergebnis. ANLASSS Drücken Sie auf «ENTER», um den Ladetest PANNUNG xx.xx V NORMAL auszuführen. ANLASSS PANNUNG NIEDRIG ANLASSS Die Startspannung liegt unter normalen PANNUNG Werten, Suchen Sie nach möglichen xx.xx V NIEDRIG Fehlern auf vom Herstellers empfohlene Weise. -
Seite 40: Ladesystem Normal Bei Test Ohne Belastung
LADESYSTEM NORMAL BEI TEST OHNE LEERLAUFSPANN BELASTUNG Das System zeigt normale Ausgangswerte des xx.xx V NORMAL Generators an. Es gibt kein Problem. NIEDRIG LADESPANNUNG OHNE LEERLAUFSPANN BELASTUNG Der Generator produziert nicht genügend xx.xx V NIEDRIG Strom für die Batterie. Prüfen Sie, den Keilriemen, um sicherzustellen das der Generator bei laufendem Motor arbeitet. -
Seite 41: Ladegerät Hoch Beim Testen Mit Zubehörlasten
HOCH DIODEN TEST RIPPLE Mindestens eine Generatordiode funktioniert FESTGESTELLT nicht oder der Starter ist beschädigt. xx.xx V HOCH Kontrollieren Sie die Montage des Generators und die Kondition und Funktionsfähigkeit der Keilriemen. Falls Sie feststellen, dass alles in Ordnung ist, ersetzen Sie den Generator. 9. -
Seite 42: Test Im Fahrzeug
10. Nach dem Abschließen des Tests des TEST Ladegeräts auf «ENTER» (Eingabe) ABGESCHLOSSEN. drücken. Alle Zubehörlasten und den DIE VERBRAUCHER Motor abschalten. Zum Ablesen der UND DEN MOTOR ABSCHALTEN Resultate des Systemtests auf «ENTER» (Eingabe) drücken. ALT. LADEVOLTS xx.xx V NORMAL SPANNUNG RIPPLE xx.xx V NORMAL SPANNUNG BEIM... - Seite 43 Was ist eine AGM-Batterie? Eine AGM-Batterie ist eine elektrische Bleisäure-Akkubatterie, die: • mit speziellen Druckventilen abgedichtet ist und unter keinen Umständen geöffnet werden darf. • vollständig wartungsfrei ist.* • bei der alle ihre Elektrolyten in Abschneidern absorbiert werden, wobei diese Abschneider aus eine schwammähnlichen Masse von verfilzten Glasfasern bestehen.
-
Seite 44: Garantiebedingungen
Ampere-Stunde von Elektrizität. Der Strom wird mit der Zeit in Stunden multipliziert, um die Leistung in Ampere-Stunden anzugeben. GARANTIEBEDINGUNGEN https://www.facom.com/produits/battery-tester.html RÜCKVERSANDT VON GÜTERN: Zu rückversendete Güter müssen mit ausreichend Verpackungsmaterial verpackt werden, um diese vor Schäden, die während dem Transport und Versand auftreten können gut zu schützen. - Seite 89 NOTAS: PARA TORNAR A MERCADDORIA, AGRADECEMOS MARCAR “MERCADDORIA DEVOLVIDA” EM TODA FATURA & DOCUMENTO DO EMBARQUE RELACIONADO PARA PREVENIR CARGA EXTRA.”...
- Seite 90 NOTA...