Inhaltsverzeichnis
Werbung
Verfügbare Sprachen
Verfügbare Sprachen
Quicklinks
MISSING SOMETHING? / BESOIN DE PIÈCES
DE RECHANGE ? / ¿TE FALTA ALGO? /
FEHLT ETWAS? / MANCA QUALCOSA?
USA/CANADA
parts.KidKraft.com
Welcome to the KidKraft family
We do our very best to ensure accuracy in every order, but occasionally we miss something. That's why
our warranty covers every single part of your new product for 90 days after purchase. If you are missing
parts or find any damage, it's easy to order replacements at parts.KidKraft.com in the US and
parts.kidkraft.eu in Europe. You can also review your warranty, download assembly instructions and more
by visiting KidKraft.com.
Bienvenue dans famille Kidkraft
Nous faisons de notre mieux pour assurer l'exactitude dans chaque commande, mais parfois nous
manquons quelque chose. C'est pourquoi notre garantie couvre chaque partie de votre nouveau
produit pendant 90 jours après l'achat. S'il vous manque des pièces ou si vous, c'est facile de
commander des pièces de rechange chez parts.KidKraft.com aux États-Unis et parts.kidkraft.eu en
Europe. Vous pouvez également consulter votre garantie, télécharger les instructions d'assemblage et
plus encore en visitant KidKraft.com.
Bienvenido a la Familia Kidkraft
Hacemos nuestro mejor esfuerzo para asegurar la precisión en cada orden, pero a veces se nos olvida
algo. Por este motivo, nuestra garantía cubre cada parte de su nuevo producto por los próximos 90 días
después de su compra. Si a le falta alguna parte o si consigue algún daño en el producto, es muy
sencillo solicitar un remplazo en parts.KidKraft.com en los Estados Unidos y en parts.kidkraft.eu en
Europa. También puede revisar su garantía, descargar instrucciones de ensamblaje y mucho más
visitando KidKraft.com.
Willkommen zu KidKraft Family
Wir geben unser Bestes, bei jeder Bestellung sicherzustellen, dass höchste Sorgfalt geboten wird, aber
vereinzelt kann es vorkommen, dass wir etwas übersehen. Aus diesem Grund deckt unsere Garantie jedes
einzelne Teil Ihres neuen Produkts für die Dauer von 90 Tagen nach Erwerb ab. Sie können ganz einfach
Ersatzteile bei parts.KidKraft.com in den USA und parts.KidKraft.eu in Europa bestellen, sollten Teile fehlen
oder Beschädigungen vorliegen. Besuchen Sie KidKraft.com, um unter anderem die Garantie einzusehen
und Aufbauanleitungen herunterzuladen.
Benvenuti nella famiglia KidKraft
Facciamo del nostro meglio per garantire la precisione in ogni ordine, ma ogni tanto qualcosa può
sfuggire. Ecco perché la nostra garanzia copre ogni singola parte del nuovo prodotto per 90 giorni dopo
l'acquisto. In caso di parti mancanti o se si riscontrano danni, basta semplicemente richiedere la
sostituzione su parts.KidKraft.com negli Stati Uniti e parts.kidkraft.eu in Europa. È anche possibile
controllare la garanzia, scaricare le istruzioni di montaggio e altro ancora visitando KidKraft.com.
Batch Code
Code de lot
Código De Lote
Chargennummer
Numero del lotto:
EUROPEAN REGIONS
parts.KidKraft.eu
AUSTRALIA
parts.KidKraft.au
Werbung
Inhaltsverzeichnis

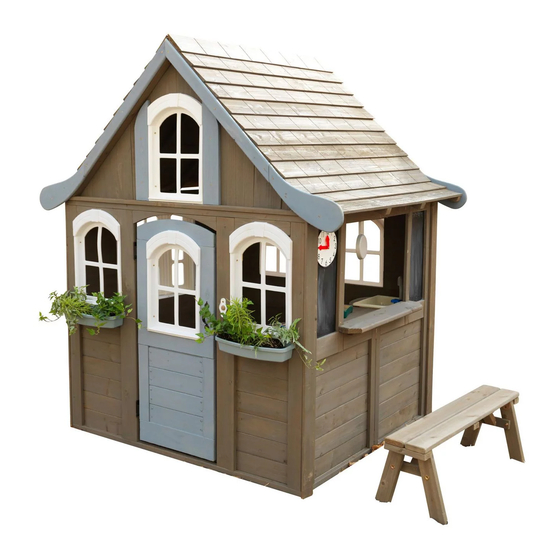
Verwandte Anleitungen für KidKraft FORESTVIEW II


Inhaltszusammenfassung für KidKraft FORESTVIEW II
- Seite 1 90 days after purchase. If you are missing parts or find any damage, it’s easy to order replacements at parts.KidKraft.com in the US and parts.kidkraft.eu in Europe. You can also review your warranty, download assembly instructions and more by visiting KidKraft.com.
-
Seite 17: Installations - Und Betriebsanleitungen
SPIELHAUS FORESTVIEW II - 20098 INSTALLATIONS - UND BETRIEBSANLEITUNGEN Um die Gefahr schwerer Verletzungen oder Todesfälle zu verringern, müssen Sie WARNUNG diese Anleitung lesen und befolgen, Bewahren Sie diese Anleitungen auf, schauen Sie sie regelmäßig an und geben Sie sie an zukünftige Besitzer der Spielset weiter. -
Seite 18: Warnungen Und Sichere Spielanleitungen
Warnungen und sichere Spielanleitungen MONTINUIERLICHE AUFSICHT DURCH ERWACHSENE ERFORDERLICH. Die meisten Verletzungen und Todesfälle passierten an der Spielplatzanlage dann, wenn Kinder unbeaufsichtigt waren! Unsere Produkte sind so konzipiert, dass sie die vorgeschriebenen undfreiwilligen Sicherheitsstandards erfüllen. Das Einhalten aller Warnungen und Empfehlungen dieser Anleitungen wird die Gefahr von Verletzungen oder Todesfällen bei Kindern verringern, die diesen Spielplatz benutzen. -
Seite 19: Tipps Für Einen Erfolgreichen Aufbau
Tipps für einen erfolgreichen Aufbau Benötigtes Werkzeug • Wasserwaage • Klauenhammer • Standard- oder Akkubohrer • Schutzbrille • Winkelmaß • Metermaß • Bleistift • Hilfe anderer Erwachsener Teileidentifikation 2 X 1 Auf jeder Seite sind die Teile und die Stückzahl aufgeführt, die für den entsprechenden Schritt benötigt werden. -
Seite 20: Jahre Beschränkte Garantie
5 Jahre beschränkte Garantie KidKraft garantiert für einen Zeitraum von einem Jahr ab dem Kaufdatum, dass dieses Produkt frei von Fehlern in der Verarbeitung, im Design oder von Materialfehlern ist. Zusätzlich gibt es für das Holz eine 5-jährigeGarantie gegen Struk- turfehler aufgrund von Schäden durch Fäulnis und Insekten. -
Seite 21: Anleitung Für Die Batterie Und Garantie
Anleitung für die Batterie und Garantie Dieses Gerät erfüllt die Anforderungen in Teil 15 der FCC-Vorschriften. Für den Betrieb gelten die folgenden zwei Bedingungen: (1) Das Gerät darf keine schädlichen Interferenzen verursachen und (2) das Gerät muss empfangene Interferenzen aufnehmen können, auch wenn diese zu Betriebsstörungen führen. HINWEIS: Dieses Gerät wurde geprüft und hält die Grenzen für ein Digitalgerät der Klasse B gemäß... - Seite 27 3 x 4 8 x 5 4 x 3 14 x 2 13 x 2 19 x 2 4449-BK 4458-BK 4453-DVGY 5943-WT 4457-WT 4455-GN 4463-BK 4450-SMGY 4454-BK 4459-BN 4451-SMGY 4456-TB 4448-644 4452-SMGY Parts and Hardware Pièces et matériel Partes y Piezas Para Instalación Teile und Befestigungsmaterial Parti e componenti meccanici...
- Seite 29 Step Étape Paso Schritt Fase Open frame all the way so all corners are at 90 degrees. Ouvrez le cadre jusqu'au bout pour que tous les coins soient à 90 degrés. Abra el marco por completo de modo que las esquinas queden a 90 grados. Öffnen Sie den Rahmen ganz, sodass alle Ecken 90°-Winkel bilden.
- Seite 30 Step Étape Paso 8 x C Schritt Fase Flush Aligné A ras Bündig A filo Flush Aligné A ras Bündig A filo Flush Aligné A ras Bündig A filo...
- Seite 32 Step Étape Paso 8 x B Schritt Fase Flush Aligné A ras Centered Bündig Centré A filo Centrado Zentriert Centrato Centered Centré Centrado Zentriert Flush / Aligné / A ras / Bündig / A filo Centrato Step 4458-BK Étape 1-3/64” Paso 2 x F 26.6mm...
- Seite 33 Step 4458-BK Étape Paso 2 x F Schritt 1-3/64” Fase 26.6mm 4458-BK 17-7/8” 454mm Step 4459-BN-b Note: 4459-BN-b is flush with door edge Étape Remarque : 4459-BN-b est aligné avec le bord de la porte Paso 2 x F Nota: 4459-BN-b está a ras del borde de la puerta Schritt Hinweis: 4459-BN-b liegt bündig an der Türkante an Fase...
- Seite 34 Step Étape Paso 4459-BN-a Schritt Fase 2 x H Important: Use a hand held screw driver and DO NOT over tighten. 4459-BN-a Important : Utiliser un tournevis manuel et ne PAS TROP serrer. Importante: Use un destornillador de mano y no atornille en exceso. Wichtig: Verwenden Sie einen Schrauben- zieher und achten Sie darauf, die Schrau- ben NICHT zu fest anzuziehen.
- Seite 35 Step 4456-TB-a Étape Paso Schritt Fase 4456-TB-a 2 x H Step Étape Paso Schritt Fase 4456-TB-a 4456-TB-a...
- Seite 36 Step 4456-TB-b Étape Paso 2 x F Schritt Fase 4456-TB-b 4456-TB-b Step 4455-GN Étape Paso 2 x F Schritt Fase 4455-GN-a 1-9/16” 40mm 4455-GN-b...
- Seite 37 Step Étape Paso 2 x B Schritt Fase Step Étape Paso 4 x B Schritt Fase Flush / Aligné / A ras / Bündig / A filo Centered Centré Centrado Zentriert Centrato...
- Seite 38 Step 2 x B Étape Paso Schritt Fase Step 4449-BK Étape Paso 12 x F Schritt 4449-BK Fase 4449-BK...
- Seite 39 Step Étape Paso Schritt Fase 10 x C 1/2” 12.7mm Flush Aligné A ras Bündig A filo Step Étape Paso Schritt Fase 1 x B 2 x D Tight Serré Ajustado Eng anliegend Serrato...
- Seite 40 Step 4 x A Étape Paso Schritt Fase 2 x B Step Étape 2 x D Paso Schritt Fase...
- Seite 41 Step Étape Paso Schritt Fase 21 x H Tight Serré Flush Flush Ajustado Aligné Aligné Eng anliegend A ras A ras Serrato Bündig Bündig A filo A filo...
- Seite 42 Step 4453-DVGY Étape 4454-BK Paso Schritt 8 x I Fase 10 x N 4453-DVGY-b 4453-DVGY-c 4453-DVGY-d 4453-DVGY-a 4454-BK...
- Seite 43 Step 4463-BK Étape 4452-SMGY Paso 4451-SMGY Schritt Fase 4450-SMGY 2 x F 4463-BK 4452-SMGY 4450-SMGY 4451-SMGY Step Étape Tuck under siding overhang Paso Placer sous la saillie latérale Schritt Introducir debajo del voladizo de revestimiento Fase 4 x C Unter den Überhang des Dachbretts schieben Infilato sotto la sporgenza laterale Flush Aligné...
- Seite 44 Step Tuck under siding overhang Étape Paso Placer sous la saillie latérale Schritt Introducir debajo del voladizo de revestimiento Fase 4 x C Unter den Überhang des Dachbretts schieben Infilato sotto la sporgenza laterale Flush Aligné A ras Bündig A filo 2 x J Step Étape...
- Seite 45 Step Étape Paso Schritt Fase 2 x D Flush Aligné A ras Bündig A filo Step 12 x B Étape Paso Schritt Fase Flush Aligné A ras Bündig A filo Flush Aligné A ras Bündig A filo Flush Aligné A ras Bündig Important: Failure to make sure the bottom of the Joists and (18) Roof Sides are flush will A filo...
- Seite 46 Step Make sure assembly is square before proceeding in this Step. Étape Assurez-vous que l'assemblage est bien droit avant de réaliser cette étape. Paso Asegúrese de que el montaje esté en perpendicular antes de pasar a este paso. Schritt Prüfen Sie, dass die Bauteile sich im rechten Winkel zueinander befinden, bevor Sie mit diesem Schritt fortfahren. Fase Prima di procedere in questo passaggio, accertarsi che l’assemblato sia in squadra.
- Seite 51 Step 8 x B Étape Paso Schritt Fase Step 4457-WT-a Étape Paso 4 x F Schritt Fase 4457-WT-a...
- Seite 54 Step 5943-WT Étape Paso 16 x F Schritt Fase 5943-WT Step 4448-644 Étape Paso 4 x G Schritt Fase 4448-644...
- Seite 55 Step Étape Paso 4 x M Schritt Fase Step Étape Paso Schritt Fase 4 x E Step Étape 4 x K Paso 4 x L Schritt Fase 4 x B Step Étape Paso Schritt Fase...