Herunterladen Diese Seite drucken

Werbung

Verfügbare Sprachen
  • DE

Verfügbare Sprachen

  • DEUTSCH, seite 9
All manuals and user guides at all-guides.com
Alpha IP
Quick Install Guide
RTA 61001-N1
132723.1705

Werbung

loading

Inhaltszusammenfassung für Mohlenhoff RTA 61001-N1 Alpha IP

  • Seite 1 All manuals and user guides at all-guides.com Alpha IP Quick Install Guide RTA 61001-N1 132723.1705...
  • Seite 2 all-gui des.c...
  • Seite 3 All manuals and user guides at all-guides.com 5 mm 3,0 x 30 mm HMIP-PSM Key: SGTIN:...
  • Seite 4 All manuals and user guides at all-guides.com ~30 cm ~150 cm...
  • Seite 5 All manuals and user guides at all-guides.com...
  • Seite 6 All manuals and user guides at all-guides.com...
  • Seite 7: Inhaltsverzeichnis

    All manuals and user guides at all-guides.com Inhalt Zu dieser Anleitung ..............8 Gültigkeit, Aufbewahrung und Weitergabe der Anleitung Symbole Sicherheit ................... 9 Bestimmungsgemäße Verwendung Sicherheitshinweise Funktion .................. 10 Geräteübersicht ............... 11 Technische Daten Inbetriebnahme ............... 12 Gerät anlernen 5.1.1 Anlernen an Alpha IP Basisstation 5.1.2 Anlernen an Alpha IP Access Point...
  • Seite 8 all-gui des.c...
  • Seite 9 All manuals and user guides at all-guides.com Bedienung ................18 Sollwert-Abgleich (Offset) Temperatureingrenzung 6.2.1 Verbindungstest Anzeigen .................. 19 Statusanzeigen Fehleranzeigen Batterien wechseln ..............21 Reinigen ................... 21 10 Werkseinstellungen herstellen ..........22 11 Außerbetriebnahme ..............22 12 Entsorgen................. 23...
  • Seite 10: Zu Dieser Anleitung

    Zu dieser Anleitung All manuals and user guides at all-guides.com 1 Zu dieser Anleitung 1.1 Gültigkeit, Aufbewahrung und Weitergabe der Anleitung Diese Anleitung gilt für das Raumbediengerät Analog RTA 61001-N1. Die Anlei- tung enthält Informationen, die für die Inbetriebnahme und Bedienung notwen- dig sind.
  • Seite 11: Sicherheit

    Sicherheit All manuals and user guides at all-guides.com 1., 2. Anweisung mit fester Reihenfolge 2 Sicherheit 2.1 Bestimmungsgemäße Verwendung Das Raumbediengerät Analog RTA 61001-N1 ist Bestandteil des Alpha IP Systems und dient der • Installation in wohnungsähnlichen Umgebungen, • Erfassung der Ist-Temperatur (Raumtemperatur), •...
  • Seite 12: Funktion

    Funktion All manuals and user guides at all-guides.com verursacht werden, wird keine Haftung übernommen. In solchen Fällen erlischt je- der Gewährleistungsanspruch. Für Folgeschäden wird keine Haftung übernommen. • Das Gerät nur in technisch einwandfreiem Zustand verwenden. • Die Leistungsgrenzen des Gerätes und dessen Umgebungsbedingungen einhal- ten.
  • Seite 13: Geräteübersicht

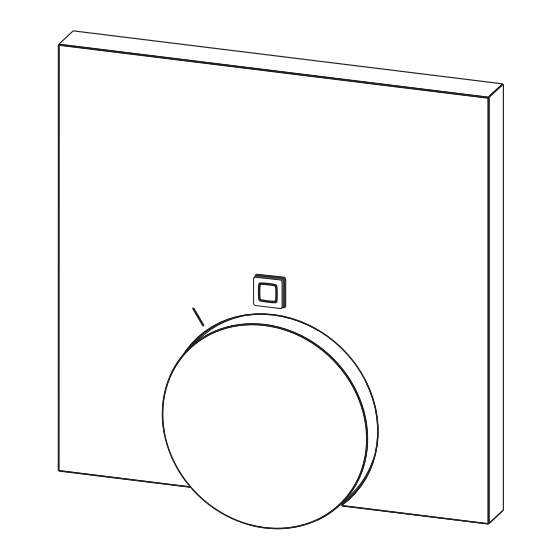
    Geräteübersicht All manuals and user guides at all-guides.com oder defekte Elektrogeräte. Die Reichweite in Gebäuden kann stark von der im Außenbereich (Freifeld) abweichen. 4 Geräteübersicht (vgl. Abb. 3 auf Seite 4) Montageunterteil Raumbediengerät Analog Systemtaste (Anlerntaste und LED) SET-Taste Stellrad Sollwertkorrekturreiter Temperaturbegrenzer 4.1 Technische Daten...
  • Seite 14 all-gui des.c...
  • Seite 15: Inbetriebnahme

    Inbetriebnahme All manuals and user guides at all-guides.com Verschmutzungsgrad Umgebungstemperatur 0 bis 50 °C Abmessungen (B x H x T) 86 x 86 x 22,5 mm / 27,5 mm Gewicht 90 g (inkl. Batterien) Funkfrequenz 868,3 MHz/869,525 MHz Empfängerkategorie SRD category 2 Typ.
  • Seite 16: Anlernen An Alpha Ip Basisstation

    Inbetriebnahme All manuals and user guides at all-guides.com 5.1.1 Anlernen an Alpha IP Basisstation Beim Anlernen einen Mindestabstand von 50 cm zwischen den Geräten einhalten. Der Anlernvorgang kann durch erneute, kurze Betätigung der Anlerntas- te abgebrochen werden. Dies wird durch rotes Aufleuchten der Geräte-LED bestätigt.
  • Seite 17: Anlernen An Alpha Ip Access Point

    Inbetriebnahme All manuals and user guides at all-guides.com Abb. 6 auf Seite 5). Falls bereits Batterien eingelegt sind, Systemtaste (C) für mind. 4 s drücken, um den Anlernmodus zu aktivieren. 9 Der Anlernmodus wird automatisch für 3 Minuten aktiviert. 9 Die Geräte-LED blinkt orange. Nach einem erfolgreichen Anlernvorgang leuchtet die LED grün.
  • Seite 18: Montage

    Inbetriebnahme All manuals and user guides at all-guides.com den beiliegenden QR-Code Scannen. Die Gerätenummer befindet sich unter dem QR-Code bzw. im Batteriefach. Nach einem erfolgreichen Anlernvorgang leuchtet die LED grün. Leuchtet die LED rot, den Vorgang wiederholen. 7. Den Anweisungen in der App folgen. 5.2 Montage Aufgrund des Batteriebetriebs kann der Montageort flexibel gewählt werden.
  • Seite 19: Montage Unterputzdose

    Inbetriebnahme All manuals and user guides at all-guides.com 5. Zwei diagonal gegenüberliegende Bohrlöcher anhand des Montageunterteils anzeichnen. Bei Holzwänden können die Schrauben direkt eingeschraubt werden. Eine Bohrung mit einem 1,5 mm Holzbohrer kann das Eindrehen der Schrau- ben erleichtern. 6. Bei Steinwänden vorgezeichnete Löcher mit einen 5 mm Steinbohrer bohren. 7.
  • Seite 20 all-gui des.c...
  • Seite 21: Montage Klebestreifen

    Inbetriebnahme All manuals and user guides at all-guides.com einrasten (vgl. Abb. 5 auf Seite 5). 5.2.3 Montage Klebestreifen Abhängig vom Untergrund kann die Montage mit den mitgelieferten doppelseiti- gen Klebestreifen erfolgen. Die Montage ist auf unterschiedlichen Untergründen wie z. B. Mauerwerk, Möbeln, Fliesen oder Glas möglich. 1.
  • Seite 22: Bedienung

    Bedienung All manuals and user guides at all-guides.com 6 Bedienung Durch Drehen des Stellrads (E) nach rechts oder links, wird die Soll-Temperatur auf einer Skala von 0 bis 5 manuell verändert. 6.1 Sollwert-Abgleich (Offset) Da die Temperatur am Raumbediengerät gemessen wird, kann es an einer anderen Stelle im Raum kälter oder wärmer sein.
  • Seite 23: Anzeigen

    Anzeigen All manuals and user guides at all-guides.com befindet, wird diese nach Erhalt des Befehls zur Bestätigung ein bzw. ausgeschaltet. 1. Stellrad (E) abnehmen. 2. Set-Taste drücken, um den Funktest durchzuführen. 7 Anzeigen 7.1 Statusanzeigen Anzeige Bedeutung Lösung 1x langes grünes Leuch- Vorgang bestätigt Mit der Einrichtung/Bedie- nung fortfahren.
  • Seite 24: Fehleranzeigen

    Anzeigen All manuals and user guides at all-guides.com 7.2 Fehleranzeigen Anzeige Bedeutung Lösung 1x langes rotes Leuchten Vorgang fehlge- • Vorgang wiederholen. schlagen Kurzes oranges Leuchten Batterien leer • Batterien austauschen. (nach grüner oder roter Empfangsmeldung) 1x langes rotes Leuchten Vorgang fehlge- •...
  • Seite 25: Batterien Wechseln

    Reinigen All manuals and user guides at all-guides.com 8 Batterien wechseln Der Blinkcode „Kurzes oranges Leuchten (nach grüner oder roter Empfangsmeldung)“ siganlisiert leere Batterien. Gleichzeitig erscheint das Symbol für leere Batterien in der Alpha IP App. Batterien gegen zwei neue des Typs LR03/Micro/AAA tauschen. 1.
  • Seite 26 all-gui des.c...
  • Seite 27: Werkseinstellungen Herstellen

    Außerbetriebnahme All manuals and user guides at all-guides.com 10 Werkseinstellungen herstellen Durch das Herstellen der Werkseinstellungen gehen alle vorgenommenen Einstel- lungen verloren. Alpha IP Access Point (App) 1. Das Gerät aus der Alpha IP löschen. Standalone-Betrieb 1. Das Gerät vom Montageunterteil abnehmen (vgl. Abb. 5 auf Seite 5). 2.
  • Seite 28: Entsorgen

    Entsorgen All manuals and user guides at all-guides.com 12 Entsorgen Das Gerät nicht im Hausmüll entsorgen! Elektronische Geräte sind entspre- chend der Richtlinie über Elektro- und Elektronik-Altgeräte über die örtlichen Sammelstellen für Elektronik-Altgeräte zu entsorgen. Dieses Handbuch ist urheberrechtlich geschützt. Alle Rechte vorbehalten. Es darf weder ganz noch teilweise ohne vorheriges Einverständnis des Herstellers kopiert, reproduziert, gekürzt oder in irgendeiner Form übertragen werden, weder mechanisch noch elektro- nisch.
  • Seite 29 All manuals and user guides at all-guides.com Contents About these instructions ............26 Validity, storage and forwarding of the instructions Symbols Safety..................27 Intended use Safety notes Function ................... 28 Device overview ............... 29 Technical data Commissioning................. 30 Teach-in of the device 5.1.1 Teach-in to Alpha IP Base Station 5.1.2...
  • Seite 30 All manuals and user guides at all-guides.com Operation ................. 35 Set value balance (offset) Temperature limitation 6.2.1 Connection test Displays..................37 Status indications Error indications Changing the batteries ............. 39 Cleaning ................... 40 10 Restoring the factory settings ..........40 11 Decommissioning ..............
  • Seite 31: About These Instructions

    About these instructions All manuals and user guides at all-guides.com 1 About these instructions 1.1 Validity, storage and forwarding of the instructions These instructions apply to the room control unit Analog RTA 61001-N1. These in- structions include information necessary for commissioning and operation. These instructions must the read completely and thoroughly before commencing any work with the device.
  • Seite 32 all-gui des.c...
  • Seite 33: Safety

    Safety All manuals and user guides at all-guides.com 1., 2. List with fixed order 2 Safety 2.1 Intended use The room control unit Analog RTA 61001-N1 is a component of the Alpha IP Sys- tem and serves for • the installation in residence-related environments, •...
  • Seite 34: Function

    Function All manuals and user guides at all-guides.com ard notes. Such cases render all warranty claims invalid. No liability is assumed for consequential damage. • Only use the device if it is in flawless state. • Observe the performance limits of the device and its environmental conditions. •...
  • Seite 35: Device Overview

    Device overview All manuals and user guides at all-guides.com The range within buildings can differ strongly from the range outside (in open air). 4 Device overview (see fig. 3 page 4) Installation bottom Room control unit Analog System button (teach-in button and LED) SET button Setting wheel Setpoint correction limiter...
  • Seite 36: Commissioning

    Commissioning All manuals and user guides at all-guides.com Dimensions (W x H x D) 86 x 86 x 22,5 mm / 27,5 mm Weight 90 g (incl. batteries) Radio frequency 868.3 MHz/869.525 MHz Receiver category SRD category 2 Typical radio range 250 m (in open air) Duty Cycle <...
  • Seite 37: Teach-In To Alpha Ip Base Station

    Commissioning All manuals and user guides at all-guides.com 5.1.1 Teach-in to Alpha IP Base Station For teach-in, keep a minimum distance of 50 cm between the devices. The teach-in process can be interrupted by shortly pressing the teach-in key again. This is confirmed by a short flash in red colour of the device LED.
  • Seite 38 all-gui des.c...
  • Seite 39: Teach-In To Alpha Ip Access Point

    Commissioning All manuals and user guides at all-guides.com fig. 6 page 5). If batteries have already been inserted, press the system key (C) for at least 4 seconds in order to activate the teach-in mode. 9 The teach-in mode is activated automatically for 3 minutes. 9 The device LED flashes in orange.
  • Seite 40: Installation

    Commissioning All manuals and user guides at all-guides.com 6. Enter the last four ciphers of the device number (SGTIN) or scan the supplied QR code for confirmation. The device number can be found below the QR code or in the battery compartment. The LED will light up in green after a successful teach-in process.
  • Seite 41: Installation In Flush-Type Box

    Commissioning All manuals and user guides at all-guides.com 5. Mark two diagonally opposite bore holes using the installation bottom. If wood walls are present, the screws can be screwed directly into the wood. Pre-drilling with a 1.5 mm wood drill can facilitate the installation of the screws.
  • Seite 42: Installation With Adhesive Strips

    Operation All manuals and user guides at all-guides.com 5.2.3 Installation with adhesive strips Depending on the ground, installation can be performed using the supplied dou- ble-sided adhesive tapes. Installation is possible on different grounds, as e. g. ma- sonry, furniture, tiles or glass. 1.
  • Seite 43: Temperature Limitation

    Operation All manuals and user guides at all-guides.com value balance of -2 K to 2 K in 0.5 K increments. 1. Remove setting wheel (E). There is a scale for the balance on the inside of the setting wheel (E) (see fig. 7 page 5). 2.
  • Seite 44 all-gui des.c...
  • Seite 45: Displays

    Displays All manuals and user guides at all-guides.com 1. Remove setting wheel (E). 2. Press the Set button in order to perform a radio test. 7 Displays 7.1 Status indications Display Meaning Solution 1 x long illumination in Process confirmed Process with the set-up/op- green eration.
  • Seite 46: Error Indications

    Displays All manuals and user guides at all-guides.com Display Meaning Solution Short flashing in orange Teach-in mode Enter the last four ciphers of (once every 10 sec.) active the device serial number for confirmation. 7.2 Error indications Display Meaning Solution 1 x long illumination Process failed •...
  • Seite 47: Changing The Batteries

    Changing the batteries All manuals and user guides at all-guides.com Display Meaning Solution 6 x long illumination Device defective • Observe the indication in the app. in red • Have the device checked by a specialised dealer. • Replace the device. 8 Changing the batteries The flashing code “short illumination in orange (after green or red reception sig- nal)”...
  • Seite 48: Cleaning

    Restoring the factory settings All manuals and user guides at all-guides.com 9 Cleaning Clean the device with a soft, clean, dry, and lint-free cloth. In order to remove heavy contamination, moisten the cloth slightly with lukewarm water. Use a solvent-free detergent for cleaning.
  • Seite 49: Decommissioning

    Disposal All manuals and user guides at all-guides.com 11 Decommissioning 1. Take off the room control unit Analog from the installation bottom (see fig. 5 page 5). 2. Remove the batteries from the back side. 3. Uninstall the device and dispose of properly. 12 Disposal Do not dispose of the device with domestic waste! Electronic devices/products must be disposed of according to the Directive...
  • Seite 50 all-gui des.c...
  • Seite 51 All manuals and user guides at all-guides.com Sommaire Concernant ce manuel d’utilisation .......... 44 Validité, conservation et transmission de ce manuel d’utilisation Symboles Sécurité ..................45 Utilisation conforme aux dispositions Consignes de sécurité Fonctionnement ............... 46 Vue d’ensemble de l’appareil ........... 47 Caractéristiques techniques Mise en service ................
  • Seite 52 All manuals and user guides at all-guides.com Utilisation ................54 Compensation de valeur de consigne (Offset) Limitation de la température 6.2.1 Test de connexion Affichages ................55 Affichage des statuts Affichage des erreurs Remplacer la batterie ............... 57 Nettoyer................... 58 10 Rétablir les réglages de l’usine ..........
  • Seite 53: Concernant Ce Manuel D'utilisation

    Concernant ce manuel d’utilisation All manuals and user guides at all-guides.com 1 Concernant ce manuel d’utilisation 1.1 Validité, conservation et transmission de ce manuel d’utilisation Ce manuel d’utilisation s’applique au thermostat d’ambiance analogique RTA 61001- N1. Le manuel d’utilisation contient des informations indispensables pour la mise en service et l’utilisation.
  • Seite 54: Sécurité

    Sécurité All manuals and user guides at all-guides.com 1., 2. Instructions avec ordre fixe 2 Sécurité 2.1 Utilisation conforme aux dispositions Le thermostat d’ambiance analogique RTA 61001-N1 fait partie intégrante du sys- tème Alpha IP et sert à • l’installation dans des environnements similaires à des logements, •...
  • Seite 55: Fonctionnement

    Fonctionnement All manuals and user guides at all-guides.com pect des consignes de sécurité. Ces situations entrainent l’expiration de la garantie ! Nous déclinons toute responsabilité pour les dommages consécutifs ! • Utiliser l’appareil uniquement s’il est en parfait état technique. •...
  • Seite 56 all-gui des.c...
  • Seite 57: Vue D'ensemble De L'appareil

    Vue d’ensemble de l’appareil All manuals and user guides at all-guides.com être provoquées, par exemple, par des sauts d’émetteur, des moteurs électriques ou des appareils électriques défectueux. La portée dans le bâtiment peut être très différente de celle à l’extérieur (champ libre).
  • Seite 58: Mise En Service

    Mise en service All manuals and user guides at all-guides.com Type de protection IP20 Niveau d'encrassement température ambiante de 0 à 50 C Dimensions (l x H x P) 86 x 86 x 22,5 mm / 27,5 mm Poids 90 g (avec les piles) Fréquence radio 868,3 MHz/869,525 MHz Catégorie de récepteur...
  • Seite 59: Programmation Sur La Station De Base Alpha Ip

    Mise en service All manuals and user guides at all-guides.com IP Access Point. En cas de programmation directe, la configuration s’effectue sur l’appareil et sur l’application Alpha IP en cas de programmation sur l’Access Point. 5.1.1 Programmation sur la station de base Alpha IP Respecter une distance minimum de 50 cm entre les appareils lors de la programmation.
  • Seite 60: Programmation Sur L'alpha Ip Access Point

    Mise en service All manuals and user guides at all-guides.com 3. Retirer le thermostat d’ambiance analogique de la base de montage (cf. fig. 5 page 5). 4. Retirer les bandes isolantes du compartiment à piles ou insérer des piles (cf. fig. 6 page 5).
  • Seite 61: Montage

    Mise en service All manuals and user guides at all-guides.com page 5). Si des piles sont déjà insérées, enfoncer la touche système (C) pen- dant au moins 4 s pour activer le mode programmation. 5. L’appareil apparait automatiquement sur l’application Alpha IP. 6.
  • Seite 62 all-gui des.c...
  • Seite 63: Montage Encastré

    Mise en service All manuals and user guides at all-guides.com (cf. fig. 5 page 5). 3. Maintenir la base de montage en position de montage. Veiller à l’orientation cor- recte de la base de montage (cf. fig. 4a page 4). 4.
  • Seite 64: Montage Par Bandes Adhésives

    Mise en service All manuals and user guides at all-guides.com 3. Monter la base de montage à l’aide des vis adaptées. 4. Poser le thermostat d’ambiance analogique sur la base de montage et l’enclen- cher des les clips de fixation (cf. fig. 5 page 5). 5.2.3 Montage par bandes adhésives Selon la base, le montage peut être réalisé...
  • Seite 65: Utilisation

    Utilisation All manuals and user guides at all-guides.com 6 Utilisation La rotation vers la droite ou la gauche de la molette (E) permet de modifier manuel- lement la température de consigne sur une échelle de 0 à 5. 6.1 Compensation de valeur de consigne (Offset) Dans la mesure où...
  • Seite 66: Test De Connexion

    Affichages All manuals and user guides at all-guides.com 6.2.1 Test de connexion Lors de ce contrôle, le thermostat d’ambiance analogique transmet un ordre de commutation à la station de base. Selon l’état de commutation dans lequel la zone chauffante se trouve, celle-ci s’allume ou s’éteint pour valider en fonction de l’ordre transmis.
  • Seite 67: Affichage Des Erreurs

    Affichages All manuals and user guides at all-guides.com Affichage Signification Solution Bref clignotement Mode paramétrage Saisir les quatre derniers ca- orange (toutes les 10 s) actif ractères du numéro de série de l'appareil pour confirmer. 7.2 Affichage des erreurs Affichage Signification Solution Éclairage rouge long...
  • Seite 68 all-gui des.c...
  • Seite 69: Remplacer La Batterie

    Remplacer la batterie All manuals and user guides at all-guides.com Affichage Signification Solution 6 x longs clignotements Appareil défectueux • Respecter l’affichage de l’application. rouges • Faire contrôler l’appareil par un commerçant spé- cialisé. • Remplacer l’appareil. 8 Remplacer la batterie Le code clignotant « Bref éclairage orange (après un signal de réception vert ou rouge) »...
  • Seite 70: Nettoyer

    Rétablir les réglages de l’usine All manuals and user guides at all-guides.com 9 Nettoyer Nettoyer l’appareil avec un chiffon doux, propre, sec et sans peluches. Pour retirer les encrassements, le chiffon peut être humidifié légèrement avec de l’eau tiède. Utiliser un détergent sans solvant pour le nettoyage. 10 Rétablir les réglages de l’usine Tous les réglages effectués sont perdus en cas de rétablissement des réglages de l’usine.
  • Seite 71: Mise Hors Service

    Élimination All manuals and user guides at all-guides.com 11 Mise hors service 1. Retirer le thermostat d’ambiance analogique de la base de montage (cf. fig. 5 page 5). 2. Retirer les piles au dos. 3. Démonter l’appareil et l’éliminer de manière conforme. 12 Élimination Ne pas jeter l’appareil dans les ordures ménagères ! Les appareils électroniques doivent être éliminés conformément à...
  • Seite 72 All manuals and user guides at all-guides.com Inhoud Over deze handleiding ............. 62 Geldigheid, bewaring en verder geven van de handleiding Symbolen Veiligheid ................. 63 Doelgericht gebruik Veiligheidsinstructies Functie ..................64 Overzicht toestel ..............65 Technische gegevens Inbedrijfname ................66 Toestel eigen maken 5.1.1 Eigen maken aan Alpha IP Basisstation...
  • Seite 73 All manuals and user guides at all-guides.com Bediening ................. 72 Streefwaardecompensatie (offset) Temperatuurbegrenzing 6.2.1 Verbindingstest Aanduidingen ................73 Statusaanduidingen Foutaanduidingen Accu’s vervangen ..............75 Reinigen ................... 75 10 Werkinstellingen opmaken ............76 11 Buitenbedrijfname ..............76 12 Als afval verwerken ..............77...
  • Seite 74 all-gui des.c...
  • Seite 75: Over Deze Handleiding

    Over deze handleiding All manuals and user guides at all-guides.com 1 Over deze handleiding 1.1 Geldigheid, bewaring en verder geven van de handleiding Deze handleiding geldt voor het kamerbedieningstoestel Analog RTA 61001-N1. De handleiding bevat informatie, die voor de inbedrijfname en bediening noodzake- lijk zijn.
  • Seite 76: Veiligheid

    Veiligheid All manuals and user guides at all-guides.com • Opsomming zonder vaste volgorde 1., 2. Aanwijzing met vaste volgorde 2 Veiligheid 2.1 Doelgericht gebruik Het kamerbedieningstoestel Analog RTA 61001-N1 maakt deel uit van het Alpha IP systeem en dient voor de •...
  • Seite 77: Functie

    Functie All manuals and user guides at all-guides.com lijk letsel en materiële schade, veroorzaakt door niet correcte handhaving of het niet naleven van de gevareninstructies, wordt geen aansprakelijkheid aanvaard. In zulke gevallen vervalt elke garantieclaim! Voor gevolgschade wordt geen aanspra- kelijkheid aanvaard! •...
  • Seite 78: Overzicht Toestel

    Overzicht toestel All manuals and user guides at all-guides.com gerealiseerd, waardoor storingen niet kunnen uitgesloten worden. Storingsinvloe- den kunnen bv. uitgelokt worden door schakelingen, elektromotoren of defecte elektrische toestellen. De reikwijdte in gebouwen kan sterk afwijken van deze buiten (openlucht). 4 Overzicht toestel (zie afb.
  • Seite 79: Inbedrijfname

    Inbedrijfname All manuals and user guides at all-guides.com Beschermingsklasse IP20 Vervuilingsgraad Omgevingstemperatuur 0 tot 50 °C Afmetingen (B x H x D) 86 x 86 x 22,5 mm / 27,5 mm Gewicht 90 g (incl. accu’s) Zendfrequentie 868,3 MHz/869,525 MHz Ontvangerscategorie SRD category 2 Typ.
  • Seite 80 all-gui des.c...
  • Seite 81: Eigen Maken Aan Alpha Ip Basisstation

    Inbedrijfname All manuals and user guides at all-guides.com ken gebeurt de configuratie aan het toestel, bij het eigen maken aan het Access Point via de Alpha IP App. 5.1.1 Eigen maken aan Alpha IP Basisstation Bij het eigen maken een minimum afstand van 50 cm tussen de toestellen aanhouden.
  • Seite 82: Eigen Maken Aan Alpha Ip Access Point

    Inbedrijfname All manuals and user guides at all-guides.com 9 De toestel-LED begint oranje te knipperen. 3. Kamerbedieningstoestel Analog van het montageonderdeel afnemen (zie afb. 5 pagina 5). 4. Isoleerbanden uit het accuvak trekken of accu’s plaatsen (zie afb. 6 pagina 5). Indien de accu’s reeds geplaatst werden, systeemtoets (C) gedurende minstens 4 s indrukken, om de eigen maken-modus te activeren.
  • Seite 83: Montage

    Inbedrijfname All manuals and user guides at all-guides.com 4. Isoleerbanden uit het accuvak trekken of accu’s plaatsen (zie afb. 6 pagina 5). Indien de accu’s reeds geplaatst werden, systeemtoets (C) gedurende minstens 4 s indrukken, om de eigen maken-modus te activeren. 5.
  • Seite 84: Montage Inbouwstopcontact

    Inbedrijfname All manuals and user guides at all-guides.com 2. Het toestel indien nodig met een gepaste schroevendraaier van het montageon- derdeel losmaken (zie afb. 5 pagina 5). 3. Het montageonderdeel aan de montagepositie houden. Op de correcte uitrichting van het montageonderdeel letten (zie afb. 4a pagina 4). 4.
  • Seite 85: Montage Kleefbanden

    Inbedrijfname All manuals and user guides at all-guides.com 1. Het toestel indien nodig met een gepaste schroevendraaier van het montageon- derdeel losmaken (zie afb. 5 pagina 5). 2. Het montageonderdeel horizontaal op het inbouwstopcontact uitrichten. 3. Het montageonderdeel door middel van passende schroeven monteren. 4.
  • Seite 86 all-gui des.c...
  • Seite 87: Bediening

    Bediening All manuals and user guides at all-guides.com 6 Bediening Door draaien van het instelwiel (E) naar rechts of links, wordt de streeftemperatuur op een schaal van 0 tot 5 manueel gewijzigd. 6.1 Streefwaardecompensatie (offset) Omdat de temperatuur aan het kamerbedieningstoestel gemeten wordt, kan het op een andere plaats in de kamer kouder of warmer zijn.
  • Seite 88: Aanduidingen

    Aanduidingen All manuals and user guides at all-guides.com verwarmingszone zich bevindt, wordt deze na het ontvangen van het commando ter bevestiging in resp. uitgeschakeld. 1. Instelwiel (E) afnemen. 2. Set-toets indrukken om de zendtest uit te voeren. 7 Aanduidingen 7.1 Statusaanduidingen Aanduiding Betekenis Oplossing...
  • Seite 89: Foutaanduidingen

    Aanduidingen All manuals and user guides at all-guides.com 7.2 Foutaanduidingen Aanduiding Betekenis Oplossing 1x langdurig rood op- Handeling mislukt • Handeling herhalen. lichten Kortstondig oranje op- Accu’s leeg • Accu’s vervangen. lichten (na groene of rode ontvangsmelding) 1x langdurig rood op- Handeling mislukt •...
  • Seite 90: Accu's Vervangen

    Reinigen All manuals and user guides at all-guides.com 8 Accu’s vervangen De knippercode „Kortstondig oranje oplichten (na groene of rode ontvangstmelding)“ signaleert lege accu’s. Gelijktijdig verschijnt het symbool voor lege accu’s in het Alpha IP App. Accu’s door twee nieuwe van het type LR03/Micro/AAA vervangen. 1.
  • Seite 91: Werkinstellingen Opmaken

    Buitenbedrijfname All manuals and user guides at all-guides.com 10 Werkinstellingen opmaken Door het opstellen van werkinstellingen gaan alle voorgenomen instellingen verloren. Alpha IP Access Point (app) 1. Het toestel uit de Alpha IP wissen. Standalone-bedrijf 1. Het toestel van het montageonderdeel nemen (zie afb. 5 pagina 5). 2.
  • Seite 92 all-gui des.c...
  • Seite 93: Als Afval Verwerken

    Als afval verwerken All manuals and user guides at all-guides.com 12 Als afval verwerken Het toestel niet met het huishoudelijk afval verwerken! Elektronische toestellen dienen overeenkomstig de richtlijn over elektrische en elektronische oude toestellen via de plaatselijke inzamelplaatsen voor elek- tronische oude toestellen als afval verwerkt te worden.
  • Seite 94 All manuals and user guides at all-guides.com Contenuto Informazioni sulle presenti istruzioni ........80 Validità, conservazione e consegna ad altri delle istruzioni Simboli Sicurezza .................. 81 Uso inteso Avvertenze sulla sicurezza Funzionamento ................ 82 Panoramica dell’apparecchio ........... 83 Caratteristiche tecniche Messa in funzione ..............
  • Seite 95 All manuals and user guides at all-guides.com Utilizzo ..................90 Compensazione del valore teorico (offset) Limitazione della temperatura 6.2.1 Prova di collegamento Visualizzazione................. 91 Indicazioni di stato Indicazioni di errore Sostituire le batterie ..............93 Pulizia ..................94 10 Ripristinare le impostazioni di fabbrica ........94 11 Messa fuori servizio ..............
  • Seite 96: Informazioni Sulle Presenti Istruzioni

    Informazioni sulle presenti istruzioni All manuals and user guides at all-guides.com 1 Informazioni sulle presenti istruzioni 1.1 Validità, conservazione e consegna ad altri delle istruzioni Le presenti istruzioni si riferiscono all’unità di controllo ambientale Analog RTA 61001-N1. Le istruzioni contengono informazioni necessarie per la messa in servizio e l’utilizzo dell’apparecchio.
  • Seite 97: Sicurezza

    Sicurezza All manuals and user guides at all-guides.com • Elenco senza una sequenza fissa 1., 2. Elenco con una sequenza fissa 2 Sicurezza 2.1 Uso inteso L’unità di controllo ambientale Analog RTA 61001-N1 fa parte del sistema Alpha IP e serve per •...
  • Seite 98 all-gui des.c...
  • Seite 99: Funzionamento

    Funzionamento All manuals and user guides at all-guides.com ogni responsabilità per danni a cose o persone causati da un uso non conforme o dalla mancata osservanza delle avvertenze sui pericoli. In tali casi vengono meno tutti i presupposti per il diritto alla garanzia. Si declina altresì ogni responsabilità per i danni conseguenti.
  • Seite 100: Panoramica Dell'apparecchio

    Panoramica dell’apparecchio All manuals and user guides at all-guides.com non esclusiva; pertanto non è possibile escludere la presenza di disturbi. Interferenze possono essere causate, ad esempio, da processi di commutazione, motori elettrici o apparecchi elettronici difettosi. La portata all’interno degli edifici può variare notevolmente rispetto a quella in spazi esterni (ovvero all’aperto).
  • Seite 101: Messa In Funzione

    Messa in funzione All manuals and user guides at all-guides.com Durata in servizio delle 2 anni (di norma) batterie Tipo di protezione IP20 Grado di impurità Temperatura ambientale Da 0 a 50 °C Dimensioni (W x H x D) 86 x 86 x 22,5 mm / 27,5 mm Peso 90 g (incl.
  • Seite 102: Apprendimento Sulla Stazione Di Base Alpha Ip

    Messa in funzione All manuals and user guides at all-guides.com direttamente sulla stazione di base Alpha IP o, in presenza di termostati per corpi caloriferi collegati, sull’Alpha IP Access Point. In caso di apprendimento diretto, la configurazione avviene sull’apparecchio, mentre in caso di apprendimento dell’Ac- cess Point essa avviene tramite la app Alpha IP.
  • Seite 103: Apprendimento Sull'alpha Ip Access Point

    Messa in funzione All manuals and user guides at all-guides.com 2. Premere per 4 secondi il tasto di sistema della stazione di base Alpha IP finché il LED del tasto di sistema lampeggia brevemente in arancione. 9 Il LED dell’apparecchio inizia a lampeggiare in arancione. 3.
  • Seite 104 all-gui des.c...
  • Seite 105: Montaggio

    Messa in funzione All manuals and user guides at all-guides.com 2. Selezionare la voce di menu Apprendimento dell’apparecchio. 3. Staccare l’unità di controllo ambientale Analog dalla base di montaggio (cfr. fig 5 pagina 5). 4. Estrarre il nastro isolante dal vano batterie o inserire le batterie (cfr. fig 6 pagina 5).
  • Seite 106: Montaggio Sopra Intonaco

    Messa in funzione All manuals and user guides at all-guides.com 5.2.1 Montaggio sopra intonaco Ö Selezionare una posizione di montaggio appropriata. 1. Assicurarsi che in prossimità della posizione scelta non vi siano condutture o cavi. 2. Ove necessario, staccare l’apparecchio dalla base di montaggio servendosi di un cacciavite appropriato (cfr.
  • Seite 107: Montaggio Con Presa A Incasso

    Messa in funzione All manuals and user guides at all-guides.com 5.2.2 Montaggio con presa a incasso I fori di fissaggio sulla base di montaggio possono essere utilizzati per il montaggio su una presa a incasso (cfr. fig 4b pagina 4). 1.
  • Seite 108: Utilizzo

    Utilizzo All manuals and user guides at all-guides.com 4. Rimuovere la pellicola di protezione dall’altro lato del nastro adesivo. 5. Orientare orizzontalmente l’apparecchio nella posizione desiderata e fissarlo premendo. 6 Utilizzo Ruotando la rotella di regolazione (E) verso destra o sinistra è possibile variare ma- nualmente la temperatura teorica su una scala da 0 a 5.
  • Seite 109: Prova Di Collegamento

    Visualizzazione All manuals and user guides at all-guides.com 1. Estrarre la rotella di regolazione (E). Per la limitazione consultare la scala riportata sul lato interno della rotella di regolazione (E) (cfr. fig 8 pagina 5). 2. Inserire i limitatori del valore teorico (G) sulla rotella di regolazione (E) in prossi- mità...
  • Seite 110 all-gui des.c...
  • Seite 111: Indicazioni Di Errore

    Visualizzazione All manuals and user guides at all-guides.com Simbolo visualizzato Significato Soluzione Breve lampeggiamento Trasmissione radio Attendere fino al termine del- in arancione / tentativo di invio / la trasmissione trasmissione dati 1x accensione lunga in Indicazione di prova Una volta terminata l'indi- arancione e 1x in verde cazione di prova, proseguire (dopo l'inserimento delle...
  • Seite 112: Sostituire Le Batterie

    Sostituire le batterie All manuals and user guides at all-guides.com Simbolo visualizzato Significato Soluzione 1x accensione lunga in Procedura fallita o • Inviare nuovamente il co- mando, entro al massimo rosso limite Duty Cycle un’ora in caso di supera- raggiunto mento del Duty Cycle •...
  • Seite 113: Pulizia

    Ripristinare le impostazioni di fabbrica All manuals and user guides at all-guides.com (cfr. fig 6 pagina 5). 4. Applicare l’unità di controllo ambientale Analog sulla base di montaggio e inne- starla in posizione. 9 L’unità di controllo ambientale esegue un autotest della durata di ca. 2 secondi. 9 Successivamente ha luogo l’inizializzazione.
  • Seite 114: Messa Fuori Servizio

    Smaltimento All manuals and user guides at all-guides.com 4. Rilasciare il tasto di sistema (C). 5. Premere nuovamente il tasto di sistema (C) per 4 secondi, fino a che il LED si accende in verde. 6. Rilasciare nuovamente il tasto di sistema (C). 9 L’apparecchio si riavvia.
  • Seite 115 All manuals and user guides at all-guides.com Contenido Acerca de este manual ............. 98 Vigencia, conservación y transferencia del manual Símbolos Seguridad ................99 Uso conforme a lo previsto Indicaciones de seguridad Función .................. 100 Vista general del dispositivo ..........101 Datos técnicos Puesta en marcha ..............
  • Seite 116 all-gui des.c...
  • Seite 117 All manuals and user guides at all-guides.com Manejo................... 108 Compensación del valor de referencia (Offset) Limitación de la temperatura 6.2.1 Prueba de conexión Indicaciones ................109 Indicaciones de estado Indicaciones de error Cambio de baterías ..............112 Limpieza ................112 10 Restablecer los ajustes de fábrica ..........
  • Seite 118: Acerca De Este Manual

    Acerca de este manual All manuals and user guides at all-guides.com 1 Acerca de este manual 1.1 Vigencia, conservación y transferencia del manual Este manual se aplica al dispositivo de control ambiental Analog RTA 61001-N1. El manual contiene información necesaria para la puesta en marcha y el manejo del dispositivo.
  • Seite 119: Seguridad

    Seguridad All manuals and user guides at all-guides.com 1., 2. Instrucciones ordenadas 2 Seguridad 2.1 Uso conforme a lo previsto El dispositivo de control ambiental Analog RTA 61001-N1 forma parte del sistema Alpha IP y se utiliza para • la instalación en entornos de uso residencial, •...
  • Seite 120: Función

    Función All manuals and user guides at all-guides.com responsabilidad sobre daños personales o materiales debidos a un uso indebido o a la no observancia de las indicaciones de peligro. ¡En tales casos se anula cualquier derecho a garantía! ¡No se asumirá ninguna responsabilidad sobre daños derivados! •...
  • Seite 121: Vista General Del Dispositivo

    Vista general del dispositivo All manuals and user guides at all-guides.com de transmisión no exclusiva, por lo que no es posible descartar interferencias. Las interferencias pueden ser debidas, p. ej., a operaciones de conmutación, motores eléctricos o aparatos eléctricos defectuosos. El alcance en el interior del edificio puede diferir en gran medida del al- cance en el exterior (campo abierto).
  • Seite 122 all-gui des.c...
  • Seite 123: Puesta En Marcha

    Puesta en marcha All manuals and user guides at all-guides.com Duración de las baterías 2 años (típicamente) Tipo de protección IP20 Grado de contaminación Temperatura ambiente 0 - 50 °C Dimensiones (An x Al x Pr) 86 x 86 x 22,5 mm / 27,5 mm Peso 90 g (incl.
  • Seite 124: Programación En La Estación Base Alpha Ip

    Puesta en marcha All manuals and user guides at all-guides.com de radiador en el Alpha IP Access Point. Para la programación directa la configura- ción se produce en el dispositivo, la programación en el Access Point se produce a través de la aplicación Alpha IP. 5.1.1 Programación en la estación base Alpha IP Durante la programación, mantener una distancia mínima de 50 cm entre los dispositivos.
  • Seite 125: Programación En Alpha Ip Access Point

    Puesta en marcha All manuals and user guides at all-guides.com que el LED de la 3. tecla del sistema parpadee rápidamente en naranja. 9 El LED del dispositivo comienza a parpadear en naranja. 4. Extraer el dispositivo de control ambiental Analog de la base de montaje (véase la fig.
  • Seite 126: Montaje

    Puesta en marcha All manuals and user guides at all-guides.com 1. Iniciar la aplicación Alpha IP en el smartphone. 2. Seleccionar el punto del menú Programar dispositivo. 3. Soltar el dispositivo de control ambiental Analog de la base de montaje (véase la fig.
  • Seite 127: Montaje En Superficie

    Puesta en marcha All manuals and user guides at all-guides.com 5.2.1 Montaje en superficie Ö Seleccionar una posición de montaje adecuada. 1. Asegurarse de que no pasen conductos por la posición seleccionada. 2. En caso necesario, soltar el dispositivo de la base de montaje con la ayuda de un destornillador apropiado (véase la fig.
  • Seite 128 all-gui des.c...
  • Seite 129: Montaje En Un Cajetín Empotrado

    Puesta en marcha All manuals and user guides at all-guides.com 5.2.2 Montaje en un cajetín empotrado Los orificios de fijación de la base de montaje pueden utilizarse para el montaje en un cajetín empotrado (véase la fig. 4b pág 4). 1.
  • Seite 130: Manejo

    Manejo All manuals and user guides at all-guides.com montaje (véase la fig. 4c pág 4). 4. Retirar la lámina protectora del otro lado de la cinta adhesiva. 5. Alinear el dispositivo horizontalmente en la posición deseada y presionar. 6 Manejo Al girar la rueda de selección (E) hacia la derecha o hacia la izquierda se modifica manualmente la temperatura deseada en una escala de 0 a 5.
  • Seite 131: Prueba De Conexión

    Indicaciones All manuals and user guides at all-guides.com 1. Retirar la rueda de selección (E). Consultar la escala de limitación en el interior de la rueda de selección (E) (véase la fig. 8 pág 5). 2. Insertar las lengüetas de los valores de referencia (G) en el rango deseado de la rueda de selección (E).
  • Seite 132: Indicaciones De Error

    Indicaciones All manuals and user guides at all-guides.com Indicación Significado Solución Breve parpadeo naranja Radiotransmisión/ Esperar hasta que la transmi- intento de transmi- sión se haya completado. sión/transmisión de datos 1x iluminación naranja Indicación de Una vez apagada la indica- y 1x iluminación verde prueba ción de prueba, continuar...
  • Seite 133 Indicaciones All manuals and user guides at all-guides.com Indicación Significado Solución 1x larga iluminación roja Proceso fallido o • ransmitir la orden de nue- límite de Duty Cycle vo, en caso de exceder el alcanzado Duty Cycle, después de no más de una hora.
  • Seite 134 all-gui des.c...
  • Seite 135: Cambio De Baterías

    Limpieza All manuals and user guides at all-guides.com 8 Cambio de baterías El código de parpadeo “breve iluminación naranja (tras aviso de recepción verde o rojo)” indica que las baterías están agotadas. Simultáneamente aparece el símbolo de baterías agotadas en la aplicación Alpha IP. Cambiar las baterías por dos nuevas del tipo LR03/Micro/AAA.
  • Seite 136: Restablecer Los Ajustes De Fábrica

    Puesta fuera de servicio All manuals and user guides at all-guides.com 10 Restablecer los ajustes de fábrica Al restablecer los ajustes de fábrica se perderán todos los ajustes efectuados. Alpha IP Access Point (aplicación) 1. Borrar el dispositivo del Alpha IP. Modo independiente 1.
  • Seite 137: Eliminación

    Eliminación All manuals and user guides at all-guides.com 12 Eliminación ¡No eliminar el dispositivo con los residuos domésticos! Los dispositivos elec- trónicos deben eliminarse de conformidad con la directiva sobre aparatos eléctricos y electrónicos a través de los centros de recogida locales de residuos de aparatos electrónicos.
  • Seite 138 All manuals and user guides at all-guides.com...
  • Seite 139 All manuals and user guides at all-guides.com 132723.1705...
  • Seite 140 all-gui des.c...