Herunterladen Inhalt Inhalt Diese Seite drucken
Inhaltsverzeichnis

Werbung

Verfügbare Sprachen

Verfügbare Sprachen

Werbung

Inhaltsverzeichnis
loading

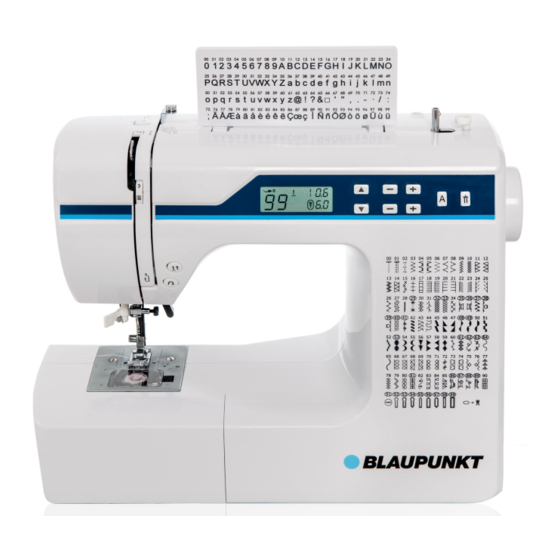
Inhaltszusammenfassung für Blaupunkt Comfort 930

  • Seite 3: Wichtige Sicherheitsanweisungen

    Deutsch WICHTIGE SICHERHEITSANWEISUNGEN Lesen Sie vor der Verwendung des Gerätes sorgfältig diese Anleitung. Bewahren Sie die Unterlagen zum Nachschlagen auf. Deutsch WARNHINWEISE DANGER -- Um das Risiko eines Stromschlags zu verringern: 1. Zum Ausschalten stellen Sie den Netzschalter auf „0" Position und ziehen anschließend den Netzstecker aus der Steckdose.
  • Seite 4 lassen Sie es vor jeder weiteren Verwendung vom Fachmann überprüfen. 11. Benutzen Sie das Gerät nie auf einer weichen Oberfläche wie z.B. Bett, Sofa usw. wo die Lüftungsöffnungen verstopft werden können. 12. Ziehen Sie immer den Netzstecker heraus, wenn Sie die Maschine reinigen, ölen oder eine Wartung - wie im Handbuch beschrieben - vornehmen.
  • Seite 5: Inhaltsverzeichnis

    INHALTSVERZEICHNIS 1. Nähvorbereitung Blindstich .............18 Teilebezeichnung der Maschine ......2 Elastischer Zickzackstich, Muschelkantenstich ... 19 Zubehör ..............3 Annähen eines Knopfes ........19 Aufstellen Ihrer Maschine ........3 Zier- und elastische-Stiche......... 20 Garnrollenhalter, Nähfußhebel ......4 Geradelastikstich, Waffelstich, Transporteur Einstellung........4 Overlockstich, Federstich, Stretch-Zickzackstich, Umrüstung auf Freiarmbetrieb .......
  • Seite 6: Nähvorbereitung Teilebezeichnung Der Maschine

    1. NÄHVORBEREITUNG Teilebezeichnung der Maschine 1. Fadenführung 2. Fadenhebel 3. Fadenspannungssteuerung 4. Frontabdeckung 5. Fadenabschneider 6. Knopflochhebel 7. Anschiebtisch (Zubehörfach) 8. Spule 9. Spulenstop 10. Taste für Stichlängeeinstellung 11. Zwillingsnadel- Betriebsschalter 12. Buchstabemodulsschalter 13. Taste für Stichbreiteeinstellung 14. Taste für Musterauswahl 15.
  • Seite 7: Zubehör

    ZUBEHÖR 1. Nadeln 2. Zwillingsnadel 3. Knopfloch Öffner 4. kleiner Schraubendreher 5. Schraubendreher für Stichplatte 6. Ölkanne 7. Spulen (4 insgesamt-1 vormontiert) 8. Kappe des Garnrollenhalters 9. Reinigungspinsel 10. Zweiter Garnrollenhalter 11. Reissverschlussfuss 12. Fuß für Satinstich (Z) 13. Knopfannähfuß (O) 14.
  • Seite 8: Nähfußhebel

    GARNROLLENHALTER Spule HORIZONTALER GARNROLLENHALTER für normale Garnrollen Setzen Sie die Garnrolle auf den Garnrollenhalter und sichern Sie diese mit einer Garnrollenkappe, damit der Vertikaler Garnrollenhalter Faden gut abläuft. Falls die Garnrolle eine Kerbe für die Garnfixierung nach Gebrauch besitzt, sollte diese zur rechten Unterseite zeigen.
  • Seite 9: Umrüstung Auf Freiarmbetrieb

    UMRÜSTUNG AUF FREIARMBETRIEB Sie können Ihre Maschine sowohl im Flachbettbetrieb als auch im Freiarmbetrieb benutzen. Wenn der Anschiebtisch angebracht ist, entsteht eine große Arbeitsfläche, mit der Flachbettbetrieb gearbeitet werden kann. Um den Anschiebtisch zu entfernen, halten Sie ihn mit beiden Händen fest und ziehen Sie ihn nach links ab, wie in der Abbildung gezeigt.
  • Seite 10: Einfadeln Der Unterfadenspule

    EINFADELN DER UNTERFADENSPULE 1. Heben Sie die Nadel ganz nach oben , in dem Sie das Handrad in Ihre Richtung drehen. 2. Entfernen Sie die Spulenabdeckung, indem Sie den Öffnungsknopf ganz nach rechts schieben. Die Spulenabdeckung wird sich anheben, so dass Sie die Abdeckung entfernen können.
  • Seite 11: Einfädeln Des Obenfadens

    EINFÄDELN DES OBENFADENS A. Heben Sie den Nähfußhebel an. Stellen Sie sicher, dass der Nähfußhebel immer angehoben ist, bevor Sie den Oberfaden einfädeln. (Falls der Nähfußhebel nicht angehoben ist, kann der Faden nicht korrekt gespannt werden). B. Drehen Sie das Handrad so lange in Ihre Richtung, bis sich die Nadel in der obersten Position befindet und der Fadengeber sichtbar ist.
  • Seite 12: Benutzung Des Automatischen Nadeleinfädlers

    BENUTZUNG DES AUTOMATISCHEN NADELEINFÄDLERS Heben Sie die Nadel in die höchste Position durch Drehen am Handrad in Ihrer Richtung. 1. Haken Sie den Faden, wie in der Abbildung dargestellt, in den Fadenführer ein. 2. Ziehen Sie den Hebel des Nadeleinfädlers nach unten und halten Sie das Fadenende fest. 3.
  • Seite 13: Heraufholen Des Unterfadens

    HERAUFHOLEN DES UNTERFADENS 1. Heben Sie den Nähfußhebel. 2. Halten Sie den Oberfaden locker mit der linken Hand und drehen Sie das Handrad mit Ihrer rechten Hand in Ihre Richtung, so dass sich die Nadel erst senkt und dann in der höchsten Stellung befindet.
  • Seite 14: Nadel-, Faden- Und Stofftabelle

    NADEL-, FADEN- UND STOFFTABELLE Die Wahl der Nadel und des Fadens wird durch die von Ihnen verwendeten Stoffe bestimmt. Die folgende Tabelle ist eine praktische Anleitung zur Nadel und Faden Auswahl. Verwenden Sie immer diese Tabelle, bevor Sie mit einem neuen Nähprojekt beginnen. Stellen Sie sicher, dass Sie dieselbe Größe und Typ in Ober- und Unterfaden verwenden.
  • Seite 15: Einstellung Der Oberfadenspannung

    EINSTELLUNG DER OBERFADENSPANNUNG 90% von Ihrer Näharbeit werden mit der Einstellung des Unterseite Spannungsregler auf "4" erfolgen. HILFREICHER HINWEIS: Eine Einstellung auf eine gut ausgewogen größere Zahl oder eine niedrigere Zahl kann das Aussehen der Näharbeit verbessern. Oberseite GERADSTICH Gutes Aussehen von der Näharbeit hängt weitestgehend von der ausgeglichenen Spannung zwischen dem Ober- und dem Unterfaden ab.
  • Seite 16: Bedienfeldfunktionen

    Bedienfeldfunktionen Tasten für Musterauswahl Stichlänge Nadelpositionsindikator Stichlängeneinstellungstasten Nähfußindikator Buchstabenstich-Modus-Schalter LCD-Anzeige Zwillingsnadel-Modus-Schalter Stichmusters Stichbreiteeinstellungstasten Buchstabenstich-Modus-Idikator Buchstabenstich-Modus Zwillingsnadel-Modus-Indikator Während der Schalter gedrückt wird, wird Stichbreite Muster- Nachschlagewerk Musternummer-Nachschla auf dem LCD erscheinen. Drücken Sie oder .Die Nummer des Zwillingsnadel-Modus gewählten Buchstaben wird angezeigt. Die Maschine näht automatisch einen Bei der Verwendung von Zwillingsnadel, drücken vollständigen Zyklus des gewählten...
  • Seite 17: Bedientasten

    BEDIENTASTEN Die Bedientasten helfen Ihnen dabei, verschiedene Grundfunktionen der Nähmaschine einfach auszuführen. NADELPOSITIONSTASTE Drücken Sie die Nadelpositionstaste, um die Nadel zu heben oder zu senken. Beim zweimal Drücken der Taste wird ein Stich genäht. RÜCKWÄRTSSTICHTASTE NADELPOSITIONSTASTE WAHLSCHALTER FÜR RÜCKWÄRTS/ ANHEFTEN STICHTASTE Rückwartsstichfunktion für Gerad- und Zickzackstich Die Rückwartsstichfunktion wird ausgeführt, wenn der...
  • Seite 18: Hilfreiche Meldungen

    HILFREICHE MELDUNGEN Bei Fehlbedienung wird eine hilfreiche Meldung angezeigt. Wenn eine hilfreiche Meldung angezeigt wird, beheben Sie das Problem entsprechend den folgenden Anweisungen. Die Spule ist nach rechts verschoben. Bewegen Sie die Spule nach links, wenn sie nicht benutzt wird. Knopflochhebel ist nicht abgesenkt oder angehoben.
  • Seite 19: Mit Dem Nähen Beginnen Geradstich

    2. Mit dem Nähen beginnen GERADSTICH Der Geradstich wird für jede Näharbeit am häufigsten verwendet. Lernen Sie nähen, indem Sie die folgenden Schritte befolgen. 1. EINSTELLUNGEN Nähfuß – Universalfuß(J) Fadenspannungsregler - 4 ANMERKUNG: Basierend auf dem Gewicht des Stoffs, leichte “Feineinstellung” der Spannung könnte gewünscht sein.
  • Seite 20: Einnähen Von Reissverschlüssen Und Paspeln

    EINNÄHEN VON REISSVERSCHLÜSSEN UND PASPELN Verwenden Sie den Reissverschlussfuss, um links oder rechts neben des Reißverschlusses oder in der Nähe von Kordeln zu nähen. EINNÄHEN VON REISSVERSCHLÜSSEN Nadel zur linken Nadel zur rechten Um an der rechten Seite zu nähen, klinken Sie die linke Hälfte Seite des Fußes Seite des Fußes des Reißverschlussfußes in den Fußhalter ein, so dass die...
  • Seite 21: Zickzackstich

    ZICKZACKSTICH Unterseite EINSTELLUNGEN: Nähfuß- Universalfuß (J) Fadenspannungsregler- 4 Der Oberfaden wird je nach Faden, Stoff, Stichart und Nahgeschwindigkeit an der Unterseite erscheinen, doch der Unterfaden darf niemals auf der Oberseite des Stoffs erscheinen. Oberseite Falls der Spulenfaden an die Oberseite gezogen wird oder falls sich Falten bilden, verringern Sie leicht die Spannung mit dem Oberfadenspannungsregler.
  • Seite 22: Blindstich

    BLINDSTICH Der Blindstich wird hauptsachlich für Falzvorhänge, Hosen, Röcke, usw. verwendet. mittlere bis schwere Stoffe Einstellungen : Nähfuß - Blindstichfuß (H) Fadenspannungsregler: 4 —Regulärer Blindstich für normale feste Stoffe Unterseite Unterseite —Elastischer Blindstich für weiche und dehnbare Stoffe 1. Fertigen Sie zuerst den groben Rand, indem Sie ihn nach unten bei feinen Stoffen falten oder bei mittleren bis schweren Stoffen versäubern.
  • Seite 23: Elastischer Zick-Zack-Stich

    ELASTISCHER ZICK-ZACK-STICH Einstellungen: Nähfuß - Universalfuß (J) Fadenspannungsregler: 4 Dies ist ein robuster Stich, wie sein Name schon besagt. Er näht drei kurze Stiche, während der normale Zickzackstich nur einen näht. Aus diesem Grund wird er dringend für das Versäubern aller Arten von Stoff empfohlen.
  • Seite 24: Zier- Und Elastische-Stiche

    ZIER- UND ELASTISCHE STICHE EINSTELLUNGEN: Nähfuß – Universalfuß (J) oder Satin-Stichfuß (Z) Fadenspannungsregler- 4 Elastische Stiche werden hauptsächlich für Maschenware oder dehnbare Stoffe verwendet, können aber jedoch auch auf gängig gewobenen Materialien angewendet werden. GERADELASTIKSTICH Der Geradelastikstich ist viel stärker als der gewöhnliche Geradstich, da er dreimal schließt - nach vorne, nach hinten und nochmals nach vorne.
  • Seite 25 STRETCH-ZICKZACKSTICH Der Stretch-Zickzackstich wird hauptsächlich für dekorative Obernähte verwendet. Er ist ideal für Kantenbearbeitung am Halsausschnitt, an Ärmeln oder Säumen. Wenn Sie ihn manuell auf einer sehr schmalen Breite eingestellt haben, könnte er auch für das Nähen von Hochbelastungsnähten verwendet werden. DOPPELTE OVERLOCKSTICH Der doppelte Overlockstich hat drei Hauptverwendungen.
  • Seite 26 LEITERSTICH Die Leiterstich wird hauptsächlich für das Verzieren von Hohlsaumnähten verwendet. Er kann auch zum Nähen über dünnes Band in einer Kontrastfarbe oder gleicher Farbe verwendet werden. Setzen Sie den Stich in der Mitte, dann erhalten Sie eine besondere Wirkung für die Dekoration.
  • Seite 27: Kantenverbindungsstich

    SCHRÄGER OVERLOCKSTICH Nähte und Versäubern in einem Arbeitsgang, um eine schmalen, geschmeidige Naht herzustellen. Besonders geeignet für Bademode, Sportbekleidung, T-Shirts, Babykleidung aus dehnbarem Nylon, Jersey und Baumwolljersey. GEKREUZTER STICH Dieser wird für Nähen und Fertigen von elastischen Stoffen oder für die Dekoration von Rändern verwendet.
  • Seite 28 DORNENSTICH Dies ist ein vielseitiger Stich, der für Zusammennähen von Stoffteilen und als dekorativer Stich verwendet wird. FISCHGRÄTENSTICH wird für Erschaffen dekorativer Ränder und für Stickereien verwendet. CHEVRONSTICH wird für Erschaffen dekorativer Ränder und für Stickereien verwendet.
  • Seite 29 Mehr Zierstiche Einstellungen: Nähfuß - Universalfuß(J) oder Satin-Stichfuß (Z) Fadenspannungsregler - 4 oder 3 Im Folgenden sind Beispiele , wie Sie diese Stiche verwenden und nähen. Sie können einige andere dekorative Stiche in der gleichen Weise benutzen. Sie sollten ein Test auf einem extra Stück von dem zu nähenden Stoff durchführen, um den zu nähenden dekorative Stich zu überprüfen.
  • Seite 30: Nähen Mit Buchstaben-Muster

    Nähen mit Buchstaben-Muster BUCHSTABENMUSTERPLATTE ANHÄNGEN Die Buchstabenmusterplatte zeigt Buchstaben und Nummer von Buchstaben. Bringen Sie die Buchstabenmusterplatte an den Buchstabenmusterplatte Handgriff der Nähmaschine, wie rechts in der Abbildung gezeigt, an. Handgriff Buchstabenmuster-Nummer Auswahl Drücken Sie den Schalter ! In der Anzeige wird Muster "0"...
  • Seite 31: Knopfloch Nähen

    KNOPFLOCH NÄHEN Tab A Tab B AUTOMATISCHES KNOPFLOCH Verwenden Sie den Knopflochfuß Ihre Maschine bietet Ihnen zwei unterschiedlich breite Riegelknopflöcher, Schlüssellochknopflöcher und Knopflöcher mit rundem Ende - durch ein System, das die Größe des Knopfes misst und die erforderliche Größe für das Knopfloch berechnet.
  • Seite 32 5. Markieren Sie vorsichtig die Position des Knopfloches auf Ihrem Kleidungsstück. 6. Legen Sie den Stoff unter den Fuß. Ziehen Sie den Spulenfaden unterhalb des Stoffes auf eine Lange von ca. 4“ (ca. 10cm) nach hinten heraus. Markierung 7.Richten Sie die Markierung des Knopfloches auf Ihrem Markierung auf dem Stoff Kleidungsstück mit der Markierung auf dem Knopflochfuß...
  • Seite 33: Zwillingsnadel

    GELITZTE KNOPFLÖCHER Dorn Haken Sie das Beilaufgarn (Hakelfaden oder Knopflochgarn) über den Dorn und ziehen Sie beide Ende des Garns nach vorne unter den Fuß und verbinden Sie das Garn wie in der Abbildung angezeigt. Nähen Sie das Knopfloch so, dass der Zickzackstich das Garn bedeckt.
  • Seite 34: Nadelposition Für Geradstich

    NADELPOSITION FÜR GRADSTICH Die Position der Nadel beim Nähen des Gradstich sollte wie angezeigt für jede der 13 verschiedenen Positionen mit dem Stichbreiteregler eingestellt werden: nach links nach rechts Stichbreiteeinstellungsknopf...
  • Seite 35: Wartung Ihrer Nähmaschine

    3. Wartung Ihrer Nähmaschine REINIGEN SIE DEN GREIFERBEREICH UND TRANSPORTEUR! Trennen Sie immer die Maschine von der Stromquelle durch Ausziehen des Netzsteckers von der Steckdose Um den bestmöglichen Betrieb Ihrer Maschine zu gewährleisten, ist es notwendig, die maßgeblichen Teile jederzeit sauber zu halten. 1.
  • Seite 36: Fehlerbehebung

    4. FEHLERBEHEBUNG ALLGEMEINE PROBLEME Die Maschine näht nicht. * Der Netzschalter ist ausgeschaltet - Schalten Sie den Netzschalter ein. * Der Knopflochhebel ist nicht in der obersten Stellung, während Sie mit Stichmuster nähen—Schieben Sie den Knopflochhebel vorsichtig nach oben * Der Knopflochhebel ist nicht abgesenkt, während Sie ein Knopfloch nähen – senken Sie den Knopflochhebel ab.
  • Seite 37 09:00 Uhr- 17:00 Uhr GLN: 42 6015287 000 5 WEEE-Reg.-Nr. DE 69109410 www.blaupunkt.com www.tuv.com 101419035704 Download Bedienungsanleitung unter: http://www.blaupunkt.com/de/servicesupport/na ehmaschinen/ All rights reserved. All brand names are registered trademark of their respective owners. S pecifications are subject to change without prior notice.
  • Seite 38: Important Safety Instructions

    IMPORTANT SAFETY INSTRUCTIONS When using an electrical appliance, basic safety precautions should always be followed, including the following. Read all instructions before using this sewing machine DANGER-- To reduce the risk of electric shock: 1. Do not allow to be used as a toy. Close attention is necessary when this sewing machine is used by or near children.
  • Seite 39 TABLE OF CONTENTS 1.KNOWING YOUR SEWING MACHINE Blindhem stitch --------------------------------------- 18 Machine identification ---------------------------------------- 2 Multi-stitch zigzag, Shell stitch ---------------------- 19 Accessories ---------------------------------------------------- 3 Sewing on a button ----------------------------------- 19 Setting up your machine ------------------------------------ 3 Decorative and stretch stitches -------------------- 20 Spool pins, Presser foot lifter ------------------------------- 4 Straight stretch stitch, Honeycomb stitch,...
  • Seite 40: Knowing Your Sewing Machine

    1. KNOWING YOUR SEWING MACHINE MACHINE IDENTIFICATION 1. Thread guide 2. Thread take-up lever 3. Thread tension control 4. Face cover 5. Thread cutter 6. Buttonhole lever 7. Extension table (Accessory box) 8. Bobbin winder shaft 9. Bobbin winder stop 10.
  • Seite 41: Accessories

    ACCESSORIES 1. Needles 2. Twin needle 3. Buttonhole opener 4. Small screw driver 5. Screw driver for needle plate 6. Oiler 7. Bobbins (4 total - 1 in machine) 8. Spool pin cap 9. Brush 10. Auxiliary spool pin 11. Zipper foot 12.
  • Seite 42: Spool Pins

    SPOOL PINS HORIZONTAL SPOOL PIN for normal thread spool Place thread spool on the pin and secure with a spool cap to ensure smooth flow of thread. If the thread spool has a thread retaining slit, it should be placed to the right. VERTICAL SPOOL PIN for large thread Spool Attach the spool pin.
  • Seite 43: Converting To Free-Arm Sewing

    CONVERTING TO FREE-ARM SEWING Your machine can be used either as a flat- bed or as a free-arm model. With the extension table in position, it provides a large working surface as a standard flat-bed model. To remove the extension table, hold it firmly with both hands and pull it off to the left as shown.
  • Seite 44 THE BOBBIN THREAD 1. Raise the needle to its highest position by rotating the hand wheel toward you. 2. Remove the bobbin cover plate by pushing the release button to the right. The bobbin cover will pop up sufficiently to allow you to remove the cover. 3.Insert the bobbin making sure the bobbin rotates counter- clockwise when you pull the thread.
  • Seite 45: Threading The Top Thread

    THREADING THE TOP THREAD A. Raise the presser foot lifter. Always be sure to raise the presser foot lifter before threading the top thread. (If the presser foot lifter is not raised, correct thread tension cannot be obtained.) B. Turn the hand wheel toward you until the needle is in its highest position and the thread take-up is visible.
  • Seite 46: Using Automatic Needle Threader

    USING AUTOMATIC NEEDLE THREADER Raise the needle to its highest position by rotating the hand wheel towards you. 1. Hook the thread to the thread guide as illustrated. 2. Pull down the lever while holding the end of the thread. 3.
  • Seite 47: Picking Up Bobbin Thread

    PICKING UP BOBBIN THREAD 1.Raise the presser foot lifter. 2.Holding the needle thread loosely with your left hand, turn the hand wheel toward you with your right hand first lowering the needle and continuing until the needle comes to its highest position. NOTE: A quick way to pick up the bobbin thread is, with straight stitch selected, touch and release the reverse switch.
  • Seite 48: Needle, Thread And Fabric Chart

    NEEDLE, THREAD AND FABRIC CHART Your fabric will determine the choice of a needle and thread. The following table is a practical guide to needle and thread selection. Always refer to it before a new sewing project. And be sure to use the same size and type of thread in the bobbin as in the top thread supply.
  • Seite 49: Adjusting Top Thread Tension

    ADJUSTING TOP THREAD TENSION 90% of your sewing will be done with the tension control set at “4”. Under side Helpful Hint: A slight adjustment to a higher number or a lower number may improve sewing appearance. Well balanced STRAIGHT STITCHING The good looking appearance of your stitching is largely determined by the balanced tension of both top and bobbin Top side...
  • Seite 50: Functions Of Control Panel

    FUNCTIONS OF CONTROL PANEL Stitch length Pattern selection button Needle position indicator Stitch length adjustment button Presser foot indicator Letter pattern mode button LCD display Twin needle mode button Stitch pattern number Stitch width adjustment button Pattern number reference guide Letter stitch mode indicator Letter pattern mode Twin needle mode indicator...
  • Seite 51: Operation Buttons

    OPERATION BUTTONS The operation buttons help you to easily perform various basic sewing machine operations. NEEDLE POSITION BUTTON Press the needle position button to raise or lower the needle. Pressing the button twice sews one stitch. DUAL PURPOSE REVERSE/ TACKING STITCH BUTTON Reverse stitch function for straight and zigzag stitches.
  • Seite 52: Helpful Messages

    HELPFUL MESSAGES If an incorrect operation is made, a helpful message will be displayed. When a helpful message is displayed, fix the problem following the instructions below. The bobbin winder is moved to the right. Move bobbin winder to left when it is not used. Buttonhole lever is not lowered or raised.
  • Seite 53: Starting To Sew

    STARTING TO SEW STRAIGHT STITCHING Straight stitch is most frequently used for every aspect of sewing. Lets learn how to sew following the steps below. 1. SETTINGS Presser foot - General Purpose Foot Thread tension control – 4 NOTE: Based upon the weight of the fabric, slight “fine tuning”...
  • Seite 54: Inserting Zippers And Piping

    INSERTING ZIPPERS AND PIPING Use the zipper foot to sew to the right or left of the zipper or close to the cord. INSERTING ZIPPERS To sew down the right side, attach the left side of the zipper foot to the presser foot holder so that the needle passes through the opening on the left side of the foot.
  • Seite 55: Zigzag Stitching

    Under side ZIGZAG STITCHING SETTINGS:Presser foot - General Purpose Foot Thread tension control – 4 The top thread may appear on the bottom depending thread, fabric, type of stitch and sewing speed, but the bobbin thread must never appear on the top of the fabric. Top side If bobbin thread is pulling to the top or you are experiencing Puckering, slightly reduce the tension with the Thread Tension...
  • Seite 56: Blindhem Stitch

    BLINDHEM STITCH The blindhem stitch is primarily used for hemming curtains, trousers, skirts, etc. Medium to heavyweight fabric Settings : Presser foot - Blind stitch foot (H) : Thread Tension Control: 4 Under side --Regular blind stitch for normal firm fabrics Under side -- Elastic blind stitch for soft, stretchable fabrics First finish the raw edge.
  • Seite 57: Multi-Stitch Zigzag

    MULTI-STITCH ZIGZAG SETTINGS :Presser foot - General Purpose Foot(J) :Thread tension control – 4 This is a strong stitch, because as its name implies, it makes three short stitches where the normal zig-zag makes only one. For this reason it is highly recommended for overcasting all types of fabrics.
  • Seite 58: Decorative And Stretch Stitches

    DECORATIVE AND STRETCH STITCHES SETTINGS :Presser foot - General Purpose Foot(J) or Satin Stitch Foot (Z) :Thread tension control – 4 Stretch stitches are mainly for use on knit, or stretchable fabrics, but can also be used on woven materials. STRAIGHT STRETCH STITCH Straight stretch stitch is far stronger than an ordinary straight stitch, because it locks three times - forwards,...
  • Seite 59: Double Overlock Stitch

    RIC-RAC STITCH The Ric-rac stitch is primarily used for a decorative topstitch. It is ideal for edging neck-bands, armholes, sleeves and hems. When manually adjusted to a very narrow width, it also can be used for sewing high stress seams. DOUBLE OVERLOCK STITCH The Double overlock stitch has three main uses.
  • Seite 60 LADDER STITCH The Ladder stitch is primarily used for drawn thread hemstitching. It can also be used for sewing over thin tape in a contrasting or same color. Place the stitch in the center and a special effect will be obtained for decoration. Another use for the ladder stitch is couching over narrow ribbon, yarn or elastic.
  • Seite 61 SLANT OVEREDGE STITCH Seams and overcasts in one operation to produce a narrow, supple seam, particularly suited to swimwear, sportswear, T-shirts, babywear in stretch nylon, jersey and cotton jersey. CROSSED STITCH Use to sew and finish elastic fabrics or for decorative work.
  • Seite 62: Fishbone Stitch

    THORN STITCH It is a versatile stitch used for joining fabric pieces and as a decorative touch. FISHBONE STITCH Use to create decorative borders and for embroidery. CHEVRON STITCH Use to create decorative borders and for embroidery.
  • Seite 63: More Decorative Stitches

    MORE DECORATIVE STITCHES SETTINGS :Presser foot - General Purpose Foot(J) or Satin Stitch Foot (Z) :Thread tension control - 4 or 3 Following are examples of how to use and sew these stitches. You can use some other decorative stitches in the same way.You should carry out a test sewing on an extra piece of the fabric being sewn to check the decorative pattern to be used.
  • Seite 64: Letter Pattern Sewing

    LETTER PATTERN SEWING ATTACHING THE LETTER PATTERN PLATE The letter pattern plate shows the letters and letter numbers. Attach the letter pattern plate to the handle of the sewing machine as shown in the illustration right side. LETTER PATTERN NUMBER SELECTION While pressing the button will appear on the LCD, pattern "0"...
  • Seite 65: Buttonhole Making

    BUTTONHOLE MAKING Tab A Tab B AUTOMATIC BUTTONHOLE USING BUTTONHOLE FOOT Your machine offers you two different widths of bartack, keyhole and round end buttonholes sewn by a system that measures the size of the button and calculates the size of buttonhole required.
  • Seite 66 5. Carefully mark the position of buttonhole on your garment. 6. Place the fabric under the foot. Pull out the bobbin thread underneath the fabric to a length of about 4 inches to the rear 7. Align the buttonhole mark on the fabric with the Fabric marking mark on the buttonhole foot, and then lower the Mark...
  • Seite 67: Twin Needle

    CORDED BUTTONHOLES Hook filler cord (such as crochet thread or buttonhole twist) Spur over the spur and pull both ends of the cord forward under the foot and tie off the cord as shown in the illustration. Sew buttonholes so that zigzag stitches cover the cord. When completed, release the cord from foot and snip off the extra length.
  • Seite 68: Straight Stitch Needle Position

    STRAIGHT STITCH NEEDLE POSITION The position of the needle when sewing straight stitch may be adjusted to anyone of 13 different positions with the Stitch Width Control as illustrated: Toward left Toward right Stitch width adjustment button...
  • Seite 69: Caring For Your Machine

    3. CARING FOR YOUR MACHINE CLEANING HOOK AREA AND FEED DOGS Always disconnect the machine from power supply by removing the plug from the wall-outlet. To ensure the best possible operation of your machine, it is necessary to keep the essential parts clean at all times.
  • Seite 70: Performance Checklist

    4. PERFORMANCE CHECKLIST GENERAL PROBLEMS Machine does not sew. * Power switch is turned off. - Turn on the switch. * Buttonhole lever is not raised when sewing stitch patterns. – Raise buttonhole lever. * Buttonhole lever is not lowered when sewing buttonhole. –...
  • Seite 71 09:00 Uhr- 17:00 Uhr GLN: 42 6015287 000 5 WEEE-Reg.-Nr. DE 69109410 www.blaupunkt.com www.tuv.com 101419035704 Download manual: http://www.blaupunkt.com/de/servicesupport/naehmaschinen/ All rights reserved. All brand names are registered trademark of their respective owners. Specifications are s ubject to change without prior notice.
  • Seite 72: Consignes De Securite Importantes

    CONSIGNES DE SECURITE IMPORTANTES Quand vous utilisez un appareil électrique, respectez toujours les précautions de sécurité de base, indiquées ci-dessous : Veuillez lire toutes les instructions avant d'utiliser cette machine à coudre. DANGER -- Pour éviter le risque de choc électrique : 1.
  • Seite 73 TABLE DES MATIÈRES 1. APPRENDRE À CONNAÎTRE VOTRE Point invisible............18 MACHINE À COUDRE Point zigzag élastique, point cocotte étroit..…..19 Nom des pièces de la machine ......2 Coudre un bouton ..........19 Accessoires............3 Points décoratifs et élastiques ......20 Installer votre machine ........... 3 point élastique droit, point gaufré, Porte-bobine, pied-de-biche ........
  • Seite 74: Apprendre À Connaître Votre Machine À Coudre Nom Des Pièces De La Machine

    1. APPRENDRE À CONNAÎTRE VOTRE MACHINE À COUDRE Nom des pièces de la machine 1. Guidage du fil 2. Releveur de fil 3. Commande de la tension du fil 4. Cache avant 5. Coupe-fil 6. Levier de boutonnière 7. Table d'extension (compartiment à accessoires) 8.
  • Seite 75: Accessoires

    ACCESSOIRES 1. Aiguilles 2. Aiguille jumelée 3. Boutonnière Contact d'ouverture 4. Petit tournevis 5. Tournevis pour plaque d'aiguille 6. Burette d'huile 7. Canettes (4 au total, 1 dans machine) 8. Capuchon du porte-bobine 9. Brosse 10. Deuxième porte-bobine 11. Pied à fermeture-éclair 12.
  • Seite 76: Contrôle Transporteur

    PORTE-BOBINE Canette PORTE-BOBINE HORIZONTAL pour les bobines normales Placez la bobine autour du porte-bobine et sécurisez-la avec un capuchon pour que le fil se déroule bien. Si la Porte-bobine vertical bobine possède une fente pour tenir le fil, elle doit être placée sur le côté...
  • Seite 77: Ajustement Fonctionnement Bras Libre

    AJUSTEMENT FONCTIONNEMENT BRAS LIBRE Vous pouvez utiliser votre machine en mode lit plat ou bras libre. Si la table d'extension est installée, un grand plan de travail est créé qui permet de travailler en mode lit plat. Pour retirer la table d'extension, maintenez-la des deux mains et tirez-la vers la gauche comme le montre l'illustration.
  • Seite 78: Enfiler La Canette Du Fil Du Dessous

    ENFILER LA CANETTE DU FIL DU DESSOUS 1. Soulevez l'aiguille tout en haut en tournant la molette vers vous. 2. Retirez le cache de la canette en déplaçant le bouton d'ouverture entièrement vers la droite. Le cache de la canette va s'ouvrir et vous pourrez le retirer. 3.
  • Seite 79: Enfiler Le Fil Du Dessus

    ENFILER LE FIL DU DESSUS A. Soulevez le levier du pied-de-biche. Assurez-vous que le levier du pied-de-biche est toujours levé avant d'enfiler le fil du dessus. (Si le levier du pied-de-biche n'est pas levé, le fil ne peut pas être correctement tendu).
  • Seite 80: Utilisation De L'enfileur Automatique D'aiguille

    UTILISATION DE L'ENFILEUR AUTOMATIQUE D'AIGUILLE Levez l'aiguille dans la position la plus haute en tournant la molette vers vous. 1. Accrochez le fil dans le guide-fil comme sur l'illustration. 2. Tirez le levier de l'enfileur d'aiguille vers le bas et maintenez fermement l'extrémité du fil. 3.
  • Seite 81: Soulever Le Fil Du Dessous

    SOULEVER LE FIL DU DESSOUS 1. Levez le levier du pied-de-biche. 2. Tenez le fil du dessus lâche avec la main gauche et tournez la molette avec votre main droite vers vous de sorte à ce que l'aiguille se baisse, puis se place dans la position supérieure. REMARQUE : Vous pouvez récupérer rapidement le fil du dessous si vous actionnez brièvement l'interrupteur arrière dans le point droit.
  • Seite 82: Tableau Des Aiguilles, Des Fils Et Des Tissus

    TABLEAU DES AIGUILLES, DES FILS ET DES TISSUS Vos tissus déterminent le choix d'une aiguille et du fil. Le tableau suivant est une notice pratique sur les aiguilles et les fils. Reportez-vous toujours à ce tableau avant de commencer un nouveau projet de couture. Assurez-vous que vous utilisez toujours la même taille et le même type pour les fils du dessus et du dessous.
  • Seite 83: Régler La Tension Du Fil Du Dessus

    RÉGLER LA TENSION DU FIL DU DESSUS 90 % de votre ouvrage aura lieu en réglant le régulateur Partie de tension sur "4". inférieure REMARQUE UTILE : Un réglage léger sur un chiffre supérieur ou inférieur peut améliorer l'aspect de bien équilibré...
  • Seite 84: Fonctions Du Champ De Commande

    Fonctions du champ de commande Touche de sélection de motif Longueur du point Indicateur de position d'aiguille Touches de réglage de la longueur Indicateur de pied-de-biche Interrupteur du mode pour point de lettres Ecran LCD Interrupteur du mode aiguille jumelée Motifs de point Touches de réglage de la largeur du point Ouvrage de référence des numéros de motif...
  • Seite 85: Touches De Commande

    TOUCHES DE COMMANDE Les touches de commande vous aident à exécuter diverses fonctions de base de la machine à coudre. TOUCHE DE POSITION DE L'AIGUILLE Appuyez sur la touche de position de l'aiguille pour lever ou baisser l'aiguille. En appuyant deux fois sur la touche, un point est cousu.
  • Seite 86: Messages Utiles

    MESSAGES UTILES En cas d'erreur de commande, un message utile apparaît. Si un message utile apparaît, éliminez le problème en respect des instructions suivantes. La canette est déplacée vers la droite. Déplacez la canette vers la gauche si elle n'est pas utilisée.
  • Seite 87: Commencer À Coudre

    Commencer à coudre POINT DROIT Le point droit est le point le plus utilisé pour chaque ouvrage. Apprenez à coudre en suivant les épates suivantes. 1. PARAMÈTRES Pied-de-biche – Pied universel(J) Régleur de la tension du fil - 4 REMARQUE : Sur la base du poids tu tissu, un réglage léger de la tension peut être nécessaire.
  • Seite 88: Point De Courtepointe Hand-Look

    COUDRE DES FERMETURES-ÉCLAIRS ET DES PASSEPOILS Utilisez le pied de fermeture-éclair pour coudre sur l'endroit ou l'envers la fermeture-éclair ou à proximité du câble. COUDRE DES FERMETURES-ÉCLAIRS Pour coudre sur l'envers, maintenez le côté endroit du pied de Aiguille du côté Aiguille du côté...
  • Seite 89: Point Zigzag

    POINT ZIGZAG Partie inférieure PARAMÈTRES Pied-de-biche – Pied universel(J) Régulateur de la tension du fil - 4 Le fil supérieur apparaît selon le fil, le tissu, le type de point et la vitesse de couture sur la partie inférieure cependant le fil du dessous ne doit jamais apparaître sur le côté...
  • Seite 90 POINT AVEUGLE Le point aveugle est principalement utilisé pour les rideaux plissés, les pantalons, les jupes etc. Tissus moyens à lourds Paramètres : Pied-de-biche - Pied du point aveugle (H) Régulateur de la tension du fil : 4 —Point aveugle régulier pour les tissus de solidité normale.
  • Seite 91: Coudre Un Bouton

    POINT ZIGZAG ÉLASTIQUE Paramètres Pied-de-biche – Pied universel(J) Régulateur de la tension du fil : 4 C'est un point épais, comme son nom le dit. Il cout trois points courts alors que le point zigzag normal n'en a qu'un. Pour cette raison, il est recommandé de surfiler tous les types de tissu.
  • Seite 92: Points Décoratifs Et Élastiques

    POINTS DÉCORATIFS ET ÉLASTIQUES PARAMÈTRES : Pied-de-biche – Pied universel(J) ou pied satin (Z) Régulateur de la tension du fil - 4 Les points élastiques sont principalement utilisés pour les tissus à maille ou extensibles mais peuvent également être utilisés sur les tissus tissés.
  • Seite 93 POINT ZIGZAG STRETCH Le point zigzag stretch est principalement utilisé pour la couture supérieure décorative. Il est idéal pour travailler les bords de décolleté, des manches ou des ourlets. Si vous le réglez manuellement à une largeur très fine, vous pouvez l'utiliser également pour coudre des coutures ultra-résistantes.
  • Seite 94: Point De Surjet

    POINT CACHÉ Le point caché est utilisé principalement pour dessiner des coutures d'ourlet creux. Il peut être également utilisé pour coudre une bande fine dans une couleur contrastée ou de la même couleur. Placez le point au milieu, vous aurez alors un effet original pour la décoration.
  • Seite 95: Point De Bordure

    POINT OVERLOCK EN BIAIS Coutures et surfilage en une étape pour fabriquer une couture fine, souple, convient notamment aux vêtements de natation, de sport, aux t-shirts, aux vêtements de bébé en nylon extensible, au jersey et au coton-jersey. COUTURE CROISÉE Il est utilisé...
  • Seite 96 POINT DE MANDRIN C'est un point polyvalent qui est utilisé pour coudre des morceaux de tissu et en tant que point décoratif. POINT D'ARÈTE DE POISSON Est utilisé pour créer des bords décoratifs et pour la broderie. POINT DE CHEVRON Est utilisé...
  • Seite 97: Plus De Points Décoratifs

    Plus de points décoratifs Paramètres : Pied-de-biche – Pied universel(J) ou pied satin (Z) Régulateur de tension du fil - 4 ou 3 Ci-après, vous trouverez des exemples d'utilisation et de couture de ces points. Vous pouvez utiliser d'autres points décoratifs de la même manière. Vous devez également faire un test sur un morceau du tissu à...
  • Seite 98: Coudre Avec Les Motifs De Lettres

    Coudre avec les motifs de lettres ACCROCHER LA PLAQUE DE MOTIF DE LETTRES La plaque de motifs de lettre indique les lettres et leurs numéros. Placez la plaque de motif de lettre sur la poignée de Plaque de motif de lettre la machine à...
  • Seite 99: Coudre Boutonnière

    COUDRE BOUTONNIÈRE Tab A Tab B BOUTONNIÈRE AUTOMATIQUE Utilisez le pied de boutonnière. Votre machine vous propose deux largeurs différentes pour les bordures, les trous et les boutonnières avec une extrémité ronde grâce à un système qui mesure la taille du bouton et calcule la taille nécessaire de la boutonnière.
  • Seite 100 5. Marquez prudemment la position de la boutonnière sur votre vêtement. 6. Placez le tissu sous le pied. Tirez le fil de la canette sous le tissu sur une longueur d'env. 4 pouces vers l'arrière. 7. Alignez la marque de la boutonnière sur votre vêtement avec Marque sur le la marque sur le pied de boutonnière et ensuite abaissez le pied Marque...
  • Seite 101: Aiguille Jumelée

    Mandrin BOUTONNIÈRE FENDUE Accrochez le fil passant (fil de crochet ou fil de boutonnière) via le mandrin et tirez la deuxième extrémité du fil vers l'avantsous le pied et reliez le fil comme sur l'illustration. Cousez la boutonnière de sorte à ce que le point zigzag recouvre le fil.
  • Seite 102: Position De L'aiguille Pour Le Point Droit

    POSITION DE L'AIGUILLE POUR LE POINT DROIT La position de l'aiguille pour la couture du point droit doit être réglée comme indiqué pour chacune des 13 positions avec le régulateur de largeur du point : sur la gauche sur la droite Bouton de réglage de la largeur du point.
  • Seite 103: Maintenance De Votre Machine

    3. Maintenance de votre machine à coudre NETTOYAGE DE LA ZONE DE LA PINCE ET DU TRANSPORTEUR Débranchez toujours la machine de la source de courant en débranchant la fiche de la prise. Pour garantir un fonctionnement optimal de votre machine, il est nécessaire que les pièces soient toujours propres.
  • Seite 104: Check-Liste

    4. CHECK-LISTE PROBLÈMES GÉNÈRAUX La machine ne coud pas. * L'interrupteur secteur est éteint - Allumez l'interrupteur secteur. * Le levier de boutonnière ne se lève pas pendant que vous cousez le motif - Levez le levier de boutonnière. * Le levier de boutonnière ne se baisse pas pendant que vous cousez la boutonnière. - Baissez le levier de boutonnière.
  • Seite 105 09:00 Uhr- 17:00 Uhr GLN: 42 6015287 000 5 WEEE-Reg.-Nr. DE 69109410 www.blaupunkt.com www.tuv.com 101419035704 Download Mode d'emploi: http://www.blaupunkt.com/de/servicesupport/naehmaschinen/ All rights reserved. All brand names are registered trademark of their respective owners. Sp ecifications are subject to change without prior notice.

Inhaltsverzeichnis