Werbung
Quicklinks
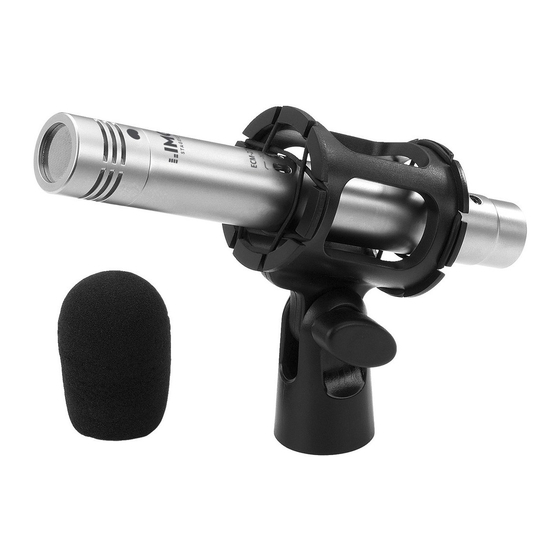
ECM-270
Best.-Nr. 23.5140
D
s
A
CH
Professionelles
Kondensatormikrofon
Bitte lesen Sie die Anleitung vor dem Betrieb gründlich
durch und heben Sie sie für ein späteres Nachlesen auf.
1 Einsatzmöglichkeiten
Dieses Mikrofon ist für professionelle Studio- und Live-
Einsätze konzipiert und eignet sich sowohl für Nahab-
nahmen von akustischen Instrumenten (z. B. Klavier,
Gitarre, Streichinstrument) als auch für Overhead-
Schallabnahmen (z. B. Schlagzeug, Chorgesang). Zum
Betrieb benötigt es eine Phantomspeisung von 48 V .
Zum Lieferumfang gehören ein stabiler Koffer, ein
vibrationsdämpfender Mikrofonhalter (Spinne), ein Er-
satzband für die Spinne und ein Wind-/Poppschutz.
2 Wichtige Hinweise für den Gebrauch
Das Mikrofon entspricht allen erforderlichen Richtlinien
der EU und ist deshalb mit
gekennzeichnet.
Verwenden Sie das Mikrofon nur im Innenbereich und
schützen Sie es vor Feuchtigkeit und Hitze (zulässi-
ger Einsatztemperaturbereich 0 – 40 °C).
Professional Capacitor Microphone
GB
Please read these operating instructions carefully prior
to operating the unit and keep them for later use.
1 Applications
This microphone is designed for professional studio and
live applications and is both suitable for close sound
pick-up of acoustic instruments (e. g. piano, guitar,
string instrument) and for overhead sound pick-up (e. g.
drums, chorus). For operation, the microphone requires
a 48 V
phantom power.
The microphone is supplied with a stable case, a
vibration-dampening microphone support (spider), a
replacement ribbon for the spider, and a windshield / pop
protection.
2 Important Notes
The microphone corresponds to all required directives
of the EU and is therefore marked with
The microphone is suitable for indoor use only. Pro-
tect it against humidity and heat (admissible ambient
temperature range 0 – 40 °C).
For cleaning only use a dry, soft cloth; never use
F
B
CH
Microphone professionnel
à condensateur
Veuillez lire la présente notice avec attention avant le
fonctionnement et conservez-la pour pouvoir vous y
reporter ultérieurement.
1 Possibilités d'utilisation
Ce microphone est conçu pour des utilisations profes-
sionnelles en studio et live et est également adapté pour
des prises de son proches d'instruments acoustiques
(par exemple piano, guitare, instrument à cordes) et
pour des prises de son Overhead (par exemple batte-
ries, chant de chorales). Une alimentation fantôme
48 V
est nécessaire pour le fonctionnement.
Sont livrés un coffret solide, un support micro atté-
nuateur de vibrations (araignée), une bande de rechan-
ge pour l'araignée et une bonnette anti-vent / anti-pop.
2 Conseils d'utilisation importants
Le microphone répond à toutes les directives nécessai-
res de l'Union Européenne et porte donc le symbole
Le microphone n'est conçu que pour une utilisation
en intérieur. Protégez-le d'une humidité élevée et de
0°
330°
30°
300°
60°
Richtcharakteristik
Pick-up pattern
90°
270°
Directivité
240°
120°
210°
150°
180°
®
Copyright
Verwenden Sie zum Reinigen nur ein trockenes, wei-
ches Tuch, niemals Chemikalien oder Wasser.
Wird das Mikrofon zweckentfremdet, falsch ange-
schlossen oder nicht fachgerecht repariert, kann
keine Haftung für daraus resultierende Sach- oder
Personenschäden und keine Garantie für das Mikro-
fon übernommen werden.
Soll das Mikrofon endgültig aus dem Betrieb
genommen werden, übergeben Sie es zur
umweltfreundlichen Entsorgung einem ört-
lichen Recyclingbetrieb.
3 Inbetriebnahme
1) Die Spinne auf ein Stativ mit 15,9-mm-Gewinde
5
(
/
") schrauben und das Mikrofon hineinschieben.
8
Bei Bedarf den Wind-/Poppschutz aufstecken.
Die seitliche Schraube an der Spinne lösen, das
Mikrofon auf die Schallquelle ausrichten und die
Schraube wieder anziehen.
2) Das Mikrofon über ein Kabel mit XLR-Stecker an
einen Mikrofoneingang des verwendeten Audioge-
räts (z. B. Mischpult) anschließen. Der Eingang muss
water or chemicals.
No guarantee claims for the microphone and no liabil-
ity for any resulting personal damage or material
damage will be accepted if the microphone is used for
other purposes than originally intended, if it is not cor-
rectly connected, or not repaired in an expert way.
If the microphone is to be put out of operation
definitively, take it to a local recycling plant for
a disposal which is not harmful to the en-
vironment.
3 Operation
1) Screw the spider onto a stand with 15.9 mm (
thread and insert the microphone. Place the wind-
shield / pop protection, if required.
Release the lateral screw on the spider, align the
microphone to the sound source, then retighten the
.
screw.
2) Connect the microphone via a cable with XLR plug to
a microphone input of the audio unit used (e. g.
mixer). The input must have a 48 V
supply. If the audio unit does not provide any phan-
la chaleur (plage de température de fonctionnement
autorisée : 0 – 40 °C).
Pour le nettoyer, utilisez uniquement un chiffon sec et
doux, en aucun cas de produits chimiques ou d'eau.
Nous déclinons toute responsabilité en cas de dom-
mages matériels ou corporels résultants si le micro-
phone est utilisé dans un but autre que celui pour
lequel il a été conçu, s'il n'est pas correctement bran-
ché ou s'il n'est pas réparé par une personne habi-
litée ; en outre, la garantie deviendrait caduque.
Lorsque le microphone est définitivement
retiré du service, vous devez le déposer dans
une usine de recyclage adaptée pour contri-
buer à son élimination non polluante.
3 Fonctionnement
1) Vissez l'araignée sur un pied doté d'un filetage
5
15,9 mm (
/
") et insérez le micro. Si besoin, placez
8
la bonnette anti-vent/anti-pop.
Desserrez la vis latérale sur l'araignée, alignez le
.
microphone par rapport à la source audio et revissez.
2) Reliez le microphone via un cordon avec fiche XLR
mâle à une entrée micro de l'appareil audio utilisé
(dB)
+20
+10
0
-10
-20
-30
©
by MONACOR INTERNATIONAL GmbH & Co. KG, Bremen, Germany. All rights reserved.
eine Phantomspeisung von 48 V
das Audiogerät diese nicht bereit, das Mikrofon über
ein Phantomspeisungsgerät (z. B. EMA-3 von „img
Stage Line") an das Audiogerät anschließen.
3) Zur Unterdrückung tiefer Frequenzen (z. B. Tritt-
schall) das Hochpassfilter einschalten: Den Filter-
schalter in die Position
4) Bei sehr hohen Schalldrücken kann zum Schutz
gegen Übersteuerung nachfolgender Geräte eine
10-dB-Dämpfung eingeschaltet werden: Den Dämp-
fungsschalter in die Position „-10dB" stellen.
4 Technische Daten
System: . . . . . . . . . . . . . . . Back-Elektret/Niere
Frequenzbereich: . . . . . . . 50 – 18 000 Hz
Empfindlichkeit, Impedanz: 5,6 mV/Pa/1 kHz, 200 Ω
max. Schalldruck: . . . . . . . 135 dB
Signal-Rausch-Abstand: . . > 60 dB
Stromversorgung: . . . . . . . Phantomspeisung 48 V
Abmessungen, Gewicht: . . Ø 20 mm × 150 mm, 140 g
Anschluss: . . . . . . . . . . . . . XLR, symmetrisch
Änderungen vorbehalten.
tom power, connect the microphone to the audio unit
via a phantom power supply unit (e. g. EMA-3 from
"img Stage Line").
3) To suppress low frequencies (e. g. subsonic sound),
switch on the high-pass filter: Set the filter switch to
position
4) With very high sound pressures, a 10 dB attenuation
may be switched on as a protection against overload
of subsequent units: Set the attenuation switch to
position "-10dB".
4 Specifications
System: . . . . . . . . . . . . . . . back electret/cardioid
5
/
")
8
Frequency range: . . . . . . . 50 – 18 000 Hz
Sensitivity, impedance: . . . 5.6 mV/Pa/1 kHz, 200 Ω
Max. sound pressure: . . . . 135 dB
S/N ratio: . . . . . . . . . . . . . . > 60 dB
Power supply: . . . . . . . . . . phantom power 48 V
Dimensions, weight: . . . . . Ø 20 mm × 150 mm, 140 g
Connection: . . . . . . . . . . . . XLR, balanced
phantom power
Subject to technical modification.
(par exemple table de mixage). L'entrée doit avoir
une alimentation fantôme 48 V . Si l'appareil audio
ne fournit pas d'alimentation fantôme, reliez le micro-
phone à l'appareil audio via une unité d'alimentation
fantôme (par exemple EMA-3 de "img Stage Line").
3) Pour éliminer les fréquences basses (par exemple
bruits de pas), allumez le filtre passe-haut : mettez
l'interrupteur sur la position
4) Pour des pressions sonores très élevées, on peut
activer une atténuation de 10 dB pour protéger les
appareils suivants contre les surcharges : mettez
l'atténuateur sur la position "-10dB".
4 Caractéristiques techniques
Système : . . . . . . . . . . . back-électret/cardioïde
Bande passante : . . . . . 50 – 18 000 Hz
Sensibilité, impédance : 5,6 mV/Pa/1 kHz, 200 Ω
Pression sonore max. : . 135 dB
Rapport signal/bruit : . . > 60 dB
Alimentation : . . . . . . . . alimentation fantôme 48 V
Dimensions, poids : . . . Ø 20 mm × 150 mm, 140 g
Branchement : . . . . . . . XLR, symétrique
Tout droit de modification réservé
50
100 200
500
1k
2k
5k
10k 20k(Hz)
aufweisen. Stellt
stellen.
.
.
Frequenzgang
Frequency response
Courbe de réponse
A-0659.99.01.08.2006
Werbung

Verwandte Anleitungen für IMG STAGELINE ECM-270


Inhaltszusammenfassung für IMG STAGELINE ECM-270
- Seite 1 ECM-270 Best.-Nr. 23.5140 Professionelles Verwenden Sie zum Reinigen nur ein trockenes, wei- eine Phantomspeisung von 48 V aufweisen. Stellt ches Tuch, niemals Chemikalien oder Wasser. das Audiogerät diese nicht bereit, das Mikrofon über Kondensatormikrofon ein Phantomspeisungsgerät (z. B. EMA-3 von „img Wird das Mikrofon zweckentfremdet, falsch ange- Bitte lesen Sie die Anleitung vor dem Betrieb gründlich...
- Seite 2 ECM-270 Best.-Nr. 23.5140 Microfono professionale Per la pulizia usare solo un panno morbido, asciutto; tale alimentazione non fosse disponibile, occorre col- non impiegare in nessun caso prodotti chimici o acqua. legare il microfono con l’apparecchio audio attra- a condensatore verso un alimentatore phantom (p. es. EMA-3 di “img Nel caso d’uso improprio, di collegamenti sbagliati o...