Herunterladen Inhalt Inhalt Diese Seite drucken

Werbung

Verfügbare Sprachen
  • DE

Verfügbare Sprachen

  • DEUTSCH, seite 14
EN
Fitting Instructions for Basic Carrier
D
Montageanleitung für Basisträgersystem
ES
Instrucciones de montaje para el sistema
de transporte
F
Instructions de montage pour Basic Carrier
IT
Istruzioni di montaggio
PL
Instrukcja systemu montażu
RU
Установочные Инструкции для
Поперечных Балок
Revision No: 3C
x 1
x 2
x 1
x 1
x 2
x 1
1
Fitting Kit
x 1
x 1
K646W
x 1
x 1

Werbung

Inhaltsverzeichnis
loading

Inhaltszusammenfassung für Whispbar K646W

  • Seite 1 K646W Fitting Kit Fitting Instructions for Basic Carrier Montageanleitung für Basisträgersystem Instrucciones de montaje para el sistema de transporte Instructions de montage pour Basic Carrier Istruzioni di montaggio Instrukcja systemu montażu Установочные Инструкции для Поперечных Балок Revision No: 3C...
  • Seite 2 Fitting Kit K646W MAX kgs (lbs) Subaru Legacy, 4dr Sedan 15-+ 60 kgs (132 lbs) 60 kgs (132 lbs) Legacy, 4dr Sedan 15-+ 60 kgs (132 lbs) 60 kgs (132 lbs) Liberty, 4dr Sedan 15-+ 60 kgs (132 lbs) 60 kgs (132 lbs)
  • Seite 3 Fitting Kit K646W Legacy, 4dr Sedan 15-+ (NZ) -310mm 445mm 880mm 872mm -12 -3/16ths" 17 1/2ths" 34 5/8ths" 34 5/16ths" Legacy, 4dr Sedan 15-+ (ZA) -310mm 445mm 880mm 872mm -12 -3/16ths" 17 1/2ths" 34 5/8ths" 34 5/16ths" Liberty, 4dr Sedan 15-+ (AU)
  • Seite 4: First Time Installation

    Fitting Kit K646W First Time Installation Remove parts from inside the package and check. Contact your dealer if any parts are missing or damaged. This kit fits type A, B, C and D. These instructions show type A crossbar fitted. They also apply to type B, C and D.
  • Seite 5 Fitting Kit K646W Use keys to remove covers. Use hex screwdriver to reverse adjusting screw 10 turns. Press adjusting screw and pull crossbar legs out. Refer to the crossbar instructions for crossbar adjustment method. Ensure each end of the crossbar is...
  • Seite 6 Fitting Kit K646W Remove locking screw. Apply protective strip as shown.  Trim if required. It is important to put the clamps in the correct position on the vehicle. Letters refer to the part numbers stamped on clamps. Clamp Part Number:...
  • Seite 7 Fitting Kit K646W Attach clamp to each leg. NOTE; clamps may have labels showing their positions on the vehicle (For example; "Front Right"). Refit locking screw so that it goes through the hole in the clamp. Do not begin to tighten the locking screw.
  • Seite 8 Fitting Kit K646W It is important to put the pads in the correct position on the vehicle. Letters refer to the pad part numbers and position. Pad Part Number: A = A295 B = A296 Place rubber pads (supplied with fitting kit) on the vehicle roof.
  • Seite 9 Fitting Kit K646W Fitment Clamps directly to edge of roof under the doors Please check the front of this manual for information relating specifically to your vehicle. Place crossbar on vehicle. Minimum recommended spacing between the bars is 700mm (27 1/2") (unless otherwise stated).
  • Seite 10 Fitting Kit K646W Tighten locking screw on both legs evenly, 2.5 Nm (1.8 ft lb). Check crossbar is securely attached to the vehicle. Use keys to fit and lock covers...
  • Seite 11 Fitting Kit K646W CAUTION: Recheck all fasteners immediately after a load is applied to the crossbars. Regularly check screws are tight.
  • Seite 12: Maintenance

    Fitting Kit K646W Maintenance Clean the car roof and surfaces of the product that will be in contact with the car roof. Follow the fitting instructions for fitting the product to your vehicle. Make sure all steps are carried out in order.
  • Seite 13 Fitting Kit K646W Check and replace worn out or defective parts. Keep the product clean and maintained. Never drive into a car wash with the roof rack system fitted. Lubricate locks and adjusting screws at regular intervals. Remove the products from the vehicle when not in use.
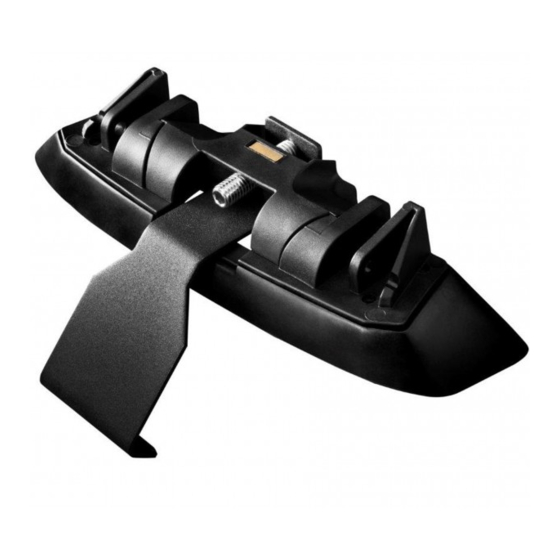
  • Seite 14 Fitting Kit K646W Erstinstallation Komponenten aus der Verpackung nehmen und überprüfen. Setzen Sie sich mit Ihrem Händler in Verbindung, sollten Teile fehlen oder beschädigt sein! Dieses Kit ist für die Typen A, B, C und D. Dargestellt ist der Querträger des Typs A.
  • Seite 15 Fitting Kit K646W Abdeckungen mit Schlüsseln abnehmen. Innensechskantschlüssel benutzen und Stellschraube mit 10 Umdrehungen lösen. Befestigungsschraube eindrücken und Querträgerschenkel ausziehen. Siehe Anweisungen für das Einstellen der Querträger! Sicherstellen, dass beide Enden der Querträger gleich lang eingestellt sind (Maß 'x', s. Abb.).
  • Seite 16 Fitting Kit K646W Stellschraube entfernen. Sicherheitsstreifen wie gezeigt anbringen. Wenn nötig, zurecht schneiden. Es ist wichtig, die Klammern an der richtigen Position am Fahrzeug anzubringen. Die Buchstaben beziehen sich auf die in die Klammern eingestanzten Teilenummern. Klammer-Teilenummern: A = B560...
  • Seite 17 Fitting Kit K646W An jedem Fuß eine Klammer befestigen. ACHTUNG: Einige Klammern tragen Hinweise zur Montageposition (z.B. "vorne rechts"). Stellschraube so wieder einsetzen, dass sie durch die Öffnung in der Klammer geht. Stellschraube nicht wieder festziehen! Die Teilenummer finden Sie auf der...
  • Seite 18 Fitting Kit K646W Es ist wichtig, die pad an der richtigen Position am Fahrzeug anzubringen. Buchstaben beziehen sich auf die Pad- Teilenummern und Position. Pad Teilenummer: A = A295 B = A296 Ort Gummipads (im Lieferumfang Anbausatz) auf dem Fahrzeugdach. Kissen...
  • Seite 19 Fitting Kit K646W Befestigung Wird direkt an die Dachkante unter den Türen geklemmt Finden Sie Informationen speziell für Ihr Fahrzeug im der Vorderteil Teil dieser Bedienungsanleitung. Setzen Sie den Querträger auf das Fahrzeug. Der empfohlene Mindestabstand zwischen den Trägern beträgt 700 mm (sofern nicht anders angegeben).
  • Seite 20 Fitting Kit K646W Befestigungsschrauben an beiden Schenkeln gleichmäßig anziehen, 2.5 Nm / 1.8 ft lb. Überprüfen ob die Querträger sicher am Fahrzeug befestigt sind. Abdeckungen aufsetzen und mit Schlüsseln verschließen (s. Abb.).
  • Seite 21 Fitting Kit K646W ACHTUNG! Schrauben regelmäßig auf festen Sitz prüfen!
  • Seite 22: Sicherheitshinweise & Tipps

    Fitting Kit K646W Sicherheitshinweise & Tipps Dach sowie alle Trägerflächen, die mit dem Dach Kontakt haben reinigen. Träger anhand der Montageanleitung montieren. Alle Schritte unbedingt in der richtigen Reihenfolge ausführen! Wenn in der Anleitung nicht anders angegeben, Querträger im Abstand von min.
  • Seite 23 Fitting Kit K646W Komponenten regelmäßig überprüfen und defekte oder verschlissene Teile gegen Originalteile ersetzen. Träger stets sauber halten (nicht ölen oder fetten)! Mit montierten Dachträgern nicht in Waschanlagen einfahren. Schlösser und Stellschrauben regelmäßig schmieren. Dachgepäckträger bei Nichtgebrauch abmontieren. Alle losen Teile sicher aufbewahren! Yakima Products, Inc.
  • Seite 24: Primera Instalación

    Fitting Kit K646W Primera instalación Retire las piezas del embalaje y confirme su contenido. Póngase en contacto con su vendedor en el caso de que falten piezas o éstas estén dañadas. Este kit se adecua a los tipos A, B, C y D.
  • Seite 25 Fitting Kit K646W Utilice las llaves para retirar la tapa. Utilice la llave Allen para desatornillar los tornillos de ajuste en 10 vueltas. Presione el tornillo de ajuste y tire de los pies de la barra hacia fuera. Consulte las instrucciones de montaje de las barras para su ajuste.
  • Seite 26 Fitting Kit K646W Retire el tornillo de bloqueo. Aplique la tira de protección como se muestra. Recorte si fuera necesario. Es importante colocar los ganchos en la posición correcta en el vehículo. Las letras se refieren a la referencia marcada en los ganchos.
  • Seite 27 Fitting Kit K646W Ponga el gancho metálico en cada pie de barra. NOTA: Los ganchos podrán tener información sobre su posición de colocación en el vehículo (Ejemplo: Delantera derecha). Recoloque los tornillos de bloqueo hasta que este se atornille al agujero en el gancho.
  • Seite 28 Fitting Kit K646W Es importante colocar los almohadilla en la posición correcta en el vehículo. Las letras se refieren a la referencia de las almohadillas. Referencia de almohadilla: A = A295 B = A296 Coloque almohadillas de goma (suministrada con el kit de fijación) en el techo del vehículo.
  • Seite 29: Montaje

    Fitting Kit K646W Montaje Fijación en la lateral del techo debajo de las puertas Por favor ver el frente de este manual para detalles específicos de su vehículo. Ponga la barra en el vehículo. Las distáncia mínima recomendada entre barras es de 700mm.
  • Seite 30 Fitting Kit K646W Apriete el tornillo de bloqueo en ambos pies uniformemente, 2.5 Nm (1.8 ft lb). Asegúrese de que la barra esté fijada al vehículo de forma segura. Utilice las llaves para instalar y cerrar las cubiertas.
  • Seite 31 Fitting Kit K646W ATENCIÓN: Verifique regularmente si los tornillos están apretados.
  • Seite 32: Mantenimiento

    Fitting Kit K646W Mantenimiento Limpie el techo del vehículo y las superfícies del producto que estarán en contacto con el techo. Siga las instrucciones de montaje para la instalación del producto en su vehículo. Asegúrese de que todos los pasos se siguen correctamente.
  • Seite 33 Fitting Kit K646W Transportar carga en el techo del vehículo cambia el comportamiento del mismo. Especial atención al efecto de viento cruzado, cambios de dirección y situaciones de frenado. Evite las aceleraciones y desaceleraciones rápidas. Conduzca con precaución. Tenga en cuenta que la altura total del vehículo se incrementa cuando se llevan...
  • Seite 34 Fitting Kit K646W Yakima Products, Inc. 15025 SW Koll Pkwy. Beaverton, OR 97006-6056 www.whispbar.com.mx Yakima Products, Inc. Archimedesbaan 25 3439 ME Nieuwegein The Netherlands +31 (0)30 600 1070 www.whispbar.eu www.whispbar.es...
  • Seite 35: Première Installation

    Fitting Kit K646W Première installation Retirer les pièces de contenu de l'emballage et vérifier. Contactez votre revendeur si certaines pièces sont manquantes ou endommagées. Ce kit correspond aux types A, B, C et D. Ces instructions montrent la barre transversale de type A posée. Elles correspondent également aux types B, C et...
  • Seite 36 Fitting Kit K646W Utiliser les clés pour retirer les caches Utiliser le tournevis cruciforme pour repositionner la vis de réglage et faire 10 tours. Appuyer sur la vis de réglage et extraire les pieds de la barre transversale. Consulter les instructions de la barre transversale pour la régler.
  • Seite 37 Fitting Kit K646W Retirer la vis de blocage. Appliquer des bandes de protection comme indiqué. Les découper si nécessaire. Il est important de placer les fixations à la bonne position sur le véhicule. Les lettres font référence aux numéros de pièces indiqués sur les fixations.
  • Seite 38 Fitting Kit K646W Mettre la fixation sur chaque pied. REMARQUE : il est possible que les fixations aient des étiquettes indiquant leurs positions sur le véhicule (par exemple : "avant droite"). Remonter la vis de réglage de sorte qu'elle passe par le trou de la fixation. Ne pas commencer à...
  • Seite 39 Fitting Kit K646W Il est important de placer les coussin à la bonne position sur le véhicule. Les lettres font référence aux numéros de pièces des coussins et à leur position. Numéro de pièce du coussin : A = A295...
  • Seite 40: Montage

    Fitting Kit K646W Montage Se fixe directement aux bords du toit sous les portes Veuillez consulter de devant l' de ce manuel pour obtenir des informations relatives à votre véhicule en particulier. Placer la barre transversale sur le véhicule. L'espace minimal recommandé entre les barres est de 700 mm (27 1/2") (sauf...
  • Seite 41 Fitting Kit K646W Serrer la vis de blocage sur les deux pieds de façon égale, 2.5 Nm (1.8 ft lb). Vérifier que la barre transversale est solidement fixée au véhicule. Utiliser les touches pour installer et verrouiller les couvercles...
  • Seite 42 Fitting Kit K646W ATTENTION : Vérifier régulièrement que les vis sont bien serrées...
  • Seite 43 Fitting Kit K646W Maintenance Nettoyer le toit de la voiture et les surfaces des produits qui seront en contact avec le toit de la voiture. Suivre les instructions de montage pour l'installation du produit sur votre véhicule. S'assurer que toutes les étapes sont réalisées dans l'ordre.
  • Seite 44 Fitting Kit K646W Un système de galerie de toit chargé peut altérer les performances de votre véhicule. Soyez particulièrement conscients des effets de vents latéraux, le changement de direction, et du freinage. Évitez accélération et de décélération. Conduisez prudemment Noter que la hauteur totale du véhicule augmente lorsque les charges sont transportées en position verticale.
  • Seite 45 Fitting Kit K646W Yakima Products, Inc. 15025 SW Koll Pkwy. Beaverton, OR 97006-6056 www.whispbar.fr www.whispbar.ca/fr Yakima Products, Inc. Archimedesbaan 25 3439 ME Nieuwegein The Netherlands +31 (0)30 600 1070 www.whispbar.eu www.whispbar.fr...
  • Seite 46: Prima Installazione

    Fitting Kit K646W Prima installazione Estrai i componenti dall’interno della confezione e verifica. Se alcune parti mancano o risultano danneggiate, contatta il tuo rivenditore. Questo kit è per il tipo A, B, C e D. Queste istruzioni mostrano il montaggio per barre di tipologia A.
  • Seite 47 Fitting Kit K646W Utilizzare la chiave per rimuovere le calotte. Utilizzare il cacciavite esagonale per ruotare di 10 giri in senso contrario la vite di regolazione. Premere la vite di regolazione ed estrarre le barre. Consultare le istruzioni relative alle barre per il motodo di regolazione delle stesse.
  • Seite 48 Fitting Kit K646W Rimuovere la vite di bloccaggio. Applicare la striscia protettiva come mostrato. Se necessario regolare. È importante porre le staffe in posizione corretta sul veicolo. Le lettere si riferiscono ai codici articolo impressi sulle staffe. Codice articolo staffe:...
  • Seite 49 Fitting Kit K646W Integrare la staffe in ciascun piede. NOTA; è possibile che le staffe abbiano etichette che ne illustrano la posizione sul veicolo (Ed esempio "Anteriore destra"). Reinserire la vite di bloccaggio in modo che passi attraverso il foro della staffe. Non iniziare a serrare la vite di bloccaggio.
  • Seite 50 Fitting Kit K646W È importante porre i tamponi in posizione corretta sul veicolo. Le lettere fanno riferimento ai codici articolo dei tamponi e alla posizione. Codice articolo del tampone: A = A295 B = A296 Posizionare i tamponi in gomma (in dotazione con il kit di installazione) sul tetto del veicolo.
  • Seite 51: Installazione

    Fitting Kit K646W Installazione Si fissa direttamente sul perimetro del tetto al di sotto delle portiere Controllare la copertina del presente manuale per acquisire informazioni sul proprio veicolo. Posizionare la barra sul veicolo. Lo spazio minimo raccomandato tra le barre è 700 mm (27 1/2") (se non diversamente...
  • Seite 52 Fitting Kit K646W Serrare uniformemente la vite di bloccaggio su entrambe le barre, 2,5 Nm (1,8 ft lb). Controllare che la barra sia ben ancorata al veicolo. Utilizzare le chiavi per inserire e bloccare le calotte...
  • Seite 53 Fitting Kit K646W importante: Ricontrollare immediatamente tutti i dispositivi di fissaggio dopo aver applicato un carico alle barre. Controllare regolarmente che le viti siano ben serrate.
  • Seite 54: Manutenzione

    Fitting Kit K646W Manutenzione Pulire il tetto dell’autovettura e le superfici del prodotto che saranno in contatto con il tetto dell'auto. Seguire le istruzioni di montaggio per il montaggio del prodotto sul veicolo. Accertarsi di seguire ogni passaggio con ordine.
  • Seite 55 Fitting Kit K646W Un portapacchi può alterare le prestazioni del veicolo. In particolare tenere presenti gli effetti dei venti laterali, del cambio di direzione e della performance di frenata. Evitare una rapida accelerazione o decelerazione. Guidare con prudenza. Si prega di notare che l’altezza totale del veicolo aumenta se si trasportano carichi verticali.
  • Seite 56 Fitting Kit K646W Yakima Products, Inc. 15025 SW Koll Pkwy. Beaverton, OR 97006-6056 www.whispbar.com www.whispbar.ca Yakima Products, Inc. Archimedesbaan 25 3439 ME Nieuwegein The Netherlands +31 (0)30 600 1070 www.whispbar.eu www.whispbar.co.uk...
  • Seite 57 Fitting Kit K646W Pierwszy montaż Sprawdź zawartość opakowania i upewnij się, czy zawiera wszystkie części znajdujące się na liście. Jeśli nie, skontaktuj się z odpowiednim sklepem. Kit pasuje do belek typu A, B, C oraz D. Instrukcja opisuje sposób montażu belek typu A.
  • Seite 58 Fitting Kit K646W Odkręć osłony za pomocą klucza. Zdejmij osłony za pomocą klucza. Przyciśnij i usuń blokadę. Zamontuj stopy. Sprawdź czy oba końce belek mają taką samą długość.
  • Seite 59 Fitting Kit K646W Odręć śrubę zabezpieczającą. Nałożyć pasek ochronny, jak pokazano. Zabezpiecz tśmą. Bardzo ważne jest aby umieścić łapy w odpowiednich miejscach na dachu samochodu Litery odnoszą się do oznakowań na łapkach Numer łapy: A = B560 B = B561...
  • Seite 60 Fitting Kit K646W Doczep łapki do kitu. Uwaga: Na łapkach umieszczona jest informacja odnośnie ich rozmieszczenia. ( Np. Prawy przód) Umieść śrubę w otworze łapki. Nie dokręcaj śruby zbyt mocno. Zobacz numer pod spodem łapki.
  • Seite 61 Fitting Kit K646W Bardzo ważne jest aby umieścić podkładek w odpowiednich miejscach na dachu samochodu Litery oznaczają podkładki oraz sposób ich rozmieszczenia. Rozmieszczenie podkładek: A = A295 B = A296 Gumowe podkładki Place (dostarczane z mocowaniem do zestawu) na dachu pojazdu.
  • Seite 62 Fitting Kit K646W Montaż Zamocuj łapy na samym brzegu dachu tuż pod drzwiami Czytać na z przodu instrukcji znajdziesz specyfikacje dla twojego samochodu. Umieść belki na dachu. Zalecana odległość między belkami wynosi 700mm. Zamontuj stopy w tych samych miejscach na obu końcach belki.Zamontuj łapki.
  • Seite 63 Fitting Kit K646W Dokręć śruby na każdej stopie, 2.5 Nm / 1.8 ft lb. Upewnij się, czy belka została poprawnie zamontowana Zamknij osłony za pomocą klucza.
  • Seite 64 Fitting Kit K646W UWAGA: Sprawdź czy dokładnie dokręciłeś śruby...
  • Seite 65: Zasady Użytkowania

    Fitting Kit K646W Zasady użytkowania Przed zamontowaniem belek oczyść powierzchnię dachu samochodu. Postępuj zgodnie z instrukcją montażu danego zestawu. Sprawdź czy nie pominąłęś żadnego punktu. Jeżeli nie pisze inaczej, ustaw belki w odległości min. 700mm. Jest to szczególnie istotne przy przewożeniu długich przedmiotów.
  • Seite 66 Fitting Kit K646W Regularnie naoliwiaj zamki i zawiasy. Zdemotuj bagażnik dachowy jeśli go nie używasz. Yakima Products, Inc. Archimedesbaan 25 3439 ME Nieuwegein The Netherlands +31 (0)30 600 1070 www.whispbar.eu www.whispbar.pl Yakima Products, Inc. 15025 SW Koll Pkwy. Beaverton, OR 97006-6056 www.whispbar.pl...
  • Seite 67: Первая Установка

    Fitting Kit K646W Первая Установка Распакуйте установочный комплект и проверьте наличие всех компонентов. В случае отсутствия или повреждения каких либо компонентов обратитесь к вашему представителю Prorack Данный установочный набор подходит к типу A, B, C и D. Данные инструкции показывают...
  • Seite 68 Fitting Kit K646W Используйте ключи чтобы снять крышки багажника Используйте шестигранную отвертку чтобы открутить регулировочный винт. Около 10-ти оборотов. Держите регулировочный винт нажатым и потяните упоры поперечных балок на себя. Полное описание регулировки упоров описано в инструкции багажника. Постарайтесь отрегулировать упоры так...
  • Seite 69 Fitting Kit K646W Полностью выкрутите винт зажима. Прикрепите защитную полосу, как показано на рисунке. В случае необходимости - обрежьте длину. ВНИМАНИЕ! Зажимные скобы должны быть правильно расположены на автомобиле. Буквы ссылаются на номер выбитый на зажиме. Номер Зажима: A = B560...
  • Seite 70 Fitting Kit K646W Вставте крепёжную скобу в ножку упора багажника. Примечание: Некоторые скобы могут иметь наклейки указывающие на их положение на крыше автомобиля (Например: Front Right) Закрутите винт зажима в зажимной блок так чтобы он прошёл сквозь отверстие в крепёжной скобе. Пока ещё не...
  • Seite 71 Fitting Kit K646W ВНИМАНИЕ! Резиновой Подкладки скобы должны быть правильно расположены на автомобиле. Буквами обозначены номера деталей Номер Резиновой Подкладки: A = A295 B = A296 Установите резиновые подкладки (предоставленные с установочном наборе ) на крыше вашего автомобиля. Внешний вид подкладок может...
  • Seite 72 Fitting Kit K646W Установка Зажимы непосредственно у края крыши под дверями cробную информацию, относящуюся к вашему типу автомобиля, можно найти перед руководства. Установите багажник на автомобиль. Рекомендуемый промежуток между поперечными балками 700мм. Постарайтесь отрегулировать упоры так чтобы они были расположенны на...
  • Seite 73 Fitting Kit K646W Попеременно затягивайты винты зажимов на упорах каждой поперечной балки, 2.5Nm / 1.8 ft lb. Проверьте, что багажник надежно установлен на автомобиле Используйте ключи чтобы установить и закрыть крышки багажника...
  • Seite 74 Fitting Kit K646W ВНИМАНИЕ! Регулярно проверяйте тугость винтов...
  • Seite 75 Fitting Kit K646W Эксплуотация Крыша автомобиля, а также все компоненты набора которые будут с ней соприкосатся должны быть чистыми Следуйте инструкции при установке продукции на ваш автомобиль. Установите поперечные балки с минимальным промежутком 700мм (27 1/2") если в инструкциях не указаны...
  • Seite 76 Fitting Kit K646W Багажник с нагрузкой может повлиять на характеристики вашего автомобиля. Старайтесь вести ваш автомобиль аккуратно, не превышая скорость и избегая резких разгонов, торможений и поворотов. Помните что багажник с грузом влияет на высоту вашего автомобиля. Всё оборудование с установленными на...
  • Seite 77 Fitting Kit K646W Yakima Products, Inc. 15025 SW Koll Pkwy. Beaverton, OR 97006-6056 www.whispbar.ru www.whispbar.com.ua Yakima Products, Inc. Archimedesbaan 25 3439 ME Nieuwegein The Netherlands +31 (0)30 600 1070 www.whispbar.eu www.whispbar.ru www.whispbar.com.ua...

Inhaltsverzeichnis