Icy Box IB-NAS5310 Benutzerhandbuch

Verwandte Anleitungen für Icy Box IB-NAS5310


Inhaltszusammenfassung für Icy Box IB-NAS5310
- Seite 1 IB-NAS5310 Network Attached Storage Benutzerhandbuch / Manual Version 1.0 Downloaded from www.Manualslib.com manuals search engine...
-
Seite 2: Inhaltsverzeichnis
DAS ÄuSSere DeS IB-NAS5310 ..................3 froNtANSIcht ......................3 rückANSIcht ......................3 MoNtAge ........................4 DAS IB-NAS5310 MIt DeM coMPuter verBINDeN ............5 uSB MoDuS ........................ 5 Mac OS X ......................5 WindOWS ......................5 NAS MoDuS ........................ 5 Verbindung Mit deM netzWerk ..............5 eINrIchtuNg DeS IB-NAS5310 .................. -
Seite 3: Einführung
Software zum zugriff auf die daten benötigt wird. der Samba Server, der im ib-naS5310 implementiert ist, bietet Speicher in der Weise an, wie es regu- läre Windows netzlaufwerke tun (gemeinhin als SMb oder cifS Protokoll bekannt). auch betriebssy- steme wie das Mac OS oder linux sind in der lage, auf diese art des netzwerkspeichers zuzugreifen. -
Seite 4: Lieferumfang
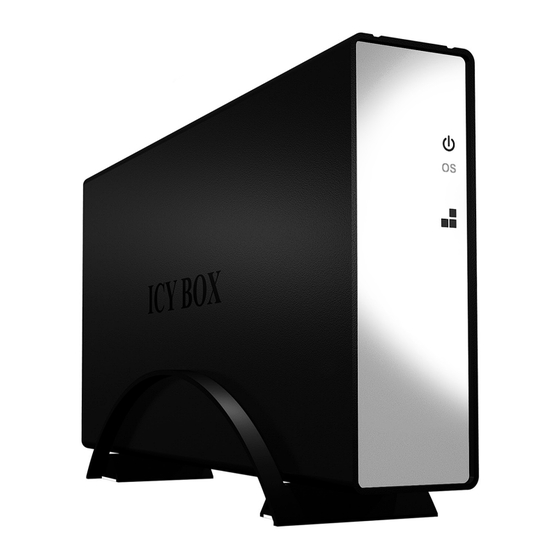
Network Attached Storage lIeferuMfANg • IB-NAS5310 • RJ-45 Netzwerkkabel • USB Kabel • Stromadapter • CD-ROM • Gebrauchsanleitung DAS ÄuSSere DeS IB-NAS5310 frontansicht rückansicht betriebs-led festplattenaktivität betriebssystems-led kapazitätsanzeigen betriebsschalter fW-taste uSb 2.0 Port Stromanschluss uSb 3.0 Port reset-taste ethernet Port Downloaded from www.Manualslib.com... -
Seite 5: Montage
IB-NAS5310 Network Attached Storage MoNtAge 1. den festplattenträger losschrauben und nach vorne herausschieben. 2. die festplatte mit dem Sata-kontakt verbinden. 3. die festplatte in den festplattenträger schrauben. 4. den festplattenträger zurück in das gehäuse schieben und von unten festschrauben. -
Seite 6: Das Ib-Nas5310 Mit Dem Computer Verbinden
Sie es als ein externes festplattengehäuse betreiben, dass über uSb mit dem computer verbunden wird. uSB Modus im uSb 3.0 High Speed Modus wird das ib-naS5310 über die uSb Schnittstelle direkt mit einem einzel- nen computer verbunden. Achtung: das ib-naS5310 darf nicht gleichzeitig an netzwerk und uSb angeschlossen werden. -
Seite 7: Einrichtung Des Ib-Nas5310
Username: admin Passwort: admin Aus Sicherheitsgründen können die Anmeldedaten via Web-Benutzeroberfläche geändert werden. Sie können die iP des ib-naS5310 auch mit Hilfe des auf der cd beigelegten Suchprogramms herausfinden. Wenn zwei neue ib-naS5310 gleichzeitig an einem netzwerk angeschlossen sind, müssen Sie zwischen beiden unterscheiden, in dem Sie "http://ib-naS5310 <XXXX>"... -
Seite 8: Web Basierte Administration
SMb Servers des ib-naS5310 für freigaben. Hier werden die freigaben erzeugt oder gelöscht, bzw. die zugriffsrechte verwaltet. ftP Server einstellung des ftP Servers des ib-naS5310. Hier werden auch benutzer angelegt und deren rechte verwaltet. Bittorrent einstellungen zum bittorrent client. Hier können torrents direkt auf die naS geladen werden. -
Seite 9: Status - Systeminformation
Sie, dass nach Änderung des netzwerknamens von nun an dieser verwendet werden muss um zugriff auf ihr ib-naS5310 zu erhalten. Wenn Sie zum beispiel den netzwerknamen auf "fileServer" ändern, muss "http://fileServer" in die adresszeile des browsers eingegeben werden um die webbasierte Managementoberfläche zu erreichen (nur Windows). -
Seite 10: Ip-Konfiguration
(automatic iP) und wenn ihr netzwerk einen dHcP Server beinhaltet, werden die iP-adressen vom dHcP-Server vergeben. das ib-naS5310 kann ebenfalls die rolle eines dHcP Servers übernehmen, sollte kein dHcP Server in ihrem netzwerk vorhanden sein. die voreingestellte iP-adresse ihres ib-naS5310 im dHcP Modus ist "169.254.0.1". - Seite 11 IB-NAS5310 Network Attached Storage PPPoE Manche dSl-basierte internetanbieter benutzen PPPoe (Point-to-Point Protocol over ethernet), um eine Verbindung zum internet herzustellen. alle lokalen benutzer können eine PPPoe-Verbindung teilen. Status zeigt den PPPoe Verbindungsstatus Service-Name Optionaler name für die Verbindung Benutzererkennung...
-
Seite 12: Maintenance (Wartung)
Maintenance (Wartung) der administrator kann hier allgemeine Verwaltungstätigkeiten das ib-naS5310 betreffend durchführen. Wenn Sie Problem mit der firmware ihres ib-naS5310 haben, können auf der Seite http://www.icybox.de eventuell entsprechende updates herunter geladen werden. Wenn Sie hier eine neue firmware hochgeladen haben oder das ib-naS5310 auf die Werkseinstellungen zurückgesetzt haben, setzen Sie bitte ihren Webbrowser zurück! - Seite 13 Verfügung stehen. Hier können Sie netzwerkfreigaben auf ihrem ib-naS5310 erzeugen, ändern oder löschen. Alle Verzeichnisse, die schon zuvor auf der Festplatte ihres IB-NAS5310 gewesen sind finden Sie in der linken Spalte der ansicht (folder list). Mit den Pfeiltasten zwischen den beiden Spalten bestimmen Sie ob die ausgewählten Verzeichnisse freigegeben werden (Sharing list).
-
Seite 14: Bittorrent
FTP Server dateien können auch unter Verwendung des ftP Protokolls mit dem ib-naS5310 ausgetauscht werden. ftP ermöglicht das austauschen von dateien über das internet. das ib-naS5310 kann als eigenstän- diger ftP Server betrieben werden, wenn ihm eine feste iP-adresse zugeordnet wird. -
Seite 15: Media Server
Wie man auf einen drucker, der an das ib-naS5310 angeschlossen ist, vom computer aus zugreift, ist im Punkt "Datei- und Druckerzugriff" beschrieben! Media Server diese funktion ermöglicht es dem administrator Share Ordner für Videos, Musik und bilder zu aktivieren. -
Seite 16: Datei- Und Druckerzugriff
Netzfreigaben unter Windows einbinden unter Windows kann auf das ib-naS5310 durch Suche in der netzwerkumgebung zugegriffen werden (als ein computer mit dem namen "ib-naS5310"). Oder Sie können auf das ib-naS5310 auf folgende Weise zugreifen: hinweis: der folgenden illustrationen sind einem Pc mit Windows XP SP2 (englisch) entnommen und mögen von ihrer anzeige geringfügig abweichen. -
Seite 17: Einrichten Eines Druckers Unter Windows
Druckers unter Windows Wenn der computer, mit dem Sie zugriff nehmen wollen, mit Windows läuft, dann befolgen Sie bitte die folgenden anweisungen, um über die ib-naS5310 auf ihren drucker zuzugreifen. rufen Sie den unterpunkt "drucker und faxgeräte" in... - Seite 18 IB-NAS5310 Network Attached Storage geben Sie hier den netz-werknamen der ib-naS5310 ein (Standardeinstel- lung: "ib-naS5310"). Wählen Sie bitte "Benutzerdefiniert" und klicken dann auf "einstellungen". in diesen fenster stellen Sie das Pro- tokoll "lPr" ein, tragen für die lPr- einstellung die Warteschlange "lp" ein und aktivieren "lPr-bytezählung".
- Seite 19 IB-NAS5310 Network Attached Storage im folgenden fenster wählen Sie ihren drucker aus. Wenn der Drucker nicht zu finden ist, können Sie das Windows update durchführen. Die neuen Treiber finden Sie meist ganz unten in der druckerliste. zum fortsetzen auf "Weiter"...
-
Seite 20: Netzfreigaben Unter Mac Os X Einbinden
"Server-adresse" an und klicken Sie auf "Verbinden". Wenn Sie den netzwerknamen ihres ib-naS5310 geändert haben, ersetzen Sie bitte "ib-naS5310" im obigen dialog mit dem netzwerknamen, den Sie gewählt haben. Wenn Sie z.b. "fileServer" als netzwerknamen eingestellt haben, dann geben Sie bitte "smb://fileServer"... - Seite 21 IB-NAS5310 Network Attached Storage nach der abfrage ihres accountnamen und Passwort fordert der nächste dialog Sie auf, den gewünschten Ordner für die freigabe auszusuchen. Wählen Sie die passende freigabe und klicken Sie auf "Ok". Downloaded from www.Manualslib.com manuals search engine...
-
Seite 22: Einrichten Eines Druckers Unter Mac Os
Druckers unter Mac oS Wenn der computer, mit dem Sie zugriff nehmen wollen, mit Mac OS läuft, dann befolgen Sie bitte die folgenden anweisungen, um über die ib-naS5310 auf ihren drucker zuzugreifen. klicken Sie auf "drucken & faxen"... - Seite 23 IB-NAS5310 Network Attached Storage Wählen Sie "iP" geben Sie die iP der ib-naS5310 an geben Sie einen Standort an Wählen Sie den für ihren drucker passenden treiber aus bestätigen Sie durch "Hinzufügen" ihr drucker wird nun unter "drucken & faxen"...
-
Seite 24: Häufige Fragen
Sie regelmäßig auf der Homepage http://www.raidsonic.de nach erhältlichen updates. 2. Unterstützt das IB-NAS5310 einen Energiesparmodus? Ja, das IB-NAS5310 reduziert die Stromaufnahme automatisch nach 15 Minuten. Die Zeit kann mit Hilfe der Weboberfläche verändert werden. 3. Wie können Daten mit dem IB-NAS5310 im Netzwerk gemeinsam genutzt werden? Mit Hilfe des SMb (Server Message block) Protokoll können freigaben des ib-naS5310 von jedem rech-...