Icy Box IB-NAS5520 Schnellstartanleitung
2x 3.5 raid hdd network storage
Quicklinks
Quick Start Guide
2x 3.5" RAID HDD Network Storage
1. Package Contents
Power Adapter
Enclosure
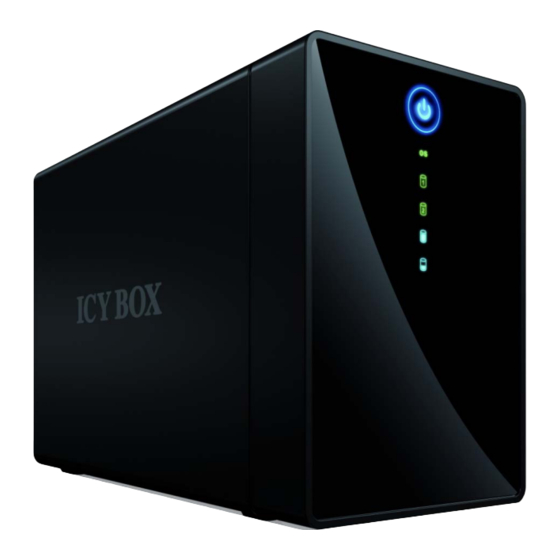
3. Front View
Power button
LED operating system
LED HDD 1
LED HDD 2
LED used
storage space
IB-NAS5520
USB cable
LAN cable
Quick Start Guide
2. Installation
4. Rear View
FW LED
FW
RAID mode
selector
CONFIRM
Ethernet port
5. Front view
Power button
Blue = Power on
Green = System ready
Flashing green = System is starting
up or shutting down
Flashing red = System cannot obtain
IP address or system is currently
starting up or shutting down.
Green = OK
Flashing green = Data access
Used storage space
5. Frontansicht
Starttaste
Blau = Gerät ist im Betrieb
Grün = System läuft und ist
Srew set
betriebsbereit
Grün blinkend = System fährt hoch
oder runter
Rot blinkend = System kann keine
IP Adresse beziehen, fährt hoch oder
runter.
Grün = OK
Grün blinkend = Datenzugriff
Speicherplatzausnutzung
in Prozent (50% und 100%)
5. Vue façade
Bouton Marche
Bleu = Sous tension
Vert = Système prêt
Vert clignotant = Système en train
de s'allumer ou de s'éteindre
Rouge clignotant = Le système
n'arrive pas à obtenir I' adresse IP ou
le système est en train de s'allumer ou
de s'éteindre.
Vert = OK
Vert clignotant = Accès aux données
Espace de stockage utilisé
5. Vista frontale
Pulsante ON/OFF
Blu = acceso (ON)
40x40 mm FAN
Verde = Sistema pronto
Verde lampeggiante = Sistema in
fase di avvio o di spegnimento
Kensington
Rosso lampeggiante = Mancato ot-
lock hole
tenimento dell'indirizzo IP da parte del
sistema oppure sistema in fase di avvio
o spegnimento
Reset
DC 12 V
Verde = OK
Verde lampeggiante = accesso ai dati
USB 3.0 port
Quantità di storage utilizzata
6. Rear View
5)
Find your personal "Cloud"
"MAC address" (e.g. 0001D2120538)
RESET
Press and hold the button during
I/O:LAN+USB3.0
startup to reset the settings.
MAC Address:0001D2120538
FW
When the LED is lit, press the button to
S/N:MC1121127E0001
update the firmware.
6)
Got to Settings
CONFIRM
Press the button for 3 second to set the
RAID mode.
7)
Enter user name
7. Application
admin
8)
Enter password
1) Turn on Power
admin
9)
Go to System Settings
Maintain
2) Select RAID mode
10) Go to Disk
LARGE/RAID 0/RAID 1
Format
3) Set RAID mode
Note: In order to use the USB 3.0 connection,
CONFIRM (3 sec.)
unplug the Ethernet cable and restart the system.
4) Open Safari/Firefox/Chrome/IE
http://myakitio.com
5)
Finden Sie Ihre persönliche "Cloud"
6. Rückansicht
"MAC address" (e.g. 0001D2120538)
RESET
Während des Startvorganges Taste drü-
I/O:LAN+USB3.0
cken und gedrückt halten um ein Reset
MAC Address:0001D2120538
der Geräteeinstellungen durchzuführen.
S/N:MC1121127E0001
FW
Die LED leuchtet, Taste drücken um
6)
Gehen Sie zu Einstellungen (Settings)
Firmwareupdate durchzuführen.
CONFIRM
3 Sekunden gedrückt halten um den
gewählten RAID Modus zu bestätigen.
7)
Geben Sie den Benutzernamen ein
admin
7. Anwendung
8)
Geben Sie das Passwort ein
admin
1) Schalten Sie das Gerät ein
9)
Gehen Sie zu Systemeinstellungen
(System Settings)
2) Wählen Sie einen RAID Modus
Maintain
10) Gehen Sie zu Festplatte (Disk)
LARGE/RAID 0/RAID 1
Format
3) Bestätigen Sie den RAID Modus
CONFIRM (3 sec.)
Hinweis: Entfernen Sie das Netzwerkkabel und
4) Öffnen Sie Safari/Firefox/Chrome/IE
starten Sie das System neu um die USB 3.0
Verbindung zu verwenden.
http://myakitio.com
6. Vue arrière
5)
Trouvez votre « nuage » ("Cloud") personnel
"MAC address" (e.g. 0001D2120538)
RESET
Appuyez sans arrêter sur le bouton
I/O:LAN+USB3.0
pendant le démarrage pour réinitialiser
MAC Address:0001D2120538
les réglages.
S/N:MC1121127E0001
FW
Lorsque le DEL est allumé, appuyez sur
6)
Allez sur Paramètres (Settings)
le bouton pour mettre à jour le firmware.
CONFIRM
Appuyez sur le bouton pendant
3 secondes pour régler le mode RAID.
7)
Saisissez votre nom d'utilisateur
admin
7. Application
8)
Saisissez votre mot de passe
admin
1) Allumez l'appareil
9)
Allez sur Paramètres du système
(System Settings)
2) Sélectionnez le mode RAID
Maintain
10) Allez sur Disque (Disk)
LARGE/RAID 0/RAID 1
Format
3) Configurez le mode RAID
CONFIRM (3 sec.)
Remarque: Pour utiliser la connexion USB 3.0,
4) Ouvrez Safari/Firefox/Chrome/IE
débranchez le câble Ethernet et rallumez le système.
http://myakitio.com
5)
Trovare la "Cloud" personale
6. Vista posteriore
"MAC address" (e.g. 0001D2120538)
RESET
Per resettare le impostazioni, premere a
I/O:LAN+USB3.0
lungo questo pulsante durante l'avvio.
MAC Address:0001D2120538
FW
Per aggiornare il firmware, premere a
S/N:MC1121127E0001
lungo questo pulsante quando il LED è
6)
Andare a Impostazioni (Settings)
acceso.
CONFIRM
Per impostare la modalità RAID,
premere questo pulsante per 3 secondi.
7)
Immettere il nome utente
admin
7. Applicazione
8)
Immettere la password
admin
1) Inserire la corrente
9)
Andare a Impostazioni di sistema
(System Settings)
2) Selezionare la modalità RAID
Maintain
10) Andare a Disco (Disk)
LARGE/RAID 0/RAID 1
Format
3) Impostare su RAID
CONFIRM (3 sec.)
Nota: Per utilizzare la connessione USB 3.0, sfilare il
4) Aprire Safari/Firefox/Chrome/IE
cavo Ethernet e riavviare il sistema.
http://myakitio.com
Made in China
Made in China
Made in China
Made in China

Verwandte Anleitungen für Icy Box IB-NAS5520


Inhaltszusammenfassung für Icy Box IB-NAS5520
- Seite 1 When the LED is lit, press the button to S/N:MC1121127E0001 Made in China update the firmware. Got to Settings IB-NAS5520 Green = System ready CONFIRM Press the button for 3 second to set the Flashing green = System is starting ...
- Seite 2 Busque su "nube" ("Cloud") personal Najděte si osobní "Cloud" 5. Vista frontal 6. Vista posterior 5. Čelní pohled 6. Pohled zezadu "MAC address" (e.g. 0001D2120538) "MAC address" (e.g. 0001D2120538) RESET Presione sin soltar el botón durante el RESET Chcete-li resetovat nastavení, stiskněte Botón de alimentación Tlačítko napájení...