Walker Edison AF40JER Montageanleitung

Verwandte Anleitungen für Walker Edison AF40JER


Inhaltszusammenfassung für Walker Edison AF40JER
- Seite 1 AF40JER AF40JER Ítem N.°: Artikel# : AF40JER AF40JER Walker Edison ® Revised 11/06/2019 (E) Copyright 2018, by Walker Edison Furniture Co., LLC. All rights reserved. ©...
-
Seite 2: Instructions De Montage Générales
Die Haupthardware, die zum Zusammenbau dieses Produkts verwendet wird, sind: Schrauben und Muttern. Elektrowerkzeuge sollten nicht für die Montage dieses Produkts verwendet werden. Möglicherweise ist ein Bohrer zur Befestigung des Produkts an der Wand erforderlich. (DE) Copyright 2018, by Walker Edison Furniture Co., LLC. All rights reserved. ©... -
Seite 3: Lista De Piezas
Lista de piezas Copyright 2018, by Walker Edison Furniture Co., LLC. All rights reserved. ©... -
Seite 4: Liste Des Pièces
(no incluido) Für die Montage benötigen Sie einen Kreuzschlitzschraubenzieher (nicht enthalten) The hardware quantities listed above are required for proper assembly.Some extra hardware may also have been included. Copyright 2018, by Walker Edison Furniture Co., LLC. All rights reserved. ©... - Seite 5 Attach part (5) to part (1) using bolt (B) with hex key (E). Repeat this step three times (DE) Teil (5) mit Bolzen (B) und Innensechskantschlüssel (E) an Teil (1) befestigen. Diesen Schritt dreimal wiederholen Copyright 2018, by Walker Edison Furniture Co., LLC. All rights reserved. ©...
- Seite 6 Attach part (5) to part (1) using bolt (B) with hex key (E). Repeat this step three times. (DE) Teil (5) mit Bolzen (B) und Innensechskantschlüssel (E) an Teil (1) befestigen. Diesen Schritt dreimal wiederholen. Copyright 2018, by Walker Edison Furniture Co., LLC. All rights reserved. ©...
- Seite 7 Step 3 (EN) Attach adjuster (D) to part (4). Repeat this step twice. (DE) Einstellvorrichtung (D) an Teil (4) befestigen. Diesen Schritt zweimal wiederholen. Copyright 2018, by Walker Edison Furniture Co., LLC. All rights reserved. ©...
- Seite 8 Attach part (4) to part (2) using bolt (B) with hex key (E). Repeat this step twice. (DE) Teil (4) mit Bolzen (B) und Innensechskantschlüssel (E) an Teil (2) befestigen. Diesen Schritt zweimal wiederholen. Copyright 2018, by Walker Edison Furniture Co., LLC. All rights reserved. ©...
- Seite 9 Attach part (4) to part (2) using screw (C) with screwdriver. Repeat this step twice. (DE) Teil (4) mit Schraube (C) mit Schraubendreher an Teil (2) befestigen. Diesen Schritt zweimal wiederholen. Copyright 2018, by Walker Edison Furniture Co., LLC. All rights reserved. ©...
- Seite 10 Attach part (4) to part (3) using bolt (B) with hex key (E). Repeat this step twice. (DE) Teil (4) mit Bolzen (B) und Innensechskantschlüssel (E) an Teil (3) befestigen. Diesen Schritt zweimal wiederholen. Copyright 2018, by Walker Edison Furniture Co., LLC. All rights reserved. P.10 ©...
- Seite 11 Attach part (4) to part (3) using screw (C) with screwdriver. Repeat this step twice (DE) Teil (4) mit Schraube (C) mit Schraubendreher an Teil (3) befestigen. Diesen Schritt zweimal wiederholen. Copyright 2018, by Walker Edison Furniture Co., LLC. All rights reserved. P.11 ©...
- Seite 12 Attach part (4) to part (5,6) using bolt (A) with hex key (E). (DE) Teil (4) mit Bolzen (A) und Innensechskantschlüssel (E) an Teil (5, 6) befestigen. Copyright 2018, by Walker Edison Furniture Co., LLC. All rights reserved. P.12 ©...
- Seite 13 Attach part (4) to part (5,6) using bolt (A) with hex key (E). (DE) Teil (4) mit Bolzen (A) und Innensechskantschlüssel (E) an Teil (5, 6) befestigen. Copyright 2018, by Walker Edison Furniture Co., LLC. All rights reserved. P.13 ©...
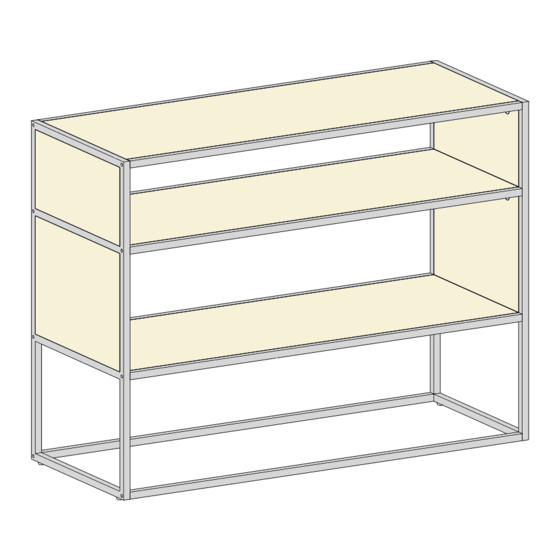
- Seite 14 Step 10 Final Assembly Copyright 2018, by Walker Edison Furniture Co., LLC. All rights reserved. P.14 ©...