Herunterladen Inhalt Inhalt Diese Seite drucken
Pioneer N-30AE Bedienungsanleitung
Vorschau ausblenden Andere Handbücher für N-30AE:
Inhaltsverzeichnis

Werbung

Verfügbare Sprachen
  • DE

Verfügbare Sprachen

  • DEUTSCH, seite 122
N-30AE
Language select / Sélection de la langue / Selección de idioma / Selezione lingua /
Sprachauswahl / Taal selecteren / Выбор языка
English
Français
Español
Italiano
Deutsch
Nederlands
Русский

Werbung

Inhaltsverzeichnis
loading

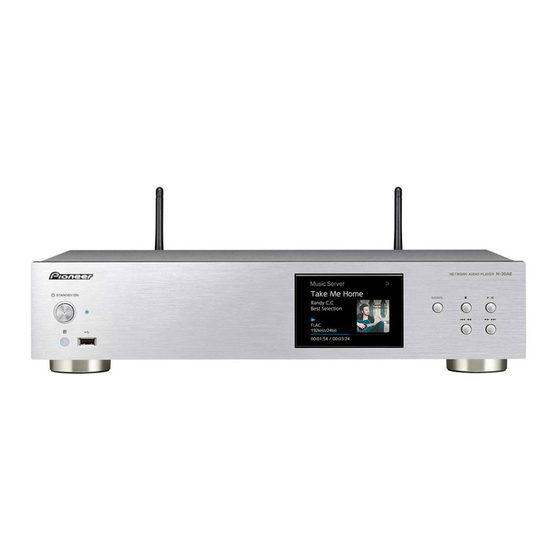
Inhaltszusammenfassung für Pioneer N-30AE

  • Seite 1 N-30AE Language select / Sélection de la langue / Selección de idioma / Selezione lingua / Sprachauswahl / Taal selecteren / Выбор языка English Français Español Italiano Deutsch Nederlands Русский...
  • Seite 2: Inhaltsverzeichnis

    > Playback Supplementary information | Advanced Setup | Others Before Start What's in the box ..............2 NETWORK AUDIO PLAYER Part Names N-30AE Front Panel ................3 Rear Panel ................4 Remote Controller ..............5 Display ..................6 Install Connections with an amplifier ..........7 Instruction Connecting the power cord, etc.
  • Seite 3: Before Start

    > Before Start > Part Names > Install > Initial Setup > Playback Supplementary information | Advanced Setup | Others What's in the box Before Start 0 The power cord must be connected only after all other cable connections are completed. 0 We will not accept responsibility for damage arising from the connection of equipment manufactured by other companies.
  • Seite 4: Front Panel

    > Before Start > Part Names > Install > Initial Setup > Playback Supplementary information | Advanced Setup | Others Front Panel Part Names        1. Í STANDBY/ON button: Turns the unit on or to standby mode. (maximum 5 V/1 A) on the rear of the unit.
  • Seite 5: Rear Panel

    (maximum 5 V/1 A) to USB devices with a USB cable. 4. NETWORK jack: Connect to the network with an ethernet cable. 5. CONTROL OUT jack: By connecting Pioneer brand amplifiers and CD players, centralized control is possible, for example you can control the amplifiers and CD players from the Pioneer Remote App.
  • Seite 6: Remote Controller

    > Before Start > Part Names > Install > Initial Setup > Playback Supplementary information | Advanced Setup | Others Remote Controller 1. Í STANDBY/ON button: Turns the unit on or into standby mode. 2. DIMMER button: Switch the display off or adjust the brightness of the display in three steps.
  • Seite 7: Display

    > Before Start > Part Names > Install > Initial Setup > Playback Supplementary information | Advanced Setup | Others Display   USB Front Song  Artist Album   FLAC  44.1   00:01:45 / 00:03:23 1. The input mode is displayed. : When shuffle play is on (USB Front / USB Rear / Music Server / Network) 2.
  • Seite 8: Connections With An Amplifier

    > Playback Supplementary information | Advanced Setup | Others Connections with an amplifier Install N-30AE Integrated amplifier, AV receiver, etc. Connection with an analog audio cable You can play the audio from network features such as internet radio through speaker systems connected to integrated amplifiers or AV receivers.
  • Seite 9 Supplementary information | Advanced Setup | Others The control jack N-30AE By connecting Pioneer brand amplifiers or CD players, for example, that have control jacks using monaural miniplug cables (without resistors), you can centralize control of the devices using the Pioneer Remote App.
  • Seite 10: Connecting The Power Cord, Etc

    > Before Start > Part Names > Install > Initial Setup > Playback Supplementary information | Advanced Setup | Others Connecting the power cord, etc. Power cord connection This model includes a removable power cord. The power cord must be connected only after all other connections are completed.
  • Seite 11: Initial Setup

    "Hello" is displayed on the display about 20 seconds later. After this, the display goes blank, then after the Pioneer logo is BLUE BLINKING displayed, you can start operating the unit.
  • Seite 12 2. Select this device in the "SET UP NEW AIRPLAY SPEAKER..." item on the screen of the iOS device and select "Next". 0 This unit is displayed as "Pioneer N-30AE XXXXXX". 3. After establishing the connection, select "Done" on the...
  • Seite 13: Usb Storage Device/Hdd

    > Before Start > Part Names > Install > Initial Setup > Playback Supplementary information | Advanced Setup | Others USB Storage Device/HDD Playback Basic operations You can play music files by connecting a USB storage device or HDD (hard disk drive) to the USB port on the front or rear of the unit.
  • Seite 14: Shuffle Play

    > Before Start > Part Names > Install > Initial Setup > Playback Supplementary information | Advanced Setup | Others DSD (DSF only) format music files. The formats for played by this unit. 0 WMA Pro/Voice/WMA Lossless formats are not embedded images are JPEG and PNG.
  • Seite 15: Internet Radio

    > Before Start > Part Names > Install > Initial Setup > Playback Supplementary information | Advanced Setup | Others Internet Radio Basic operations When this unit is connected to a network, you can listen to TuneIn or other preregistered Internet radio services. Depending on the internet radio service, the user may need to register from their computer first.
  • Seite 16: Basic Operation

    2. Click the Connect icon in the track play screen of the Spotify app. 3. Select this unit. 0 This unit is displayed as "Pioneer N-30AE XXXXXX” 4. This unit turns on automatically and the input selector changes to NETWORK and streaming of Spotify starts.
  • Seite 17: Airplay

    Wi-Fi displayed, and tap "Done". iPhone 0 This unit is displayed as "Pioneer N-30AE XXXXXX". 0 If an "AirPlay Password" has been set on this unit, Pioneer N-30AE enter the password you set.
  • Seite 18: Music Server

    > Before Start > Part Names > Install > Initial Setup > Playback Supplementary information | Advanced Setup | Others Music Server It is possible to stream music files stored on PCs or NAS there may be differences in the names of items you can devices connected to the same network as this unit.
  • Seite 19 > Before Start > Part Names > Install > Initial Setup > Playback Supplementary information | Advanced Setup | Others Controlling Remote Playback from a PC 0 Supported formats: MPEG-1/MPEG-2 Audio Layer-3 Apple Lossless (.m4a/.mp4/.M4A/.MP4): 0 Supported sampling rates: 44.1 kHz, 48 kHz 0 Supported sampling rates: 44.1 kHz, 48 kHz, 88.2 kHz, You can use this unit to play music files stored on your PC 0 Supported bitrates: Between 8 kbps and 320 kbps and...
  • Seite 20: Entering Text

    > Before Start > Part Names > Install > Initial Setup > Playback Supplementary information | Advanced Setup | Others Entering text Text entry, for passwords, etc., uses the following remote controller buttons. REPEAT button (a): Each press changes text type in the order upper case →...
  • Seite 21: Supplementary Information For Player Functions

    > Before Start > Part Names > Install > Initial Setup > Playback | Advanced Setup | Others Supplementary information Supplementary information for player functions Supplementary information Due to firmware (the software for the system) updates after you make your purchase or firmware changes during production of the product, there may be additions or changes to the features available compared to what is in the instruction manual.
  • Seite 22: Advanced Settings

    > Before Start > Part Names > Install > Initial Setup > Playback Supplementary information | Advanced Setup | Others Advanced Settings Advanced Setup The unit allows you to configure advanced settings to provide you with an even better experience. 1.
  • Seite 23: System Info

    > Before Start > Part Names > Install > Initial Setup > Playback Supplementary information | Advanced Setup | Others 0 You can make Wi-Fi connection settings using a web browser on a computer. For details, ∫ Network Check refer to “Web Setup” ( P23).
  • Seite 24: Factory Reset

    > Before Start > Part Names > Install > Initial Setup > Playback Supplementary information | Advanced Setup | Others Factory Reset Reset the settings of this unit to the status at the time of shipment. We recommend that you take a note of the settings you have changed before going ahead with a factory reset.
  • Seite 25: Firmware Update

    > Before Start > Part Names > Install > Initial Setup > Playback Supplementary information | Advanced Setup | Others Firmware Update Firmware Update The updating function on this unit How to update 0 Stop any playing Internet radio, USB storage device, or server content.
  • Seite 26: Updating Via Usb

    > Before Start > Part Names > Install > Initial Setup > Playback Supplementary information | Advanced Setup | Others If an error message is displayed: When an error occurs, Firmware files are named in the following way: 0 "COMPLETE" is displayed when the update is "*-**...
  • Seite 27: Troubleshooting

    > Before Start > Part Names > Install > Initial Setup > Playback Supplementary information | Advanced Setup | Others Troubleshooting Others Before starting the procedure ∫ Wi-Fi Connection may occur. You can avoid these issues by changing the channel of the access point. For instructions on changing When operation is unstable, problems may be solved by 0 Try plugging/unplugging the power supply of wireless channels, see the instruction manual provided with the...
  • Seite 28 > Before Start > Part Names > Install > Initial Setup > Playback Supplementary information | Advanced Setup | Others ® 0 This unit is compatible with Windows Media Player 11 or 12 network servers or NAS that are compatible with home network functionality.
  • Seite 29: General Specifications

    > Before Start > Part Names > Install > Initial Setup > Playback Supplementary information | Advanced Setup | Others General Specifications ∫ Analog audio output ∫ Others Rated Output Level and Impedance Control out 0 RCA OUT : 2 Vrms (1 kHz, 0 dB)/500 3.5 mini jack (monaural) a 2 ‰...
  • Seite 30: License And Trademark Information

    > Before Start > Part Names > Install > Initial Setup > Playback Supplementary information | Advanced Setup | Others License and Trademark Information “All other trademarks are the property of their respective owners.” “Toutes les autres marques commerciales sont la propriété de leurs détenteurs respectifs.”...
  • Seite 31 Register your product on http://www.pioneer.eu (Europe) © 2016 Onkyo & Pioneer Corporation. All rights reserved. © 2016 Onkyo & Pioneer Corporation. Tous droits de reproduction et de traduction réservés. http://pioneer-audiovisual.com/privacy/ F1712-3 “Pioneer” is a trademark of Pioneer Corporation, and is used under license.
  • Seite 32 > Lecture Informations supplémentaires | Configuration avancée | Autres Avant de Démarrer Ce que contient la boîte ............2 NETWORK AUDIO PLAYER Nom des pièces N-30AE Panneau frontal ..............3 Panneau arrière ..............4 Télécommande ............... 5 Afficheur ................. 6 Installation Raccordements avec un amplificateur ........
  • Seite 33: Avant De Démarrer

    > Avant de Démarrer > Nom des pièces > Installation > Initial Setup > Lecture Informations supplémentaires | Configuration avancée | Autres Ce que contient la boîte Avant de Démarrer 0 Le cordon d'alimentation devra être branché uniquement lorsque tous les autres raccordements seront effectués.
  • Seite 34: Panneau Frontal

    > Avant de Démarrer > Nom des pièces > Installation > Initial Setup > Lecture Informations supplémentaires | Configuration avancée | Autres Panneau frontal Nom des pièces        1. Touche Í STANDBY/ON : Permet la mise en marche ou en veille de l'appareil. 0 Lorsque vous raccordez un DD qui nécessite plus de 5 V/0,5 A, branchez-le sur le port 2.
  • Seite 35: Panneau Arrière

    4. Prise NETWORK : Sert à se connecter au réseau à l'aide d'un câble LAN. 5. Prise CONTROL OUT : En y raccordant des amplificateurs et des lecteurs CD de marque Pioneer, le contrôle centralisé est possible. Vous pouvez, par exemple, contrôler les amplificateurs et les lecteurs CD avec Pioneer Remote App.
  • Seite 36: Télécommande

    > Avant de Démarrer > Nom des pièces > Installation > Initial Setup > Lecture Informations supplémentaires | Configuration avancée | Autres Télécommande 1. Touche Í STANDBY/ON : Permet la mise en marche ou en veille de l'appareil. 2. Touche DIMMER : Sert à désactiver l'afficheur ou à régler sa luminosité sur trois niveaux. ...
  • Seite 37: Afficheur

    > Avant de Démarrer > Nom des pièces > Installation > Initial Setup > Lecture Informations supplémentaires | Configuration avancée | Autres Afficheur   USB Front Song  Artist Album   FLAC  44.1   00:01:45 / 00:03:23 1.
  • Seite 38: Raccordements Avec Un Amplificateur

    > Initial Setup > Lecture Informations supplémentaires | Configuration avancée | Autres Raccordements avec un amplificateur Installation N-30AE Amplificateur intégré, récepteur AV, etc. Raccordement à l'aide d'un câble audio analogique Vous pouvez lire le son d'une fonction réseau comme la radio internet par le système d'enceintes raccordé...
  • Seite 39 La prise de contrôle N-30AE En raccordant des amplificateurs ou des lecteurs CD de marque Pioneer, par exemple, munis de prises de contrôle avec des câbles de connexion miniprise monaural (sans résistances), vous pouvez centraliser le contrôle des appareils en utilisant Pioneer Remote App.
  • Seite 40: Pour Brancher Le Cordon D'alimentation, Etc

    > Avant de Démarrer > Nom des pièces > Installation > Initial Setup > Lecture Informations supplémentaires | Configuration avancée | Autres Pour brancher le cordon d'alimentation, etc. Branchement du cordon d'alimentation Ce modèle dispose d’un cordon d’alimentation amovible. Le cordon d'alimentation doit être connecté uniquement lorsque toutes les autres connexions sont effectuées.
  • Seite 41: Initial Setup

    "Hello" s'affiche à l'écran une vingtaine de secondes plus tard. L'écran se vide ; une fois que le logo Pioneer s'est BLUE BLINKING affiché, vous pouvez commencer à utiliser l'appareil.
  • Seite 42 1. Connectez le dispositif iOS par Wi-Fi. 2. Sélectionnez cet appareil dans l'élément "SET UP NEW AIRPLAY SPEAKER..." sur l'écran du périphérique iOS et sélectionnez "Next". 0 Cet appareil est affiché sous la forme "Pioneer N- 30AE XXXXXX".
  • Seite 43: Périphérique De Stockage Usb/Dd

    > Avant de Démarrer > Nom des pièces > Installation > Initial Setup > Lecture Informations supplémentaires | Configuration avancée | Autres Périphérique de stockage USB/DD Lecture Commandes de base Vous pouvez lire des fichiers musicaux en connectant un périphérique de stockage USB ou un DD (disque dur) au port USB situé...
  • Seite 44 > Avant de Démarrer > Nom des pièces > Installation > Initial Setup > Lecture Informations supplémentaires | Configuration avancée | Autres 0 L'affichage du nom de l'album, du nom de l'artiste et de la stockage de masse USB.) 0 Débits binaires pris en charge: Entre 8 kbps, 320 kbps et VBR. pochette de l'album est pris en charge avec les fichiers 0 L'appareil est également compatible avec les périphériques musicaux aux formats MP3/WMA/Apple Lossless/FLAC/...
  • Seite 45: Radio Internet

    > Avant de Démarrer > Nom des pièces > Installation > Initial Setup > Lecture Informations supplémentaires | Configuration avancée | Autres Radio Internet Commandes de base Lorsque cet appareil est connecté au réseau, vous pouvez écouter TuneIn ou d'autres services de radio Internet préenregistrés.
  • Seite 46: Spotify

    2. Cliquez sur l'icône Connect sur l'écran de lecture de la piste de l'appli Spotify. 3. Sélectionnez cet appareil. 0 Cet appareil est affiché sous la forme "Pioneer N- 30AE XXXXXX". 4. Cet appareil s’allume automatiquement, le sélecteur d’entrée passe automatiquement sur NETWORK et la diffusion en flux de Spotify démarre.
  • Seite 47: Airplay

    "Done". Pioneer N-30AE 0 Cet appareil est affiché sous la forme "Pioneer N- 30AE XXXXXX". 0 Si un "AirPlay Password" a été défini sur cet appareil, saisissez le mot de passe défini.
  • Seite 48: Music Server

    > Avant de Démarrer > Nom des pièces > Installation > Initial Setup > Lecture Informations supplémentaires | Configuration avancée | Autres Music Server Il est possible de diffuser en flux des fichiers de musique liste de lecteurs dans le réseau. présents sur les ordinateurs ou dispositifs NAS connectés 4.
  • Seite 49 > Avant de Démarrer > Nom des pièces > Installation > Initial Setup > Lecture Informations supplémentaires | Configuration avancée | Autres Contrôler la lecture distance à partir d'un PC 0 Notez que la lecture via une connexion LAN sans fil des 0 Formats pris en charge: MPEG-2/MPEG-4 Audio taux d'échantillonnage de 88,2 kHz ou plus, et DSD ne 0 Taux d’échantillonnage pris en charge : 44,1 kHz,...
  • Seite 50: Saisie D'un Texte

    > Avant de Démarrer > Nom des pièces > Installation > Initial Setup > Lecture Informations supplémentaires | Configuration avancée | Autres Saisie d'un texte La saisie de texte, pour les mots de passe, etc. nécessite l'utilisation des touches suivantes de la télécommande. Touche REPEAT (a) : chaque pression permet de modifier le type de texte, dans l'ordre majuscules →...
  • Seite 51: Informations Supplémentaires Concernant Les Fonctions Du Lecteur

    > Avant de Démarrer > Nom des pièces > Installation > Initial Setup > Lecture | Configuration avancée | Autres Informations supplémentaires Informations supplémentaires concernant les fonctions du lecteur Informations supplémentaires À cause des mises à jour du micrologiciel (le logiciel du système) effectuées après l'achat ou des modifications du micrologiciel durant la production du produit, il pourrait y avoir des ajouts ou des changements des fonctionnalités...
  • Seite 52: Configuration Avancée

    > Avant de Démarrer > Nom des pièces > Installation > Initial Setup > Lecture Informations supplémentaires | Configuration avancée | Autres Configuration avancée Configuration avancée L'appareil vous permet de configurer les paramètres avancés pour qu'ils vous fournissent une expérience encore meilleure. 1.
  • Seite 53 > Avant de Démarrer > Nom des pièces > Installation > Initial Setup > Lecture Informations supplémentaires | Configuration avancée | Autres ∫ Wi-Fi Setup ∫ AirPlay Password Effectuez les réglages de la connexion Wi-Fi. ( P10) Vous pouvez saisir un mot de passe pouvant avoir jusqu'à 31 caractères pour que seuls les Ce réglage peut être effectué...
  • Seite 54 > Avant de Démarrer > Nom des pièces > Installation > Initial Setup > Lecture Informations supplémentaires | Configuration avancée | Autres Web Setup System Info Vous pouvez effectuer le réglage des paramètres de connexion Wi-Fi à l’aide d’un L'adresse MAC de cet appareil et la version actuelle du micrologiciel s'affichent. navigateur web sur ordinateur.
  • Seite 55: Mise À Jour Du Micrologiciel

    > Avant de Démarrer > Nom des pièces > Installation > Initial Setup > Lecture Informations supplémentaires | Configuration avancée | Autres Mise à jour du micrologiciel Mise à jour du micrologiciel La fonction de mise à jour de cet appareil Comment mettre à...
  • Seite 56: Mise À Jour Via Usb

    > Avant de Démarrer > Nom des pièces > Installation > Initial Setup > Lecture Informations supplémentaires | Configuration avancée | Autres Si un message d'erreur s'affiche : Lorsqu'une erreur se stockage USB avec cet appareil. Nous vous remercions produit, " * - ** Error!" apparait sur l'afficheur de cet de votre compréhension.
  • Seite 57: Dépannage

    > Avant de Démarrer > Nom des pièces > Installation > Initial Setup > Lecture Informations supplémentaires | Configuration avancée | Autres Dépannage Autres Avant de démarrer la procédure L'afficheur ne s'allume pas obstacle pour améliorer la visibilité, et essayez de nouveau.
  • Seite 58 > Avant de Démarrer > Nom des pièces > Installation > Initial Setup > Lecture Informations supplémentaires | Configuration avancée | Autres lancée. pouvoir être distribuées vers cet appareil ; cela dépend 0 Essayez de brancher/débrancher la prise électrique de des spécifications du périphérique NAS ou du serveur cet appareil et du routeur, et essayez de redémarrer le que vous utilisez.
  • Seite 59: Caractéristiques Générales

    > Avant de Démarrer > Nom des pièces > Installation > Initial Setup > Lecture Informations supplémentaires | Configuration avancée | Autres Caractéristiques générales ∫ Sortie audio analogique Autres Niveau de sortie et impédance nominale Sortie contrôle 0 RCA OUT : 2 Vrms (1 kHz, 0 dB)/500 0 Mini prise 3,5 (monophonique) a 2 ‰...
  • Seite 60: Licence Et Marque Commerciale

    > Avant de Démarrer > Nom des pièces > Installation > Initial Setup > Lecture Informations supplémentaires | Configuration avancée | Autres Licence et Marque commerciale “All other trademarks are the property of their respective owners.” “Toutes les autres marques commerciales sont la propriété de leurs détenteurs respectifs.”...
  • Seite 61 Enregistrez votre produit sur http://www.pioneer.eu (Europe) © 2016 Onkyo & Pioneer Corporation. All rights reserved. © 2016 Onkyo & Pioneer Corporation. Tous droits de reproduction et de traduction réservés. http://pioneer-audiovisual.com/privacy/ F1712-3 “Pioneer” is a trademark of Pioneer Corporation, and is used under license.
  • Seite 62: Initial Setup

    Información complementaria | Configuración avanzada | Otros Antes de empezar Qué se encuentra en la caja ........... 2 NETWORK AUDIO PLAYER Nombres de las piezas N-30AE Panel frontal ................3 Panel trasero ................4 Mando a distancia ..............5 Pantalla ................... 6 Instalación...
  • Seite 63: Antes De Empezar

    > Antes de empezar > Nombres de las piezas > Instalación > Initial Setup > Reproducción Información complementaria | Configuración avanzada | Otros Qué se encuentra en la caja Antes de empezar 0 El cable de alimentación no debe conectarse hasta que no se hayan completado todas las otras conexiones.
  • Seite 64: Panel Frontal

    > Antes de empezar > Nombres de las piezas > Instalación > Initial Setup > Reproducción Información complementaria | Configuración avanzada | Otros Panel frontal Nombres de las piezas        1. Botón Í STANDBY/ON: Enciende la unidad o la pone en modo de espera. 0 Cuando conecte un HDD que requiera más de 5 V/0,5 A, conéctelo al puerto USB 2.
  • Seite 65: Panel Trasero

    V/1 A) a dispositivos USB con un cable USB. 4. Conector NETWORK: Conecte con la red a través de un cable ethernet. 5. Conector CONTROL OUT: Si conecta amplificadores de la marca Pioneer y reproductores de CD, puede centralizar el control. Por ejemplo, puede controlar los amplificadores y los reproductores de CD desde Pioneer Remote App.
  • Seite 66: Mando A Distancia

    > Antes de empezar > Nombres de las piezas > Instalación > Initial Setup > Reproducción Información complementaria | Configuración avanzada | Otros Mando a distancia 1. Botón Í STANDBY/ON: Enciende la unidad o la configura en modo de espera. 2.
  • Seite 67: Pantalla

    > Antes de empezar > Nombres de las piezas > Instalación > Initial Setup > Reproducción Información complementaria | Configuración avanzada | Otros Pantalla   USB Front Song  Artist Album   FLAC  44.1   00:01:45 / 00:03:23 1.
  • Seite 68: Conexiones Con Un Amplificador

    > Reproducción Información complementaria | Configuración avanzada | Otros Conexiones con un amplificador Instalación N-30AE Amplificador integrado, receptor de AV, etc. Conexión con un cable de audio analógico Puede reproducir el audio procedente de funciones de red, como la radio por Internet, a través de los sistemas de altavoces conectados a los amplificadores integrados o receptores AV.
  • Seite 69 Información complementaria | Configuración avanzada | Otros El conector de control N-30AE Si conecta amplificadores de marca Pioneer o reproductores de CD que tengan, por ejemplo, conectores de control con cables mini plug monoaurales (sin resistencias), puede centralizar el control de los dispositivos utilizando Pioneer Remote App.
  • Seite 70: Conexión Del Cable De Alimentación, Etc

    > Antes de empezar > Nombres de las piezas > Instalación > Initial Setup > Reproducción Información complementaria | Configuración avanzada | Otros Conexión del cable de alimentación, etc. Conexión del cable de alimentación Este modelo incluye un cable de alimentación extraíble. El cable de alimentación debe conectarse sólo después de que todas las otras conexiones se hayan completado.
  • Seite 71: Initial Setup

    "Hello" unos 20 segundos después. Tras esto, la pantalla se queda BLUE BLINKING en blanco y después de que aparezca el logo Pioneer, puede comenzar a usar la unidad. Configuración de la conexión Wi-Fi Cuando enciende la unidad por primera vez, se muestra automáticamente la pantalla de configuración inicial que le...
  • Seite 72 "Next". automática, seleccionando "Push Button" puede configuración. 0 Esta unidad se muestra como "Pioneer N-30AE conectarse sin introducir una contraseña. XXXXXX". 3. Tras establecer la conexión, seleccione "Done" en la pantalla del dispositivo iOS.
  • Seite 73: Dispositivo De Almacenamiento Usb/Hdd

    > Antes de empezar > Nombres de las piezas > Instalación > Initial Setup > Reproducción Información complementaria | Configuración avanzada | Otros Dispositivo de almacenamiento USB/HDD Reproducción Operaciones básicas Playback Puede reproducir archivos de música conectando un dispositivo de almacenamiento USB o un HDD (disco duro) al puerto USB en la parte delantera o trasera de la unidad.
  • Seite 74 > Antes de empezar > Nombres de las piezas > Instalación > Initial Setup > Reproducción Información complementaria | Configuración avanzada | Otros 0 La visualización del nombre del álbum, el nombre del existen dispositivos que esta unidad no puede reproducir 0 Tasas de muestreo compatibles: 44,1 kHz, 48 kHz artista y la portada es compatible con archivos de música incluso aunque cumplan con los estándares de la clase de...
  • Seite 75: Radio Por Internet

    > Antes de empezar > Nombres de las piezas > Instalación > Initial Setup > Reproducción Información complementaria | Configuración avanzada | Otros Radio por Internet Operaciones básicas Cuando esta unidad está conectada a una red, puede escuchar TuneIn u otros servicios de radio por internet ya registrados.
  • Seite 76: Spotify

    2. Haga clic en el icono de conexión de la pantalla de reproducción de pista de la aplicación Spotify. 3. Seleccione esta unidad. 0 Esta unidad se muestra como "Pioneer N-30AE XXXXXX". 4. La unidad se encenderá automáticamente, el selector de entrada cambiará...
  • Seite 77: Airplay

    "Done". Pioneer N-30AE 0 Esta unidad se muestra como "Pioneer N-30AE XXXXXX". 0 Si se ha establecido una "AirPlay Password" en esta unidad, introduzca la contraseña que estableció.
  • Seite 78: Music Server

    > Antes de empezar > Nombres de las piezas > Instalación > Initial Setup > Reproducción Información complementaria | Configuración avanzada | Otros Music Server Es posible transmitir archivos de música almacenados en 4. Seleccione esta unidad en "Media streaming options" y PC o dispositivos NAS conectados a la misma red que esta compruebe que está...
  • Seite 79 > Antes de empezar > Nombres de las piezas > Instalación > Initial Setup > Reproducción Información complementaria | Configuración avanzada | Otros Controlar la reproducción remota desde un música. 0 Tasas de muestreo compatibles: 44,1 kHz, 48 kHz, 0 Tenga en cuenta que la reproducción a través de LAN 88,2 kHz, 96 kHz, inalámbrica de velocidades de muestreo de 88,2 kHz o 0 Tasas de bits compatibles: Entre 8 kbps y 320 kbps y...
  • Seite 80: Introducción De Texto

    > Antes de empezar > Nombres de las piezas > Instalación > Initial Setup > Reproducción Información complementaria | Configuración avanzada | Otros Introducción de texto Para la introducción de texto, contraseñas, etc., se utilizan los siguientes botones del mando a distancia. Botón REPEAT (a): Cada vez que pulsa, se cambia el tipo de texto en el orden mayúsculas →...
  • Seite 81: Información Complementaria Sobre Las Funciones Del Reproductor

    > Antes de empezar > Nombres de las piezas > Instalación > Initial Setup > Reproducción | Configuración avanzada | Otros Información complementaria Información complementaria sobre las funciones del reproductor Información complementaria Debido a las actualizaciones de firmware (el software del sistema) tras la compra o a cambio de firmware durante la producción del producto, es posible que se produzcan adiciones o cambios en las funciones disponibles en...
  • Seite 82: Configuración Avanzada

    > Antes de empezar > Nombres de las piezas > Instalación > Initial Setup > Reproducción Información complementaria | Configuración avanzada | Otros Configuración avanzada Configuración avanzada La unidad le permite configurar ajustes avanzados para brindarle una experiencia todavía mejor. 1.
  • Seite 83 > Antes de empezar > Nombres de las piezas > Instalación > Initial Setup > Reproducción Información complementaria | Configuración avanzada | Otros Solo se puede realizar cuando "Wi-Fi" está seleccionado en "Connection". ENTER. 0 Puede configurar la conexión Wi-Fi utilizando un navegador web en un ordenador. Para ∫...
  • Seite 84: System Info

    > Antes de empezar > Nombres de las piezas > Instalación > Initial Setup > Reproducción Información complementaria | Configuración avanzada | Otros System Info 0 Para más información sobre el funcionamiento del ordenador, consulte las instrucciones de funcionamiento apropiadas. Se mostrarán la dirección MAC de esta unidad y la versión actual de firmware.
  • Seite 85: Actualización De Firmware

    > Antes de empezar > Nombres de las piezas > Instalación > Initial Setup > Reproducción Información complementaria | Configuración avanzada | Otros Actualización de Firmware Actualización de Firmware La función de actualización de esta unidad Cómo actualizar Actualización del firmware a través de la red La unidad dispone de una función que permite actualizar el Existen dos métodos de actualización de firmware: por 0 Verifique que la unidad esté...
  • Seite 86 > Antes de empezar > Nombres de las piezas > Instalación > Initial Setup > Reproducción Información complementaria | Configuración avanzada | Otros 4. Pulse Í STANDBY/ON en la unidad principal para poner correctamente dependiendo del dispositivo o de su la unidad en modo de espera.
  • Seite 87: Resolución De Problemas

    > Antes de empezar > Nombres de las piezas > Instalación > Initial Setup > Reproducción Información complementaria | Configuración avanzada | Otros Resolución de problemas Otros Antes de iniciar el procedimiento La pantalla no se ilumina 0 Acorte la distancia desde el punto de acceso o elimine cualquier obstáculo para mejorar la visibilidad e intente Cuando el funcionamiento es inestable, se pueden resolver 0 Puede que la pantalla se haya apagado al pulsar...
  • Seite 88 > Antes de empezar > Nombres de las piezas > Instalación > Initial Setup > Reproducción Información complementaria | Configuración avanzada | Otros Función de red nombres de artista para el Music Server 0 Los metadatos, como los nombres de álbum y los 0 Si no puede seleccionar un servicio de red, estará...
  • Seite 89: Especificaciones Generales

    > Antes de empezar > Nombres de las piezas > Instalación > Initial Setup > Reproducción Información complementaria | Configuración avanzada | Otros Especificaciones generales ∫ Salida de audio analógico Otros Nivel de salida nominal e impedancia Salida de control 0 RCA OUT : 2 Vrms (1 kHz, 0 dB)/500 0 Miniconector 3,5 (monaural) a 2...
  • Seite 90: Información Sobre Licencias Y Marcas Comerciales

    > Antes de empezar > Nombres de las piezas > Instalación > Initial Setup > Reproducción Información complementaria | Configuración avanzada | Otros Información sobre licencias y marcas comerciales “All other trademarks are the property of their respective owners.” “Toutes les autres marques commerciales sont la propriété de leurs détenteurs respectifs.”...
  • Seite 91 Registre su producto en http://www.pioneer.eu (Europa) © 2016 Onkyo & Pioneer Corporation. All rights reserved. © 2016 Onkyo & Pioneer Corporation. Tous droits de reproduction et de traduction réservés. http://pioneer-audiovisual.com/privacy/ F1712-3 “Pioneer” is a trademark of Pioneer Corporation, and is used under license.
  • Seite 92 > Riproduzione Informazioni aggiuntive | Impostazioni avanzate | Altri Prima di iniziare Contenuto della confezione ............ 2 NETWORK AUDIO PLAYER Nome dei componenti N-30AE Pannello frontale ..............3 Pannello posteriore ..............4 Telecomando ................5 Display ..................6 Installazione Collegamenti con un amplificatore ......... 7 Collegamento del cavo di alimentazione, ecc.
  • Seite 93: Prima Di Iniziare

    > Prima di iniziare > Nome dei componenti > Installazione > Initial Setup > Riproduzione Informazioni aggiuntive | Impostazioni avanzate | Altri Contenuto della confezione Prima di iniziare 0 Il cavo di alimentazione deve essere collegato solo dopo che sono stati completati tutti gli altri collegamenti.
  • Seite 94: Pannello Frontale

    > Prima di iniziare > Nome dei componenti > Installazione > Initial Setup > Riproduzione Informazioni aggiuntive | Impostazioni avanzate | Altri Pannello frontale Nome dei componenti        1. Tasto Í STANDBY/ON: Accende l’unità o la mette in standby. 0 Quando si collega un HDD che richiede più...
  • Seite 95: Pannello Posteriore

    4. Jack NETWORK: Permette il collegamento alla rete con un cavo LAN. 5. Jack CONTROL OUT: Quando si collegano amplificatori e lettori CD Pioneer è possibile il controllo centralizzato. Per esempio, è possibile controllare gli amplificatori e i lettori CD per mezzo della App Pioneer Remote.
  • Seite 96: Telecomando

    > Prima di iniziare > Nome dei componenti > Installazione > Initial Setup > Riproduzione Informazioni aggiuntive | Impostazioni avanzate | Altri Telecomando 1. Tasto Í STANDBY/ON: Accende l’unità o la mette in standby. 2. Pulsante DIMMER: Spegne il display o regola la luminosità del display su tre livelli. 3.
  • Seite 97: Display

    > Prima di iniziare > Nome dei componenti > Installazione > Initial Setup > Riproduzione Informazioni aggiuntive | Impostazioni avanzate | Altri Display   USB Front Song  Artist Album   FLAC  44.1   00:01:45 / 00:03:23 1.
  • Seite 98: Installazione

    > Riproduzione Informazioni aggiuntive | Impostazioni avanzate | Altri Collegamenti con un amplificatore Installazione N-30AE Amplificatore integrato, ricevitore AV, ecc. Collegamento con un cavo audio analogico È possibile riprodurre l'audio tramite funzionalità di rete come Internet Radio attraverso diffusori collegati ad amplificatori integrati o ricevitori AV.
  • Seite 99 Informazioni aggiuntive | Impostazioni avanzate | Altri Terminale di controllo N-30AE Quando si collegano amplificatori e lettori CD Pioneer, per esempio, dotati di terminali di controllo che impiegano cavi minijack mono (senza resistori), è possibile centralizzare il controllo dei dispositivi usando l'App Pioneer Remote.
  • Seite 100: Collegamento Del Cavo Di Alimentazione, Ecc

    > Prima di iniziare > Nome dei componenti > Installazione > Initial Setup > Riproduzione Informazioni aggiuntive | Impostazioni avanzate | Altri Collegamento del cavo di alimentazione, ecc. Collegamento del cavo di alimentazione Questo modello include un cavo di alimentazione estraibile. Il cavo di alimentazione deve essere collegato solo dopo che sono stati completati tutti gli altri collegamenti.
  • Seite 101: Initial Setup

    20 secondi, sul display compare la scritta "Hello". In seguito, la scritta scompare e viene visualizzato il logo BLUE BLINKING Pioneer. A questo punto l'unità è pronta per essere utilizzata. Impostazioni per il collegamento Wi-Fi In occasione della prima accensione, la schermata Initial Setup viene visualizzata automaticamente, consentendo così...
  • Seite 102 Se si seleziona "WEP", "WPA" o "WPA2", immettere la connessione senza immettere una password. e selezionare "Next". password e confermare. 0 Questa unità viene visualizzata come "Pioneer N- viene visualizzato una volta completata 30AE XXXXXX". l'impostazione. 3. Una volta stabilita la connessione, selezionare "Done"...
  • Seite 103: Dispositivo Di Archiviazione Usb/Hdd

    > Prima di iniziare > Nome dei componenti > Installazione > Initial Setup > Riproduzione Informazioni aggiuntive | Impostazioni avanzate | Altri Dispositivo di archiviazione USB/HDD Riproduzione Operazioni base I file musicali possono essere riprodotti anche collegando un dispositivo di archiviazione USB o un HDD (hard disk drive) alla porta USB sulla parte anteriore o posteriore dell'unità.
  • Seite 104 > Prima di iniziare > Nome dei componenti > Installazione > Initial Setup > Riproduzione Informazioni aggiuntive | Impostazioni avanzate | Altri 0 La visualizzazione del nome dell'album, del nome non possono essere riprodotti da questa unità.) kbps e VBR. dell'artista e della copertina dell'album è...
  • Seite 105: Internet Radio

    > Prima di iniziare > Nome dei componenti > Installazione > Initial Setup > Riproduzione Informazioni aggiuntive | Impostazioni avanzate | Altri Internet radio Operazioni base Quando questa unità è connessa a una rete, è possibile ascoltare TuneIn o altri servizi di Internet radio memorizzati. A seconda del servizio di Internet radio utilizzato, l'utente potrebbe doversi registrare prima dal proprio computer.
  • Seite 106: Spotify

    2. Fare clic sull'icona Connect nella schermata di riproduzione dei brani dell'app Spotify. 3. Selezionare questa unità. 0 Questa unità viene visualizzata come "Pioneer N- 30AE XXXXXX". 4. Questa unità si accende automaticamente, il selettore di ingresso passa a NETWORK e viene avviato lo streaming di Spotify.
  • Seite 107: Airplay

    "Done". Pioneer N-30AE 0 Questa unità viene visualizzata come "Pioneer N- 30AE XXXXXX". 0 Se su questa unità è stata impostata una "AirPlay Password", immettere tale password.
  • Seite 108: Music Server

    > Prima di iniziare > Nome dei componenti > Installazione > Initial Setup > Riproduzione Informazioni aggiuntive | Impostazioni avanzate | Altri Music Server È possibile eseguire lo streaming di file musicali verificare che sia impostata su "Allow". memorizzati su PC o dispositivi NAS collegati alla stessa 5.
  • Seite 109 > Prima di iniziare > Nome dei componenti > Installazione > Initial Setup > Riproduzione Informazioni aggiuntive | Impostazioni avanzate | Altri Controllo della riproduzione in remoto da frequenza di campionamento di 88,2 kHz o superiore, e 0 Frequenze di campionamento supportate: 44,1 kHz, DSD non è...
  • Seite 110: Immissione Di Testo

    > Prima di iniziare > Nome dei componenti > Installazione > Initial Setup > Riproduzione Informazioni aggiuntive | Impostazioni avanzate | Altri Immissione di testo Per immettere del testo, ad esempio per le password ecc., usare i tasti del telecomando. Tasto REPEAT (a): ciascuna pressione modifica il tipo di testo nell'ordine seguente: maiuscolo →...
  • Seite 111: Informazioni Aggiuntive Sulle Funzioni Del Lettore

    > Prima di iniziare > Nome dei componenti > Installazione > Initial Setup > Riproduzione | Impostazioni avanzate | Altri Informazioni aggiuntive Informazioni aggiuntive sulle funzioni del lettore Informazioni aggiuntive A seguito di aggiornamenti del firmware (il software del sistema) effettuati dopo l'acquisto o di modifiche del firmware eseguite durante la fabbricazione del prodotto, poterebbero essere disponibili funzioni aggiuntive o modificate rispetto a quelle descritte nel presente manuale.
  • Seite 112: Impostazioni Avanzate

    > Prima di iniziare > Nome dei componenti > Installazione > Initial Setup > Riproduzione Informazioni aggiuntive | Impostazioni avanzate | Altri Impostazioni Avanzate Impostazioni avanzate Questa unità consente di configurare le impostazioni avanzate in modo da fornire un'esperienza ancora migliore. 1.
  • Seite 113 > Prima di iniziare > Nome dei componenti > Installazione > Initial Setup > Riproduzione Informazioni aggiuntive | Impostazioni avanzate | Altri ∫ Wi-Fi Setup È possibile immettere una password non più lunga di 31 caratteri, in modo tale che solo gli utenti registrati possano utilizzare AirPlay.
  • Seite 114 > Prima di iniziare > Nome dei componenti > Installazione > Initial Setup > Riproduzione Informazioni aggiuntive | Impostazioni avanzate | Altri System Info Web Setup Verranno visualizzate le informazioni relative all'indirizzo MAC di questa unità e alla versione È possibile definire le impostazioni della connessione Wi-Fi usando un browser web su un del firmware corrente.
  • Seite 115: Aggiornamento Del Firmware

    > Prima di iniziare > Nome dei componenti > Installazione > Initial Setup > Riproduzione Informazioni aggiuntive | Impostazioni avanzate | Altri Aggiornamento del firmware Aggiornamento del firmware Funzione di aggiornamento su questa unità Procedura di aggiornamento Internet sia stata stabilita. 0 Spegnere il componente di controllo (PC, ecc.) collegato Questa unità...
  • Seite 116 > Prima di iniziare > Nome dei componenti > Installazione > Initial Setup > Riproduzione Informazioni aggiuntive | Impostazioni avanzate | Altri 4. Premere Í STANDBY/ON sull'unità principale per loro contenuto. mettere l'unità in standby. Il processo è completato e il 0 Non saremo responsabili in alcun modo per qualsiasi firmware è...
  • Seite 117: Risoluzione Dei Problemi

    > Prima di iniziare > Nome dei componenti > Installazione > Initial Setup > Riproduzione Informazioni aggiuntive | Impostazioni avanzate | Altri Risoluzione dei problemi Altri Prima di iniziare la procedura DISPLAY. Premere DISPLAY per accendere il display. 0 Quando si utilizzano altri punti di accesso in prossimità dell’unità, potrebbero verificarsi vari problemi come In caso di funzionamento instabile, i problemi potrebbero l’interruzione della riproduzione e della comunicazione.
  • Seite 118 > Prima di iniziare > Nome dei componenti > Installazione > Initial Setup > Riproduzione Informazioni aggiuntive | Impostazioni avanzate | Altri 0 A seconda dell'ISP, è richiesta l’impostazione del server proxy. 0 Assicurarsi che il router e/o il modem utilizzati siano supportati dal proprio ISP.
  • Seite 119: Caratteristiche Generali

    > Prima di iniziare > Nome dei componenti > Installazione > Initial Setup > Riproduzione Informazioni aggiuntive | Impostazioni avanzate | Altri Caratteristiche generali ∫ Uscita audio analogica ∫ Altri Livello e impedenza di uscita nominale Control out 0 RCA OUT : 2 Vrms (1 kHz, 0 dB)/500 3,5 mini jack (mono) a 2 ‰...
  • Seite 120: Informazioni Di Licenza E Dei Marchi

    > Prima di iniziare > Nome dei componenti > Installazione > Initial Setup > Riproduzione Informazioni aggiuntive | Impostazioni avanzate | Altri Informazioni di licenza e dei marchi “All other trademarks are the property of their respective owners.” “Toutes les autres marques commerciales sont la propriété de leurs détenteurs respectifs.”...
  • Seite 121 Registrare il proprio prodotto su http://www.pioneer.eu (Europa) © 2016 Onkyo & Pioneer Corporation. All rights reserved. © 2016 Onkyo & Pioneer Corporation. Tous droits de reproduction et de traduction réservés. http://pioneer-audiovisual.com/privacy/ F1712-3 “Pioneer” is a trademark of Pioneer Corporation, and is used under license.
  • Seite 122: Wiedergabe

    > Initial Setup > Wiedergabe Ergänzende Informationen | Erweiterte Einrichtung | Andere Vor dem Start Lieferumfang ................2 NETWORK AUDIO PLAYER Teilenamen N-30AE Bedienfeld ................3 Rückseite ................4 Fernbedienung ............... 5 Display ..................6 Installation Verbindungen mit einem Verstärker ........7 Bedienungsanleitung Anschließen des Netzkabels usw.
  • Seite 123: Vor Dem Start

    > Vor dem Start > Teilenamen > Installation > Initial Setup > Wiedergabe Ergänzende Informationen | Erweiterte Einrichtung | Andere Lieferumfang Vor dem Start 0 Das Netzkabel darf erst angeschlossen werden, wenn alle anderen Kabelverbindungen hergestellt wurden. 0 Wir übernehmen keine Haftung für Schäden, die beim Anschließen von Hauptgerät (1) Drittanbietergeräten entstehen.
  • Seite 124: Bedienfeld

    > Vor dem Start > Teilenamen > Installation > Initial Setup > Wiedergabe Ergänzende Informationen | Erweiterte Einrichtung | Andere Bedienfeld Teilenamen        1. Í STANDBY/ON-Taste: Schalten Sie das Gerät ein bzw. in den Standby-Modus. 0 Beim Anschließen von HDDs, die mehr als 5 V/0,5 A benötigen, verwenden Sie den 2.
  • Seite 125: Rückseite

    Strom versorgt werden (maximal 5 V/1 A). 4. NETWORK-Buchse: Stellen Sie über LAN-Kabel eine Netzwerkverbindung her. 5. CONTROL OUT-Buchse: Wenn Verstärker und CD-Player von Pioneer angeschlossen werden, ist eine zentrale Bedienung möglich. Sie können die Verstärker oder CD-Player beispielsweise über die Remote-App von Pioneer bedienen.
  • Seite 126: Fernbedienung

    > Vor dem Start > Teilenamen > Installation > Initial Setup > Wiedergabe Ergänzende Informationen | Erweiterte Einrichtung | Andere Fernbedienung 1. Í STANDBY/ON-Taste: Schalten Sie das Gerät ein bzw. in den Standby-Modus. 2. DIMMER Taste: Schalten Sie das Display aus oder passen Sie die Helligkeit in drei Stufen an. 3.
  • Seite 127: Display

    > Vor dem Start > Teilenamen > Installation > Initial Setup > Wiedergabe Ergänzende Informationen | Erweiterte Einrichtung | Andere Display   USB Front Song  Artist Album   FLAC  44.1   00:01:45 / 00:03:23 1. Der Eingangsmodus wird angezeigt. dem Netzwerk verbunden ist.
  • Seite 128: Verbindungen Mit Einem Verstärker

    > Initial Setup > Wiedergabe Ergänzende Informationen | Erweiterte Einrichtung | Andere Verbindungen mit einem Verstärker Installation N-30AE Integrierter Verstärker, AV-Receiver usw. Verbindung über ein analoges Audiokabel Sie können Audio von Netzwerk-Features wie Internetradio über Lautsprechersysteme wiedergeben, welche an integrierte Verstärker oder AV-Receiver angeschlossen sind.
  • Seite 129 > Wiedergabe Ergänzende Informationen | Erweiterte Einrichtung | Andere CONTROL-Buchse N-30AE Wenn Verstärker und CD-Player von Pioneer mit Control- Buchsen über Mono-Ministeckerkabel (ohne Widerstand) angeschlossen werden, ist eine zentrale Bedienung möglich. Sie können die Verstärker oder CD-Player beispielsweise über die Remote-App von Pioneer bedienen.
  • Seite 130: Anschließen Des Netzkabels Usw

    > Vor dem Start > Teilenamen > Installation > Initial Setup > Wiedergabe Ergänzende Informationen | Erweiterte Einrichtung | Andere Anschließen des Netzkabels usw. Anschließen des Netzkabels Diesem Modell liegt ein abtrennbares Netzkabel bei. Das Netzkabel darf erst angeschlossen werden, wenn alle anderen Anschlüsse vorgenommen wurden.
  • Seite 131: Initial Setup

    Gerätestart: Wenn Sie Í STANDBY/ON drücken, blinkt die Netzanzeige am Hauptgerät langsam blau. Etwa 20 Sekunden später wird "Hello" auf dem Display angezeigt. Die Anzeige erlischt, dann wird das Pioneer-Logo BLUE BLINKING angezeigt, und Sie können das Gerät in Betrieb nehmen.
  • Seite 132 Button" aus und bestätigen Sie die Auswahl. Wenn der SPEAKER..." aus und wählen Sie "Next" aus. Zugangspunkt über eine Taste zum automatischen 0 Dieses Gerät wird als "Pioneer N-30AE XXXXXX" angezeigt. Einrichten verfügt, können Sie die Verbindung mit "Push 3. Wenn die Verbindung hergestellt wurde, wählen Sie im Button"...
  • Seite 133: Usb-Speichergerät/Hdd

    > Vor dem Start > Teilenamen > Installation > Initial Setup > Wiedergabe Ergänzende Informationen | Erweiterte Einrichtung | Andere USB-Speichergerät/HDD Wiedergabe Grundlegende Funktionen Sie können Musikdateien wiedergeben, indem Sie ein USB- Speichergerät oder HDD (Hard Disk Drive) an den USB-Port an der Vorder- oder Rückseite des Geräts anschließen.
  • Seite 134 > Vor dem Start > Teilenamen > Installation > Initial Setup > Wiedergabe Ergänzende Informationen | Erweiterte Einrichtung | Andere auszuwählen. wiedergegeben werden können, obwohl sie den USB- 0 Unterstützte Formate: MPEG-1/MPEG-2 Audio Layer 3 0 Das Anzeigen von Albumnamen, Künstlernamen und Massenspeichergeräteklasse-Standard erfüllen.) 0 Unterstützte Abtastfrequenzen: 44,1 kHz, 48 kHz Albumcovern wird bei Musikdateien der Formate MP3/WMA/...
  • Seite 135: Internetradio

    > Vor dem Start > Teilenamen > Installation > Initial Setup > Wiedergabe Ergänzende Informationen | Erweiterte Einrichtung | Andere Internetradio Grundlegende Funktionen aus und bestätigen die Auswahl. Wenn dieses Gerät mit einem Netzwerk verbunden ist, können Sie TuneIn und weitere voreingestellte Internetradio-Dienste wiedergeben.
  • Seite 136: Spotify

    Netzwerk wie dieses Gerät. 2. Klicken Sie im Track-Wiedergabebildschirm der Spotify- App auf die Connect-Schaltfläche. 3. Wählen Sie dieses Gerät aus. 0 Dieses Gerät wird als "Pioneer N-30AE XXXXXX" angezeigt. 4. Dieses Gerät wird automatisch eingeschaltet, der Eingangsselektor zu NETWORK gewechselt und das Streaming von Spotify gestartet.
  • Seite 137: Airplay

    Sie aus der angezeigten Liste von Geräten dieses Gerät aus und tippen Sie auf "Done". Pioneer N-30AE 0 Dieses Gerät wird als "Pioneer N-30AE XXXXXX" angezeigt. 0 Wenn auf diesem Gerät ein "AirPlay Password" festgelegt wurde, geben Sie das festgelegte Passwort ein.
  • Seite 138: Music Server

    > Vor dem Start > Teilenamen > Installation > Initial Setup > Wiedergabe Ergänzende Informationen | Erweiterte Einrichtung | Andere Music Server Das Streaming von Musikdateien, die auf PCs oder NAS- 3. Klicken Sie auf "Turn on media streaming", um eine Liste Geräten gespeichert sind, welche mit demselben Netzwerk wie der Player im Netzwerk anzuzeigen.
  • Seite 139: Ferngesteuerte Wiedergabe Von Einem Pc

    > Vor dem Start > Teilenamen > Installation > Initial Setup > Wiedergabe Ergänzende Informationen | Erweiterte Einrichtung | Andere Ferngesteuerte Wiedergabe von einem PC Musikdateiformate. 0 Unterstützte Formate: MPEG-2/MPEG-4 Audio 0 Beachten Sie, dass eine WLAN-Wiedergabe von 0 Unterstützte Abtastfrequenzen: 44,1 kHz, 48 kHz, Sie können dieses Gerät verwenden, um Musikdateien Abtastraten von 88,2 kHz oder höher sowie DSD nicht 88,2 kHz, 96 kHz...
  • Seite 140: Eingeben Von Text

    > Vor dem Start > Teilenamen > Installation > Initial Setup > Wiedergabe Ergänzende Informationen | Erweiterte Einrichtung | Andere Eingeben von Text Texteingabe bei Passwörtern usw. erfolgt über die Tasten der Fernbedienung. REPEAT-Taste (a): Bei jedem Tastendruck wird der Texttyp in dieser Reihenfolge geändert: Großbuchstaben →...
  • Seite 141: Ergänzende Informationen Zu Den Funktionen Des Players

    > Vor dem Start > Teilenamen > Installation > Initial Setup > Wiedergabe | Erweiterte Einrichtung | Andere Ergänzende Informationen Ergänzende Informationen zu den Funktionen des Players Ergänzende Informationen Aufgrund von Updates an der Firmware (System-Software) nach dem Kauf oder Änderungen an der Firmware während der Herstellung kann es zu Abweichungen zwischen verfügbaren Funktionen und Bedienungsanleitung kommen.
  • Seite 142: Erweiterte Einstellungen

    > Vor dem Start > Teilenamen > Installation > Initial Setup > Wiedergabe Ergänzende Informationen | Erweiterte Einrichtung | Andere Erweiterte Einstellungen Erweiterte Einrichtung Mit den erweiterten Einstellungen dieses Geräts können Sie Leistung und Bedienfreundlichkeit individuell anpassen. 1. Drücken Sie SETUP auf der Fernbedienung. Setup Network Setting Option Setting...
  • Seite 143 > Vor dem Start > Teilenamen > Installation > Initial Setup > Wiedergabe Ergänzende Informationen | Erweiterte Einrichtung | Andere ∫ Wi-Fi Setup von Text" ( P19). Wenn die Eingabe beendet ist, drücken Sie ENTER. Vornehmen von Wi-Fi-Verbindungseinstellungen. ( P10) ∫...
  • Seite 144 > Vor dem Start > Teilenamen > Installation > Initial Setup > Wiedergabe Ergänzende Informationen | Erweiterte Einrichtung | Andere Web Setup ∫ Digital Filter "Slow": Weicher, flüssiger Klang Sie können die Wi-Fi-Verbindungseinstellungen über einen Webbrowser am Computer "Sharp" (Standardwert): Klang mit mehr Struktur und Kontur vornehmen.
  • Seite 145: Firmware-Update

    > Vor dem Start > Teilenamen > Installation > Initial Setup > Wiedergabe Ergänzende Informationen | Erweiterte Einrichtung | Andere Firmware-Update Firmware-Update Update-Funktion dieses Geräts So wird das Update ausgeführt Aktualisierung der Firmware über das Netzwerk Bei diesem Gerät kann die Firmware (Systemsoftware) Es gibt zwei Möglichkeiten zur Aktualisierung der Firmware: über ein Netzwerk oder den USB-Port aktualisiert werden.
  • Seite 146: Update Über Usb

    > Vor dem Start > Teilenamen > Installation > Initial Setup > Wiedergabe Ergänzende Informationen | Erweiterte Einrichtung | Andere 4. Drücken Sie Í STANDBY/ON am Hauptgerät, um das Gerät in Schäden an Daten oder fehlerhafte Speichervorgänge, den Standby-Modus zu schalten. Der Vorgang ist abgeschlossen die durch die Verwendung des USB-Speichergeräts mit und Ihre Firmware ist auf die neuste Version aktualisiert.
  • Seite 147: Fehlerbehebung

    > Vor dem Start > Teilenamen > Installation > Initial Setup > Wiedergabe Ergänzende Informationen | Erweiterte Einrichtung | Andere Fehlerbehebung Andere Bevor Sie den Vorgang starten ∫ Das Display leuchtet nicht Die Wiedergabe wird unterbrochen, und es erfolgt keine Kommunikation Bei instabilem Betrieb können Probleme möglicherweise 0 Es ist möglich, dass das Display durch Drücken von 0 Verringern Sie den Abstand zum Zugangspunkt und...
  • Seite 148: Netzwerkfunktion

    > Vor dem Start > Teilenamen > Installation > Initial Setup > Wiedergabe Ergänzende Informationen | Erweiterte Einrichtung | Andere ∫ Netzwerkfunktion Die Wiedergabe stoppt beim Hören der Musikdateien auf dem Netzwerkserver 0 Wenn Sie keinen Netzwerkdienst auswählen können, ist 0 Wenn der PC als Netzwerkserver verwendet wird, die Auswahl nach dem Starten der Netzwerkfunktion schließen Sie alle Anwendungen bis auf die...
  • Seite 149: Allgemeine Technische Daten

    > Vor dem Start > Teilenamen > Installation > Initial Setup > Wiedergabe Ergänzende Informationen | Erweiterte Einrichtung | Andere Allgemeine technische Daten ∫ Analoger Audioausgang ∫ Andere Ausgangsnennleistungspegel und Impedanz Control-Ausgang 0 RCA OUT: 2 Vrms (1 kHz, 0 dB)/500 3,5 Minibuchse (Mono) a 2 ‰...
  • Seite 150: Lizenz- Und Warenzeicheninformationen

    > Vor dem Start > Teilenamen > Installation > Initial Setup > Wiedergabe Ergänzende Informationen | Erweiterte Einrichtung | Andere Lizenz- und Warenzeicheninformationen “All other trademarks are the property of their respective owners.” “Toutes les autres marques commerciales sont la propriété de leurs détenteurs respectifs.”...
  • Seite 151 Registrieren Sie hier Ihr Produkt http://www.pioneer.eu (Europa) © 2016 Onkyo & Pioneer Corporation. All rights reserved. © 2016 Onkyo & Pioneer Corporation. Tous droits de reproduction et de traduction réservés. http://pioneer-audiovisual.com/privacy/ F1712-3 “Pioneer” is a trademark of Pioneer Corporation, and is used under license.
  • Seite 152: Initial Setup

    > Afspelen Extra informatie | Geavanceerde Setup | Overige Vóór het Starten Wat zit er in de doos ............... 2 NETWORK AUDIO PLAYER Namen van de onderdelen N-30AE Voorpaneel ................3 Achterpaneel ................4 Afstandsbediening ..............5 Display..................6 Installeren Verbindingen met een versterker ..........
  • Seite 153: Vóór Het Starten

    > Vóór het Starten > Namen van de onderdelen > Installeren > Initial Setup > Afspelen Extra informatie | Geavanceerde Setup | Overige Wat zit er in de doos Vóór het Starten 0 Het netsnoer moet pas worden verbonden nadat alle andere kabels verbonden zijn. 0 Wij zijn niet aansprakelijk voor enige schade als gevolg van de verbinding van apparatuur die door andere bedrijven geproduceerd is.
  • Seite 154: Voorpaneel

    > Vóór het Starten > Namen van de onderdelen > Installeren > Initial Setup > Afspelen Extra informatie | Geavanceerde Setup | Overige Voorpaneel Namen van de onderdelen        1. Í STANDBY/ON-knop: Schakelt het toestel in of schakelt het naar de stand-by-modus. 0 Wanneer er een HDD die meer dan 5 V/0,5 A vereist verbonden wordt, aansluiting 2.
  • Seite 155: Achterpaneel

    USB-kabel. 4. NETWORK-aansluiting: Maak verbinding met een netwerk via een ethernet-kabel. 5. CONTROL OUT-aansluiting: Door versterkers van het merk Pioneer en CD-spelers te verbinden, is een gecentraliseerde bediening mogelijk. U kunt de versterkers en de CD- spelers bijvoorbeeld bedienen met de Pioneer Remote App.
  • Seite 156: Afstandsbediening

    > Vóór het Starten > Namen van de onderdelen > Installeren > Initial Setup > Afspelen Extra informatie | Geavanceerde Setup | Overige Afstandsbediening 1. Í STANDBY/ON-knop: Schakelt het toestel in of schakelt het naar de stand-by-modus. 2. DIMMER-knop: Schakel het display uit of regel de helderheid van het display in drie stappen.
  • Seite 157: Display

    > Vóór het Starten > Namen van de onderdelen > Installeren > Initial Setup > Afspelen Extra informatie | Geavanceerde Setup | Overige Display   USB Front Song  Artist Album   FLAC  44.1   00:01:45 / 00:03:23 1.
  • Seite 158: Verbindingen Met Een Versterker

    > Afspelen Extra informatie | Geavanceerde Setup | Overige Verbindingen met een versterker Installeren N-30AE Geïntegreerde versterker, AV-ontvanger, enz. Verbinding met een analoge audiokabel U kunt audio afspelen die afkomstig is van netwerkkenmerken zoals internetradio, via luidsprekersystemen die verbonden zijn met geïntegreerde versterkers of AV-ontvangers.
  • Seite 159 > Afspelen Extra informatie | Geavanceerde Setup | Overige De bedieniningsaansluiting N-30AE Door versterkers van het merk Pioneer of CD-spelers te verbinden, die bijvoorbeeld bedieningsaansluitingen voor mono ministekkerkabels (zonder weerstanden) hebben, kunt u de bediening van de apparaten centraliseren met gebruik van de Pioneer Remote App.
  • Seite 160: Het Netsnoer Verbinden, Enz

    > Vóór het Starten > Namen van de onderdelen > Installeren > Initial Setup > Afspelen Extra informatie | Geavanceerde Setup | Overige Het netsnoer verbinden, enz. Verbinding netsnoer Dit model bevat een verwijderbaar netsnoer. Het netsnoer moet pas worden aangesloten nadat alle andere aansluitingen zijn voltooid.
  • Seite 161: Initial Setup

    20 minuten later "Hello" afgebeeld op de display. Hierna wordt de display BLUE BLINKING leeg, vervolgens kunt u nadat het Pioneer logo afgebeeld wordt starten met het bedienen van het toestel. Wi-Fi-verbindinginstellingen Wanneer u voor het eerst de stroom aanzet, wordt automatisch het begininstellingsscherm afgebeeld wat u toelaat gemakkelijk Wi-Fi-verbindingsinstellingen te maken.
  • Seite 162 "WPA2" selecteert, het wachtwoord invoeren en bevestigen. 2. Selecteer dit apparaat in het "SET UP NEW AIRPLAY wordt weergegeven wanneer de instellingen voltooid zijn. SPEAKER..." item op het scherm van het iOS-apparaat en selecteer "Next". 0 Dit toestel wordt afgebeeld als "Pioneer N-30AE XXXXXX".
  • Seite 163: Usb-Opslagapparaat/Hdd

    > Vóór het Starten > Namen van de onderdelen > Installeren > Initial Setup > Afspelen Extra informatie | Geavanceerde Setup | Overige USB-opslagapparaat/HDD Afspelen Basisbedieningen U kunt muziekbestanden afspelen door een USB- opslagapparaat te of HDD (hard disk drive) aan de USB- poort te verbinden op de voor- of achterkant van het toestel.
  • Seite 164 > Vóór het Starten > Namen van de onderdelen > Installeren > Initial Setup > Afspelen Extra informatie | Geavanceerde Setup | Overige 0 Het display van albumnaam, artiestnaam en album art 0 Het toestel is ook compatibel met USB-opslagapparaten WMA (.wma/.WMA): wordt ondersteund met MP3/WMA/Apple Lossless/ met gebruik van de formaten FAT16 of FAT32 van het...
  • Seite 165: Internetradio

    > Vóór het Starten > Namen van de onderdelen > Installeren > Initial Setup > Afspelen Extra informatie | Geavanceerde Setup | Overige Internetradio Basisbedieningen Als dit toestel met een netwerk verbonden is, kunt u naar TuneIn of andere vooraf geregistreerde internetradiodiensten luisteren.
  • Seite 166: Spotify

    2. Klik op de icoon Verbinding in het afspeelscherm van de nummers van de Spotify-app. 3. Selecteer dit toestel. 0 Dit toestel wordt afgebeeld als "Pioneer N-30AE XXXXXX". 4. Dit toestel wordt automatisch ingeschakeld en de ingangskeuzeschakelaar verandert in NETWORK en het streamen van Spotify start.
  • Seite 167: Airplay

    Wi-Fi van het iOS-apparaat, selecteer dit toestel in de iPhone weergegeven lijst met apparaten en tik "Done" aan. 0 Dit toestel wordt afgebeeld als "Pioneer N-30AE Pioneer N-30AE XXXXXX". 0 Als een "AirPlay Password" niet ingesteld is op dit toestel, het wachtwoord dat u instelde invoeren.
  • Seite 168: Music Server

    > Vóór het Starten > Namen van de onderdelen > Installeren > Initial Setup > Afspelen Extra informatie | Geavanceerde Setup | Overige Music Server Het is mogelijk muziekbestanden te streamen die opgeslagen 4. Selecteer deze unit in "Media streaming options" en zijn op PC's of NAS-apparaten die met hetzelfde netwerk controleer of het is ingesteld op "Allow".
  • Seite 169 > Vóór het Starten > Namen van de onderdelen > Installeren > Initial Setup > Afspelen Extra informatie | Geavanceerde Setup | Overige Afspelen op afstand bedienen vanaf een PC Ondersteunde audioformaten AIFF-bestanden bevatten ongecomprimeerde PCM digitale audio. U kunt deze unit gebruiken om muziekbestanden Voor serverweergave en weergave via een USB- 0 Ondersteunde bemonsteringsfrequenties: 44,1 kHz, opgeslagen op uw PC af te spelen door de PC in uw...
  • Seite 170: Invoeren Tekst

    > Vóór het Starten > Namen van de onderdelen > Installeren > Initial Setup > Afspelen Extra informatie | Geavanceerde Setup | Overige Invoeren tekst Tekstinvoer, voor wachtwoorden, enz., de volgende afstandsbedieningsknoppen gebruiken. REPEAT-knop (a): Elke keer dat u hierop drukt verandert het teksttype in de volgorde hoofdletters →...
  • Seite 171: Extra Informatie Voor De Functies Van De Speler

    > Vóór het Starten > Namen van de onderdelen > Installeren > Initial Setup > Afspelen | Geavanceerde Setup | Overige Extra informatie Extra informatie voor de functies van de speler Extra informatie Door updates van de firmware (de software van het systeem) die u uitvoert na aankoop, of door firmware- veranderingen tijdens de productie van het product, kunnen er toevoegingen of veranderingen van de beschikbare...
  • Seite 172: Geavanceerde Setup

    > Vóór het Starten > Namen van de onderdelen > Installeren > Initial Setup > Afspelen Extra informatie | Geavanceerde Setup | Overige Geavanceerde instellingen Geavanceerde Setup Het toestel stelt u in staat geavanceerde instellingen te configureren om u een nog betere ervaring te laten beleven.
  • Seite 173 > Vóór het Starten > Namen van de onderdelen > Installeren > Initial Setup > Afspelen Extra informatie | Geavanceerde Setup | Overige ∫ Wi-Fi Setup ∫ AirPlay Password Maak Wi-Fi-verbindinginstellingen. ( P10) U kunt een wachtwoord invoeren van maximaal 31 tekens zodat alleen de geregistreerde Dit kan alleen ingesteld worden wanneer "Wi-Fi"...
  • Seite 174 > Vóór het Starten > Namen van de onderdelen > Installeren > Initial Setup > Afspelen Extra informatie | Geavanceerde Setup | Overige System Info 0 Raadpleeg juiste gebruiksaanwijzing voor informatie betreffende werking van de computer. Het MAC-adres van dit toestel en de huidige firmwareversie zullen afgebeeld worden. 0 Aangezien dit soort verbinding niet gecodeerd is, zou er een klein veiligheidsrisico bij betrokken kunnen zijn.
  • Seite 175: Firmware-Update

    > Vóór het Starten > Namen van de onderdelen > Installeren > Initial Setup > Afspelen Extra informatie | Geavanceerde Setup | Overige Firmware-update Firmware-update De bijwerkfunctie op dit toestel Hoe te updaten 0 Controleer of het apparaat is ingeschakeld en de verbinding met het internet is bevestigd.
  • Seite 176 > Vóór het Starten > Namen van de onderdelen > Installeren > Initial Setup > Afspelen Extra informatie | Geavanceerde Setup | Overige Als een foutbericht wordt weergegeven: Wanneer zich van het USB-opslagapparaat met dit toestel. Dank u voor een fout voordoet, wordt "*-** Error!" op het display van uw begrip.
  • Seite 177: Problemen Oplossen

    > Vóór het Starten > Namen van de onderdelen > Installeren > Initial Setup > Afspelen Extra informatie | Geavanceerde Setup | Overige Problemen oplossen Overige Alvorens de procedure te starten ∫ Het display wordt niet verlicht Het afspelen wordt onderbroken en de communicatie werkt niet Wanneer bediening onstabiel is, kunnen problemen 0 Het is mogelijk dat het display uitgeschakeld werd toen...
  • Seite 178 > Vóór het Starten > Namen van de onderdelen > Installeren > Initial Setup > Afspelen Extra informatie | Geavanceerde Setup | Overige ∫ Netwerkfunctie 0 Metagegevens, zoals albumnamen en artiestnamen Album art in Music Server wordt soms wel soms niet moeten herkend worden op de server voor distributie weergegeven 0 Als u geen netwerkdienst kunt selecteren, zal die...
  • Seite 179: Algemene Specificaties

    > Vóór het Starten > Namen van de onderdelen > Installeren > Initial Setup > Afspelen Extra informatie | Geavanceerde Setup | Overige Algemene specificaties ∫ Analoge audio-uitgang Uitgaande bediening 3,5 mini-aansluiting (mono) a 2 ‰ Nominaal uitgangsniveau en impedantie 0 RCA OUT : 2 Vrms (1 kHz, 0 dB)/500 ∫...
  • Seite 180: Licentie En Handelsm

    > Vóór het Starten > Namen van de onderdelen > Installeren > Initial Setup > Afspelen Extra informatie | Geavanceerde Setup | Overige Licentie en handelsm “All other trademarks are the property of their respective owners.” “Toutes les autres marques commerciales sont la propriété de leurs détenteurs respectifs.”...
  • Seite 181 Registreer uw product op http://www.pioneer.eu (Europa) © 2016 Onkyo & Pioneer Corporation. All rights reserved. © 2016 Onkyo & Pioneer Corporation. Tous droits de reproduction et de traduction réservés. http://pioneer-audiovisual.com/privacy/ F1712-3 “Pioneer” is a trademark of Pioneer Corporation, and is used under license.
  • Seite 182 > Воспроизведение Дополнительная информация | Расширенная настройка | Другие функции Перед началом Содержимое упаковки ............2 Сетевой аудиопроигрыватель Названия частей N-30AE Передняя панель ..............3 Задняя панель ............... 4 Пульт дистанционного управления ........5 Дисплей ................. 6 Установка Подключение усилителя ............7 Как...
  • Seite 183: Перед Началом

    > Перед началом > Названия частей > Установка > Начальная настройка > Воспроизведение Дополнительная информация | Расширенная настройка | Другие функции Содержимое упаковки Перед началом 0 Шнур питания необходимо подключать только после выполнения всех других кабельных соединений. 0 Мы не несем ответственности за ущерб, возникший из-за подключения Основной...
  • Seite 184: Передняя Панель

    > Перед началом > Названия частей > Установка > Начальная настройка > Воспроизведение Дополнительная информация | Расширенная настройка | Другие функции Передняя панель Названия частей        1. Кнопка Í STANDBY/ON: включение аппарата или его переключение в режим 5 В/0,5 A) на...
  • Seite 185: Задняя Панель

    4. Гнездо NETWORK: для подключения к сети с помощью кабеля LAN. 5. Гнездо CONTROL OUT: при подключении усилителей и проигрывателей компакт- дисков Pioneer позволяет централизованно управлять ими с помощью приложения Pioneer Remote. 6. Гнезда ANALOG OUT: для подключения, например, интегрированного усилителя,...
  • Seite 186: Названия Частей

    > Перед началом > Названия частей > Установка > Начальная настройка > Воспроизведение Дополнительная информация | Расширенная настройка | Другие функции Пульт дистанционного управления 1. Кнопка Í STANDBY/ON: включение аппарата или его переключение в режим ожидания. 2. Кнопка DIMMER: выключение дисплея или выбор яркости дисплея из трех уровней. 3.
  • Seite 187: Дисплей

    > Перед началом > Названия частей > Установка > Начальная настройка > Воспроизведение Дополнительная информация | Расширенная настройка | Другие функции Дисплей   USB Front Song  Artist Album   FLAC  44.1   00:01:45 / 00:03:23 1.
  • Seite 188: Подключение Усилителя

    > Установка > Начальная настройка > Воспроизведение Дополнительная информация | Расширенная настройка | Другие функции Подключение усилителя Установка N-30AE Интегрированный усилитель, AV-ресивер и т. п. Подключение с помощью аналогового аудиокабеля Благодаря сетевым функциям можно воспроизводить звук, например интернет-радио, через акустические...
  • Seite 189: Установка

    > Воспроизведение Дополнительная информация | Расширенная настройка | Другие функции Гнездо управления N-30AE При подключении усилителей или проигрывателей компакт-дисков Pioneer, оснащенных гнездами управления, посредством монофонических кабелей с мини-штекерами (без резисторов), можно централизованно управлять устройствами с помощью приложения Pioneer Remote. Кроме того, даже в случае размещения других...
  • Seite 190: Как Подключить Шнур Питания И Т. П

    > Перед началом > Названия частей > Установка > Начальная настройка > Воспроизведение Дополнительная информация | Расширенная настройка | Другие функции Как подключить шнур питания и т. п. Подключение шнура питания В комплект этой модели входит съемный шнур питания. Шнур питания необходимо подключать только после выполнения...
  • Seite 191: Включение Питания И Начальная Настройка

    питания на аппарате начинает медленно мигать синим цветом, затем примерно через 20 секунд на дисплее появляется "Hello". После этого дисплей гаснет, а когда появляется логотип BLUE BLINKING Pioneer, можно начинать операции на аппарате. Настройки соединения Wi-Fi После первого включения питания автоматически появляется экран начальной настройки, позволяющий...
  • Seite 192 1. Подключите устройство iOS к Wi-Fi. появляется после выполнения настроек. 2. Выберите данное устройство в пункте "SET UP NEW AIRPLAY SPEAKER..." на экране устройства iOS и выберите "Next". 0 Ресивер отображается как "Pioneer N-30AE XXXXXX". 3. Послу установки соединения выберите "Done" на...
  • Seite 193: Устройство Памяти Usb/Hdd

    > Перед началом > Названия частей > Установка > Начальная настройка > Воспроизведение Дополнительная информация | Расширенная настройка | Другие функции Устройство памяти USB/HDD Воспроизведение Основные операции Музыкальные файлы можно воспроизводить, подключив устройство памяти USB или HDD (жесткий диск) к порту USB на...
  • Seite 194 > Перед началом > Названия частей > Установка > Начальная настройка > Воспроизведение Дополнительная информация | Расширенная настройка | Другие функции 0 Отображение названия альбома, имени исполнителя и некоторые устройства не воспроизводятся данным 0 Поддерживаемые частоты дискретизации: 44,1 кГц, 48 кГц художественного...
  • Seite 195: Интернет-Радио

    > Перед началом > Названия частей > Установка > Начальная настройка > Воспроизведение Дополнительная информация | Расширенная настройка | Другие функции Интернет-радио Основные операции воспроизведения нажмите NET RADIO MENU (b), выберите "Remove from My Presets" и подтвердите Когда аппарат подключен к сети, можно слушать TuneIn выбор.
  • Seite 196: Spotify

    1. Подключите смартфон к той же сети, что и аппарат. 2. Нажмите значок Connect на экране воспроизведения композиций приложения Spotify. 3. Выберите аппарат. 0 Ресивер отображается как "Pioneer N-30AE XXXXXX". 4. Ресивер автоматически включится, селектор входов переключится на NETWORK, и запустится потоковая...
  • Seite 197: Airplay

    в Центре управления устройства iOS, выберите данный аппарат из Pioneer N-30AE открывшегося списка устройств и коснитесь "Done". 0 Ресивер отображается как "Pioneer N-30AE XXXXXX". 0 В случае установки на аппарате "AirPlay Password" введите установленный вами пароль. 4. Воспроизведите музыкальные файлы на устройстве iOS.
  • Seite 198: Music Server

    > Перед началом > Названия частей > Установка > Начальная настройка > Воспроизведение Дополнительная информация | Расширенная настройка | Другие функции Music Server Ресивер поддерживает потоковое воспроизведение отобразить подключенные к сети проигрыватели, музыкальных файлов с ПК или NAS-устройств, затем перейдите к шагу 4. подключенных...
  • Seite 199 > Перед началом > Названия частей > Установка > Начальная настройка > Воспроизведение Дополнительная информация | Расширенная настройка | Другие функции 0 В зависимости от используемого сервера и воспроизведение невозможно. 0 Разрядность квантования: 8 бит, 16 бит, 24 бит воспроизводимых файлов, истекшее и оставшееся 0 Имена...
  • Seite 200: Ввод Текста

    > Перед началом > Названия частей > Установка > Начальная настройка > Воспроизведение Дополнительная информация | Расширенная настройка | Другие функции Ввод текста Для ввода текста, например паролей и т. п., используются указанные ниже кнопки пульта ДУ. Кнопка REPEAT (a): при каждом нажатии этой кнопки тип...
  • Seite 201: Дополнительная Информация О Функциях Проигрывателя

    > Перед началом > Названия частей > Установка > Начальная настройка > Воспроизведение | Расширенная настройка | Другие функции Дополнительная информация Дополнительная информация о функциях проигрывателя Дополнительная информация Вследствие обновлений встроенного программного обеспечения (программного обеспечения системы), произошедших после покупки, либо его изменений в процессе...
  • Seite 202: Расширенная Настройка

    > Перед началом > Названия частей > Установка > Начальная настройка > Воспроизведение Дополнительная информация | Расширенная настройка | Другие функции Расширенные настройки Расширенная настройка В аппарате предусмотрены расширенные настройки, открывающие дополнительные возможности при его эксплуатации. 1. Нажмите SETUP на пульте ДУ. Setup Network Setting Option Setting...
  • Seite 203: Названия Частей

    > Перед началом > Названия частей > Установка > Начальная настройка > Воспроизведение Дополнительная информация | Расширенная настройка | Другие функции ∫ Wi-Fi Setup Можно задать пароль длиной до 31 знака, чтобы функция AirPlay оказалась доступной только для зарегистрированных пользователей. Подробную информацию о том, как Выполнение...
  • Seite 204 > Перед началом > Названия частей > Установка > Начальная настройка > Воспроизведение Дополнительная информация | Расширенная настройка | Другие функции English (значение по умолчанию), German, French, Spanish, Italian, Dutch, Swedish, 3. Нажмите / , чтобы выбрать "Use iOS Device" и нажмите ENTER. Russian, Chinese 4.
  • Seite 205: Обновление Встроенного Программного Обеспечения

    > Перед началом > Названия частей > Установка > Начальная настройка > Воспроизведение Дополнительная информация | Расширенная настройка | Другие функции Обновление встроенного программного обеспечения Обновление встроенного программного обеспечения Функция обновления на аппарате Способы обновления Обновление встроенного программного обеспечения по сети Ресивер...
  • Seite 206 > Перед началом > Названия частей > Установка > Начальная настройка > Воспроизведение Дополнительная информация | Расширенная настройка | Другие функции 4. Нажмите кнопку Í STANDBY/ON на аппарате, чтобы перевести его потребовать много времени или проходить 6. Нажмите / и ENTER, чтобы по порядку выбрать в...
  • Seite 207: Поиск И Устранение Неисправностей

    > Перед началом > Названия частей > Установка > Начальная настройка > Воспроизведение Дополнительная информация | Расширенная настройка | Другие функции Поиск и устранение неисправностей Другие функции Перед началом процедуры дисплей. попробуйте еще раз. Перенесите аппарат подальше от микроволновых печей и других точек доступа. При...
  • Seite 208 > Перед началом > Названия частей > Установка > Начальная настройка > Воспроизведение Дополнительная информация | Расширенная настройка | Другие функции питания аппарата и маршрутизатора и перезагрузите 0 Поскольку для передачи на аппарат метаданных, маршрутизатор. таких как названия альбомов и имена исполнителей, необходимо...
  • Seite 209: Общие Характеристики

    > Перед началом > Названия частей > Установка > Начальная настройка > Воспроизведение Дополнительная информация | Расширенная настройка | Другие функции Общие характеристики ∫ Аналоговый аудиовыход ∫ Другие функции Номинальный выходной уровень и импеданс Выходное гнездо управления ч 0 RCA OUT: 2 Vrms (1 кГц, 0 дБ)/500 0 Мини-гнездо...
  • Seite 210: Лицензии И Товарные Знаки

    > Перед началом > Названия частей > Установка > Начальная настройка > Воспроизведение Дополнительная информация | Расширенная настройка | Другие функции Лицензии и товарные знаки “All other trademarks are the property of their respective owners.” “Toutes les autres marques commerciales sont la propriété de leurs détenteurs respectifs.”...
  • Seite 211 Зарегистрируйте ваше изделие http://www.pioneer.eu (Европа) © 2016 Onkyo & Pioneer Corporation. All rights reserved. © 2016 Onkyo & Pioneer Corporation. Tous droits de reproduction et de traduction réservés. http://pioneer-audiovisual.com/privacy/ F1712-3 “Pioneer” is a trademark of Pioneer Corporation, and is used under license.

Diese Anleitung auch für:

N-30ae-s pr3N-30ae-bN-30ae-sN-30

Inhaltsverzeichnis