Herunterladen Inhalt Inhalt Diese Seite drucken
Daikin EKSRDS2A Bedienungs- Und Installationsanleitung

Daikin EKSRDS2A Bedienungs- Und Installationsanleitung

Solar-druckstation
Inhaltsverzeichnis

Werbung

Verfügbare Sprachen
  • DE

Verfügbare Sprachen

  • DEUTSCH, seite 29
Operating and
installation instructions
Solar pressure station
Operating and Installation instructions
English
Solar pressure station
Bedienungs- und Installationsanleitung
Deutsch
Solar-Druckstation
Manuel d'utilisation
Français
Solaire station de pression
Manuale di istruzioni
Italiano
Solare gruppo a pressione
Gebruiksaanwijzing
Nederlands
Zonne Drukstation
Manual de instalação e de operação
Portugues
Estação de impressão solares
Kullan m K lavuzu ve Cihaz Çal tirma talimatlar
ı
ı
ı
ış
ı
Türkçe
Solar - Pompa ve emniyet gruba
EKSRDS2A

Werbung

Inhaltsverzeichnis

Fehlerbehebung

loading

Inhaltszusammenfassung für Daikin EKSRDS2A

  • Seite 1 Solare gruppo a pressione Gebruiksaanwijzing Nederlands Zonne Drukstation Manual de instalação e de operação Portugues Estação de impressão solares Kullan m K lavuzu ve Cihaz Çal tirma talimatlar ı ı ı ış ı Türkçe Solar - Pompa ve emniyet gruba EKSRDS2A...
  • Seite 3: Operating And Installation Instructions

    Operating and installation instructions Solar pressure station Operating and Installation instructions English Solar pressure station EKSRDS2A...
  • Seite 4: Inhaltsverzeichnis

    Table of contents This instruction manual ................4 Precautions ..................4 Safety ....................... 5 Intended use ................... 5 Predictable incorrect application ............. 5 Safe handling .................. 5 Staff qualification................6 Modifications to the product ............6 Usage of spare parts and accessories ..........6 Liability information .................
  • Seite 5 Maintenance ................... 22 Troubleshooting ..................22 10 Decommissioning, disposal ..............24 11 Warranty ....................24 12 Copyright ....................2...
  • Seite 6: This Instruction Manual

    This instruction manual 1 This instruction manual This instruction manual is part of the product. Read this manual before using the product. Keep this manual during the entire service life of the prod- uct and always have it readily available for reference. Always hand this manual over to future owners or users of the product.
  • Seite 7: Safety

    Safety 2 Safety 2.1 Intended use The solar pump assembly may only be used to circulate the following liquids in intrinsically safe, closed, solar systems. Standard heat transfer fluids (solar liquids) suitable for so- lar systems such as water-glycol mixtures The integrated safety group assembly serves to secure against excessive pressure.
  • Seite 8: Staff Qualification

    Safety applicable safety regulations and directives concerning the prevention of accidents. WARNING Severe burns or death caused by mains voltage (AC 230 V, 50 Hz) in the pump head. Avoid any contact of the pump head with water or solar liquid.
  • Seite 9: Liability Information

    Safety Use only genuine spare parts and accessories of the manufacturer. 2.7 Liability information The manufacturer shall not be liable in any form whatsoever for direct or consequential damage resulting from failure to observe the technical instructions, guidelines and recommendations. The manufacturer or the sales company shall not be liable for costs or damages incurred by the user or by third parties in the usage or application of this product, in particular in case of...
  • Seite 10: Product Description

    Product description 3 Product description Complete, pre-assembled and tightness-tested solar pump as- sembly with all required safety and functional components, in- cluding form-fit heat insulation. The heat insulation is also used to package the product for safe transport.
  • Seite 11 Product description 1 Flow 2 Return 3 Ball valve, blue, can be shut off, with grav- ity brake and ther- mometer 4 Safety group assem- 5 Safety valve 6 Discharge opening 7 Pressure gauge with mounting valve 8 Connection for ex- pansion vessel.
  • Seite 12: Technical Specifications

    Technical specifications 4 Technical specifications Fig. 2: Dimensions [mm]...
  • Seite 13 Technical specifications Table 1: Technical specifications Parameter Value System connection General specifications Weight Max. 5.5 kg Material of fittings Brass CW617N Material heat insu- Polypropylene EPP lation System pressure Max. 6 bar Operating temperature range Ambient Max. 40 °C Medium Max.
  • Seite 14: Approvals, Tests And Conformities

    Transport and storage 4.1 Approvals, tests and conformities The safety valve of the safety group assembly complies with Pressure Equipment Directive ( See enclosed operating instructions of the manufacturer of the circulation pump for circulation pump. 5 Transport and storage CAUTION Damage to the product due to improper transport.
  • Seite 15: Mounting

    Mounting and commissioning During heating up, liquid must be able to escape via the discharge line of the safety valve (no obstructions). Install the safety valve in such a way that it cannot be shut off. Do not install shut-off valves, filters or similar equipment. Install the solar pump assembly in such a way that no ex- ternal forces can act on the components after it has been installed.
  • Seite 16 Mounting and commissioning Drill holes (Ø 10 mm) at the position of the two marks and insert the enclosed dowels. Screw the long hanger bolt in- to the top hole, the short hanger bolt into the bottom hole. with the bottom insulation and secure it with a washer and a nut.
  • Seite 17: Connecting

    Mounting and commissioning 6.2 Connecting Connect the pipes of the solar circuit to the connections of the fittings. Connect the pipe or flex pipe of the expansion vessel to the safety group assembly. Safety group assem- Flat gasket Flex pipe, flat-sealing Fig.
  • Seite 18 Mounting and commissioning 6.2.1 Discharge line of the safety valve The discharge opening is designated by an arrow on the valve body. WARNING Injuries and hazard of scalding due to hot liquid or steam escaping via the discharge opening. Install the discharge line in such a way as to avoid any damage or injuries due to escaping liquid and that the liq- uid can be safely collected in a suitable collector tank for solar liquid.
  • Seite 19 Mounting and commissioning Drain the liquid discharged via the discharge line into a container that can hold the total capacity of the system. The discharged liquid must be collected and returned to the system or disposed of by a specialised company. Do not drain the discharged liquid into the sewage sys- tem.
  • Seite 20: Electrical Connection

    Mounting and commissioning 6.3 Electrical connection Mains voltage is interrupted and cannot be switched on. Connect the circulation pump described in the enclosed operating instructions. Route the connection cable of the circulation pump through a cable duct to the bottom and connect it to the solar controller.
  • Seite 21 Mounting and commissioning Screw hose connectors to the filling and flushing valves and connect hoses. Open the shut-off valves (1, 2) and close the shut-off (3) for filling. Fill the system with solar liquid via the upper valve (1). As soon as solar liquid escapes via valve (2), close this valve.
  • Seite 22: Operation

    Operation 7 Operation For safety reasons, liquid must be able to escape via the dis- charge line of the safety valve during heating. Do not shut off the safety valve. If the safety valve has responded, check the system prior to resuming operation.
  • Seite 23: Venting The System

    Operation 7.2 Venting the system WARNING Hazard of scalding due to hot liquid or steam escaping at the vent valve or due to contact with the vent pot. Only vent the system if the red thermometer shows a temperature value of < 50 °C. 1 Solar liquid with air 2 Direction of flow of solar liquid...
  • Seite 24: Maintenance

    Maintenance 8 Maintenance Table 2: Maintenance times When Activity Drain, flush and fill the system Flow meter can no longer be read Circulation pump Replace the circulation pump, see defective below 8.1.1 Replace circulation pump Close the shut-off at the flow meter and set the blue ball valve to 90°...
  • Seite 25 Troubleshooting Problem Possible reason Repair Noise in the circula- System pressure Increase the system pressure tion pump too low or check the gas volume in the expansion vessel Circulation pump Incorrect power Check fuses; check for loose does not start supply cable terminals Circulation pump...
  • Seite 26: Decommissioning, Disposal

    Decommissioning, disposal 10 Decommissioning, disposal Switch off the supply voltage. Dismount (see chapter 6, page 12, re- verse sequence of steps). INFORMATION has an environmentally friendly design. The waste created during disposal can be recycled or thermally ON DISPOSAL treated. The recyclable materials can be sorted and separated.
  • Seite 27: Copyright

    Copyright 12 Copyright The manufacturer retains the copyright to these operating in- structions. These operating instructions may not be reprinted, translated, copied in part or in whole without prior written con- sent. We reserve the right to technical modifications with reference to the specifications and illustrations in this manual.
  • Seite 29 Bedienungs- und Installationsanleitung Solar-Druckstation Bedienungs- und Installationsanleitung Deutsch Solar-Druckstation EKSRDS2A...
  • Seite 30 Inhaltsverzeichnis Zu dieser Betriebsanleitung ..................3 Aufbau der Warnhinweise ................3 Sicherheit ......................... 4 Bestimmungsgemäße Verwendung ............. 4 Vorhersehbare Fehlanwendung ..............4 Sichere Handhabung ................... 4 Qualifikation des Personals ................5 Veränderungen am Produkt ................. 5 Verwendung von Ersatzteilen und Zubehör ..........5 Haftungshinweise ..................
  • Seite 31: Zu Dieser Betriebsanleitung

    Zu dieser Betriebsanleitung Zu dieser Betriebsanleitung Diese Betriebsanleitung ist Teil des Produkts. Betriebsanleitung vor dem Gebrauch des Produkts lesen. Betriebsanleitung während der gesamten Lebensdauer des Produkts aufbewahren und zum Nachschlagen bereithalten. Betriebsanleitung an jeden nachfolgenden Besitzer oder Benut- zer des Produkts weitergeben. Aufbau der Warnhinweise WARNWORT Hier stehen Art und Quelle der Gefahr.
  • Seite 32: Sicherheit

    Sicherheit Sicherheit Bestimmungsgemäße Verwendung Die Solarpumpengruppe eignet sich ausschließlich Umwälzen folgender Medien eigensicheren, geschlossenen thermischen Solaranlagen. • Für thermische Solaranlagen geeignete, handelsübliche Wär- meträgerflüssigkeiten (Solarflüssigkeiten), wie z. B. Wasser- Glykol-Gemische Die integrierte Sicherheitsgruppe dient zur Absicherung gegen Drucküberschreitung. Eine andere Verwendung ist nicht bestimmungsgemäß. Vorhersehbare Fehlanwendung Die Solarpumpengruppe darf insbesondere in...
  • Seite 33: Qualifikation Des Personals

    Sicherheit Qualifikation des Personals Montage, Inbetriebnahme, Betrieb, Wartung, Außerbetriebnahme und Entsorgung dürfen nur von fachspezifisch qualifiziertem Perso- nal durchgeführt werden. Arbeiten an elektrischen Teilen dürfen nur von einer ausgebildeten Elektrofachkraft in Übereinstimmung mit den geltenden Vorschriften und Richtlinien ausgeführt werden. Veränderungen am Produkt Eigenmächtige Veränderungen am Produkt können zu Fehlfunktio- nen führen und sind aus Sicherheitsgründen verboten.
  • Seite 34: Produktbeschreibung

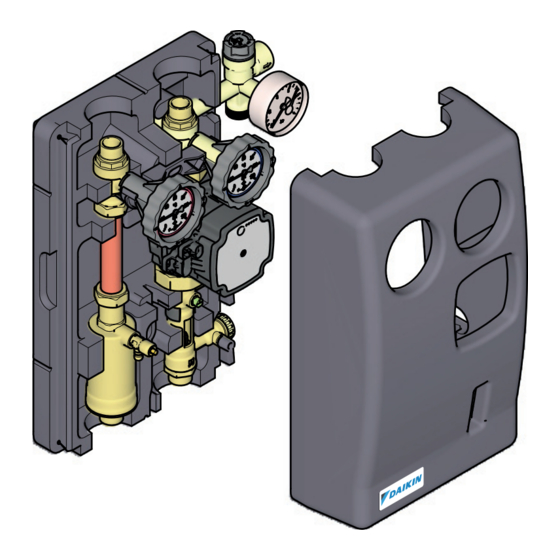
    Produktbeschreibung Produktbeschreibung Komplette, fest vormontierte und auf Dichtheit geprüfte Solarpum- pengruppe mit allen erforderlichen Sicherheits- und Funktionsbautei- len inklusive formschlüssiger Wärmedämmung. Die Wärmedäm- mung dient gleichzeitig als sichere Transport-Verpackung. 1 Vorlauf 2 Rücklauf 3 Kugelhahn, blau, ab- sperrbar, mit Schwer- kraftbremse und Ther- mometer 4 Sicherheitsgruppe...
  • Seite 35: Technische Daten

    Technische Daten Technische Daten Bild 2: Abmessungen [mm]...
  • Seite 36: Zulassungen, Prüfungen Und Konformitäten

    Technische Daten Tabelle 1: Technische Daten Parameter Wert Systemanschluss Allgemeine Daten Gewicht Max. 5,5 kg Werkstoff Armaturen Messing CW617N Werkstoff Wärme- Polypropylen EPP dämmung Anlagendruck Max. 6 bar Temperatureinsatzbereich Umgebung Max. 40 °C Medium Max. 120 °C, kurzzeitig max. 160 °C Durchflussmesser Pumpenanschluss Pumpenseitig mit Flansch und Überwurfmut-...
  • Seite 37: Transport Und Lagerung

    Transport und Lagerung Transport und Lagerung VORSICHT Beschädigung des Produkts durch unsachgemäßen Transport. Produkt nicht werfen oder fallen lassen. VORSICHT Beschädigung des Produkts durch unsachgemäße Lagerung. Produkt gegen Stöße geschützt lagern. Produkt nur in trockener und sauberer Arbeitsumgebung lagern. Montage und Inbetriebnahme WARNUNG Verbrühungen durch heiße Solarflüssigkeit und austretenden Dampf.
  • Seite 38: Montieren

    Montage und Inbetriebnahme Sicherstellen, dass der Nenndruck der Solarpumpengruppe dem Planwert der Anlage entspricht. Sicherstellen, dass die Flüssigkeit in der Anlage mit dem Ein- satzbereich der Solarpumpengruppe verträglich ist. montieren Dichtflächen sind auf Sauberkeit und Beschädigungen geprüft. Alle Rohrenden sind rechtwinklig und entgratet. wird montagefertig geliefert.
  • Seite 39: Anschließen

    Montage und Inbetriebnahme anschließen Rohrleitungen des Solarkreises mit Anschlüssen der Armaturen verschrauben. Rohr oder Wellrohr des Ausdehnungsgefäßes an der Sicher- heitsgruppe verschrauben. Sicherheitsgruppe Flachdichtung Wellrohr flachdichtend Bild 4: Anschluss Wellrohr G¾ Abblaseleitung mit Sicherheitsventil der Sicherheitsgruppe ver- schrauben, siehe unten. Elektrischen Anschluss nach Kapitel 6.3, Seite 13, vornehmen.
  • Seite 40 Montage und Inbetriebnahme Abblaseleitung des Sicherheitsventils Die Abblaseöffnung ist durch einen Pfeil auf dem Ventilkörper ge- kennzeichnet. WARNUNG Gesundheitsschäden und Verbrennungsgefahr durch austre- tende, heiße Flüssigkeit oder Dampf an der Abblaseöffnung. Die Abblaseleitung so legen, dass weder Personen- noch Sach- schäden durch die austretende Flüssigkeit verursacht werden und diese in einen geeigneten Solar-Auffangbehälter abfließen kann.
  • Seite 41: Elektrischer Anschluss

    Montage und Inbetriebnahme Elektrischer Anschluss Netzspannung ist unterbrochen und gegen Wiedereinschalten gesichert. Umwälzpumpe nach beiliegender Betriebsanleitung elektrisch anschließen. Anschlusskabel der Umwälzpumpe durch Kabelkanal nach un- ten führen und an Solarregelung anschließen. Die Betriebsanlei- tung der Solarregelung beachten. Zur Verlängerung der Anschlussleitung kann eine handelsübli- che abgeschirmte Leitung mit 3 x 1,5 mm²...
  • Seite 42 Montage und Inbetriebnahme Schlauchtüllen an den Befüll- und Spülhähnen anschrauben und Schläuche anschließen. Die Absperrhähne (1, 2) für die Be- füllung öffnen und die Absperrung (3) zur Befüllung schließen. Anlage über oberen Hahn (1) mit Solarflüssigkeit füllen. Sobald Solarflüssigkeit aus dem unteren Hahn (2) entweicht, diesen Hahn schließen.
  • Seite 43: Betrieb

    Betrieb Betrieb Während der Beheizung muss aus Sicherheitsgründen Flüssigkeit aus der Abblaseleitung des Sicherheitsventils austreten können. Das Sicherheitsventil nicht absperren. Die Anlage vor Wiederaufnahme des Betriebes nach dem Aus- lösen des Sicherheitsventils überprüfen. Ein einwandfreier Betrieb ist nur bei offenen Kugelhähnen möglich (0°-Stellung, siehe Bild 6, Seite 13).
  • Seite 44: Anlage Entlüften

    Betrieb Anlage entlüften WARNUNG Verbrennungsgefahr durch austretende, heiße Flüssigkeit oder Dampf am Entlüftungshahn oder Berühren des heißen Entlüfter- topfes. Anlage nur entlüften bei Temperaturen von < 50 °C am roten Thermometer. Solarflüssigkeit mit Luft Fließrichtung der Solar- flüssigkeit Entlüftete Solar- flüssigkeit Ventil Entlüftungshahn mit...
  • Seite 45: Wartung

    Wartung Wartung Tabelle 2: Wartungszeitpunkte Wann Tätigkeit Durchflussmesser Anlage leeren, spülen und neu befül- nicht mehr ablesbar Umwälzpumpe defekt Umwälzpumpe austauschen, siehe unten Umwälzpumpe austauschen Absperrung am Durchflussmesser schließen und blauen Kugel- hahn in 90°-Stellung bringen. Umwälzpumpe austauschen. Absperrung am Durchflussmesser öffnen und blauen Kugelhahn in 0°-Stellung bringen.
  • Seite 46 Störungen Problem Mögliche Ursache Fehlerbehebung Umwälzpumpe läuft Fehlerhafte Strom- Sicherungen und eventuell lose nicht an versorgung Kabelklemmen prüfen Umwälzpumpe Kurz auf maximale Drehzahl um- durch Ablagerungen schalten in den Lagern blo- Rotor deblockieren, Schrauben- ckiert dreher in die Kerbe einführen und von Hand drehen Umwälzpumpe ver- Umwälzpumpe demontieren und...
  • Seite 47: Außerbetriebnahme Und Entsorgung

    Außerbetriebnahme und Entsorgung 10 Außerbetriebnahme und Entsorgung Versorgungsspannung abschalten. demontieren (siehe Kapitel 6, Seite 9, in umge- kehrter Reihenfolge). ist umweltfreundlich aufgebaut. Bei der Entsor- HINWEIS ZUR gung fallen nur Abfälle an, die entweder der stofflichen ENTSORGUNG Wiederverwertung oder der thermischen Verwertung zugeführt werden können.
  • Seite 48: Urheberrecht

    Urheberrecht 12 Urheberrecht Das Urheberrecht an dieser Betriebsanleitung verbleibt beim Herstel- ler. Nachdruck, Übersetzung und Vervielfältigung, auch auszugswei- se, sind ohne schriftliche Genehmigung nicht erlaubt. Änderungen von technischen Details gegenüber den Angaben und Abbildungen der Betriebsanleitung sind vorbehalten.
  • Seite 49 __________________________ __________________________ __________________________ __________________________ __________________________ __________________________ __________________________ __________________________ __________________________ __________________________ __________________________ __________________________ __________________________ __________________________ __________________________ __________________________ __________________________ __________________________ __________________________ __________________________ __________________________ __________________________ __________________________ __________________________ __________________________ __________________________ __________________________ __________________________ __________________________ __________________________ __________________________ __________________________ __________________________ __________________________ __________________________ __________________________ __________________________ __________________________ __________________________ __________________________ __________________________ __________________________ __________________________...
  • Seite 51 Manuel d'utilisation Solaire station de pression Manuel d'utilisation Français Solaire station de pression EKSRDS2A...
  • Seite 52 Table des matières A propos de cette notice technique ............4 Composition des messages d'avertissements ......... 4 Sécurité ....................5 Utilisation conforme ................ 5 Utilisation non conforme prévisible ..........5 Sécurité ..................5 Qualification du personnel ............... 6 Modification du produit ..............6 Utilisation de pièces détachées et accessoires .......
  • Seite 53 Maintenance ................... 25 Défaillances .................... 25 10 Mise hors service et élimination .............. 27 11 Garantie ....................28 12 Droit d'auteur ..................28...
  • Seite 54: Propos De Cette Notice Technique

    A propos de cette notice technique 1 A propos de cette notice technique Cette notice technique fait partie du produit. Lire cette notice technique avant la mise en route. Conserver cette notice technique aussi longtemps que le produit est en service et la laisser à disposition pour une utilisation ultérieure.
  • Seite 55: Sécurité

    Sécurité 2 Sécurité 2.1 Utilisation conforme L'ensemble pompe solaire est destiné exclusi- vement à la circulation des fluides suivants dans des installa- tions solaires thermiques fermées à sécurité intrinsèque. Pour des liquides caloporteurs (liquides solaires) en vente dans le commerce adaptés aux installations solaires thermiques comme par ex.
  • Seite 56: Qualification Du Personnel

    Sécurité L'utilisation doit également respecter toutes les normes et directives relatives à la sécurité et à la prévention des ac- cidents. AVERTISSE- Risque de brûlures graves ou danger de mort par tension MENT secteur (AC 230 V, 50 Hz) dans la tête de la pompe. Eviter tout contact de la tête de la pompe avec l'eau ou du liquide solaire.
  • Seite 57: Responsabilité

    Sécurité N'utilisez que des accessoires et pièces détachées d’origine provenant du fabricant. 2.7 Responsabilité La responsabilité du fabricant ou la garantie ne pourra être engagée pour des dommages ou dommages consécutifs résultant d'une inobservation des dispositions techniques, conseils ou directives. Le fabricant et le distributeur ne sont pas responsables des coûts ou dommages subis par l'utilisateur ou un tiers du fait de l'utilisation du produit, en particulier du fait d'une utilisation...
  • Seite 58: Description Du Produit

    Description du produit 3 Description du produit Ensemble pompe solaire complet, prémonté, test d'étanchéité effectué, avec tous les éléments nécessaires de sécurité et de fonctionnement, y compris isolation thermique à forme finale. L'isolation thermique est aussi un emballage pour le transport.
  • Seite 59 Description du produit 1 Départ 2 Retour 3 Vanne à sphère, bleu, verrouillable, avec frein à com- mande par gravité et thermomètre 4 Groupe de sécurité 5 Soupape de sécurité 6 Orifice de purge 7 Manomètre avec vanne de montage 8 Raccord vase d'ex- pansion 9 Pompe de circulation...
  • Seite 60: Caractéristiques Techniques

    Caractéristiques techniques 4 Caractéristiques techniques Fig. 2 : Dimensions [mm]...
  • Seite 61 Caractéristiques techniques Tableau 1 : Caractéristiques techniques Paramètre Valeur Raccord système Caractéristiques générales Poids Max. 5,5 kg Matériau robinette- Laiton CW617N Matériau isolation Polypropylène EPP thermique Pression de l'ins- Max. 6 bar tallation Plage de température Ambiante Max. 40 °C Fluide Max.
  • Seite 62: Certifications, Homologation, Conformités

    Transport et stockage 4.1 Certifications, homologation, conformités La soupape de sécurité du groupe de sécurité est conforme à la directive sur les équipements sous pression ( Pompe de circulation, voir notice technique fournie du fabri- cant. 5 Transport et stockage ATTENTION Endommagements dus à...
  • Seite 63: Montage De

    Montage et mise en service Monter un siphon thermique si le vase d'expansion a été monté à la même hauteur ou plus haut que l'ensemble pompe solaire. Au cours du chauffage, il faut que le liquide puisse s'échapper librement par la conduite de purge de la sou- pape de sécurité.
  • Seite 64 Montage et mise en service est livré prêt au montage. Ne démonter au- cune pièce. Retirer l'isolation supérieure. Maintenir avec l'isolation inférieure sur le mur (aligner avec un niveau à bulle) et faire deux marques. Percer deux trous (Ø 10 mm) à la position des marques et monter les chevilles jointes.
  • Seite 65: Raccordement De

    Montage et mise en service 6.2 Raccordement de Visser les conduites rigides du circuit solaire avec les rac- cords de la robinetterie. Visser le tube ou le tube ondulé du vase d’expansion au groupe de sécurité. Groupe de sécurité Joint plat Tube ondulé...
  • Seite 66 Montage et mise en service 6.2.1 Conduite de purge de la soupape de sécurité L'orifice de purge est marqué d’une flèche sur le corps de la soupape. AVERTISSE- Dommages corporels et risques d’échaudures causés par MENT l'écoulement de liquide brûlant ou de vapeur par l'orifice de purge.
  • Seite 67 Montage et mise en service Amener l'écoulement de la conduite de purge dans un ré- cipient capable de contenir le contenu total de l'installa- tion. L'écoulement doit être recueilli et reconduit dans l'installation ou éliminé par une entreprise spécialisée. Ne pas déverser l'écoulement dans les canalisations.
  • Seite 68: Branchement Électrique

    Montage et mise en service 6.3 Branchement électrique S'assurer que la tension secteur soit coupée et éviter toute remise en marche. Effectuer le branchement électrique de la pompe de circu- lation comme indiqué dans la notice technique ci-jointe. Diriger la conduite de raccordement de la pompe de circu- lation vers le bas à...
  • Seite 69 Montage et mise en service 0° Service – ouvert dans le sens d’écoulement du liquide solaire 45° Mise en service, remplissage, purge d’air, rinçage – les deux côtés ouverts (le clapet anti- retour est désactivé) 90° Entretien – fermé Fig. 6 : Vannes à sphère Visser les embouts tuyau aux vannes de remplissage et de vidange et brancher les tuyaux.
  • Seite 70 Montage et mise en service Introduire l'isolation thermique des conduites rigides jusque dans les évidements de l'isolation thermique de l'ensemble pompe solaire. ª L'ensemble pompe solaire est prêt au service.
  • Seite 71: Service

    Service 7 Service Au cours du chauffage, il faut que le liquide puisse s'échapper par la conduite de purge de la soupape de sécurité pour des raisons de sécurité. Ne pas fermer la soupape de sécurité. Après que la soupape de sécurité a réagi, vérifier l'instal- lation avant la reprise du fonctionnement.
  • Seite 72: Purge D'air De L'installation

    Service 7.2 Purge d’air de l'installation AVERTISSE- Risque de brûlures dues à l'écoulement de liquide chaud ou de vapeur sur la vanne de purge d'air ou en cas de MENT contact avec le dispositif de purge. Ne purger l'installation qu'à des températures < 50 °C au thermomètre rouge.
  • Seite 73: Maintenance

    Maintenance 8 Maintenance Tableau 2 : Périodicité de la maintenance Quand Opération Plus de possibilité de Vider l'installation, rincer et rem- relever l'indication du plir à nouveau débitmètre Pompe de circulation Remplacer la pompe de circula- défectueuse tion, voir ci-dessous 8.1.1 Remplacer la pompe de circulation Fermer l'arrêt sur le débitmètre et mettre la vanne à...
  • Seite 74 Défaillances Problème Cause possible Action corrective Pompe de circula- Pression de l'ins- Augmenter la pression de l'ins- tion bruyante tallation insuffi- tallation ou vérifier le volume sante de gaz dans le vase d'expan- sion Pompe de circula- Alimentation en Vérifier les fusibles et éven- tion ne démarre pas courant défec- tuellement la bonne fixation...
  • Seite 75: Mise Hors Service Et Élimination

    Mise hors service et élimination 10 Mise hors service et élimination Couper l'alimentation secteur. Démonter (voir chapitre 6, page 13, effec- tuer les opérations en ordre inverse). La conception de respecte l'environnement. Son CONSIGNES élimination produit uniquement des déchets qui peuvent soit D'ELIMINA- être amenés au recyclage des matériaux soit à...
  • Seite 76: Garantie

    Garantie 11 Garantie La garantie du fabricant sur ce produit est de 24 mois à comp- ter de la date d'achat. La garantie peut être invoquée dans tous les pays dans lesquels ce produit est vendu par le fabri- cant ou par ses revendeurs agréés. 12 Droit d'auteur Le fabricant a le droit d'auteur sur cette notice technique.
  • Seite 77 __________________________ __________________________ __________________________ __________________________ __________________________ __________________________ __________________________ __________________________ __________________________ __________________________ __________________________ __________________________ __________________________ __________________________ __________________________ __________________________ __________________________ __________________________ __________________________ __________________________ __________________________ __________________________ __________________________ __________________________ __________________________ __________________________ __________________________ __________________________ __________________________ __________________________ __________________________ __________________________ __________________________ __________________________ __________________________ __________________________ __________________________ __________________________ __________________________ __________________________ __________________________ __________________________ __________________________...
  • Seite 79 Manuale di istruzioni Solare gruppo a pressione Manuale di istruzioni Italiano Solare gruppo a pressione EKSRDS2A...
  • Seite 80 Indice Su queste istruzioni ................... 4 Struttura dei simboli di avvertimento ..........4 Sicurezza ....................5 Uso conforme .................. 5 Applicazione errata prevedibile ............5 Utilizzo in sicurezza ................. 5 Qualifica del personale ..............6 Modifiche del prodotto ..............6 Ricambi e accessori .................
  • Seite 81 Manutenzione ..................24 Guasti ...................... 24 10 Smontaggio e smaltimento ..............26 11 Garanzia ....................26 12 Diritto d’autore..................27...
  • Seite 82: Su Queste Istruzioni

    Su queste istruzioni 1 Su queste istruzioni Le presenti Istruzioni per l’uso costituiscono parte del prodotto. Leggere le Istruzioni per l’uso prima di utilizzare l’apparecchio. Conservare le Istruzioni per l’uso consentendone l’agevole consultazione per tutta la durata utile del prodot- Consegnare le Istruzioni per l’uso a ogni seguente pro- prietario o utente del prodotto.
  • Seite 83: Sicurezza

    Sicurezza 2 Sicurezza 2.1 Uso conforme Il gruppo di circolazione per circuiti solari chiusi è progettato esclusivamente per il ricircolo dei fluidi termovet-tori in impianti solari termici chiusi a sicurezza intrinseca. fluidi termovettori comuni adatti a impianti solari termici ("liquidi solari"), ad es. miscele di acqua-glicole Il gruppo di sicurezza integrato serve per la protezione contro sovrappressione.
  • Seite 84: Qualifica Del Personale

    Sicurezza AVVERTIMENTO Ustioni gravi o morte da tensione di rete (c.a. 230V, 50 Hz) nella testata della pompa. Evitare ogni contatto della testata della pompa con acqua o liquido solare. Prima di aprire la testata della pompa e di eseguire inter- venti di manutenzione e pulizia, interrompere la tensione di rete e proteggere contro re-inserimento accidentale.
  • Seite 85: Responsabilità Civile

    Sicurezza 2.7 Responsabilità civile L’azienda produttrice declina ogni responsabilità e garanzia per danni diretti e conseguenti che risultano dalla mancata osservanza delle istruzioni, prescrizioni e raccomandazioni tecniche. Il produttore e il rivenditore non rispondono dei costi o danni che derivano all'utente o a terzi in concomitanza all'uso del dispositivo, in particolare in caso di uso improprio o abuso dello stesso, anomalie delle connessioni, guasti al dispositivo o ai dispositivi connessi.
  • Seite 86: Descrizione Del Prodotto

    Descrizione del prodotto 3 Descrizione del prodotto Gruppo di circolazione solare completo, solidamente assem- blato e testato ermeticamente, dotato di tutti i componenti di sicurezza necessari, incluso il guscio coibente presagomato. Il guscio coibente funge da protezione per trasporti in sicurezza.
  • Seite 87 Descrizione del prodotto 1 Mandata 2 Ritorno 3 Valvola di intercetta- zione, azzurra, con ritegno anticircolazione naturale e termometro integrati 4 Gruppo di sicurezza 5 Valvola di sicurezza 6 Apertura di sfogo 7 Manometro con val- vola di montaggio 8 Raccordo per vaso di espansione 9 Pompa di circolazio 10 Valvola/regolatore di...
  • Seite 88: Specifiche Tecniche

    Specifiche tecniche 4 Specifiche tecniche Fig. 2: Dimensioni [mm]...
  • Seite 89 Specifiche tecniche Tabella 1: Specifiche tecniche Parametri Valore Attacco al sistema Dati generali Peso max. 5,5 kg Materiale rubinet- Ottone CW 617 N teria Materiale coiben- Polipropilene EPP tazione Pressione d'eser- max. 6 bar cizio Campo di temperatura Ambiente max. 40 °C Mezzo max.
  • Seite 90: Omologazioni, Prove E Conformità

    Trasporto e magazzinaggio 4.1 Omologazioni, prove e conformità La valvola di sicurezza del gruppo di sicurezza è conforme alla Direttiva per Apparecchi in Pressione ( Pompa di circolazione, si veda l’allegato manuale del produtto- re della pompa. 5 Trasporto e magazzinaggio ATTENZIONE Rischio di danneggiamento da trasporto non adeguato.
  • Seite 91: Montaggio Di

    Montaggio e messa in esercizio Montare il gruppo di pompe solari sempre in modo che in caso di stagnazione non possa penetrare vapore nel vaso di espansione. Quando il vaso di espansione è montato alla stessa altez- za o ad altezza superiore del gruppo di circolazione sola- re, applicare anche ad esso una protezione coibente.
  • Seite 92 Montaggio e messa in esercizio viene fornito pronto al montaggio. Non smonta-re componenti. Sfilare la parte superiore della coibentazione. Appoggiare la coibentazione inferiore di alla parete (allineare con una livella a bolla d'aria) e se- gnare due marcature sulla parete. Praticare fori (Ø...
  • Seite 93: Collegare

    Montaggio e messa in esercizio 6.2 Collegare Avvitare i tubi di collegamento del circuito solare agli at- tacchi della rubinetteria. Avvitare il tubo o il tubo corrugato del vaso di espansione al gruppo di sicurezza. Gruppo di sicurezza Guarnizione piatta Guarnizione piatta tubo corrugato Fig.
  • Seite 94 Montaggio e messa in esercizio 6.2.1 Condotto di spurgo della valvola di sicurezza L’apertura di spurgo è contrassegnata da una freccia sul corpo della valvola. AVVERTIMENTO Pericolo di lesioni e ustioni causato da liquidi bollenti o vapore fuoriuscenti dall'apertura di spurgo. Installare la tubatura di spurgo in modo in modo da preve- nire lesioni o danni dall'eventuale fuoriuscita di fluido ter- movettore surriscaldato, in modo che il fluido fuoriuscente...
  • Seite 95: Allacciamento Elettrico

    Montaggio e messa in esercizio 6.3 Allacciamento elettrico La tensione di rete è interrotta e protetta contro il reinse- rimento. Allacciare la pompa di circolazione come descritto nel manuale accluso. Cablare il cavo di alimentazione della pompa di circola- zione verso il basso nell'apposito condotto per il collega- mento con la regolazione solare.
  • Seite 96 Montaggio e messa in esercizio Avvitare i raccordi portagomma alle valvole di riempimen- to/svuotamento e collegare i tubi. Aprire le valvole di inter- cettazione (1, 2) e la chiusura (3) per il riempimento. Riempire il sistema con liquido solare dal rubinetto supe- riore (1).
  • Seite 97: Operazione

    Operazione 7 Operazione Per motivi di sicurezza, durante il riscaldamento il liquido ter- movettore deve poter fuoriuscire dal tubo di spurgo della val- vola di sicurezza. Non bloccare la valvola di sicurezza. Dopo la fuoriuscita del liquido dallo spurgo della valvola di sicurezza, controllare il sistema prima di ripristinarne il funzionamento.
  • Seite 98: Sfiatare L'impianto

    Operazione 7.2 Sfiatare l'impianto. AVVERTIMENTO Pericolo di ustioni causato da liquido o vapore surriscaldato che fuoriesce dal rubinetto di spurgo o da contatto con il degassatore. Sfiatare l’impianto solo con temperature < 50 °C indicate dal termometro rosso. 1 Liquido solare con aria 2 Direzione di flusso del liquido solare...
  • Seite 99: Manutenzione

    Manutenzione 8 Manutenzione Tabella 2: Intervalli di manutenzione Quando Intervento Non è possibile leg- Svuotare, sciacquare e riempire gere il flussometro nuovamente il sistema. Pompa di circolazio- Sostituire la pompa di circolazio- ne difettosa. ne, vedi sotto 8.1.1 Sostituire la pompa di circolazione. Chiudere la valvola di intercettazione del flussometro e gi- rare in posizione a 90°...
  • Seite 100 Guasti Problema Possibile causa Contromisure La pompa di circo- Pressione impian- Aumentare la pressione lazione è rumorosa. to troppo bassa. dell’impianto o verificare il vo- lume di gas nel vaso di espan- sione. La pompa di circo- Allacciamento Controllare i fusibili e morsetti lazione non si av- elettrico non cor- eventualmente non stretti.
  • Seite 101: Smontaggio E Smaltimento

    Smontaggio e smaltimento 10 Smontaggio e smaltimento Disconnettere il dispositivo dalla rete di alimentazione. Smontare (vedere il Cap. 6 a pag. 13, in ordine inverso). è ecocompatibile. In sede di smaltimento NOTA SULLO contiene solo rifiuti riciclabili o idonei al recupero termico. SMALTIMENTO I materiali idonei al recupero termico sono separabili al 100%...
  • Seite 102: Diritto D'autore

    Diritto d’autore 12 Diritto d’autore Il produttore resta titolare dei diritto d’autore per le presenti istruzioni. La loro ristampa, traduzione o riproduzione anche parziale non è consentita se non a seguito di consenso scritto. Con riserva di modifiche di dettagli tecnici rispetto alle indica- zioni e illustrazioni contenute nel presente manuale.
  • Seite 103 __________________________ __________________________ __________________________ __________________________ __________________________ __________________________ __________________________ __________________________ __________________________ __________________________ __________________________ __________________________ __________________________ __________________________ __________________________ __________________________ __________________________ __________________________ __________________________ __________________________ __________________________ __________________________ __________________________ __________________________ __________________________ __________________________ __________________________ __________________________ __________________________ __________________________ __________________________ __________________________ __________________________ __________________________ __________________________ __________________________ __________________________ __________________________ __________________________ __________________________ __________________________ __________________________ __________________________...
  • Seite 105 Installatie- en Gebruiksaanwijzing Zonne Drukstation Installatie- en gebruikshandleiding Nederlands Zonne Drukstation EKSRDS2A...
  • Seite 106 Inhoudsopgave Over deze gebruiksaanwijzing ..............4 Opbouw van de waarschuwingen ........... 4 Veiligheid ....................5 Reglementair gebruik ..............5 Voorzienbaar verkeerd gebruik ............5 Veilig gebruik .................. 5 Kwalificatie van het personeel ............6 Veranderingen aan het product ............6 Gebruik van reserveonderdelen en accessoires ......
  • Seite 107 Onderhoud ....................24 Storingen ....................24 10 Buitenbedrijfstelling en verwijdering ............27 11 Garantie ....................28 12 Auteursrecht ................... 28...
  • Seite 108: Over Deze Gebruiksaanwijzing

    Over deze gebruiksaanwijzing 1 Over deze gebruiksaanwijzing Deze gebruiksaanwijzing maakt deel uit van het product. De gebruiksaanwijzing vóór gebruik van het product lezen. De gebruiksaanwijzing gedurende de gehele levensduur van het product bewaren en bij de hand houden om te raadplegen.
  • Seite 109: Veiligheid

    Veiligheid 2 Veiligheid 2.1 Reglementair gebruik De zonnepompgroep mag uitsluitend worden gebruikt voor het circuleren van de volgende media in intrinsiek veilige, gesloten thermische zonne-energiesystemen. Voor thermische zonne-energiesystemen geschikte, in de handel verkrijgbare warmtedragervloeistoffen (zonnevloeistoffen), zoals bijvoorbeeld water-glycol- mengsels De geïntegreerde veiligheidsgroep is bedoeld ter beveiliging tegen overdruk.
  • Seite 110: Kwalificatie Van Het Personeel

    Veiligheid veiligheidsbepalingen en ongevallenpreventievoorschriften in acht nemen. Ernstige brandwonden of de dood door netspanning WAARSCHUWING (AC 230V, 50 Hz) in de pompkop. De pompkop niet met water of zonnevloeistof in aanraking brengen. De netspanning vóór het openen van de pompkop en voor aanvang van onderhouds- en reinigingswerkzaamheden onderbreken en tegen opnieuw inschakelen beveiligen.
  • Seite 111: Aansprakelijkheid

    Veiligheid 2.7 Aansprakelijkheid De fabrikant aanvaardt geen enkele aansprakelijkheid voor schade en gevolgschade die voortvloeit uit niet-naleving van de technische voorschriften, instructies en aanbevelingen. De fabrikant en het verkoopbedrijf zijn niet aansprakelijk voor kosten of schade voor de gebruiker of derden als gevolg van het gebruik van dit product, vooral bij ondeskundig gebruik van het product, misbruik of storingen van de aansluiting, storingen van het product of van de aangesloten producten.
  • Seite 112: Productbeschrijving

    Productbeschrijving 3 Productbeschrijving Complete, stevig voorgemonteerde en op dichtheid gecontroleerde zonnepompgroep met alle noodzakelijke veiligheids- en functionele onderdelen inclusief vormgesloten warmte-isolatie. De warmte-isolatie fungeert tevens als verpakking voor een veilig transport.
  • Seite 113 Productbeschrijving 1 Voorloop 2 Terugloop 3 Kogelkraan, blauw, afsluitbaar, met zwaartekrachtrem en thermometer 4 Veiligheidsgroep 5 Veiligheidsventiel 6 Afblaasopening 7 Manometer met montageventiel 8 Aansluiting voor expansievat 9 Circulatiepomp 10 Afsluiting 11 Vul- en spoelkranen 12 Debietmeter 13 Warmte-isolatie 14 Ontluchtingspot 15 Ontluchtingskraan met handwiel 16 Kogelkraan, rood,...
  • Seite 114: Technische Gegevens

    Technische gegevens 4 Technische gegevens Afbeelding 2: afmetingen [mm]...
  • Seite 115 Technische gegevens Tabel 1: technische gegevens Parameter Waarde Systeemaansluiting Algemene gegevens Gewicht Max. 5,5 kg Materiaal Messing CW617N armaturen Materiaal warmte- Polypropyleen EPP isolatie Installatiedruk Max. 6 bar Temperatuurbereik Omgeving Max. 40 °C Medium Max. 120 °C, kortstondig max. 160 °C Debietmeter Pompaansluiting Aan de pompzijde met flens en...
  • Seite 116: Goedkeuringen, Tests En Conformiteit

    Transport en opslag 4.1 Goedkeuringen, tests en conformiteit Het veiligheidsventiel van de veiligheidsgroep voldoet aan de Richtlijn Drukapparatuur ( Circulatiepomp zie bijgevoegde handleiding van de fabrikant van de circulatiepomp. 5 Transport en opslag VOORZICHTIG Beschadiging van het product door ondeskundig transport. Niet gooien met het product en het product niet laten vallen.
  • Seite 117: Monteren

    Montage en inbedrijfstelling Een warmte-isolatielus inbouwen als het expansievat even hoog als of hoger dan de zonnepompgroep is gemonteerd. Tijdens het verwarmen moet vloeistof ongehinderd uit de afblaasleiding van het veiligheidsventiel kunnen komen. Het veiligheidsventiel onafsluitbaar monteren. Geen afsluiters, vuilvangers, etc. in de afblaasleiding inbouwen.
  • Seite 118 Montage en inbedrijfstelling met de onderste isolatie tegen de muur houden (uitlijnen met een waterpas) en twee markeringen aftekenen. Gaten (Ø 10 mm) boren op de positie van de beide markeringen en meegeleverde pluggen aanbrengen. Lange stokschroef boven, korte stokschroef beneden indraaien.
  • Seite 119: Aansluiten

    Montage en inbedrijfstelling 6.2 De aansluiten De buisleidingen van het zonnecircuit op de aansluitingen van de armaturen aansluiten. De buis of ribbelbuis van het expansievat op de veiligheidsgroep aansluiten. Veiligheidsgroep Vlakke pakking Ribbelbuis, vlakdichtend Afbeelding 4: aansluiting ribbelbuis G¾ De afblaasleiding op het veiligheidsventiel van de veiligheidsgroep aansluiten, zie onder.
  • Seite 120 Montage en inbedrijfstelling 6.2.1 Afblaasleiding van het veiligheidsventiel De afblaasopening is aangegeven door een pijl op het ventielhuis. Gezondheidsschade en verbrandingsgevaar door hete WAARSCHUWING vloeistof of damp die uit de afblaasopening komt. De afblaasleiding zodanig leggen dat de uitstromende vloeistof noch lichamelijk letsel noch materiële schade veroorzaakt en dat deze in een geschikte opvangbak voor zonnevloeistof kan stromen.
  • Seite 121 Montage en inbedrijfstelling De afblaasleiding mag maximaal 2 meter lang zijn en twee bochten hebben. De afblaasleiding moet toegankelijk en observeerbaar zijn. De uit de afblaasleiding gestroomde vloeistof in een bak leiden die groot genoeg is voor de complete inhoud van de installatie.
  • Seite 122: Elektrische Aansluiting

    Montage en inbedrijfstelling 6.3 Elektrische aansluiting Netspanning is onderbroken en tegen opnieuw inschakelen beveiligd. De circulatiepomp elektrisch aansluiten volgens de bijgevoegde handleiding. De aansluitkabel van de circulatiepomp door een kabelgoot naar beneden leiden en op de zonneregelaar aansluiten. De gebruiksaanwijzing van de zonneregelaar in acht nemen.
  • Seite 123 Montage en inbedrijfstelling 0° Werking – open in de stroomrichting van de zonnevloeistof 45° Inbedrijfstelling, vullen, ontluchten, spoelen – beide kanten open (de terugstroombeveiliging is gedeactiveerd) 90° Onderhoud – gesloten Afbeelding 6: kogelkranen Slangtules op de vul- en spoelkranen schroeven en slangen aansluiten.
  • Seite 124 Montage en inbedrijfstelling De installatie via bovenste kraan (1) met zonnevloeistof vullen. De onderste kraan (2) sluiten zodra er zonnevloeistof uit komt. De installatie onder druk zetten. De bovenste kraan sluiten. De afsluiting (3) weer terugdraaien. De installatie ontluchten, zie hoofdstuk Fehler! Verweis- quelle konnte nicht gefunden werden., pagina Fehler! Textmarke nicht definiert..
  • Seite 125: Werking

    Werking 7 Werking Tijdens het verwarmen moet om veiligheidsredenen vloeistof uit de afblaasleiding van het veiligheidsventiel kunnen komen. Het veiligheidsventiel niet afsluiten. De installatie vóór het hervatten van de werking na de inwerkingtreding van het veiligheidsventiel controleren. Een correcte werking is alleen bij open kogelkranen mogelijk (0°-stand, zie afbeelding 6, pagina 19).
  • Seite 126: Installatie Ontluchten

    Werking 7.2 Installatie ontluchten WAARSCHUWING Verbrandingsgevaar door hete vloeistof of damp die uit de ontluchtingskraan komt of door het aanraken van de hete ontluchtingspot. De installatie alleen ontluchten als de rode thermometer een temperatuur van minder dan 50 °C aangeeft. 1 Zonnevloeistof met lucht 2 Stroomrichting van...
  • Seite 127 Werking Het ventiel (4) openen. ª De afgescheiden lucht ontsnapt uit de ontluchtingspot. Het ventiel weer sluiten zodra er zonnevloeistof ontsnapt.
  • Seite 128: Onderhoud

    Onderhoud 8 Onderhoud Tabel 2: onderhoudsmomenten Wanneer Werkzaamheden Debietmeter niet Installatie leegmaken, spoelen en meer afleesbaar opnieuw vullen Circulatiepomp Circulatiepomp vervangen, zie defect onder 8.1.1 Circulatiepomp vervangen De afsluiting op de debietmeter sluiten en de blauwe kogelkraan in 90°-stand brengen. De circulatiepomp vervangen.
  • Seite 129 Storingen Probleem Mogelijke oorzaak Oplossing Circulatiepomp Installatiedruk te Installatiedruk verhogen of maakt lawaai laag gasvolume in het expansievat controleren Circulatiepomp start Onjuiste Zekeringen controleren en niet stroomvoorziening eventueel controleren of kabelklemmen loszitten Circulatiepomp Voor korte tijd overschakelen geblokkeerd door naar maximaal toerental afzettingen in de Rotor deblokkeren, lagers...
  • Seite 130 Storingen Probleem Mogelijke oorzaak Oplossing Bij het leegmaken Kogelkranen en/of Kogelkranen in 45°-stand van de installatie afsluiting gesloten brengen en afsluiting openen: komt er geen medium uit de vul- en spoelinrichtingen Overige storingen – Product naar de fabrikant opsturen...
  • Seite 131: Buitenbedrijfstelling En Verwijdering

    Buitenbedrijfstelling en verwijdering 10 Buitenbedrijfstelling en verwijdering De voedingsspanning uitschakelen. demonteren (zie hoofdstuk 6, pagina 12, in omgekeerde volgorde). heeft een milieuvriendelijk design. Bij de INFORMATIE verwijdering ontstaat alleen afval dat ofwel gerecycled ofwel OVER DE thermisch behandeld kan worden. De recyclebare materialen VERWIJDERING kunnen naar soort gescheiden worden.
  • Seite 132: Garantie

    Garantie 11 Garantie De fabrikant verleent op dit product een garantie van 24 maanden na aankoopdatum. De garantie geldt in alle landen waar dit product door de fabrikant of zijn geautoriseerde dealers wordt verkocht. 12 Auteursrecht Het auteursrecht op deze gebruiksaanwijzing berust bij de fabrikant.
  • Seite 133 __________________________ __________________________ __________________________ __________________________ __________________________ __________________________ __________________________ __________________________ __________________________ __________________________ __________________________ __________________________ __________________________ __________________________ __________________________ __________________________ __________________________ __________________________ __________________________ __________________________ __________________________ __________________________ __________________________ __________________________ __________________________ __________________________ __________________________ __________________________ __________________________ __________________________ __________________________ __________________________ __________________________ __________________________ __________________________ __________________________ __________________________ __________________________ __________________________ __________________________ __________________________ __________________________ __________________________...
  • Seite 135 Manual de instalação e de operação Estação de impressão solares Manual de instalação e de operação Portugues Estação de impressão solares EKSRDS2A...
  • Seite 136 Índice 1 Sobre este manual................. 4 Conteúdos dos avisos..............4 Segurança ....................5 Uso segundo os fins previstos ............5 Aplicação incorreta previsível............5 Operação segura ................5 Qualificação do pessoal ..............6 Modificações no produto ..............6 Uso de peças de reposição e acessórios........7 2.1 Notas sobre responsabilidades ..........
  • Seite 137 Manutenção .................... 25 Falhas ..................... 25 10 Desativação e eliminação ............... 28 11 Garantia ....................29 12 Direitos autorais ..................29...
  • Seite 138: Sobre Este Manual

    Sobre este manual 1 Sobre este manual Este manual de instruções faz parte do produto. Leia o manual de instruções antes de utilizar o produto. Guarde este manual de instruções durante toda a vida útil do produto e mantenha-o sempre à mão para consulta. O manual de instruções deve ser passado para qualquer proprietário ou usuário posterior do produto.
  • Seite 139: Segurança

    Segurança 2 Segurança 2.1 Uso segundo os fins previstos O grupo de bomba solar destina-se exclusivamente para a circulação dos seguintes produtos em sistemas solares térmicos dotados de segurança intrínseca e fechados. Destinado a fluidos disponíveis no mercado (fluidos solares), adequados para transferên-cia térmica em sistemas solares térmicos, como por ex.
  • Seite 140: Qualificação Do Pessoal

    Segurança Este produto só deve ser operado em perfeitas condições, tomando em consideração o manual de instruções, os regulamentos e as diretivas vigentes, bem como as normas legais de segurança e prevenção de acidentes. ADVERTÊNCIA Perigo de queimaduras graves ou morte devido à tensãoda rede elétrica (230 V CA, 50 Hz) na cabeça da bomba.
  • Seite 141: Uso De Peças De Reposição E Acessórios

    Segurança 2.6 Uso de peças de reposição e acessórios A aplicação de peças de reposição e acessórios inadequados pode danificar o produto. Utilize apenas peças de reposição e acessórios originais do fabricante. Notas sobre responsabilidades O fabricante não assume qualquer responsabilidade ou garantia por danos e consequências resultantes da inobservância dos regulamentos técnicos, diretivas e recomendações.
  • Seite 142: Descrição Do Produto

    Descrição do produto 3 Descrição do produto Bomba solar completa, pré-montada e testada quanto à estanqueidade, com todos os componentes funcionais e de segurança necessários, incluindo um isolamento térmico envolvente. O isolamento térmico serve também como embalagem segura para transporte.
  • Seite 143 Descrição do produto 1 Fluxo 2 Retorno 3 Válvula de esfera, azul, bloqueável, com freio de gravidade e termómetro 4 Grupo de segurança 5 Válvula de segurança 6 Abertura de purga 7 Manómetro com válvula de montagem 8 Conexão para o tanque de expansão 9 Bomba de circulação 10 Fecho...
  • Seite 144: Dados Técnicos

    Dados técnicos 4 Dados técnicos Figura 2: Dimensões [mm] da...
  • Seite 145 Dados técnicos Tabela 1: Dados técnicos Valor Parâmetro Conexão do sistema Dados gerais Peso Máx. 5,5 kg Material Latão CW617N guarnições Material de Polipropileno EPP isolamento térmico Pressão do Máx. 6 bar sistema Faixa de temperaturas operacionais Ambiente Máx. 40 °C Fluido Máx.
  • Seite 146: Aprovações, Testes E Conformidades

    Transporte e armazenamento 4.1 Aprovações, testes e conformidades A válvula de segurança do grupo de segurança corresponde à diretiva para equipamentos de pressão. Para a bomba de circulação, consulte as instruções anexas do fabricante da bomba. 5 Transporte e armazenamento CUIDADO Perigo de danos para o produto devido a transporte impróprio.
  • Seite 147: Montagem Da

    Montagem e colocação em operação Se o tanque de expansão for montado à mesma altura ou mais alto do que o conjunto da bomba solar, deve ser instalado um termosifão. Durante o aquecimento o fluido deve poder escorrer sem impedimento pela abertura de purga da válvula de segurança.
  • Seite 148 Montagem e colocação em operação é fornecida pronta para ser montada. Não se deve desmontar qualquer peça. Retire o isolamento superior. Segure a com o isolamento inferior contra a parede, alinhe com um nível de bolha, e desenhe duas marcas. Na posição das marcas, abra dois furos (Ø...
  • Seite 149: Conexão Da

    Montagem e colocação em operação 6.2 Conexão da Aparafuse os tubos do circuito solar às conexões das guarnições. Aparafuse o tubo ou tubo ondulado do tanque de expansão ao grupo de segurança. Grupo de segurança Vedação plana Tubo ondulado com vedação plana Figura 4: Conexão do tubo ondulado G¾...
  • Seite 150 Montagem e colocação em operação 6.2.1 Tubulação de purga na válvula de segurança A abertura de purga está identificada com uma flecha no corpo da válvula de segurança. ADVERTÊNCIA Perigo para a saúde e risco de queimaduras no caso deescapar líquido quente ou vapor pela abertura de purga.
  • Seite 151 Montagem e colocação em operação A descarga da tubulação de purga deve ser dirigida para um recipiente com capacidade suficiente para receber o volume completo da instalação. A descarga deve ser recolhida e reaplicada na instalação, por um serviço especializado, ou então eliminada. A descarga da purga nunca deve ser dirigida para a canalização de esgoto.
  • Seite 152: Ligação À Rede Elétrica

    Montagem e colocação em operação 6.3 Ligação à rede elétrica A tensão da rede elétrica deve estar desligada e bloqueada para se evitar uma religação. Faça a ligação elétrica da bomba de circulação segundo as instruções do respetivo manual de instru-ções anexo. Instale o cabo de ligação da bomba de circulação para baixo através do canal de cabo e conete ao controle solar.
  • Seite 153 Montagem e colocação em operação Aparafuse as buchas de mangueiras às torneiras de enchimento e lavagem e fixe as mangueiras. Para o enchimento abra as torneiras (1, 2) e feche o fecho (3). Encha a instalação com fluido solar através da torneira superior (1).
  • Seite 154: Operação

    Operação 7 Operação Por razões de segurança, durante o aquecimento deve poder escapar líquido da tubulação da válvula de segurança. Não feche a válvula de segurança. Antes de reiniciar a operação e após a válvula de segurança reagir com uma descarga, verifique a instalação.
  • Seite 155: Evacuação Da Instalação

    Operação 7.2 Evacuação da instalação ADVERTÊNCIA Risco de queimaduras devido a fuga de líquido quente ouvapor pela válvula de evacuação, ou quando se toca no vaso de evacuação quente. A instalação só deve ser evacuada com temperaturas abaixo de 50 °C conforme indicado no termómetro vermelho.
  • Seite 156: Manutenção

    Manutenção Manutenção Tabela 2: Intervalos de manutenção Quando Atividade Não se consegue Esvazie a instalação, lave e mais ler o medidor recarregue novamente de fluxo A bomba de Substitua a bomba de circulação circulação está (ver abaixo) defeituosa 8.1.1 Substituição da bomba de circulação Feche o bloqueio no medidor de fluxo e coloque a válvula de esfera azul na posição 90°.
  • Seite 157 Falhas Tabela 3: Falhas Problema Causa possível Eliminação da falha Ar na instalação A instalação faz Faça uma evacuação da baru-lhos instalação, ver Cap 7.1, página 20 A potência da Ajuste para uma rotação mais bomba foi baixa ajustada para muito alto A bomba de A pressão na...
  • Seite 158 Falhas Problema Causa possível Eliminação da falha Quando se quer As válvulas de Coloque as válvulas de esfera fazer o esfera e/ou o na posição 45° e abra o fecho: esvaziamento da fecho estão instalação, não sai fechados nenhum fluido do dispositivos de enchimento e lavagem...
  • Seite 159: Desativação E Eliminação

    Desativação e eliminação 10 Desativação e eliminação Desligue a alimentação elétrica. Desmonte a (ver o Cap 6, página 12, na ordem inversa). foi construida segundo as diretivas de NOTA SOBRE proteção ambiental. Ao se eliminar o produto resultam só materiais que podem ser reciclados, ou transferidos para ELIMINAÇÃO um reaproveitamento térmico de resíduos.
  • Seite 160: Garantia

    Garantia 11 Garantia O fabricante oferece para este produto uma garantia de 24 meses a partir da data de com-pra. A garantia é válida para todos os países nos quais este produto é vendido pelo fabri- cante ou pelos seus revendedores autorizados. 12 Direitos autorais O fabricante é...
  • Seite 161 __________________________ __________________________ __________________________ __________________________ __________________________ __________________________ __________________________ __________________________ __________________________ __________________________ __________________________ __________________________ __________________________ __________________________ __________________________ __________________________ __________________________ __________________________ __________________________ __________________________ __________________________ __________________________ __________________________ __________________________ __________________________ __________________________ __________________________ __________________________ __________________________ __________________________ __________________________ __________________________ __________________________ __________________________ __________________________ __________________________ __________________________ __________________________ __________________________ __________________________ __________________________ __________________________ __________________________...
  • Seite 163 Kullanım Kılavuzu ve Cihazı Çalıştirma talimatları Solar - Pompa ve emniyet gruba Kullan m K lavuzu ve Cihaz Çal tirma talimatlar ı ı ı ış ı Türkçe Solar - Pompa ve emniyet gruba EKSRDS2A...
  • Seite 164 Nakliye ve depolama ................12 Montaj ve işletmeye alma................ 12 EKSRDS2A'nin montajı ............ 13 EKSRDS2A'nin bağlantısı ..........15 Elektrik bağlantısı................18 EKSRDS2A'nin işletmeye alınması ........18 İşletim ..................... 20 Debi ölçme aygıtındaki okuma kenarı ........... 20 Sistemdeki havanın tahliyesi ............21...
  • Seite 165 Bakım ..................... 22 Arızalar ....................22 10 Devre dışı bırakma ve tasfiye..............24 11 Garanti ....................24 12 Telif hakkı ....................25...
  • Seite 166: Bu Kullanma Kılavuzu Hakkında

    Bu kullanma kılavuzu hakkında 1 Bu kullanma kılavuzu hakkında Bu kullanma kılavuzu ürünün bir parçasıdır. Ürünü kullanmadan önce bu kullanma kılavuzunu okuyun. Ürünün bütün kullanım ömrü boyunca bu kullanma kıla- vuzunu saklayın ve her an okumak için hazır tutun. Kullanma kılavuzunun ürünün sonraki sahiplerine veya kullanıcılarına verin.
  • Seite 167: Güvenlik

    Güvenlik 2 Güvenlik 2.1 Amacına uygun kullanım EKSRDS2A solar pompa grubu sadece aşağıdaki maddelerin kendiliğinden güvenli, kapalı termik solar sistemler içindeki sirkülasyonu için uygundur. Termik solar sistemler için uygun, piyasada bulunan ısı taşıyıcı sıvılar (solar sıvılar) içindir, örn. su-glikol karışım- ları...
  • Seite 168: Personelin Kalifikasyonu

    Güvenlik UYARI Pompa kafasındaki şebeke voltajından (AC 230 V, 50 Hz) dolayı ağır yanıklar veya can kaybı söz konusu olabilir. Pompa kafasını suyla veya solar sıvıyla temas ettirmeyin. Pompa kafasını açmadan ve bakım ve temizlik çalışmalarına başlamadan önce şebeke voltajını kesin ve tekrar açılmaması...
  • Seite 169: Sorumluluk Uyarıları

    Güvenlik 2.7 Sorumluluk uyarıları Teknik talimatlara, kılavuzlara ve tavsiyelere uyulmadığı için meydana gelen hasarlar ve bunları takip eden hasarlar için üretici herhangi bir sorumluluk üstlenmez ve garanti vermez. Üretici ve satıcı firma bu ürünün kullanılmasından, özellikle de uygunsuz şekilde kullanılmasından, bağlantıların kötüye kullanılmasından veya bunlardaki arızalardan, üründeki veya buna bağlanan ürünlerdeki arızalardan kaynaklanan hasarlardan veya masraflardan sorumlu tutulamaz.
  • Seite 170: Ürün Tanımı

    Ürün tanımı 3 Ürün tanımı Komple, sabit monte edilmiş ve sızdırmazlık kontrolü yapılmış solar pompa grubu olup gereken bütün güvenlik ve fonksiyon parçalarına ve de uygun şekilde bağlanmış ısı yalıtımına sa- hiptir. Isı yalıtım aynı zamanda güvenli nakliyat ambalajı görevi görür.
  • Seite 171 13 Isı yalıtımı 14 Hava tahliye yuvası 15 El çarklı hava tahliye vanası 16 Küresel musluk, mavikırmızı, kilitlene- bilir, yer çekimi freni- ne ve termometreye sahiptir Resim 1: EKSRDS2A, Dolum ve yıkama vanalı ve hava tahliye yuvalı ileri ve geri akış...
  • Seite 172: Teknik Veriler

    Teknik Veriler 4 Teknik Veriler Resim 2: Ebatlar [mm] EKSRDS2A...
  • Seite 173 Teknik Veriler Tablo 1: Teknik Veriler Parametre Değer Sistem bağlantısı Genel Veriler Ağırlık Azami 5,5 kg Armatürlerin o- Pirinç CW617N luştuğu malzeme Isı yalıtımı malze- Polipropilen EPP mesi Sistem basıncı Azami 6 bar Sıcaklık kullanım aralığı Çevre Azami 40 °C Madde Azami 120 °C, kısa süre için azami 160 °C...
  • Seite 174: İzinler, Kontroller Ve Uygunluklar

    Nakliye ve depolama 4.1 İzinler, kontroller ve uygunluklar Güvenlik grubundaki emniyet vanası basınç cihazları yönetmeliğine uygundur ( Sirkülasyon pompası için pompa üreticisinin ekteki kılavuzuna bakınız. 5 Nakliye ve depolama DIKKAT Uygunsuz nakliye nedeniyle ürün zarar görebilir. Ürünü fırlatmayın veya düşürmeyin. DIKKAT Uygunsuz depolama nedeniyle ürün zarar görebilir.
  • Seite 175 Bu iki işaretin olduğu pozisyona delikler (Ø 10 mm) açın ve ürünle birlikte verilen dübelleri sokun. Üst tahta cıvat- asını üste, kısa tahta cıvatasını ise alta takın. EKSRDS2A'yi alt izolasyonla birlikte asın ve altlık diski ve somunlarla emniyete alın. Solar devreye ait boru hatlarını armatürlerdeki bağlantılara...
  • Seite 176 Montaj ve işletmeye alma Üst izolasyonu yerleştirin. Resim 3: EKSRDS2A montajı...
  • Seite 177 Montaj ve işletmeye alma Solar devreye ait boru hatlarını armatürlerdeki bağlantılara vidalayın. Genleşme kabına ait boruyu veya kıvrımlı boruyu güvenlik grubuna vidalayın. Güvenlik grubu Düz conta Düz sızdırmazlık sağlayan kırımlı boru Resim 4: Kıvrımlı boru G¾ bağlantısı Dışarı üfleme borusunu emniyet grubuna ait emniyet va- nasıyla birlikte vidalayın, aşağı...
  • Seite 178 Montaj ve işletmeye alma UYARI Dışarı üfleme deliğinden dışarı çıkan sıcak sıvı veya buhar nedeniyle sağlık problemleri ve yanma tehlikesi söz ko- nusudur. Dışarı üfleme borusunu yerleştirirken bunan çıkan sıvı nedeniyle kimsenin yaralanmamasına ve mal hasarı o- luşmamasına ve de bunun uygun bir solar toplama kabına akmasına dikkat edin.
  • Seite 179 Montaj ve işletmeye alma Dışarı üfleme borusundan çıkan sıvıyı, sistemin bütün içeriğini alabilecek bir kabın içine yönlendirin. Çıkan sıvı toplanmalı ve bir uzman işletme tarafından sisteme geri yönlendirilmeli ya da tasfiye edilmelidir. Çıkan sıvıyı kanalizasyona yönlendirmeyin.
  • Seite 180: Elektrik Bağlantısı

    Bağlantı hattını uzatmak için piyasada bulunan zırhlı bir kablo, 3 x 1,5 mm² ve en fazla Ø 10 mm, kullanılabilir. EKSRDS2A'de debi ölçme aygıtındaki dolum ve yıka-ma vanalarından dolum yapılabilir. Dışarı üfleme borusunun veya emniyet vanasının yakınına, üzerinde şunların yazılı olduğu bir uyarı...
  • Seite 181 Montaj ve işletmeye alma Hortum kovanlarını dolum ve yıkama vanalarına vidalayın ve hortumları bağlayın. Kapatma vanalarını (1, 2) dolum için açın ve kilidi (3) dolum için kapatın. Sistemi üstteki vanadan (1) solar sıvıyla doldurun. Alt vanadan (2) solar sıvı sızdığı sürece bunu kapatın. Sisteme basınç...
  • Seite 182: İşletim

    İşletim 7 İşletim Isıtma işlemi sırasında güvenlik nedeniyle emniyet vanasının dışarı üfleme borusundan sıvı akabilmelidir. Emniyet vanasını kapatmayın. Sistemi tekrar işletmeye almadan önce ve emniyet vanası devreye girdikten sonra kontrol edin. Kusursuz işletim sadece küresel vanalar açıkken mümkündür (0°-konumu, bkz. resim 6, sayfa 19). 7.1 Debi ölçme aygıtındaki okuma kenarı...
  • Seite 183: Sistemdeki Havanın Tahliyesi

    İşletim 7.2 Sistemdeki havanın tahliyesi UYARI Hava tahliye musluğundan dışarı çıkan sıcak sıvı veya buhar nedeniyle ya da sıcak hava tahliye yuvasına doku- nulduğunda yanma tehlikesi söz konusudur. Sistemdeki havanın tahliyesi için kırmızı termometredeki sıcaklığının 50 °C'nin altında olması gerekiyor. 1 Hava içeren solar sıvı...
  • Seite 184: Bakım

    Bakım 8 Bakım Tablo 2: Bakım zamanları Ne zaman İşlem Debi ölçme aygıtı Sistemi boşaltın, yıkayın ve yeni- okunamıyor den doldurun Sirkülasyon pompası Sirkülasyon pompasını değiştirin, arızalı aşağı bakınız 8.1.1 Sirkülasyon pompasının değişimi Debi ölçme aygıtındaki kilidi kapatın ve mavi küresel vanayı...
  • Seite 185 Arızalar Problem Olası nedeni Arızayı giderme Sirkülasyon pom- Sistem basıncı Sistem basıncını yükseltin pasından ses çok düşük veya genleşme kabındaki gaz çıkıyor hacmini kontrol edin Sirkülasyon pom- Hatalı elektrik Sigortaları ve gevşemiş kablo pası çalışmıyor beslemesi kıskaçlarını kontrol edin Sirkülasyon pom- Kısa bir süre için azami devir pası...
  • Seite 186: Devre Dışı Bırakma Ve Tasfiye

    Devre dışı bırakma ve tasfiye 10 Devre dışı bırakma ve tasfiye Besleme voltajını kapatın. EKSRDS2A'yi sökün (bkz. bölüm 6, sayfa 12, ters sırada). EKSRDS2A çevre dostudur. Bunu tasfiye ederken sadece TASFIYE BIL- tekrar değerlendirilebilecek maddeler ya da termik açıdan geri GILERI: dönüşüm sistemlerine verilebilecek atıklar oluşur.
  • Seite 187: Telif Hakkı

    Telif hakkı 12 Telif hakkı Bu kullanma kılavuzu üzerindeki telif hakkı üreticinindir. Bunun özet halinde dahi baskısı, tercümesi ve çoğaltılması için yazılı onay alınmalıdır. Teknik detaylarla kullanma kılavuzunda verilen bilgiler ve resimlerdeki değişiklikler saklıdır.
  • Seite 188 __________________________ __________________________ __________________________ __________________________ __________________________ __________________________ __________________________ __________________________ __________________________ __________________________ __________________________ __________________________ __________________________ __________________________ __________________________ __________________________ __________________________ __________________________ __________________________ __________________________ __________________________ __________________________ __________________________ __________________________ __________________________ __________________________ __________________________ __________________________ __________________________ __________________________ __________________________ __________________________ __________________________ __________________________ __________________________ __________________________ __________________________ __________________________ __________________________ __________________________ __________________________ __________________________ __________________________...
  • Seite 189 __________________________ __________________________ __________________________ __________________________ __________________________ __________________________ __________________________ __________________________ __________________________ __________________________ __________________________ __________________________ __________________________ __________________________ __________________________ __________________________ __________________________ __________________________ __________________________ __________________________ __________________________ __________________________ __________________________ __________________________ __________________________ __________________________ __________________________ __________________________ __________________________ __________________________ __________________________ __________________________ __________________________ __________________________ __________________________ __________________________ __________________________ __________________________ __________________________ __________________________ __________________________ __________________________ __________________________...
  • Seite 190 __________________________ __________________________ __________________________ __________________________ __________________________ __________________________ __________________________ __________________________ __________________________ __________________________ __________________________ __________________________ __________________________ __________________________ __________________________ __________________________ __________________________ __________________________ __________________________ __________________________ __________________________ __________________________ __________________________ __________________________ __________________________ __________________________ __________________________ __________________________ __________________________ __________________________ __________________________ __________________________ __________________________ __________________________ __________________________ __________________________ __________________________ __________________________ __________________________ __________________________ __________________________ __________________________ __________________________...

Inhaltsverzeichnis