Inhaltsverzeichnis
Werbung
Verfügbare Sprachen
Verfügbare Sprachen
Quicklinks
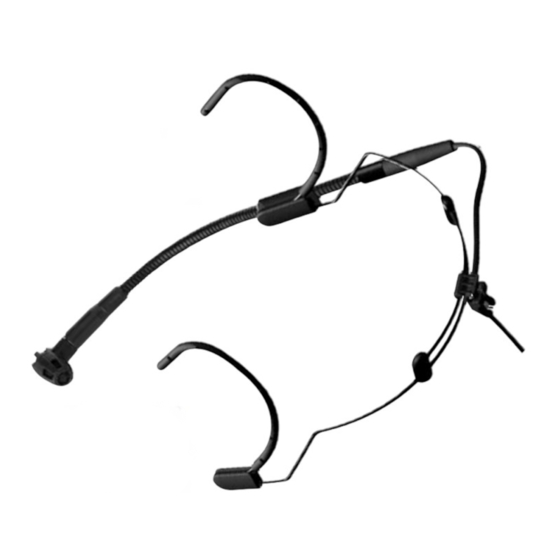
C 520
C 520 L
BEDIENUNGSANLEITUNG
Bitte vor Inbetriebnahme des Gerätes lesen!
USER INSTRUCTIONS
Please read the manual before using the equipment!
MODE D'EMPLOI
Veuillez lire cette notice avant d'utiliser le système!
ISTRUZIONI PER L'USO
Prima di utilizzare l'apparecchio, leggere il manuale!
MODO DE EMPLEO
¡Sirvase leer el manual antes de utilizar el equipo!
INSTRUÇÕES DE USO
Favor leia este manual antes de usar o equipamento!
Downloaded from
www.Manualslib.com
. . . . . . . . . . .
. . . . . . . . . . . . . . .
. . . . . . . . . . . . . . . . . . . . . .
. . . . . . . . . . . . .
. . . . . . . . . . . . . . . . . . .
. . . . . . . . . . . . . . .
manuals search engine
S. 2
p. 12
p. 22
p. 32
p. 42
S. 52
Werbung
Kapitel
Inhaltsverzeichnis
Fehlerbehebung

Verwandte Anleitungen für AKG MicroMic C 520


Inhaltszusammenfassung für AKG MicroMic C 520
- Seite 1 C 520 C 520 L BEDIENUNGSANLEITUNG S. 2 ... Bitte vor Inbetriebnahme des Gerätes lesen! USER INSTRUCTIONS p. 12 ....Please read the manual before using the equipment! MODE D’EMPLOI p.
-
Seite 2: Inhaltsverzeichnis
6 Technische Daten ....... . 11 AKG C 520/C 520 L Downloaded from www.Manualslib.com... -
Seite 3: Sicherheitshinweis/Beschreibung
1 x C 520 od. C 520 L 1 x W 44 Kontrollieren Sie bitte, ob die Verpackung alle oben angeführten Teile enthält. Falls etwas fehlt, wenden Sie sich bitte an Ihren AKG-Händler. • Siehe www.akg.com oder aktuelle MicroMic- 1.3 Optionales Broschüre. -
Seite 4: Beschreibung
1.6 C 520 L • Für Speisung mittels Batteriespeisegerät B 29 L, Phantomspeiseadapter MPA V L oder Sender PT 40, PT 400. • 1,5 m langes Anschlusskabel mit 3-poligem Mini-XLR-Stecker. AKG C 520/C 520 L Downloaded from www.Manualslib.com manuals search engine... -
Seite 5: Anschluss
2 Anschluss Das C 520/C 520 L ist ein Kondensatormikrofon 2.1 Einleitung und benötigt daher eine Stromversorgung. Wenn Sie andere als die von AKG empfohlenen Wichtig! Speisegeräte verwenden, kann das Mikrofon beschädigt werden und erlischt die Garantie. 1. Schließen Sie den Phantomspeiseadapter am 2.2 C 520... -
Seite 6: Anwendung
Ohrbügels (1) ein. (Die Abdeckung (4) stabilisiert den Ohrbügel und verhindert, dass sich Haare im Drahtbo- gen verfangen.) 5. Drücken Sie das Kabel wieder in den Kabelhal- ter (5) hinein. AKG C 520/C 520 L Downloaded from www.Manualslib.com manuals search engine... -
Seite 7: Mikrofon Aufsetzen
Abb. 6 bezeichneten Stellen und biegen Sie vorsichtig etwas nach innen. • Probieren Sie, ob das Mikrofon besser sitzt. Falls nicht, verbiegen Sie den Draht vorsichtig etwas weiter. AKG C 520/C 520 L Downloaded from www.Manualslib.com manuals search engine... -
Seite 8: Mikrofon Positionieren
1. Ziehen Siehe Abb. 8. Schwanenhals (1) aus der Halterung (2) heraus. 2. Klemmen Sie den Schwanenhals (1) an der gewünschten Stelle wieder in die Halterung (2) ein. AKG C 520/C 520 L Downloaded from www.Manualslib.com manuals search engine... -
Seite 9: Reinigung
4.1 Mikrofon- einem mit Wasser befeuchteten Tuch. gehäuse • Den Schaumstoff-Windschutz reinigen Sie am 4.2 Windschutz besten mit einer milden Waschmittellösung. Der Windschutz ist sofort nach dem Trocknen wieder einsatzbereit. AKG C 520/C 520 L Downloaded from www.Manualslib.com manuals search engine... -
Seite 10: Fehlerbehebung
Mischpult zu weit drehen. aufgedreht. 2. Mischpulteingang zu 2. 10-dB-Vorabschwä- empfindlich. chung zwischen Mi- krofonkabel und Ein- gang stecken. C 520 L: Siehe auch Bedienungsanleitung des Senders und Empfängers! AKG C 520/C 520 L Downloaded from www.Manualslib.com manuals search engine... -
Seite 11: Technische Daten
Netto/Bruttogewicht: C 520: 30 g / 540 g C 520 L: 30 g / 471 g Dieses Produkt entspricht den in der Konformitätserklärung angeführten Normen. Sie können die Konformitätserklärung auf http://www.akg.com oder per E-Mail an sales@akg.com anfordern. Frequenzgang Polardiagramm AKG C 520/C 520 L Downloaded from www.Manualslib.com... - Seite 12 6 Specifications ........21 AKG C 520/C 520 L Downloaded from www.Manualslib.com...
-
Seite 13: Precaution/Description
1 x W 44 Check that the packaging contains all of the com- ponents listed above. Should anything be miss- ing, please contact your AKG dealer. • Visit www.akg.com or refer to the latest 1.3 Optional MicroMic brochure. Accessories • C 520 L: B 29 L battery power supply 1.4 Brief... -
Seite 14: C 520
• For use with the B 29 L battery power supply, MPA V L phantom power adapter, or PT 40 or PT 400 transmitters. • 5-ft. (1.5-m) plug-in connecting cable with 3- pin mini XLR connectors. AKG C 520/C 520 L Downloaded from www.Manualslib.com manuals search engine... -
Seite 15: Interfacing
2.1 Introduction and therefore needs a power supply. Using any power supply other than those rec- Important! ommended by AKG may damage your micro- phone and will void the warranty. 1. Connect the phantom power adapter on the 2.2 C 520 microphone cable to a balanced XLR micro- phone input with phantom power. -
Seite 16: Using Your Microphone
(1). (The cover (4) stabilizes the temple piece and prevents your hair from getting caught in the wire loop.) 5. Press the cable back into the cable holder (5). AKG C 520/C 520 L Downloaded from www.Manualslib.com manuals search engine... -
Seite 17: Putting The Micorphone On
6 and bend inward with extreme care. • Check whether the microphone fits better. If it does not, bend the wire some more, again with extreme care. AKG C 520/C 520 L Downloaded from www.Manualslib.com manuals search engine... -
Seite 18: Aligning The Microphone
1. Unsnap the goose- Refer to fig. 8. neck (1) from the holder (2). 2. Snap the gooseneck (1) back into the holder (2) at the desired position. AKG C 520/C 520 L Downloaded from www.Manualslib.com manuals search engine... -
Seite 19: Cleaning
4.1 Microphone cloth moistened with water. Surface • Clean the foam windscreen in mild soap suds. 4.2 Windscreen You can use the windscreen again as soon as it has dried. AKG C 520/C 520 L Downloaded from www.Manualslib.com manuals search engine... -
Seite 20: Troubleshooting
CCW. 2. Mixer input sensitivity 2. Connect a 10-dB too high. preattenuation pad between microphone cable and input. C 520 L: Also read the transmitter and receiver manuals! AKG C 520/C 520 L Downloaded from www.Manualslib.com manuals search engine... -
Seite 21: Specifications
C 520: 30 g/540 g (1.1/19.1 oz.) C 520 L: 30 g/471 g (1.1/16.6 oz.) This product conforms to the standards listed in the Declaration of Conformity. To order a free copy of the Declaration of Conformity, visit http://www.akg.com or contact sales@akg.com. Frequency Response... - Seite 22 5 Dépannage ........30 6 Caractéristiques techniques ..... . . 31 AKG C 520/C 520 L Downloaded from www.Manualslib.com...
-
Seite 23: Consigne De Sécurité / Description
1 x W 44 Contrôlez si le carton contient bien tous les élé- ments énumérés ci-dessus. Si ce n’est pas le cas, veuillez contacter votre distributeur AKG. • Voir www.akg.com ou la brochure MicroMic la 1.3 Accessoires plus récente. optionnels •... -
Seite 24: C 520
MPA V L ou émet- teur de poche PT 40 ou PT 400. • Câble de raccordement enfichable de 1,5 m de long, avec connecteur mini-XLR 3 points. AKG C 520/C 520 L Downloaded from www.Manualslib.com manuals search engine... -
Seite 25: Raccordement
2. B 29 L: Raccordez le B 29 L sur l’entrée voulue. MPA V L: Connectez le MPA V L sur une entrée de micro symétrique type XLR avec alimenta- tion fantôme et mettez l’alimentation fantôme sous tension. AKG C 520/C 520 L Downloaded from www.Manualslib.com manuals search engine... -
Seite 26: Utilisation
(1) respec- tive. (L’embout (4) stabilise la branche et empêche que les cheveux ne se prennent dans le fil de l’arceau.) 5. Enfoncez le câble dans l’attache (5). AKG C 520/C 520 L Downloaded from www.Manualslib.com manuals search engine... -
Seite 27: Pour Mettre L'arceau
à la Fig. 6 et courbez-les avec précautions vers l’intérieur. • Essayez si le micro tient mieux. Si ce n’est pas le cas courbez encore un peu plus le fil métal- lique, toujours avec précautions. AKG C 520/C 520 L Downloaded from www.Manualslib.com manuals search engine... -
Seite 28: Positionner Le Microphone
Fig. 8 : Réglage du bras de micro 1. Sortez col-de- Voir Fig. 8. cygne (1) du support (2). 2. Fixez col-de- cygne (1) dans le support (2) à la posi- tion souhaitée. AKG C 520/C 520 L Downloaded from www.Manualslib.com manuals search engine... -
Seite 29: Nettoyage
(eau claire). • La bonnette antivent se lave à l’eau savon- 4.2 Bonnette neuse en utilisant un produit doux. La bonnette antivent peut être réutilisée dès qu’elle est sèche. AKG C 520/C 520 L Downloaded from www.Manualslib.com manuals search engine... -
Seite 30: Dépannage
C 520 L: Veuillez vous reporter aussi aux notices d’emploi de l’émetteur et du récepteur ! AKG C 520/C 520 L Downloaded from www.Manualslib.com manuals search engine... -
Seite 31: Caractéristiques Techniques
C 520 L : 30 g / 471 g Ce produit est conforme aux normes citées dans la Déclaration de Conformité, dont vous pouvez prendre connaissance en consultant le site http://www.akg.com ou en adressant un e-mail à sales@akg.com. Réponse en fréquence Diagramme polaire... - Seite 32 6 Dati tecnici........41 AKG C 520/C 520 L Downloaded from www.Manualslib.com...
-
Seite 33: Indicazione Per La Sicurezza/Descrizione
1 x W 44 Controllate per favore se la confezione contiene tutti i componenti di cui sopra. Se manca qual- cosa rivolgetevi al vostro rivenditore AKG. • Vedi www.akg.com o l’attuale depliant Micro- 1.3 Accessori Mic. opzionali • C 520 L: alimentatore a batteria B 29 L 1.4 Breve... -
Seite 34: C 520
B 29 L, adattatore per alimentazione phantom MPA V L oppure trasmettitore da ta- sca PT 40 o PT 400. • Cavo di collegamento lungo 1,5 m, innestabile, con connettore mini-XLR a 3 poli. AKG C 520/C 520 L Downloaded from www.Manualslib.com manuals search engine... -
Seite 35: Collegamento
2.1 Introduzione ha quindi bisogno di alimentazione. Se usate alimentatori diversi da quelli racco- Importante! mandati dall’AKG, il microfono può subire danni e la garanzia si estingue. 1. Collegate l’adattatore per l’alimentazione 2.2 C 520 phantom disposto sul cavo microfonico a un ingresso microfonico XLR simmetrico con ali- mentazione phantom. -
Seite 36: Impiego
(1). (La copertura (4) stabilizza l’archetto auricolare e evita che i capelli si intreccino nell’archetto metallico.) 5. Premete di nuovo il cavo nel dispositivo di fis- saggio (5). AKG C 520/C 520 L Downloaded from www.Manualslib.com manuals search engine... -
Seite 37: Come Indossare Il Microfono
6 e piegateli prudentemente un po’ verso l’interno. • Provate se la posizione del microfono è più conveniente. Se no, piegate il filo prudente- mente un po’ di più. AKG C 520/C 520 L Downloaded from www.Manualslib.com manuals search engine... -
Seite 38: Posizionare Il Microfono
1. Sfilate il collo di ci- gno (1) dal disposi- tivo di fissaggio (2). 2. Reinfilate il collo di cigno (1) nel punto prescelto nel dispo- sitivo di fissaggio (2). AKG C 520/C 520 L Downloaded from www.Manualslib.com manuals search engine... -
Seite 39: Pulizia
4.1 Scatola del inumidito con acqua. microfono • L‘antisoffio in espanso viene pulito preferibil- 4.2 Antisoffio mente con una blanda soluzione detersiva; appena asciugato, l‘antisoffio è subito pronto all'uso. AKG C 520/C 520 L Downloaded from www.Manualslib.com manuals search engine... -
Seite 40: Eliminazione Di Difetti
2. Inserire un preattenuatore troppo sensibile. di 10 dB tra cavo mi- crofonico ed ingresso. C 520 L: Vedi anche le istruzioni per l’uso per il trasmettitore e del ricevitore! AKG C 520/C 520 L Downloaded from www.Manualslib.com manuals search engine... -
Seite 41: Dati Tecnici
C 520: 30 g / 540 g C 520 L: 30 g / 471 g Questo prodotto corrisponde alle norme elencate nella dichiarazione di confor- mità, che è disponibile al sito http://www.akg.com oppure all'indirizzo email sales@akg.com. Risposta in frequenza Diagramma polare... - Seite 42 6 Datos técnicos ........51 AKG C 520/C 520 L Downloaded from www.Manualslib.com...
-
Seite 43: Indicaciones De Seguridad/Descripción
1 x W 44 Sírvase controlar si el embalaje contiene todas las piezas indicadas arriba. Si falta algo, le rogamos dirigirse a su distribuidor AKG. • Sírvase consultar www.akg.com o el más re- 1.3 Accesorios ciente folleto sobre MicroMic. opcionales •... -
Seite 44: C 520
MPA V L o un transmisor de bol- sillo PT 40 ó PT 400. • Cable de conexión enchufable de 1,5 m de largo con conector mini-XLR de 3 polos. AKG C 520/C 520 L Downloaded from www.Manualslib.com manuals search engine... -
Seite 45: Conexión
2.1 Introducción necesita, por lo tanto, alimentación de corriente. Si se utilizan alimentadores diferentes a los re- ¡Importante! comendados por AKG puede dañarse el micró- fono, cesando con ello la garantía. 1. Conecte el adaptador de alimentación fan- 2.2 C 520 tasma del cable del micrófono a una entrada... -
Seite 46: Utilización
(La cubierta (4) estabiliza el arco auricular, im- pidiendo que se enreden pelos en el arco de alambre.) 5. Vuelva a colocar el cable en e la contratrac- ción (5). AKG C 520/C 520 L Downloaded from www.Manualslib.com manuals search engine... -
Seite 47: Colocarse El Micrófono
• Pruebe si el micrófono le queda mejor. De no hacerlo, vuelva a doblar el alambre un poco más pero con mucho cuidado. AKG C 520/C 520 L Downloaded from www.Manualslib.com manuals search engine... -
Seite 48: Posicionar El Micrófono
1. Retire el cuello de cisne (1) de la suje- ción (2). 2. Vuelva a enclavar el cuello de cisne (1) en el lugar deseado en la sujeción (2). AKG C 520/C 520 L Downloaded from www.Manualslib.com manuals search engine... -
Seite 49: Limpieza
4.1 Caja del medecido con agua. micrófono • La pantalla antiviento de goma espuma puede 4.2 Pantalla limpiarse fácilmente con un detergente suave y antiviento reutilizarse inmediatamente después de haberse secado. AKG C 520/C 520 L Downloaded from www.Manualslib.com manuals search engine... -
Seite 50: Eliminación De Fallos
10 dB entre el sible. cable de micrófono y la entrada. C 520 L: Véanse también los Manuales de Instrucciones del transmisor y del receptor. AKG C 520/C 520 L Downloaded from www.Manualslib.com manuals search engine... -
Seite 51: Datos Técnicos
C 520 L: 30 g / 471 g Este aparato corresponde a las normas citadas en la declaración de conformi- dad. Esta última está disponible en el sitio http://www.akg.com o puede ser soli- citada al correo electrónico sales@akg.com. Respuesta de frecuencia... - Seite 52 6 Especificações ........61 AKG C 520/C 520 L Downloaded from www.Manualslib.com...
-
Seite 53: Aviso De Segurança / Descricão
1 x W 44 Verifique se a embalagem contém todos os com- ponentes acima indicados. Caso falte algo, favor entre em contato com a concessionária da AKG. • Veja www.akg.com ou a brochura atual MicroMic. 1.3 Acessórios • C 520 L: Alimentador de pilhas B 29 L opcionais Apresentação... -
Seite 54: C 520
B 29 L, adatador de alimentação fantasma MPA V L ou a emissores PT 40 e PT 400 • Cabo de conexão com comprimento de 1,5 m enfichável com conector mini-XLR de 3 pólos AKG C 520/C 520 L Downloaded from www.Manualslib.com manuals search engine... -
Seite 55: Conexão
2.1 Introdução por isso precisa de uma alimentação de corrente. Se usar outros alimentadores senão aqueles Importante! recomendados pela AKG, o microfone pode ser danado e caduca a garantia. 1. Conete o adatador de alimentação fantasma 2.2 C 520 no cabo a uma entrada de microfone XLR com alimentação fantasma. -
Seite 56: Aplicação
(1). (A tampa (4) torna a haste estável, evitando que cabelo fique dentro do arco de arame.) 5. Pressione novamente o cabo para dentro da destração do cabo (5). AKG C 520/C 520 L Downloaded from www.Manualslib.com manuals search engine... -
Seite 57: Meter O Microfone
6, dobrando-os com cautela para dentro. • Experimente se o microfone está ajustado me- lhor. Caso contrário, dobre o arame um pouco mais com cautela. AKG C 520/C 520 L Downloaded from www.Manualslib.com manuals search engine... -
Seite 58: Posicionar O Microfone
1. Tire o pescoço de cisne (1) do disposi- tivo de fixação (2). 2. Fixe o pescoço de cisne (1) no disposi- tivo de fixação (2) na posição desejada. AKG C 520/C 520 L Downloaded from www.Manualslib.com manuals search engine... -
Seite 59: Limpeza
4.1 Carcaça do molhado em água. microfone • Lave o paravento de material esponjoso com 4.2 Paravento uma solução não agressiva de detergente. Pode usá-lo imediatamente depois de ter secado. AKG C 520/C 520 L Downloaded from www.Manualslib.com manuals search engine... -
Seite 60: Resolver Problemas
é demasia- atenuador de 10 dB damente sensível. entre o cabo de mi- crofone e a entrada. C 520 L: Veja também o manual do emissor e do receptor! AKG C 520/C 520 L Downloaded from www.Manualslib.com manuals search engine... -
Seite 61: Especificações
C 520: 30 g / 540 g C 520 L: 30 g / 471 g Este produto corresponde às normas citadas na declaração de conformidade, que pode pedir na nossa página da web http://www.akg.com, ou enviando-nos um email para sales@akg.com. Resposta de freqüência... - Seite 62 N N o o t t i i z z e e n n - - N N o o t t e e s s - - N N o o t t e e s s - - N N o o t t e e - - N N o o t t a a s s - - N N o o t t a a s s AKG C 520/C 520 L Downloaded from www.Manualslib.com...
- Seite 63 N N o o t t i i z z e e n n - - N N o o t t e e s s - - N N o o t t e e s s - - N N o o t t e e - - N N o o t t a a s s - - N N o o t t a a s s AKG C 520/C 520 L Downloaded from www.Manualslib.com...
- Seite 64 8500 Balboa Boulevard, Northridge, CA 91329, U.S.A, phone: (+1 818) 920-3212 e-mail: akgusa@harman.com For other products and distributors worldwide visit www.akg.com Technische Änderungen vorbehalten. Specifications subject to change without notice. Ces caractéristiques sont susceptibles de modifications. Ci riserviamo il diritto di effettuare modifiche tecniche. Nos reservamos el derecho de introducir modificaciones técnicas. Especificações sujei- tas a mudanças sem aviso prévio.