Herunterladen Inhalt Inhalt Diese Seite drucken

Werbung

Verfügbare Sprachen
  • DE

Verfügbare Sprachen

  • DEUTSCH, seite 1
Thermaxx Retroheat
Ölradiator
Oil radiator
Radiateur à bain d'huile
Radiador de aceite
Radiatore ad olio
10035081 10035082
Hinweis: Dieses Produkt ist nur für gut isolierte
Räume oder für den gelegentlichen Gebrauch
geeignet.
Note: This product is only suitable for well insulated
spaces or occasional use.
Nota: Este producto está indicado únicamente en
lugares abrigados o para una utilización punctual.
Remarque : Ce produit ne peut être utilisé que
dans des locaux bien isolés ou de manière
occasionnelle.
Nota: Questo prodotto è adatto solo per spazi ben
isolati o uso occasionale.

Werbung

Inhaltsverzeichnis
loading

Inhaltszusammenfassung für Klarstein Thermaxx Retroheat

  • Seite 1 Thermaxx Retroheat Hinweis: Dieses Produkt ist nur für gut isolierte Räume oder für den gelegentlichen Gebrauch geeignet. Note: This product is only suitable for well insulated Ölradiator spaces or occasional use. Oil radiator Nota: Este producto está indicado únicamente en Radiateur à...
  • Seite 3: Inhaltsverzeichnis

    Sehr geehrter Kunde, wir gratulieren Ihnen zum Erwerb Ihres Gerätes. Lesen Sie die folgenden Hinweise sorgfältig durch und befolgen Sie diese, um möglichen Schäden vorzubeugen. Für Schäden, die durch Missachtung der Hinweise und unsachgemäßen Gebrauch entstehen, übernehmen wir keine Haftung. Scannen Sie den QR-Code, um Zugriff auf die aktuellste Bedienungsanleitung und weitere Informationen rund um das Produkt zu erhalten.
  • Seite 4: Sicherheitshinweise

    SICHERHEITSHINWEISE • Kinder ab 8 Jahren, psychisch, sensorisch und körperlich eingeschränkte Menschen dürfen das Gerät nur benutzen, wenn sie vorher von einer für sie verantwortlichen Aufsichtsperson ausführlich mit den Funktionen und den Sicherheitsvorkehrungen vertraut gemacht wurden und die damit verbundenen Risiken verstehen. •...
  • Seite 5 oder die die Stromgrenzwerte überschreiten. • Gerät vom Stromversorgungsnetz trennen wenn es nicht in Betrieb ist. • Ziehen Sie nicht am Netzkabel oder am Gerät selbst, um den Netzstecker aus der Steckdose herauszuziehen. • Berühren Sie niemals das Gerät mit nassen oder feuchten Händen. •...
  • Seite 6: Geräteübersicht

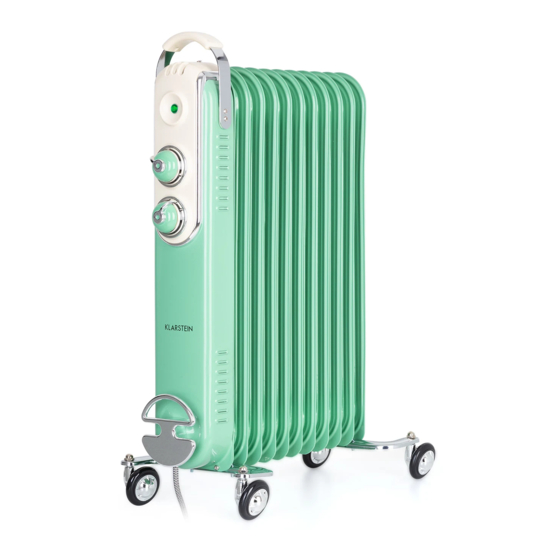
    GERÄTEÜBERSICHT Griff Leuchtanzeige des Betriebs Regelthermostat. Funktionswahlschalter. Timer (optional) Kabelaufwickler Halterung (2 Stück) Metallstützen (2 Stück) Flügelmuttern (4 Stück) Aufl agerollen (4 Stück) Muttern (4 Stück)
  • Seite 7: Montage Der Rollen

    MONTAGE DER ROLLEN Setzen Sie die Auflagerollen in die Löcher “C” und “D” in die Metallstützen ein und befestigen Sie sie mit den Muttern. Drehen Sie das Gerät mit der Oberseite nach unten, schrauben Sie die Flügelmuttern aus der Halterung (Abb. 1) und stecken Sie die Halterung zwischen das erste und das zweite Element (Abb.
  • Seite 8: Bedienung

    BEDIENUNG WARNUNG GEFAHR EINES BRANDES Verwenden Sie das Gerät nicht in der Nähe von Gardinen oder anderen brennbaren Materialien. Zum Anschalten des Geräts den Stecker mit dem Wandstecker verbinden, den Funktionsschalter (4) in die gewünschte Position drehen und den Temperaturschalter (3) im Uhrzeigersinn auf die maximale Position drehen.
  • Seite 9 Zeitzschaltuhr offener Kontakt geschlossener Kontakt 1. Stellen Sie die Uhrzeit der Zeitschaltuhr entsprechend der Uhr ein, indem Sie das Rad im Uhrzeigersinn drehen (nicht entgegen dem Uhrzeigersinn !). 2. Die Zeitschaltuhr hat einen kleinen Schalter. Die Funktionen sind: I= Gerät ist immer an; = Zeitschaltuhr ist eingeschaltet 3.
  • Seite 10: Wartung

    WARTUNG Vor dem Reinigen des Geräts ziehen Sie immer das Netzkabel aus der Steckdose heraus und lassen das Gerät völlig abkühlen. Zum Reinigen des Gerätes einen weichen und leicht feuchten Lappen benutzen. Keine Scheuerreiniger oder chemische Lösemittel benutzen. Verwenden Sie keine nassen Stoffe, Flüssigkeiten oder sehr nasse Tücher, da eventuell eindringendes Wasser das Gerät irreparabel beschädigen kann.
  • Seite 11: Produktdatenblatt

    PRODUKTDATENBLATT Modellkennungen 10035081, 10035082 Angabe Symbol Wert Einheit Angabe Einheit Wärmeleistung Nur bei elektrischen Speicher-Einzelraumheizgeräten: Art der Regelung der Wärmezufuhr Nennwärmeleistung Manuelle Regelung der Wärmezufuhr nein mit integriertem Thermostat Mindestwärmeleistung Manuelle Regelung der Wärmezufuhr nein (Richtwert) mit Rückmeldung der Raum- und/ oder Außentemperatur Maximale kontinuierliche Elektronische Regelung der Wärmezufuhr...
  • Seite 13: Technical Data

    Dear Customer, Congratulations on purchasing this equipment. Please read this manual carefully and take care of the following hints to avoid damages. Any failure caused by ignoring the mentioned items and cautions mentioned in the instruction manual are not covered by our warranty and any liability.
  • Seite 14: Safety Instructions

    SAFETY INSTRUCTIONS • Children over the age of 8 and persons with reduced physical, sensory or mental capabilities or those with a lack of experience and knowledge may only use the device if they are instructed on how to do so by a person responsible for their safety, or if they are supervised and understand the hazards associated with the use of the device.
  • Seite 15 • In case of a breakdown or malfunctioning of the appliance, disconnect it at once. • Do not attempt to repair it, but take it to a service centre approved by the manufacturer. • If you decide you do not want to use this appliance any longer, disable it by cutting the power cable - of course, after disconnecting it from the socket.
  • Seite 16: Device Description

    DEVICE DESCRIPTION Carry handle Inidicator light Adjustable thermostat Power selector Timer (option) Cord winder Brackets (2 pieces) Supports (2 pieces) Wing nuts (4 pieces) Support wheels (4 pieces) Nuts (4 pieces)
  • Seite 17: Assembly Of The Support Rolls

    ASSEMBLY OF THE SUPPORT ROLLS Insert the wheels into holes “C” and “D” in the metal supports and fasten them with the nuts. Turn the apparatus upside down, unscrew the wing nuts from the bracket (fig. 1) and insert the bracket between the first and second element (fig. 2). Insert the end of the bracket into holes “A”...
  • Seite 18: Operation

    OPERATION WARNING DANGER OF FIRE Do not place this product near curtains or other combustible material. To turn the appliance on, insert the plug in the power outlet, set the power selector (4) in the desired position and turn the adjustable thermostat (3) clockwise to the maximum position.
  • Seite 19 Timer open contact closed contact 1. Regulate the time of timer according to the clock by turn it clockwise (DO NOT TURN IT COUNTER CLOCKWISE) 2. The timer has a small swich,the function is as follow: I= Unit is always On; = Timer function is ON 3.
  • Seite 20: Maintenance

    MAINTENANCE This appliance does not require any special maintenance. Disconnect the plug from the socket and let the appliance cool down well before cleaning it. In order to clean the appliance, use a soft or slight damp cloth. Never use abrasives or chemical solvents. Do not use very wet substances, liquids or cloths to prevent water from entering into the apparatus and irreparably damaging it.
  • Seite 21: Product Data Sheet

    PRODUCT DATA SHEET Model identifiers 10035081, 10035082 Item Symbol Value Unit Item Unit Heat output Type of heat input, for electric storage local space heaters only Nominal heat output manual heat charge control, with integrated thermostat Minimum heat output manual heat charge control with room (indicative) and/or outdoor temperature feedback Maximum continuous...
  • Seite 23: Fiche Technique

    Chère cliente, cher client, Toutes nos félicitations pour l’acquisition de ce nouvel appareil. Veuillez lire attentivement et respecter les instructions de ce mode d’emploi afin d’éviter d’éventuels dommages. Nous ne saurions être tenus pour responsables des dommages dus au non-respect des consignes et à...
  • Seite 24: Consignes De Sécurité

    CONSIGNES DE SÉCURITÉ • Les enfants à partir de 8 ans ainsi que les personnes aux capacités physiques, mentales ou sensorielles réduites ne doivent utiliser l’appareil qu'après avoir été familiarisés par une personne responsable de leur sécurité aux fonctionnalités et aux mesures de sécurité...
  • Seite 25 • Ne laissez pas l'appareil exposé aux intempéries (pluie, ensoleillement). • Ne soumettez pas l'appareil à des coups ou des chocs. • En cas de défaut ou de dysfonctionnement, l'appareil doit être immédiatement déconnecté de l'alimentation électrique. • Si vous ne souhaitez plus utiliser l'appareil, rendez-le inutilisable en coupant le cordon d'alimentation (après l'avoir débranché).
  • Seite 26: Aperçu De L'appareil

    APERÇU DE L'APPAREIL Poignée Témoin de fonctionnement Thermostat réglable Sélecteur de fonction Minuterie (facultatif) Enrouleur de câble Support (2 pièces) Supports métalliques (2 pièces) Ecrous à oreilles (4 pièces) Roulettes (4 pièces) Ecrous (4 pièces)
  • Seite 27: Montage Des Roulettes

    MONTAGE DES ROULETTES Placez les roulettes de support dans les trous "C" et "D" des supports métalliques et fixez-les avec les écrous. Retournez l'appareil, dévissez les écrous à oreilles du support (Fig.1) et insérez le support entre le premier et le deuxième élément (Fig.2). Insérez l'extrémité du support dans les trous "A"...
  • Seite 28: Utilisation

    UTILISATION MISE EN GARDE RISQUE D'INCENDIE N'utilisez pas l'appareil à proximité de rideaux ou d'autres matériaux inflammables. Pour allumer l'appareil, branchez la fiche à la prise, tournez le sélecteur de fonction (4) dans la position souhaitée et tournez le sélecteur de température (3) dans le sens des aiguilles d'une montre jusqu'à...
  • Seite 29 Minuterie Contact ouvert Contact fermé 1. Réglez la minuterie en fonction de l'horloge en tournant la roue dans le sens horaire (pas dans le sens antihoraire !). 2. La minuterie a un petit interrupteur. Les fonctions sont : I = l'appareil est toujours allumé...
  • Seite 30: Maintenance

    MAINTENANCE Avant de nettoyer l'appareil, débranchez toujours le cordon d'alimentation de la prise et laissez l'appareil refroidir complètement. Utilisez un chiffon doux et légèrement humide pour nettoyer l'appareil. N'utilisez pas de nettoyants abrasifs ou de solvants chimiques. N'utilisez pas de substances humides, de liquides ou de chiffons très humides, car l'eau peut pénétrer irrémédiablement l'appareil.
  • Seite 31: Fiche De Données Produit

    FICHE DE DONNÉES PRODUIT Référence (s) du produit 10035081, 10035082 Donnée Symbole Valeur Unité Donnée Unité Puissance calorifique Uniquement pour les radiateurs électriques à accumulation : Type de régulation de l'apport de chaleur Puissance calorifique Pnom Régulation manuelle de l'apport de nominale chaleur avec thermostat intégré...
  • Seite 33: Datos Técnicos

    Estimado cliente: Le felicitamos por la adquisición de este producto. Lea atentamente el siguiente manual y siga cuidadosamente las instrucciones de uso con el fin de evitar posibles daños. La empresa no se responsabiliza de los daños ocasionados por un uso indebido del producto o por haber desatendido las indicaciones de seguridad.
  • Seite 34: Indicaciones De Seguridad

    INDICACIONES DE SEGURIDAD • Los niños mayores de 8 años y las personas con discapacidades físicas o psíquicas solamente podrán utilizar el aparato si han sido previamente instruidas sobre su uso y conocen las indicaciones de seguridad. • Los niños no deben jugar con el aparato. La limpieza y el mantenimiento del aparato no debe ser realizada por niños sin supervisión.
  • Seite 35 • No exponga el aparato a impactos ni golpes. • En caso de que se produzca una avería o un fallo en el funcionamiento, el aparato debe desconectarse del suministro eléctrico. • Si no desea utilizar más el aparato, desactívelo cortando el cable de alimentación (cuando no esté...
  • Seite 36: Vista General Del Aparato

    VISTA GENERAL DEL APARATO Indicador luminoso de funcionamiento Termostato regulador Interruptor de selección de funciones Temporizador (opcional) Compartimento para enrollar el cable Soporte (2 uds.) Soportes de metal (2 uds.) Tuercas de mariposa (4 uds.) Ruedas (4 uds.) Tuercas (4 uds.)
  • Seite 37: Montaje De Las Ruedas

    MONTAJE DE LAS RUEDAS Inserte las ruedas en los orificios "C" y "D" de los soportes de metal y fíjelas con las tuercas. Voltee el aparato para que la parte superior se oriente hacia abajo, desenrosque las tuercas de mariposa del soporte (il. 1) y encaje el soporte entre el primer y el segundo elemento (il.
  • Seite 38: Manejo

    MANEJO ADVERTENCIA RIESGO DE INCENDIO No utilice el aparato cerca de cortinas ni de otros materiales inflamables. Para encender el aparato, conecte el enchufe a la toma de corriente, gire el interruptor de funciones (4) a la posición deseada y el interruptor de temperatura (3) a la máxima posición en sentido horario.
  • Seite 39 Temporizador Contacto abierto Contacto cerrado 1. Ajuste la hora del temporizador girando la rueda en sentido horario (nunca en sentido antihorario). 2. El temporizador cuenta con un pequeño interruptor. Sus funciones son: I = aparato siempre encendido; = temporizador activado. 3.
  • Seite 40: Mantenimiento

    MANTENIMIENTO Antes de limpiar el aparato, desconecte siempre el cable de la toma de corriente y deje que el aparato se enfríe por completo. Para limpiar el aparato, utilice un paño húmedo y suave. No utilice limpiadores abrasivos ni disolventes químicos. No utilice tejidos mojados, líquidos ni paños muy mojados, pues una filtración de agua al interior del aparato podría causar daños irreparables.
  • Seite 41: Hoja De Datos Del Producto

    HOJA DE DATOS DEL PRODUCTO Denominación del modelo 10035081, 10035082 Dato Símbolo Valor Unidad Dato Unidad Potencia térmica Solo con disposítivos de acumulación de calor eléctricos para abastecimiento local: Tipo de regulación del abastecimiento de calor Potencia térmica nominal Pnom Regulación manual del abastecimiento de calor con termostato integrado: Potencia térmica mínima...
  • Seite 43: Dati Tecnici

    Gentile Cliente, La ringraziamo per aver acquistato il dispositivo. La preghiamo di leggere attentamente le seguenti istruzioni per l’uso e di seguirle per evitare possibili danni tecnici. Non ci assumiamo alcuna responsabilità per danni scaturiti da una mancata osservazione delle avvertenze di sicurezza e da un uso improprio del dispositivo.
  • Seite 44: Avvertenze Di Sicurezza

    AVVERTENZE DI SICUREZZA • Bambini a partire da 8 anni e persone con capacità fisiche e sensoriali limitate possono utilizzare il dispositivo solo se sono stati istruiti da una persona responsabile del loro controllo sulle funzioni e le procedure di sicurezza e comprendono i rischi associati.
  • Seite 45 • Non esporre il dispositivo ad agenti atmosferici (pioggia, raggi del sole). • Non sottoporre il dispositivo a colpi e urti. • In caso di guasto o malfunzionamento, il dispositivo deve essere scollegato immediatamente dalla rete elettrica. • Se il dispositivo non si desidera utilizzare più il dispositivo, disattivarlo tagliando il cavo di alimentazione (quando la spina è...
  • Seite 46: Descrizione Del Dispositivo

    DESCRIZIONE DEL DISPOSITIVO Impugnatura Spia di funzionamento Termostato di controllo Interruttore di selezione delle funzioni Timer (opzionale) Vano avvolgicavo Supporto (2 pz.) Supporti metallici (2 pz.) Dadi ad alette (4 pz.) Ruote (4 pz.) Dadi (4 pz.)
  • Seite 47: Montaggio Ruote

    MONTAGGIO RUOTE Inserire i rulli di supporto nei fori "C" e "D" dei supporti metallici e fissarli con i dadi. Capovolgere l'unità, svitare i dadi ad alette dalla staffa (Fig. 1) e inserire la staffa tra il primo e il secondo elemento (Fig. 2). Inserire l'estremità della staffa nei fori "A" e "B" del supporto metallico (Fig.
  • Seite 48: Utilizzo

    UTILIZZO AVVERTENZA PERICOLO D’INCENDIO Non utilizzare il dispositivo vicino a tende o altri materiali infiammabili. Per accendere il dispositivo, inserire la spina nella presa elettrica a muso, ruotare l’interruttore di selezione delle funzioni (4) nella posizione desiderata e girare l’interruttore della temperatura (3) in senso orario in posizione massima. Non appena è...
  • Seite 49 Timer Contatto aperto Contatto chiuso 1. Impostare l’ora del timer sull’ora effettiva, ruotando la manopola in senso orario (non in senso antiorario I). 2. Il timer non è dotato di interruttore. Le funzioni sono: I = dispositivo sempre acceso; = timer acceso. 3.
  • Seite 50: Manutenzione

    MANUTENZIONE Prima di pulire il dispositivo, staccare la spina dalla presa e farlo raffreddare completamente. Per la pulizia, utilizzare un panno morbido e leggermente inumidito. Non utilizzare detergenti abrasivi o solventi chimici. Non utilizzare tessuti bagnati, liquidi o panni fradici, dato che se dovesse penetrare acqua all’interno potrebbero risultare danni irreparabili.
  • Seite 51: Scheda Informativa Del Prodotto

    SCHEDA INFORMATIVA DEL PRODOTTO Identificazione del modello (i) 10035081, 10035082 Indicazione Simbolo Valore Unità Indicazione Unità Potenza termica Solo per gli apparecchi per il riscaldamento d'ambiente locale elettrici ad accumulo: Tipo di controllo dell´apporto termico Potenza termica nominale Pnom Controllo manuale del carico termico con termostato integrato Potenza termica minima Pmin...

Diese Anleitung auch für:

1003508110035082

Inhaltsverzeichnis