Inhaltsverzeichnis
Werbung
Verfügbare Sprachen
Verfügbare Sprachen
Quicklinks
hatcocorp.com
Register Online!
(see page 2)
Installation and Operating Manual
Beheizte Auslagevitrine
Serien GMHD
Installations- und Bedienungshandbuch
P 13
Registrieren Sie sich online!
Comptoir de Présentation Chauffant
Séries GMHD
Manuel d'installation et d'utilisation
P 37
S'inscrire en ligne!
Warmhoudvitrine
Modelreeksen GMHD
Handleiding voor Installatie en Bediening
P 61
Registreer online!
P/N 07.04.845.00
GLOMAX
Heated Display Case
GMHD Series
For
and Non-
Original Instructions
Instrucciones originales
Instructions originales
Originalanleitung
Istruzioni originali
Vertaling van de
originele instructies
®
Models
Gabinete Exhibidor Térmico
Series GMHD
Manual de Instalación y Operación
¡Regístrese en línea!
Vetrina Riscaldata
Manuale per l'installazione e l'uso
Registratevi online!
P 25
Serie GMHD
P 49
© 2018 Hatco Corporation
Werbung
Kapitel
Inhaltsverzeichnis

Verwandte Anleitungen für Hatco GLOMAX GMHD Serie


Inhaltszusammenfassung für Hatco GLOMAX GMHD Serie
- Seite 1 Séries GMHD Serie GMHD Manuel d’installation et d’utilisation Manuale per l’installazione e l’uso P 37 P 49 S’inscrire en ligne! Registratevi online! Warmhoudvitrine Modelreeksen GMHD Handleiding voor Installatie en Bediening P 61 Registreer online! P/N 07.04.845.00 © 2018 Hatco Corporation...
-
Seite 2: Inhaltsverzeichnis
Heated Display Cases are designed to hold ® prepared foods for prolonged periods of time while maintaining that “just made” quality. Hatco Heated Display Cases provide the best environment for food products by regulating the air WARNING temperature and providing humidity. The use of controlled heat maintains serving temperature and texture longer than conventional holding equipment. -
Seite 3: Important Safety Information
• Do not attempt to repair or replace a damaged This unit has no “user-serviceable” parts. If service power cord. The cord must be replaced by Hatco, an is required on this unit, contact an Authorized Hatco Authorized Hatco Service Agent, or a person with Service Agent or contact the Hatco Service Department at similar qualifications. -
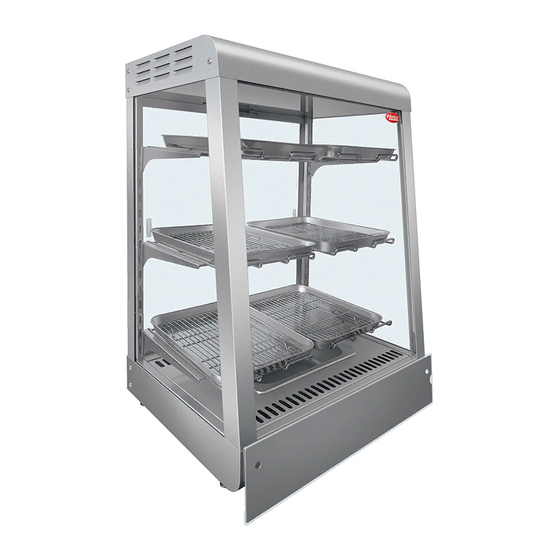
Seite 4: Model Description
MODEL DESCRIPTION All Models GMHDH-3PT All GLOMAX Heated Display Cases are constructed of The GMHDH-3PT models come with an electronically- ® stainless steel and aluminum with rear glass sliding doors controlled humidity system and can hold up to 9 food pans and full-view tempered glass on the front and sides. -
Seite 5: Specifications
NOTE: Receptacle not supplied by Hatco. NOTE: The specification label is located on the bottom of the unit. See label for serial number and verification of unit electrical information. -
Seite 6: Installation
INSTALLATION General 5. For GMHD models: install the front sign holder. GLOMAX Heated Display Cases are shipped with most ® a. Align the sign holder holes with the screw holes on the components pre-assembled. Care should be taken when unit and secure using the supplied screws. unpacking shipping carton to avoid damage to unit and b. -
Seite 7: Operation
OPERATION General Heat Control Knob Use the following procedures to operate the GLOMAX Heated ® Power I/O (on/off) Switch Display Case. WARNING Read all safety messages in the IMPORTANT SAFETY INFORMATION section before operating this equipment. GMHD-2PT Models Startup 1. Plug the unit into a properly grounded electrical receptacle Sliding of the correct voltage, size, and plug configuration. -
Seite 8: Gmhdh-3Pt Models
OPERATION GMHDH-3PT Models Shutdown Perform the following steps for shutdown of all models. Startup 1. Plug the unit into a properly grounded electrical receptacle 1. Move the Power I/O (on/off) switch on the base to the O of the correct voltage, size, and plug configuration. See (off) position. - Seite 9 OPERATION Setting the Air Temperature 1. Press the key to enter temperature setting mode. The temperature display will show the current temperature setting. 2. Press the key or key to reach the desired temperature. The temperature range is 20°–85°C (68°–185°F) in single degree increments. The temperature setting will begin to increase or decrease rapidly when holding the key or...
-
Seite 10: Maintenance
This unit has no “user-serviceable” parts. If service is required on this unit, contact an Authorized Hatco 9. Plug the unit into its power source and fill the reservoir Service Agent or contact the Hatco Service Department at as usual for daily operation using the procedure in the +1-414-671-6350. -
Seite 11: Troubleshooting Guide
Contact an Authorized Hatco Service Agent or Hatco for assistance. Unit is on, but not warming. Incorrect voltage supplied to heating element. Contact an Authorized Hatco Service Agent or Hatco for assistance. Heating element is defective. Contact an Authorized Hatco Service Agent or Hatco for assistance. -
Seite 12: International Limited Warranty
ANY OTHER PRODUCT OR GOODS. Replacement Parts SERVICE INFORMATION The warranty on this Hatco unit is for one year from date of The Hatco dealer will do the following: purchase or eighteen months from date of shipping from Hatco, • Provide replacement part(s) as required whichever occurs first. -
Seite 13: Wichtige Informationen Für Den Benutzer
(im Sommer: Juni bis September – Spannung und das Kaufdatum in die folgenden Zeilen. Haben 7.00 Uhr bis 17.00 Uhr Montag bis Donnerstag Sie bitte dies Information zur Hand, wenn Sie Hatco wegen 7.00 Uhr bis 16.00 Uhr Freitag) einer Service-Unterstützung anrufen. -
Seite 14: Wichtige Sicherheitshinweise
• Achten Sie darauf, dass keine Flüssigkeiten in das verhindern, und standfest genug, um das Gewicht von Gerät geschüttet werden. Gerät und Speisen zu tragen. • Verwenden Sie bei der Reparatur von Hatco Geräten HINWEIS ausschließlich Hatco Ersatzteile. Wenn Sie keine Original-Hatco-Ersatzteile verwenden, werden alle Verwenden Sie nur nichtscheuernde Reinigungsmittel. -
Seite 15: Modellbeschreibung
MODELLBESCHREIBUNG Alle Modelle GMHDH-3PT Alle GLOMAX Beheizte Vitrinen werden aus Edelstahl und Die Modelle GMHDH-3PT sind mit einem elektronisch ® Aluminium hergestellt, sie sind mit Glasschiebetüren auf der gesteuerten Feuchtigkeitssystem ausgestattet und darin können Rückseite sowie Hartglas auf der Vorderseite und an den bis zu 9 Lebensmittelbehälter mit Untersetzern aufbewahrt beiden Seitenflächen ausgestattet. -
Seite 16: Technische Daten
GEFAHR VON ELEKTROSCHOCKS: Das Gerät muss an eine ordnungsgemäß geerdete Steckdose mit der Steckerkonfigurationen richtigen Spannung, Größe und Steckerkonfiguration ANMERKUNG : Die Steckdose wird nicht von Hatco angeschlossen werden. Wenn Stecker und Steckdose nicht bereitgestellt. übereinstimmen, wenden Sie sich an einen qualifizierten... -
Seite 17: Aufstellen Des Gerät
AUFSTELLEN DES GERÄTS Allgemeines 5. Für GMHD-Modelle: Den vorderen Schilderhalter anbringen. Bei der Auslieferung der beheizten GLOMAX Auslagevitrinen ® sind die meisten Komponenten vormontiert. Beim Auspacken a. Richten Sie die Löcher der Tafelhalter mit den des Versandkartons darauf achten, um Schäden am Gerät und Schraubenlöchern am Gerät aus und sichern Sie sie den beiliegenden Komponenten zu verhüten. -
Seite 18: Betrieb
BETRIEB Allgemeines Abschalten Befolgen Sie die folgenden Schritte für alle Modelle, um sie Befolgen Sie die folgenden Verfahren, um die beheizte auszuschalten. GLOMAX Auslagevitrine in Betrieb zu nehmen. ® 1. Stellen Sie den Ein-/Ausschalter auf „O“ (aus). WARNUNG 2. Führen Sie die „tägliche Reinigung“ durch, wie im Abschnitt „WARTUNG“... -
Seite 19: Modelle Gmhdh-3Pt
BETRIEB Modelle GMHDH-3PT 4. Stellen Sie die Lufttemperatur auf die gewünschte Temperatur ein (siehe im Abschnitt „Lufttemperatur Inbetriebnahme einstellen“ beschriebene Vorgehensweise). 1. Stecken Sie das Gerät in eine ordnungsgemäß geerdete 5. Stellen Sie die Feuchtigkeit auf die gewünschte Stufe ein Steckdose mit der richtigen Spannung, Größe und (siehe im Abschnitt „Feuchtigkeit einstellen“... - Seite 20 BETRIEB Lufttemperatur einstellen 1. Drücken Taste, Temperatureinstellungsmodus öffnen. Temperaturanzeige zeigt die aktuelle Temperatureinstellung 2. Drücken Sie die Taste oder die Taste, gewünschte Temperatur einzustellen. Der Temperaturbereich liegt zwischen 20°–85 °C in Einzelzifferschritten. Die Temperatureinstellung erhöht oder verringert sich beim Drücken der Taste oder der Taste für 2 Sekunden schnell.
-
Seite 21: Wartung
Vorgang „Wasserbehälter entleeren” durch, um die Falls eine Reparatur dieses Geräts erforderlich sein Entkalkungslösung aus dem Wasserbehälter zu entleeren. sollte, wenden Sie sich an Ihren autorisierten Hatco 8. Füllen Sie den Wasserbehälter weiter mit sauberem Wasser Servicebetrieb oder an die Hatco Serviceabteilung unter und entleeren Sie den Wasserbehälter anschließend... -
Seite 22: Richtlinien Zur Störungsbeseitigung
Symptom Mögliche Ursache Abhilfemassnahme LED-Leuchten funktionieren LED-Leuchten sind defekt. Wenden Sie sich an Ihren Hatco Händler vor Ort oder an den nicht Kundendienst von Hatco. Das Gerät ist angeschlossen, Das Gerät wird nicht mit Strom versorgt. Wenden Sie sich an Ihren Hatco Händler vor Ort oder an den aber nichts funktioniert. -
Seite 23: Optionen Und Zubehör
OPTIONEN UND ZUBEHÖR Untersetzer Wasserbehälter (ausschließlich GMHD- Modelle) Untersetzer können als Zubehör bestellt werden. Wasserbehälter können als Zubehör bestellt werden. Untersetzer Pfannen für Speisen Wasserbehälter Pfannen für Speisen können als Zubehör bestellt werden. Pfanne für Speisen Form-Nr. GMHDCEM-0918... -
Seite 24: Internationale Beschränkte Garantie
SCHADENERSATZES Metall-ummantelte Speisenwärmer-Elemente Die Haftung seitens Hatco und das ausschließliche Rechtsmittel Metall-ummantelte Luft-Wärme-Elemente für Schaukästen des Käufers ist nach Ermessen von Hatco oder einer von Hatco Metall-ummantelte Luft-Wärme-Elemente für autorisierten Serviceagentur nur der Ersatz des von der Garantie Aufbewahrungskästen geschützten Teils oder Produktes, sofern die oben angeführten Eingebaute, metallummantelte Heizschachtelemente —... -
Seite 25: Información Importante Para El Propietario
(etiqueta de especificaciones ubicada en la 7:00 a.m. a 5:00 p.m., lunes a jueves parte inferior de la unidad). Por favor, tenga esta información 7:00 a.m. a 4:00 p.m., viernes) disponible cuando llame a Hatco para recibir asistencia técnica. Teléfono: +1-414-671-6350 ______________________________________ Modelo No. -
Seite 26: Información Importante De Seguridad
• Esta unidad no tiene una construcción “a prueba de autorizado de Hatco o con el Departamento de Servicio de chorros”. No use un pulverizador de limpieza a chorro Hatco al +1-414-671-6350. -
Seite 27: Descripción Del Modelo
DESCRIPCIÓN DEL MODELO Todos los modelos GMHDH-3PT All GLOMAX Los exhibidores calientes se construyen de acero Los modelos GMHDH-3PT vienen con un sistema de ® inoxidable y aluminio con puertas traseras corredizas de vidrio humedad con control termostático y pueden albergar y vidrios templados en el frente y los costados que permiten hasta 9 bandejas de alimentos con rejillas separadoras. -
Seite 28: Especificaciones
Configuraciones del Enchufe voltaje, tamaño y configuración del enchufe correctos. Si NOTA: Hatco no proporciona el tomacorriente. el enchufe y el tomacorriente no coinciden, comuníquese con un electricista calificado para determinar e instalar el NOTA: La etiqueta de especificaciones está... -
Seite 29: Instalación
INSTALACIÓN Generalidades 5. Para los modelos GMHD: instale el soporte del letrero delantero. Los gabinetes exhibidores térmicos GLOMAX se envían con ® la mayoría de los componentes preensamblados. Debe tener a. Alinee los orificios del soporte del letrero con los orificios cuidado al desempacar la caja en la que se envía la unidad de los tornillos en la unidad y asegúrelas utilizando los para evitar dañar la unidad y los componentes incluidos. -
Seite 30: Operación
OPERACIÓN Generalidades Apagado Seguir los siguientes pasos para apagar todos los modelos. Seguir los siguientes pasos para utilizar los gabinetes exhibidores térmicos GLOMAX. 1. Coloque los interruptores de encendido y apagado (I/O) en la posición O (apagado). ADVERTENCIA 2. Realice el procedimiento de “limpieza diaria” que se describe en la sección MANTENIMIENTO de este manual. -
Seite 31: Modelos Gmhdh-3Pt
OPERACIÓN Modelos GMHDH-3PT 5. Establezca la humedad en el nivel deseado (consulte el procedimiento “Establecimiento de la humedad” en esta Puesta en funcionamiento sección). 1. Enchufe la unidad a un tomacorriente puesto a tierra, que 6. Espere 30 minutos para que la unidad alcance la tenga el voltaje, el tamaño y la configuración de enchufe temperatura operativa antes de colocar el gabinete con adecuados. - Seite 32 OPERACIÓN Establecimiento de la temperatura del aire 1. Presione la tecla para ingresar al modo de establecimiento de temperatura. La pantalla de temperatura muestra el ajuste de temperatura actual. 2. Presione la tecla para alcanzar la temperatura deseada. El rango de temperaturas es de 20 ° a 85 °C (68 °...
-
Seite 33: Mantenimiento
9. Enchufe la unidad en la fuente de alimentación y autorizado de Hatco o con el Departamento de Servicio de llene el depósito como lo hace normalmente para el Hatco al +1-414-671-6350. -
Seite 34: Guía De Resolución De Problemas
Si no logra resolver un problema, póngase en contacto con en la pantalla digital para indicar un error en la condición de el agente de servicio autorizado de Hatco más cercano para funcionamiento de la unidad. Póngase en contacto con un obtener ayuda. -
Seite 35: Opciones Y Accesorios
OPCIONES Y ACCESORIOS Trébedes Recipientes para agua (Modelos GMHD únicamente) Las trébedes se pueden encargar como accesorios. Recipientes para agua se pueden encargar como accesorios. Trébede Recipiente para agua Recipientes para alimentos Los recipientes para alimentos se pueden encargar como accesorios. -
Seite 36: Garantía Internacional Limitada
Hatco, o por INFRACCIÓN DEL DERECHO DE PROPIEDAD INTELECTUAL. 18 meses a partir de su envío por Hatco. El comprador debe Sin limitar la generalidad de lo anterior, TALES GARANTÍAS establecer la fecha de compra del producto registrando el... -
Seite 37: Informations Importantes Pour Le Propriétaire
Les comptoirs de présentation chauffants AVERTISSEMENT Hatco sont le moyen idéal de conserver les aliments, car ils régulent la température de l’air. L’utilisation d’une chaleur contrôlée permet de maintenir la température de service et de préserver la texture plus longtemps qu’avec un équipement... -
Seite 38: Consignes De Sécurité Importantes
DANGER DE BRÛLURE : Certaines surfaces extérieures électrique endommagé. Ce cordon doit être changé de l’appareil deviennent chaudes. Toucher ces zones de par Hatco, par un réparateur Hatco agréé ou par une l’appareil avec précaution. personnes de qualifications comparables. Placer l’appareil sur un plan de travail de hauteur correcte •... -
Seite 39: Description Du Modèle
DESCRIPTION DU MODÈLE Tous les modèles GMHDH-3PT Tous les comptoirs de présentation chauffants GLOMAX sont Les modèles GMHDH-3PT sont équipés d’un système ® en acier inoxydable et en aluminium avec des portes arrière d’humidité à commande électronique et peuvent contenir coulissantes en verre, ainsi que du verre trempé... -
Seite 40: Caractéristiques Techniques
Si la Configuration des fiches fiche et la prise ne se correspondent pas, s’adresser à un NOTA: Prise non fournie par Hatco. électricien qualifié pour déterminer et installer une prise de courant de format et de tension corrects. -
Seite 41: Installation
INSTALLATION Généralités 5. Pour les modèles GMHD : installez le support d’enseigne frontal. La plupart des composants des comptoirs de présentation GLOMAX sont préassemblés avant l’expédition. Faire ® a. Alignez les trous du support d’enseigne avec les trous attention lors du déballage pour éviter d’endommager l’appareil de vis de l’appareil et maintenir en place grâce aux vis et ses composants. -
Seite 42: Mode D'emploi
MODE D’EMPLOI Généralités Bouton de réglage Interrupteur de la chaleur Suivez les étapes ci-dessous pour faire fonctionner le comptoir d’alimentation I/O de présentation chauffant GLOMAX (marche/arrêt) ® AVERTISSEMENT Lire tous les messages de sécurité de la section Consignes de sécurité importantes avant d’utiliser ce matériel. Modèles GMHD-2PT Mise en service 1. -
Seite 43: Modèles Gmhdh-3Pt
MODE D’EMPLOI Modèles GMHDH-3PT 4. Réglez la température de l’air selon la température souhaitée (consultez la procédure « Réglage de la Mise en service température de l’air » de cette section). 1. Branchez l’appareil à une prise de courant reliée à la terre 5. - Seite 44 MODE D’EMPLOI Réglage de la température de l’air 1. Appuyez sur le bouton pour passer en mode de réglage de la température. L’affichage de température montre le réglage de température actuel. 2. Appuyez bouton pour atteindre température souhaitée. plage de températures va de 20 °C à 85 °C (68 °F à...
-
Seite 45: Maintenance
Si cet appareil doit être réparé, contacter un 8. Continuez à remplir et à vidanger le réservoir d’eau avec réparateur Hatco agréé ou le Service après-vente Hatco au de l’eau propre jusqu’à ce que la solution de détartrage +1 414-671-6350. -
Seite 46: Guide De Dépannage
Si le problème persiste, veuillez contacter l’agence d’entretien d’affichage numérique pour indiquer une erreur au niveau du agréée Hatco la plus proche ou Hatco pour obtenir une fonctionnement de l’appareil. Contactez un agent de service assistance. Pour trouver l’agence d’entretien la plus proche, Hatco agréé... -
Seite 47: Options Et Accessoires
OPTIONS ET ACCESSOIRES Grilles Cuvettes d’eau (Modèles GMHD uniquement) Les grilles peuvent être commandées en guise d’accessoires. Les cuvettes d’eau peuvent être commandées en guise d’accessoires. Grille Bacs alimentaires Cuvette d’eau Les bacs alimentaires peuvent être commandés en guise d’accessoires. Bac alimentaire Formulaire n°... -
Seite 48: Garantie Limitée Internationale
écrites de INTELLECTUELLE. Sans limitation quand aux garanties pré- Hatco ou de 18 mois à partir de la date d’expédition de l’usine citées, DE TELLES GARANTIES NE COUVRENT PAS: Les Hatco. L’acheteur doit prouver la date d’achat du Produit par ampoules à... -
Seite 49: Informazioni Importanti Per Il Proprietario
ATTENZIONE Le vetrine riscaldate GLOMAX Hatco sono il prodotto di approfondite ricerche e prove sul campo. I materiali impiegati sono stati selezionati per ottimizzarne la durevolezza, l’estetica e le prestazioni. -
Seite 50: Importanti Informazioni Sulla Sicurezza
Agente di assistenza autorizzato • Non tirare l’unità dal cavo di alimentazione. di Hatco o con il Reparto di assistenza di Hatco al numero telefonico +1-414-671-6350. • Smettere di usare l’unità se il cavo di alimentazione si consuma o si logora. -
Seite 51: Descrizione Dei Modelli
DESCRIZIONE DEI MODELLI Tutti i modelli GMHDH-3PT Tutti i GLOMAX Gli espositori riscaldati sono costruiti in I modelli GMHDH-3PT sono forniti con un sistema di ® acciaio inox e alluminio con sportelli posteriori scorrevoli in umidificazione controllato elettronicamente e possono vetro e vetro temperato completamente a vista sulla parte contenere fino a 9 vassoi per cibi con treppiedi. -
Seite 52: Dati Tecnici
Configurazioni delle spine tensione e configurazione di spina. Se la spina e la presa NOTA: Presa non fornita da Hatco. non corrispondono, mettersi in contatto con un elettricista qualificato per stabilire la tensione corretta e installare la NOTA: L’etichetta delle specifiche è... -
Seite 53: Installazione
INSTALLAZIONE Informazioni generali 5. Per i modelli GMHD: installare il supporto dell’insegna anteriore. Le vetrine riscaldate GLOMAX sono consegnate con la ® maggior parte dei componenti preassemblati. Nell’aprire a. Allineare i fori del porta targhette sull'unità e fissarlo con l’imballaggio fare attenzione ad evitare di danneggiare l’unità le viti in dotazione. -
Seite 54: Funzionamento
FUNZIONAMENTO Informazioni generali Manopola di Azionare la vetrina riscaldata GLOMAX adottando le seguenti controllo termico Interruttore di accensione (I/O) procedure. AVVERTENZA Prima di usare l’unità, leggere tutti i messaggi di sicurezza contenuti nella sezione IMPORTANTI INFORMAZIONI SULLA SICUREZZA. Modelli GMHD-2PT Avvio 1. -
Seite 55: Modelli Gmhdh-3Pt
FUNZIONAMENTO Modelli GMHDH-3PT 4. Impostare la temperatura dell’aria in modo da ottenere la temperatura voluta (fare riferimento a "Impostazione della Avvio temperatura dell'aria" in questa sezione). 1. Collegare l'unità a una presa elettrica con messa a 5. Impostare l’umidità al livello desiderato (fare riferimento a terra, tensione, dimensione e configurazione della spina "Impostazione dell'umidità"... - Seite 56 FUNZIONAMENTO Impostazione della temperatura dell'aria 1. Premere il tasto per entrare in modalità di impostazione della temperatura. Il display della temperatura mostra l’impostazione attuale della temperatura. 2. Premere il tasto o il tasto per raggiungere la temperatura desiderata. L’intervallo di temperatura è di 20-85 °C (68-185 °F) con incrementi di un grado.
-
Seite 57: Manutenzione
Agente di assistenza serbatoio dell'acqua. autorizzato di Hatco o con il Reparto di assistenza di Hatco 8. Continuare a riempire e svuotare il serbatoio dell'acqua al numero telefonico +1-414-671-6350. -
Seite 58: Guida Alla Soluzione Dei Problemi
Se non si riesce a risolvere un problema, contattare il centro I seguenti codici di errore possono apparire sul display digitale di assistenza autorizzato più vicino o Hatco per ricevere per segnalare un errore nelle condizioni di funzionamento assistenza. Per trovare il centro assistenza più vicino, dell'unità. -
Seite 59: Opzioni E Accessori
OPZIONI E ACCESSORI Sottopentola Vaschette dell'acqua (Solo modelli GMHD) I sottopentola sono ordinabili come accessori. Le vaschette dell'acqua sono ordinabili come accessori. Sottopentola Vaschetta dell'acqua Vaschette per alimenti Le vaschette per alimenti sono ordinabili come accessori. Vaschetta per alimenti N. di pubblicazione GMHDCEM-0918... -
Seite 60: Garanzia Limitata Internazionale
Componenti di sostegno dell’armatura (impianto di parti nuove o rigenerate, a scelta di Hatco, da parte di Hatco riscaldamento ad aria rivestito in metallo ) stessa o di un centro di servizio autorizzato in relazione Elementi del pozzo riscaldato incorporato —... -
Seite 61: Belangrijke Informatie Voor De Eigenaar
Zorg 7:00 uur tot 17:00 uur maandag tot donderdag ervoor dat u deze informatie ter beschikking hebt als u Hatco 7:00 uur tot 16:00 uur op vrijdag) voor service belt. -
Seite 62: Belangrijke Veiligheidsinformatie
• De constructie van dit apparaat is niet bestand tegen kunnen worden vervangen. Als het apparaat moet worden hogedrukspuiten. Gebruik geen sprays met een hersteld neemt u contact op met een erkend Hatco spuitstraal om dit apparaat schoon te maken. servicevertegenwoordiger of de Hatco serviceafdeling op het nummer +1-414-671-6350. -
Seite 63: Modelbeschrijving
MODELBESCHRIJVING GMHDH-3PT Alle modellen GMHD-3PT-modellen worden geleverd met een elektronische Alle GLOMAX Warmhoudvitrines zijn gemaakt van roestvrij ® vochtigheidsregelaar en zijn geschikt voor maximaal 9 staal en aluminium, met glazen schuifdeuren. De voor- en voedselpannen met onderzetters. Voedselpannen zijn zijkanten zijn volledig voorzien van gehard glas voor een volledig 245 mm x 185 mm (9-5/8″... -
Seite 64: Specificaties
CEE 7/7 Schuko BS-1363 CH1-10P niet passen, neemt u contact op met een gekwalificeerd elektricien om een stopcontact met de correcte spanning en grootte te installeren. Stekkerconfiguraties OPMERKING: Stopcontact niet door Hatco geleverd. Tabel met elektrische gegevens Model Spanning Watts Ampère Stekkerconfiguratie... -
Seite 65: Installatie
INSTALLATIE Algemeen 4. Plaats de planken, voedselpannen en onderzetters. GLOMAX warmhoudvitrines worden verzonden met ® 5. Voor GMHD-modellen: plaats de houder voor het de meeste onderdelen vooraf gemonteerd. Nell’aprire naambordje op de voorkant. l’imballaggio fare attenzione ad evitare di danneggiare l’unità a. -
Seite 66: Werking
WERKING Algemeen Warmteregelknop I/O-voedingsschakelaar Voer de volgende procedure uit om het apparaat te bedienen. (aan/uit) WAARSCHUWING Lees alle veiligheidsvoorschriften onder Belangrijke veiligheidsinformatie voor u dit apparaat bedient. GMHD-2PT-modellen Ingebruikname Schuifdeur 1. Steek de stekker van het apparaat alleen in een naar behoren geaard stopcontact met de correcte spanning, grootte en stekkerconfiguratie. -
Seite 67: Gmhdh-3Pt-Modellen
WERKING GMHDH-3PT-modellen Uitschakelen Volg voor alle modellen de volgende stappen om het apparaat Ingebruikname uit te schakelen. 1. Steek de stekker van het apparaat in een correct geaard elektrisch stopcontact met de juiste spanning en de juiste 1. Zet de aan-uitknop op de voet op stand O (uit). grootte en stekkerconfiguratie. -
Seite 68: Onderhoud
Voor GMHDH-modellen: Raadpleeg de procedure 'Het kunnen worden vervangen. Als het apparaat moet worden verwijderen van kalk en afzetting van mineralen' in deze hersteld neemt u contact op met een erkend Hatco paragraaf. servicevertegenwoordiger of de Hatco serviceafdeling op het nummer +1-414-671-6350. -
Seite 69: Het Verwijderen Van Kalk En Afzetting Van Mineralen (Gmhdh-Modellen)
ONDERHOUD Het verwijderen van kalk en afzetting van Legen van het waterreservoir (GMHDH- mineralen (GMHDH-modellen) modellen) Volg de volgende procedure om het waterreservoir van Het waterreservoir moet leeg zijn voordat het apparaat wordt GMHDH-modellen periodiek te reinigen en te ontkalken. verplaatst en tijdens de procedure 'Verwijderen van kalk en afzetting van mineralen'. -
Seite 70: Oplossen Van Problemen
Hatco contact opnemen voor assistentie. Ga voor aan het geven. Neem contact op met een erkende Hatco- het dichtstbijzijnde servicepunt naar onze website www. vertegenwoordiger of Hatco voor ondersteuning. -
Seite 71: Internationale Beperkte Garantie
Zonder de algemeenheid van het voorafgaande te De koper van het product moet de aankoopdatum valideren beperken DEKKEN ZULKE GARANTIES NIET HET door het product te registreren bij Hatco of door andere VOLGENDE: Gloeilampen met coating, fluorescentielampen, bevredigende middelen naar Hatco’s eigen goeddunken. - Seite 72 Water bijvullen, laag waterpeil Humidity, Humidity Cycle Feuchtigkeit, Befeuchtungszyklus Humedad, ciclo de humedad Umidità, ciclo di umidità Humidité, Cycle Humidité Vochtigheid, bevochtigingscyclus HATCO CORPORATION P.O. Box 340500 Milwaukee, WI 53234-0500 U.S.A. Telephone 414-671-6350 support@hatcocorp.com www.hatcocorp.com September 2018 P/N 07.04.845.00 Form No. GMHDCEM-0918...