Olimpia splendid LIMPIA 6 Hinweise Für Die Verwendung Und Pflege
Vorschau ausblenden
Andere Handbücher für LIMPIA 6:
- Hinweise für die verwendung und pflege (53 Seiten)
Inhaltsverzeichnis
Werbung
Verfügbare Sprachen
Verfügbare Sprachen
Quicklinks
Werbung
Inhaltsverzeichnis

Verwandte Anleitungen für Olimpia splendid LIMPIA 6


Inhaltszusammenfassung für Olimpia splendid LIMPIA 6
- Seite 1 LIMPIA 6 On/O TEMP TUMID 1 2 4 8 Timer TIMER MIST+/- Heat ISTRUZIONI PER USO E MANUTENZIONE INSTRUCTION FOR USE AND MAINTENANCE MODE D'EMPLOI ET D'ENTRETIEN HINWEISE FÜR DIE VERWENDUNG UND PFLEGE INSTRUCCIONES PARA EL USO Y EL MANTENIMIENTO...
- Seite 2 QUANDO SI UTILIZZANO APPARECCHIATURE ELETTRICHE, È SEMPRE NECESSARIO SEGUIRE PRECAUZIONI DI SICUREZZA DI BASE PER RIDURRE RISCHI DI INCENDIO, SCOSSE ELETTRICHE E INFORTUNI A PERSONE, INCLUSO QUANTO SEGUE: Questo prodotto deve essere utilizzato unicamente secondo le 1 - ATTENZIONE Questa è un’apparecchiatura elettrica e richiede atten- zione durante l’utilizzo.
- Seite 3 36 - Non coprire la bocchetta con un panno o la mano e non utilizzare senza la bocchetta. 37 - Utilizzare acqua potabile o distillata nella tanica. Le aree con acque dure richiederanno la pulizia più frequente. LIMPIA 6...
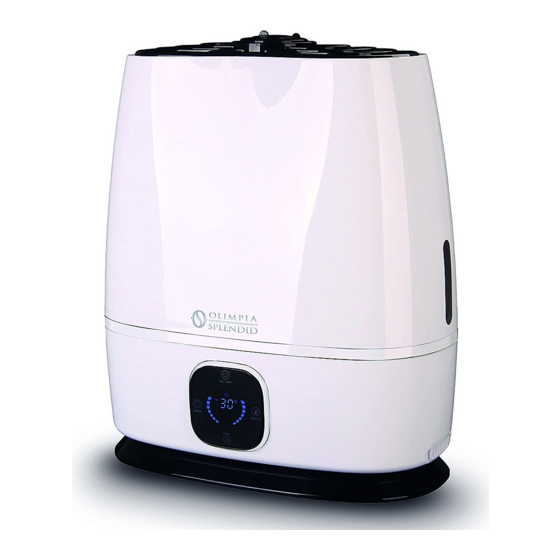
- Seite 4 1- CARATTERISTICHE PRINCIPALI E FUNZIONAMENTO • 3 livelli di emissione. • Nebbia calda/fresca. • Vano per aggiunta aroma. Finestra livello acqua a corredo) Tappo della tanica Corpo Pannello di controllo Vano aroma Filtro aria SOLO PER USO DOMESTICO...
- Seite 5 Versare acqua fredda potabile Chiudere il coperchio della tanica, direttamente nella tanica. Non girandolo a destra. È importante versare nient’altro che acqua nella tanica. dopo avere riempito la tanica con acqua. Fissare la tanica alla base dell’unità. LIMPIA 6...
- Seite 6 A) ON/OFF Premere il pulsante ON/OFF per selezionare nebbia calda (icona sole accesa) o fresca (icona sole spenta). Premere il pulsante MIST per regolare il livello di emissione su basso, medio o alto. Si consiglia di impostare un livello di emissione di nebbia basso per l’uso notturno. D) Timer Premere il pulsante TIMER, da apparecchio in funzione, per impostare il tempo (ore) allo spegnimento.
-
Seite 7: Manutenzione Giornaliera
Se si nota un accumulo d’acqua durante l’uso, ridurre l’umidità e Se si utilizza acqua dura, distillata o acqua di rubinetto, oc- corre pulire settimanalmente il trasduttore. Risciacquare con acqua pulita e lasciare asciugare. LIMPIA 6... - Seite 8 5c- DISCO ULTRASONICO Togliere la spina di alimentazione dell’unità. Rimuovere la tanica e svuotare tutta l’acqua dalla vasca e tanica dell’unità. Individuare il disco ultrasonico nella parte centrale interna dell’unità di base. Usare SOLO un pennello morbido per pulire delicatamente il disco e rimuovere accumuli e depositi.
- Seite 9 • Imballare l’unità nel suo cartone originale e conservare in luogo fresco e asciutto. NOTA: SE SI RISCONTRA UN PROBLEMA NON TENTA- ANNULLARE LA GARANZIA E CAUSARE DANNI LIMPIA 6...
-
Seite 10: Guida Per La Risoluzione Dei Problemi
6- GUIDA PER LA RISOLUZIONE DEI PROBLEMI PROBLEMA SOLUZIONE Vapore d'acqua e umidità non • Spina di alimentazione: Scollegare e quindi riprovare. vengono prodotti. • Interruzione di corrente: Quando la corrente torna, riprovare. • Installazione della tanica: Accertarsi che la tanica sia collegata correttamente. •... - Seite 11 SMALTIMENTO Il simbolo su il prodotto o sulla confezione indica che il prodotto non deve essere considerato come un normale appropriato per il riciclaggio di apparecchiature elettriche ed elettroniche. Provvedendo a smaltire questo prodotto i n modo appropriato, si contribuisce a evitare potenziali conseguenze negative per l’ambiente e per la salute, che potrebbero derivare da uno smaltimento inadeguato del prodotto.
- Seite 12 WHEN USING ELECTRICAL APPLIANCES, BASIC SAFETY PRECAUTIONS SHOULD ALWAYS BE FOLLOWED TO REDUCE THE RISK OF FIRE, ELECTRIC SHOCK, AND INJURY TO PERSONS, INCLUDING THE FOLLOWING: 1 - CAUTION This is an electrical appliance and requires attention when in use. 2 - CAUTION To reduce the risk of severe burns, keep this product out of the reach of children and pets.
- Seite 13 35 - 36 - spout. 37 - Use clean or distilled water in tank. Hard water areas will require more frequent cleaning. 38 - If moisture forms on the walls or windows of the room, turn off the LIMPIA 6...
- Seite 14 1- MAIN FEATURES AND OPERATING • 3 emission levels. • Warm/cool mist. • • Flavour addition compartment. Mist outlet Decorative cover Water tank Cover Water tank cap Control panel Flavour compartment FOR HOUSEHOLD USE ONLY...
- Seite 15 Separate the tank from the base tank lid, turning it to the left. of the unit. Close the tank lid, turning it to the right. It is important to FIRMLY water into the tank. water. Attach tank to base of unit. LIMPIA 6...
- Seite 16 3- OPERATING INSTRUCTIONS A) ON/OFF Press the button to TURN ON and TURN OFF the appliance. B) Hot/cool mist Press the ON/OFF button to select warm mist (sun icon turned on) or fresh (sun icon turned off). Press the MIST button to adjust the emission level to low, medium or high. To set a low mist emission level for night use is advised.
-
Seite 17: Daily Maintenance
Before clearing, turn off the power and unplug the appliance from the electrical outlet. 5- CLEANING 5a- GENERAL CLEANING water and a light brush (a soft paintbrush is advised). Wipe the surface of the unit with a soft, damp cloth if need- surface with a cloth. LIMPIA 6... - Seite 18 5c- ULTRASONIC DISK Unplug unit. Locate the ultrasonic disk on the inside centre of the base unit. ONLY use a soft paintbrush to clean the disk and remove accumulations and deposits. * Clean the disk with a soft paintbrush. No other cleaning tool should be used.
- Seite 19 4. Also check mist nozzle and mist tube in water tank. Clean as needed. 5d- END OF SEASON STORAGE end of the season. NOTE: IF YOU EXPERIENCE A PROBLEM DO NOT AT- TEMPT TO OPEN THE MOTOR HOUSING YOUR- AND CAUSE DAMAGE TO THE HUMIDIFIER OR LIMPIA 6...
-
Seite 20: Troubleshooting Guide
6- TROUBLESHOOTING GUIDE PROBLEM SOLUTION Water vapor and humidity are • not produced. • • Tank Installation: Make sure the tank is correctly attached. • The surface of the ultrasonic disk is dirty: Clean ultrasonic disk. • produced. • • The surface of the ultrasonic disk is dirty: Clean ultrasonic disk. •... - Seite 21 DISPOSAL appliance cannot be treated as normal domestic trash, but and electronic appliances. Your contribution to the correct disposal of this product disposal.
- Seite 22 LES PRECAUTIONS SUIVANTES: 2 - ATTENTION pour réduire le risque de graves brûlures, tenir le produit du produit (sachets en plastique etc.). 4 - Le démontage, la réparation ou la reconversion par une personne non autorisée pourrait comporter des dommages graves et entraîner l’annulation de la garantie du fabricant.
- Seite 23 36 - Ne pas couvrir la goulotte avec un chiffon ou la main et ne pas utiliser sans la goulotte. 37 - Utiliser de l’eau potable ou distillée dans le réservoir. Les régions à 38 - S’il se forme de l’humidité sur les murs ou les fenêtres de la pièce, LIMPIA 6...
- Seite 24 1- CARACTERISTIQUES PRINCIPALES ET FONCTIONNEMENT • • Brume chaude/fraîche. • • Compartiment pour l’ajout d’arômes. en dotation) Couvercle Flotteur Corps Pupitre de contrôle Compartiment pour arôme SEULEMENT POUR USAGE DOMESTIQUE...
- Seite 25 Verser de l’eau froide potable di- Fermer le couvercle du réservoir, rectement dans le réservoir. en le tournant vers la droite. Il est Ne rien verser d’autre que de l’eau dans le réservoir. le bouchon après avoir rempli le réservoir avec de l’eau. LIMPIA 6...
- Seite 26 A) ON/OFF allumée) ou froid (icône soleil éteinte). est recommandé de régler un faible niveau d’émission de brouillard faible dans le cadre d’une utilisation nocturne. D) Minuterie...
-
Seite 27: Entretien Quotidien
Vider le réservoir d’eau. Enlever la buse de diffusion de brume et (l’utilisation d’une brosse douce est recommandée). humide, si nécessaire. Si l’on remarque une accumulation d’eau pendant l’utilisation, Si l’on utilise de l’eau dure, distillée ou de l’eau du robinet, Rincer à l’eau claire et laisser sécher. LIMPIA 6... - Seite 28 5c- DISQUE A ULTRASONS Enlever le réservoir et vider l’eau du bac et du réservoir de l’unité. le disque et éliminer la saleté accumulée et les dépôts. douce uniquement. Ne pas utiliser d’autres outils de net-...
- Seite 29 5d- REMISAGE EN FIN DE SAISON NE PAS remiser avec de l’eau à l’intérieur du bac ou du réservoir d’eau. • Emballer l’unité dans son carton d’origine et conserver dans un endroit frais et sec. RAIT ANNULER LA GARANTIE ET CAUSER DES LIMPIA 6...
-
Seite 30: Guide Pour La Resolution Des Problemes
6- GUIDE POUR LA RESOLUTION DES PROBLEMES PROBLEME SOLUTION La vapeur d'eau et humidité ne • sont pas produits. • • • La surface du disque à ultrasons est encrassée : Nettoyer le disque à ultrasons. • Eau excessive: enlever une certaine quantité d'eau du réservoir. •... - Seite 31 ELIMINATION que ce produit ne doit pas être jeté au titre des ordures ménagères normales, mais doit être remis à un centre électroniques. En contribuant à une élimination correcte de ce produit, vous protéger l’environnement et la santé d’autrui. L’environnement et la santé...
- Seite 32 BEI VERWENDUNG ELEKTRISCHER GERÄTE IST ES STETS ERFORDERLICH, DIE GRUNDLEGENDEN SICHERHEITSVORKEHRUNGEN ZU BEACHTEN, UM GEFAHREN FÜR PERSONEN DURCH BRAND, ELEKTRISCHEN STROMSCHLAG UND UNFÄLLE ZU REDUZIEREN, IM EINZELNEN: halten Sie das Produkt fern von Kindern und Haustieren. 6 - Stellen Sie den Befeuchter auf eine stabile, ebene und nivellierte 7 - Blockieren Sie den Lufteinlass oder -auslass nicht.
- Seite 33 Reinigern oder Substanzen. 26 - die Materialien der Einheit und in der Folge die gesamte Einheit.Jegliche len Sie nichts auf oder in den Tank. Steckdose trennen. erfolgt, nicht feucht werden. Sie dieses seitlich aus. 38 - LIMPIA 6...
-
Seite 34: Haupteigenschaften Und Betrieb
1- HAUPTEIGENSCHAFTEN UND BETRIEB • 3 Ausgabelevels. • • • Dekorationsdeckel Wassertank Deckel Wassertankver- Korpus FÜR DEN HÄUSLICHEN GEBRAUCH... - Seite 35 2- BEDIENUNGSANWEISUNGEN 2a- ABFÜLLUNG Trennen Sie den Tank vom Sockel der Einheit. Sie diesen nach links drehen. indem Sie diesen nach rechts LIMPIA 6...
- Seite 36 3- BETRIEBSANLEITUNG A) ON/OFF D) Timer einzustellen.
-
Seite 37: Tägliche Wartung
4- TÄGLICHE WARTUNG rischen Steckdose. Verschmutzung zu entfernen. Reinigen und trocknen Sie mit einem weichen und sauberen Tuch oder mit einem Papier- taschentuch. 5- REINIGUNG 5a- GENERALREINIGUNG empfohlen). weichen und gegebenenfalls feuchten Tuch. Sollte festzustellen sein, dass sich Wasser sen. LIMPIA 6... - Seite 38 5c- ULTRASCHALLSCHEIBE Entfernen Sie den Versorgungsstecker der Einheit. NUR einen weichen Pinsel verwenden, um die Scheibe zu reinigen und Ansammlungen und Ablagerungen zu beseitigen. Pinsel reinigen. gungswerkzeuge verwendet werden.
- Seite 39 Ort auf. HINWEIS: VERSUCHEN SIE BEIM AUFTRETEN EINES PRO- BLEMS NICHT, DEN SITZ DES MOTORS SELBST- STÄNDIG ZU ÖFFNEN: DIESER EINGRIFF KÖNNTE ZUM VERFALL DER GARANTIE FÜHREN UND ZU SCHÄDEN AM BEFEUCHTER ODER VERLETZUN- LIMPIA 6...
-
Seite 40: Anleitung Zur Behebung Von Problemen
6- ANLEITUNG ZUR BEHEBUNG VON PROBLEMEN PROBLEM LÖSUNG • Versorgungsstecker: Trennen und erneut versuchen. produziert. • • korrekt angeschlossen ist. • • produziert. • es erneut. • • Wasser. • • ersetzen. • schlechten Geruch. • Die Einheit funktioniert nicht •... - Seite 41 ENTSORGUNG...
- Seite 42 SARIO TOMAR PRECAUCIONES BÁSICAS DE SEGURIDAD PARA Y ACCIDENTES A PERSONAS, INCLUYENDO LAS SIGUIENTES: el uso. 2 - ATENCIÓN: Para reducir el riesgo de graves quemaduras, mantenga 3 - ATENCIÓN: No permita a los niños jugar con el embalaje del aparato (por ejemplo, bolsas de plástico).
- Seite 43 32 - No utilice el aparato cerca de un lavabo. 34 - No sumerja la unidad en agua ni vierta agua sobre la unidad o en la boquilla de humedad. boquilla. duras se requiere una limpieza más frecuente. LIMPIA 6...
- Seite 44 1- CARACTERÍSTICAS PRINCIPALES Y FUNCIONAMIENTO • • Niebla caliente/fresca. • • Caja para añadir aromas. Tapa decorativa (si suministrado) Tapa Flotador Cuerpo Panel de control Filtro del aire...
-
Seite 45: Instrucciones Antes Del Uso
2- INSTRUCCIONES ANTES DEL USO 2a- LLENADO unidad. Vierta agua fría potable directamente hacia la derecha. Es importante LIMPIA 6... -
Seite 46: Instrucciones De Uso
3- INSTRUCCIONES DE USO A) ON/OFF (icono sol apagado). D) Timer (horas) al apagado del aparato. -
Seite 47: Mantenimiento Diario
4- MANTENIMIENTO DIARIO toma de corriente. suciedad. 5- LIMPIEZA 5a- LIMPIEZA GENERAL suave). Si se utiliza agua dura, destilada o de grifo, es necesario limpiar semanalmente el transductor. LIMPIA 6... - Seite 48 ria una limpieza semanal o en cualquier momento para Utilice SÓLO un pincel suave para limpiar delicadamente suave. No utilice otros utensilios de limpie- Disco ultrasónico...
- Seite 49 Limpie en la forma necesaria. NOTA: SI SE OBSERVA UN PROBLEMA, NO INTENTE VOCAR DAÑOS AL HUMIDIFICADOR Y LESIONES LIMPIA 6...
- Seite 50 PROBLEMA SOLUCIÓN No se produce vapor de agua y • humedad. • • • Se sopla aire, pero no se produce • vapor de agua. • • • • • El agua presente en la unidad es demasiado fría: sustituya con agua fresca, pero no fría.
- Seite 51 DESGUACE Este símbolo sobre el producto o su embalaje, indica que el mismo no puede ser tratado como residuo doméstico habitual, sino debe ser entregado en un punto de recogida Otras informaciones sobre el reciclado de este producto las Esta norma es válida únicamente para los estados miembros de la UE.