Herunterladen Inhalt Inhalt Diese Seite drucken

Werbung

Verfügbare Sprachen
  • DE

Verfügbare Sprachen

  • DEUTSCH, seite 23
IM Size: 145W x 210H mm (folded)
Disposal of Old Electrical & Electronic Equipment ( Applicable
in the European Union and other European countries
with separate collection systems )
This symbol on the product or on its packaging indicates that this
product shall not be treated as household waste. Instead it shall be
handed over to the applicable collection point for the recycling of
electrical and electronic equipment. By ensuring this product is
disposed of correctly, you will help prevent potential negative
Manuale di istruzioni • Manual de instrucciones
consequences for the environment and human health, which could
Instruction Manual • Manuel d'instructions
otherwise be caused by inappropriate waste handling of this
product. The recycling of materials will help to conserve natural
Bedienungsanleitung • Manual de Instruções
resources. For more detailed information about recycling of this
BGMP-9123
product, please cantact your local city office, your household waste
disposal service or the shop where you purchased the product.
Robot da cucina multifunzione • Robot Multifunción de Cocina
Multifunction Cooker • Cuiseur multifonction
Multifunktions-Kocher • Panela multifunções

Werbung

Inhaltsverzeichnis
loading

Inhaltszusammenfassung für Masterpro BGMP-9123

  • Seite 1 The recycling of materials will help to conserve natural Bedienungsanleitung • Manual de Instruções resources. For more detailed information about recycling of this BGMP-9123 product, please cantact your local city office, your household waste disposal service or the shop where you purchased the product.
  • Seite 2: Avvertenze Importanti

    Robot da cucina multifunzione: 15. Scollegare l'apparecchio dalla presa di corrente immediatamente dopo l'uso. 16. Spegnere l'apparecchio e scollegarlo dalla presa di corrente prima di sostituire gli accessori o 220-240V~ 50-60Hz avvicinarsi alle parti che si muovono durante il funzionamento. 17.
  • Seite 3: Descrizione Delle Parti

    DESCRIZIONE DELLE Pulsante Temperatura Temperature disponibili: 37℃, 80℃, 90℃, 100℃, 120℃. PARTI: Premere il pulsante Temperatura per selezionare la temperatura desiderata tra 37℃, 80℃, 90℃, A. Tappo del coperchio 100℃ e 120℃. Premendo il pulsante Temperatura per la sesta volta la funzione di riscaldamento verrà...
  • Seite 4: Display Led

    INSTALLAZIONE E RIMOZIONE DELLA LAMA Pulsante Dessert (programma automatico) Quando l'apparecchio è in standby, premere il pulsante Dessert; l'indicatore luminoso si illuminerà; quindi premere il pulsante Avvio/Arresto per avviare l'apparecchio (gli altri pulsanti non saranno attivi). Il programma Dessert dispone di quattro sotto-programmi (fare riferimento ai dettagli del programma).
  • Seite 5: Modalità Di Funzionamento

    Beccuccio 1. Installare la lama nel recipiente. 2. Installare il recipiente sull'unità principale. 3. Posizionare il coperchio. Collegare l'apparecchio alla presa di corrente. 4. Impostare la durata di miscelazione (la durata massima è 5 minuti) e selezionare la velocità. Premere il pulsante Avvio/Arresto per avviare l'apparecchio. 5.
  • Seite 6: Codici Errore

    CODICI ERRORE il pulsante Avvio/Arresto; l'apparecchio si avvierà e l'indicatore luminoso corrispondente alla tempera- tura si accenderà. L'apparecchio manterrà gli alimenti alla temperatura impostata. Dopo aver selezionato una velocità pari o superiore al livello 3 e una temperatura pari o superiore a Codice Significato Soluzione...
  • Seite 7 Robot Multifunción de Cocina: Questo simbolo indica che il prodotto non deve essere smaltito insieme ai rifiuti domestici nei Paesi dell'Ue. Per evitare potenziali danni all'ambiente o alla salute a causa di uno smaltimento incontrollato dei rifiuti, riciclarlo responsabilmente per 220-240V~ 50-60Hz promuovere il riutilizzo sostenibile delle risorse materiali.
  • Seite 8: Nombre De Las Piezas

    NOMBRE DE LAS Utilice solo un paño húmedo para limpiar el aparato. 15. Desenchufe el aparato inmediatamente después de su uso. PIEZAS: 16. Apague el aparato y desconéctelo de la red eléctrica antes de cambiar cualquier accesorio y de aproximarse a cualquier pieza que se mueva durante el funcionamiento. A.
  • Seite 9 Botón de Temperatura continuación pulse el botón ENCENDER/APAGAR para poner el aparato en funcionamiento. Rango de Temperatura: 37℃,80℃,90℃, 100℃,120℃. Cuando el aparato esté funcionando en un programa Automático, la pulsación de cualquier otro Primero Pulse el botón “Calentamiento”, para seleccionar la temperatura 37℃, 80℃,90℃, 100 botón de programa Automático no funcionará.
  • Seite 10: Modo Operativo

    CÓMO MONTAR LA CUCHILLA Bloqueada 1. Coloque la cuchilla en la base del cuenco, gire en sentido contrario a las agujas del reloj para bloquear la cuchilla. (Consulte la imagen superior) Colocación del cuenco PRECAUCIÓN: 1. Coloque el cuenco en la toma correspondiente. Compruebe que la espita del cuenco está en la 1.
  • Seite 11 2. coloque el cuenco en el aparato principal. 2. Cierre la tapa del cuenco. Enchufe el aparato 3. Cierre la tapa del cuenco. Enchufe el aparato. 3. Seleccione el tiempo necesario. Seleccione la temperatura. Seleccione la velocidad. Pulse el botón ENCENDER/APAGAR el aparato comenzará...
  • Seite 12: Código De Error

    CÓDIGO DE ERROR Esta marca indica que el producto no se debe tirar en la basura doméstica dentro de la Unión Europea. Para evitar daños al medio ambiente y la salud humana por la eliminación incontrolada de desechos, deberá reciclarlos responsablemente para Código Explicación Solución...
  • Seite 13 Multifunction Cooker: 15. Unplug the appliance immediately after use. 16. Switch off the appliance and disconnected from supply before changing accessories or 220-240V~ 50-60Hz approaching parts which move in use. 17. Appliances can be used by persons with reduced physical, sensory or mental capabilities or lack Heating: 800W of experience and knowledge if they have been given supervision or instruction concerning use of the appliance in a safe way and if they understand the hazards involved.
  • Seite 14: Parts Name

    PARTS NAME: Temperature button Temperature range: 37℃,80℃,90℃, 100℃,120℃. A. Measuring cup First Press “Heating” button, to choose “37℃,80℃,90℃, 100℃,120℃”temperature. Press the sixth B. Bowl lid time the Temperature return to “zero”. C. Air proof ring Timer button D. Bowl handle For the timer: (Timer range: 30 seconds-99minutes ) Press timer increase button is “+”, decrease button is “–“.
  • Seite 15: Led Display

    Dough button (Automatic program button) 1. Put the Blade lock on bowl bottom base and anticlockwise rotating to locked the blade on the bowl Under standby mode, press “Dough” button by hand, indicator will be lighting, then press ON/OFF inside. (See above figure) button to start the appliance work in the following way (in other work mode by pressing the button is invalid) CAUTION:...
  • Seite 16: Working Mode

    Place the bowl Please follow the steps: 1. Place the bowl onto the bowl socket. Be sure to the spout of the bowl on the back of machine.(Pls 1. assemble the blade to the bowl force press by hand of bowl to ensure install bowl well) 2.
  • Seite 17 CLEANING Please follow the steps: 1. Assemble the bowl to the main appliance. 1. Before you clean the appliance,turn off the appliance and remove the plug from the socket. 2. Add the water (0.5L≤water≤1.75L) in the bowl. 2. While cleaning, don’t immerse the bowl in water. (Caution: The water in the bowl should be more 3.
  • Seite 18 Cuiseur multifonction: 15. Débranchez l'appareil immédiatement après l’utilisation. 16. Eteignezl’appareil et déconnectez-le de la prise secteur avant de changer un accessoire ou 220-240V~ 50-60Hz d'approcher les pièces qui sont mobiles lors du fonctionnement. 17. L’appareil peut être utilisé par des personnes dont les capacités physiques, sensorielles ou Chauffage: 800W mentales sont réduites ou qui manquent d'expérience et de connaissances si elles ont reçu une supervision ou des instructions concernant l'utilisation de l'appareil de manière sûre et si elles...
  • Seite 19: Noms Des Pièces

    NOMS DES PIÈCES: Bouton de température Plage de température : 37℃,80℃,90℃, 100℃,120℃. A. Gobelet de mesure Appuyez une première fois sur le bouton de chauffagepour choisir la température : 37℃, 80℃, 90℃, B. Couvercle du bol 100℃, 120℃. Appuyez une sixième fois pour remettre la température à « zéro ». C.
  • Seite 20: Affichage Led

    COMMENT ASSEMBLER LA LAME Bouton Dessert (bouton de programme Automatique) En mode de veille, appuyez manuellement surle bouton «Dessert », l’indicateur s’allumera, puis appuyez sur le bouton MARCHE/ARRÊT pour démarrer le programme (lorsque la machine fonctionne en programme automatique, appuyer sur un autre bouton du programme automatique ne fonctionnera pas.
  • Seite 21: Mode De Fonctionnement

    COMMENT ASSEMBLER / ENLEVER LE BOL Veuillez suivre les étapes : 1. Assemblez la lame dans le bol 2. Assemblezle bol à l’appareil. 3. Puis placez le couvercle sur le bol. Branchez le câble au secteur. 4. Réglez la durée souhaitée (le minuteur max est de 5 minutes), sélectionnez la vitesse. Appuyez sur le boutonMARCHE/ARRÊT pour démarrerl’appareil.
  • Seite 22 CODE D’ERREUR 3. Réglez la durée désirée. Réglez latempérature. Sélectionnezla vitesse. Appuyez sur le bouton MARCHE/ARRÊT et l’appareil commencera à chauffer ;, l’indicateur de chauffage s’allumera et l’appareil maintiendra les aliments à la température définie. Code Explication Solution (Si vous réglez d'abord la vitesse≧3 et réglez la température≧60℃ ; lorsque la température à l’intérieur de la cuve atteint 60℃, la vitesse sera réduite au niveau 2 et le chauffage sera maintenu).
  • Seite 23 Multifunktions-Kocher: Ce marquage indique que ce produit ne doit pas être éliminé avec les autres déchets ménagers dans l’UE. Pour éviter tout risque de nuire à l'environnement ou à la santé humaine par une élimination incontrôlée des déchets, recyclez cet article de manière 220-240V~ 50-60Hz responsable afin de promouvoir la réutilisation durable des ressources matérielles.
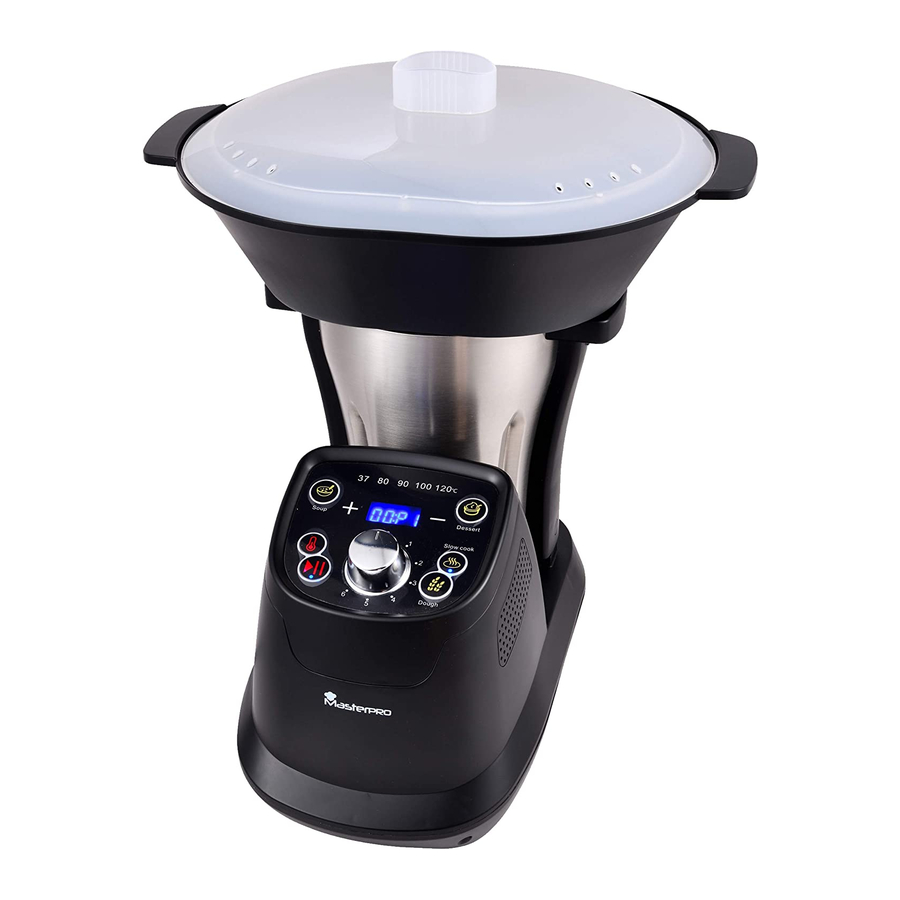
  • Seite 24 TEILEBEZEICHNUNG Gerätes entfernen. 14. Tauchen Sie das Hauptgerät niemals in Wasser oder eine andere Flüssigkeit ein und spülen Sie A. Messbecher es nie unter dem Wasserhahn ab. Verwenden Sie zum Reinigen des Geräts nur ein feuchtes Tuch. 15. Trennen Sie das Gerät sofort nach Gebrauch vom Stromnetz. B.
  • Seite 25: Led-Anzeige

    Temperaturtaste Desserttaste (Automatische Programmtaste) Temperaturbereich: 37 ℃,80 ℃,90 ℃, 100 ℃,120 ℃. Drücken Sie im Standby-Modus die „Desserttaste mit der Hand. Daraufhin leuchtet die Anzeige . Drücken Sie zuerst die Heiz-Taste, um zu unter „37 ℃, 80 ℃, 90 ℃, 100 ℃, 120 ℃“ eine Drücken Sie dann die EIN/AUS-Taste, um das Gerät wie folgt zu starten (das Drücken einer Temperatur auszuwählen.
  • Seite 26: So Wird Das Messer Montiert

    SO WIRD DAS MESSER MONTIERT SO WIRD DIE SCHÜSSEL INSTALLIERT/ENTFERNT Verriegelt 1. Setzen Sie das Messer auf denSchüsselboden und drehen Sie entgegen demUhrzeigersinn, um das Messer in der Schüssel zu verriegeln.. (Siehe oben Abb. ) VORSICHT: 1. Das Messer ist sehr scharf. Gehen Sie vorsichtig damit um. Halten Sie nur den oberen Teil des Schüssel aufsetzen Messers! 1.
  • Seite 27 Das Messer eignet sich optimal z. B. zum Zerkleinern und zum Mixen von Lebensmitteln usw. 1. Montieren Sie die Schüssel am Hauptgerät. Befolgen Sie die Schritte: 2. Bringen Sie dann den Schüsseldeckel an. Stecken Sie den Stecker ein. 3. Stellen Sie die benötigte Zeit ein. Stellen Sie die Temperatur ein. Wählen Sie die Geschwindigkeit. 1.
  • Seite 28: So Wird Der Luftdichtungsring Installiert

    FEHLERCODE 10. Wenn die Schüssel und das Messer schwer zu reinigen sind: Sie können etwas heiße Seifenlauge in die Schüssel geben und das Gerät für einige Sekunden mit Geschwindigkeitsstufe 1 betreiben. Dieses Zeichen bedeutet, dass das Produkt im gesamten EU-Gebiet nicht mit anderem Code Erläuterung Lösung...
  • Seite 29 Panela multifunções: 15. Desligue imediatamente o aparelho após a utilização. 16. Desligueo aparelho e retire a ficha da alimentação antes de proceder à alteração de acessórios 220-240V~ 50-60Hz ou de se aproximar de peças móveis durante o funcionamento. 17. Os aparelho podem ser utilizados por pessoas com capacidades físicas, sensoriais ou mentais Aquecimento: 800W reduzidas ou com falta de experiência e conhecimentos se forem supervisionadas e tiverem recebido instruções relativamente à...
  • Seite 30: Nome Dos Componentes

    NOME DOS Botão da temperatura Amplitude da temperatura 37℃, 80℃, 90℃, 100℃,120℃. COMPONENTES: Primeiro prima o botão “Aquecimento” para escolher a temperatura “37℃, 80℃, 90℃, 100℃,120 A. Copo medidor ℃”. Prima pela sexta vez a Temperatura para voltar ao “zero”. B.
  • Seite 31: Montagem Da Lâmina

    MONTAGEM DA LÂMINA Botão da sobremesa (botão do programa automático) No modo de suspensão, quando o aparelho estiver a funcionar no programa “Sobremesa”, é inútil premir outro botão do programa Auto; o utilizador deve parar o trabalho em curso e reinicializar o aparelho.
  • Seite 32: Modo De Funcionamento

    3. De seguida coloque a tampa na taça. Ligue-a. 4. Defina o tempo que precisa (a temporização máxima é de 5 minutos), selecione a velocidade. Primao botão LIGAR/DESLIGAR , o aparelho começa a funcionar. 5. O aparelho emite um som “Beep” 10 vezes quando para automaticamente após concluir o trabalho.
  • Seite 33 CÓDIGO DE AVARIA LIGAR/DESLIGAR , o aparelho começa a funcionar e o indicador luminoso de aquecimento acende, o aparelho mantém-se quente na temperatura definida. (Caso defina primeiro o nível da velocidade para≧3 e a temperatura para≧60℃; quando o interior Código Descrição Solução da taça tiver atingido 60℃, a velocidade diminui para o nível 2 e a função de aquecimento será...
  • Seite 34 Esta marcação indica que este produto não deve ser eliminado com os resíduos domésticos na UE. Para evitar possíveis perigos para o ambiente ou a saúde pública resultantes da eliminação descontrolada de resíduos, faça uma reciclagem responsável para promover a reutilização sustentável dos recursos materiais. Para devolver o seu dispositivo usado, recorra aos sistemas de devolução e recolha ou contacte o revende- dor onde o produto foi adquirido.

Inhaltsverzeichnis