
Verwandte Anleitungen für peerless-AV IM760PU


Inhaltszusammenfassung für peerless-AV IM760PU
- Seite 1 IM760PU, IM760PU-S 32" - 71" 200 lb (81 - 180 cm) (91 kg) ČEŠ TÜR 2016-07-12 #:096-9003-2 (2018-03-15)
- Seite 2 WARNING ENG - This product is designed to be installed on wood stud walls. Hardware is included for wood stud installation. Before installing make sure the supporting surface will support the combined load of the equipment and hardware. Screws must be tightly secured. Do not overtighten screws or damage can occur and product may fail.
- Seite 3 VÝSTRAHA ČEŠ - Tento výrobek je určen pro montáž na hrázděné (duté) stěny. Je dodán společně s upevňovacím materiálem pro instalaci na hrázděné stěny. Před instalací se ujistěte, že nosná plocha unese kombinované zatížení zařízení a technického vybavení. Šrouby musí být pevně zajištěny. Šrouby příliš neutahujte, nebo může dojít k poškození...
- Seite 4 Symbols Símbolos Symboles Symbole Symbolen WARNING Simboli ADVERTENCIA Symboly ČEŠ ADVERTISSEMENT Symboly ACHTUNG Screws must get at least three Símbolos WAARSCHUWING full turns and fi t snug. Semboller TÜR AVVERTENZA Los tornillos tienen que dar, ČEŠ VÝSTRAHA por lo menos, tres vueltas VÝSTRAHA completas y quedar ajustados.
- Seite 5 Tools Needed for Assembly. Herramientas necesarias para el ensamblaje. Outils nécessaires au montage. To properly tighten screws: Tighten until screw Für den Zusammenbau erforderliche Werkzeuge. head makes contact, then tighten another 1/2 Voor montage benodigd gereedschap. turn. Do not overtighten screws. Attrezzi necessari per l’assemblaggio.
-
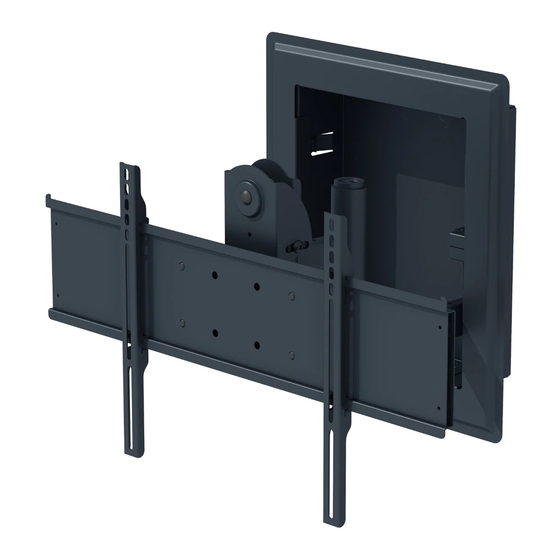
Seite 6: Parts List
Parts List IM760PU IM760PU-S Description Part # Part # A in-wall box 095-P1989 095-C4989 G (1) axial mount 095-P1519 095-C4519 adapter plate 201-P1110 201-C4110 4mm allen wrench tilt-to-roll assembly 201-P1093 201-C4093 outer trim 095-P1517 095-C4517 arm assembly 096-P1612 096-C4612 G 4mm allen wrench... - Seite 7 I ( 1 ) L ( 2 ) M ( 2 ) S ( 1 ) threaded fi nishing cap cable bushing vinyl trim knob Used with specifi c mounts only P ( 4 ) BB ( 4 ) CC ( 4 ) M5 x 12mm M5 x 10mm M10 x 17mm...
- Seite 8 WARNING ENG - When installing Peerless wall mounts on a wood stud wall covered with gypsum board (drywall), verify that the woods studs are a minimum of 2" x 4" nominal size. Do not install this unit in a fi re rated wall. If you are unsure, contact your building architect or local building department.
- Seite 9 Use stud fi nder to locate and mark edge of studs. Utilice un localizador de montantes para localizar y marcar los bordes de los montantes. Localisez et marquez les bords des montants à l’aide d’un localisateur de montants. Bestimmen und markieren Sie die Kanten der Ständer mithilfe eines Balkenfi...
- Seite 10 Using dimensions shown, draw outline for in-wall box. Make sure lines are level before removing drywall. Utilizando las dimensiones indicadas, trace un bosquejo de la caja que va dentro de la pared. Cerciórese de que las líneas estén niveladas antes de quitar el yeso-cartón. Tracez le contour du boîtier encastré...
- Seite 11 Level in-wall box. Mark mounting holes. Marque los orifi cios de montaje. Marquez les trous de fi xation. Markieren Sie die Montagelöcher. Markeer montagegaten. Contrassegna I fori di montaggio. Vyznačte montážní otvory. ČEŠ Vyznačte montážne otvory. Marque os furos de montagem. Montaj deliklerini işaretleyin.
- Seite 12 2.5" (64mm) 5/32" 5/32" (4mm) (4mm) Drill mounting holes into supporting surface (2.5" (64mm) minimum depth required). Taladre los agujeros de montaje en la superfi cie de apoyo; se requiere una profundidad mínima de Mounting hole must center on stud. 2.5"...
- Seite 13 3/8" (10mm) Q (6) Q (6) 7.25" 7.25" 7.25" 7.25" (184mm) (184mm) (184mm) (184mm) 2016-07-12 #:096-9003-2 (2018-03-15)
- Seite 14 P (4) 2016-07-12 #:096-9003-2 (2018-03-15)
- Seite 15 Center adapter brackets vertically on back of screen. Centre verticalmente los soportes en la pantalla. Centrez les supports à la verticale de l’écran. Richten Sie die Halterungen senkrecht mittig an der Bildschirm. Centreer de beugels verticaal op de van het scherm. centra le staff...
- Seite 16 CC (4) 2016-07-12 #:096-9003-2 (2018-03-15)
- Seite 17 Tighten. Apretar. Serrer. Anziehen. Aandraaien. Stringere. ČEŠ Utáhněte. Utiahnite. Apertar. Sıkmak. TÜR 11-1 1/4" (6mm) R (2) 2016-07-12 #:096-9003-2 (2018-03-15)
- Seite 18 11-2 11-3 R (2) 2016-07-12 #:096-9003-2 (2018-03-15)
- Seite 19 Adjust, hand tighten. Ajuste, apriete a mano. Tilt Adjustment Réglez, serrer à la main. Ajuste de la inclinación Einstellen, handfest anziehen. Réglage de l'inclinaison Aanpassen, draai met de hand aan. Neigungseinstellung Regolare, serrare a mano. Het kantelmechanisme bijstellen Nastavit, dotáhněte rukou. ČEŠ...
- Seite 20 Loosen, adjust, tighten. Afl oje, ajuste, apriete. Desserrez, réglez, puis serrez. Lösen, einstellen, anziehen. Losdraaien, aanpassen, aandraaien. Allentare, regolare, stringere. ČEŠ Uvolnit, nastavit, přitáhnout. Uvoľniť, nastaviť, pritiahnuť. Desaperte, ajuste, aperte. Gevşetin, ayarlayın, sıkın. TÜR +/- 7° 2016-07-12 #:096-9003-2 (2018-03-15)
- Seite 21 Optional; Access plate can be temporarily removed to install UL listed single receptacle electrical box. Opcional; La placa de acceso se puede quitar momentáneamente para instalar una caja eléctrica de un solo receptáculo clasifi cada por UL. Facultatif; La plaque d’accès peut être temporairement retirée pour installer un coff...
- Seite 22 15-2 O (4) 15-3 N (8) 2016-07-12 #:096-9003-2 (2018-03-15)
- Seite 23 This page intentionally left blank. Página en blanco. Cette page a été laissée en blanc intentionnellement. Diese Seite wurde absichtlich freigelassen. Deze pagina is met opzet blanco gelaten. Pagina lasciata intenzionalmente vuota. Tato strana je záměrně prázdná. ČEŠ Táto strana je zámerne prázdna. Esta página foi intencionalmente deixada em branco.
- Seite 24 LIMITED FIVE-YEAR WARRANTY Peerless Industries, Inc. (“Peerless”) warrants to original end-users of Peerless products will be free from defects in material and ® workmanship, under normal use, for a period of fi ve years from the date of purchase by the original end-user (but in no case longer than six years after the date of the product's manufacture).
- Seite 25 BESCHRÄNKTEN FÜNFJÄHRIGEN GARANTIE Peerless Industries, Inc. („Peerless”) übernimmt gegenüber den ursprünglichen Endnutzern von Peerless®-Produkten die Gewährleistung, dass diese unter normalen Einsatzbedingungen für fünf Jahre ab Datum des Kaufs durch den ursprünglichen Endnutzer (aber in keinem Fall länger als sechs Jahre nach Herstellungsdatum des Produkts) frei von Material- und Verarbeitungsfehlern sind. Peerless repariert oder ersetzt nach eigenem Ermessen ein Produkt, das dieser Garantie nicht entspricht, oder erstattet den Kaufpreis dafür.
- Seite 26 OMEZENÁ PĚTILETÁ ZÁRUKA Peerless Industries, Inc. (“Peerless”) zaručuje původním koncovým uživatelům výrobků Peerless®, že budou bez vad na materiálu a provedení, za podmínky běžného používání, po dobu pěti let od data nákupu původním koncovým uživatelem (ale v žádném případě ne déle než...
- Seite 27 BEŞ YILLIK SINIRLI GARANTİ Peerless Industries, Inc. (bundan sonra “Peerless” olarak anılacaktır) Peerless® ürünlerinde normal kullanım koşulları altında orijinal son kullanıcının satın alma tarihinden itibaren beş yıl süreyle (ama her halükarda ürünün üretim tarihinden itibaren en fazla altı yıl süreyle) malzeme ve işçilik arızaları...
- Seite 28 Peerless-AV Peerless-AV Europe Peerless-AV de Mexico 2300 White Oak Circle Unit 3 Watford Interchange, Ave de las Industrias 413 Aurora, IL 60502 Colonial Way, Watford, Herts, Parque Industrial Escobedo Email: tech@peerlessmounts.com WD24 4WP, United Kingdom Escobedo N.L Mexico 66062 Ph: (800) 865-2112...