
Verwandte Anleitungen für InterM EMI-300


Inhaltszusammenfassung für InterM EMI-300
- Seite 1 OC03 OC03 B370031 EMI-300 7-Channel 2 x 150W Mixing Amplifier EMI-300 150Wx2 MIXING AMPLIFIER Downloaded from www.Manualslib.com manuals search engine...
-
Seite 2: Inhaltsverzeichnis
Dear customer thank you very much for choosing a Inter-M product. We wish you a lot of fun and success with your new EMI-300. To become familiar with all functions of this product, please study this instruction manu- al before use. -
Seite 3: Welcome
Care should be taken so than objects do not fall and liquids are not spilled into the enclosure through openings.” EMI-300 Downloaded from www.Manualslib.com... -
Seite 4: Unpacking
S3125A S3125A EMI-300 Downloaded from www.Manualslib.com manuals search engine... -
Seite 5: Features
- 2 Full-Stereo master sections with individual controls. - Limiter for internal power amplifiers to eliminate overload distortion. - Master 1 line-level lowpass output (100Hz/12dB) with balanced XLR connector for connection of active subwoofers. EMI-300 Downloaded from www.Manualslib.com manuals search engine... -
Seite 6: Front Panel
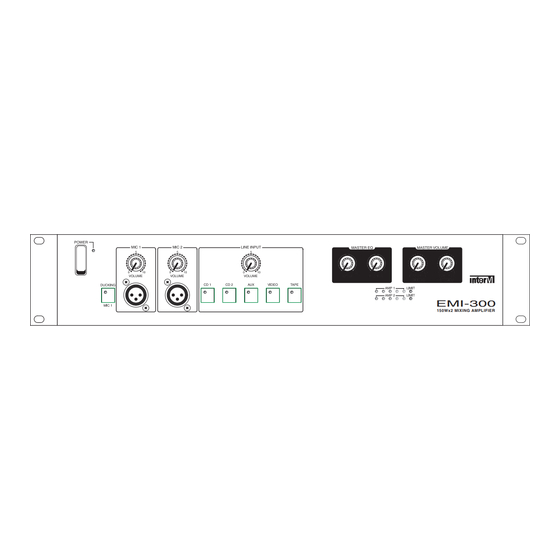
7-CHANNEL 2 X 150W MIXING AMPLIFIER Front Panel Front Panel EMI-300 150Wx2 MIXING AMPLIFIER 14 15 16 1. MAIN POWER SWITCH 2. VOLUME CONTROL FOR MICROPHONE 1 3. VOLUME CONTROL FOR MICROPHONE 2 4. VOLUME CONTROL FOR LINE SIGNAL Controls the volume of the selected line input 5. - Seite 7 - Line input selector buttons Only one Line input is active at a time. 12. CD 1 13. CD 2 14. AUX 15. VIDEO (AUDIO SIGNAL) 16. TAPE 17. OUTPUT LEVEL METER AND LIMITER LED EMI-300 Downloaded from www.Manualslib.com manuals search engine...
-
Seite 8: Rear Panel
The level of this output is adjusted with the Master 1 control. 22. MODE SWITCH Use this switch to set EMI-300 to stereo, mono or bridge mode (see page 8). When using this switch, always observe the instructions on pages 8, 9 and 10. -
Seite 9: Recording Output
You can use them to connect external sound processor devices, such as equalizers, effect units etc. The tip contact carries the Send signal from the EMI-300, the ring contact expects the Return signal from the external device (see page 12). -
Seite 10: Operational Modes
The EMI-300 can be operated in 3 modes (Stereo/Mono/Bridge) that can be selected with the AMP ROUT- ING switch (22). Depending on the selected mode, your speakers have to be connected to the EMI-300 in a slightly different manner for every mode. For this reason you should first choose an operational mode that suits your needs best from the listing below. -
Seite 11: Connection Of Speakers
4 ohms (8 ohms for bridge mode) can overload the outputs. CONNECTION OF MORE SPEAKERS When connecting a number of speakers to the EMI-300, always observe the polarities to avoid sound can- cellations. In the following examples always observe the correct speaker polarity. -
Seite 12: Connection Of Speakers(Contd.)
If, for example, 4 ohms speakers are used, the total imped- ance will also be 4 ohms which perfectly matches the EMI-300 amplifiers EMI-300 Downloaded from www.Manualslib.com... -
Seite 13: Connection Of Sound Sources
Initial Settings Before powering up the emi-300, set the gain controls of all used line inputs (27) to center position. Set the Before powering up the EMI-300, set the gain controls of all used line inputs (26) to center position. Set the gain controls of all unused inputs to full counterclockwise position. -
Seite 14: Insert Jacks
The level of this output depends on the setting of the MASTER 2 con- If you are operating your EMI-300 in stereo mode, you can use the MASTER 2 output to connect another trol.If you are operating your EMI-300 in stereo mode, you can use the MASTER 2 output to connect another power amplifier for increasing your available system power. -
Seite 15: Applications
PROT POWER R-PLUS SERIES Amplifier Subwoofer POWER CLIP PROT CLIP PROT POWER R-PLUS SERIES Amplifier Speakers Speakers Deck, CD Player, etc. Tape Recorder Effect Processor MODEL NO. EMI-300 EMI-300 150Wx2 MIXING AMPLIFIER Microphones EMI-300 Downloaded from www.Manualslib.com manuals search engine... -
Seite 16: Block Diagram
7-CHANNEL 2 X 150W MIXING AMPLIFIER Block Diagram Block Diagram EMI-300 Downloaded from www.Manualslib.com manuals search engine... -
Seite 17: Specifications
Distortion (THD) ..........................< 0.1% Frequency range ......................18 - 25.000 Hz - GENERAL Power Source................AC 100V/120V/230V/240V, 50/60Hz Power Consumption ........................261W Weight..........................13kg/28.6lb Dimensions.....................483(W)x90(H)x383(D)mm ........................19(W)x3.5(H)x15(D)in * Specifications and design subject to change without notice. EMI-300 Downloaded from www.Manualslib.com manuals search engine... -
Seite 18: Service
To obtain specific warranty information and available service locations contact Inter-M directly or the autho- rized Inter-M Distributor for your specific country or region. EMI-300 Downloaded from www.Manualslib.com manuals search engine... - Seite 19 OC03 OC03 B370031 EMI-300 7-Channel 2 x 150W Mixing Amplifier EMI-300 150Wx2 MIXING AMPLIFIER Downloaded from www.Manualslib.com manuals search engine...
- Seite 20 Dank, dass sie sich für ein Produkt von Inter-M entschieden haben. Wir wünschen ihnen mit Ihrem neuen EMI-300 viel Spass und Erfolg. Bitte lesen sie diese Bedienungsanleitung vor Inbetriebnahme des Systems gründlich durch, um sich mit allen Funktionen vertraut zu machen.
-
Seite 21: Sicherheitshinweise
• wenn das Gerät fallen gelassen oder das Gehäuse beschädigt wurde. Betreiben sie EMI-300 nicht in feuchter Umgebung. Setzen Sie die das Gerät nicht Regen oder Schnee aus. Betreiben sie das Gerät nicht in der Nähe von Hitzequellen (z.B. Heizkörper). -
Seite 22: Frontseite
7-CHANNEL 2 X 150W MIXING AMPLIFIER Frontseite Frontseite EMI-300 150Wx2 MIXING AMPLIFIER 14 15 16 1. NETZSCHALTER 2. LAUTSTÄRKEREGLER FÜR MIKROFON 1 3. LAUTSTÄRKEREGLER FÜR MIKROFON 2 4. LAUTSTÄRKEREGLER FÜR LINE-EINGÄNGE Dieser Regler gilt für den jeweils ausgewählten Line-Eingang 5. BASS-REGLER Dieser Regler ist für alle Eingänge wirksam... -
Seite 23: Mikrofoneingang
Mikrofoneingänge können gleichzeitig benutzt werden. - Auswahltaster für Line-Eingänge: Es ist jeweils nur ein Line-Eingang aktiv. 12. CD 1 13. CD 2 14. AUX 15. VIDEO (CASSETTENGERÄT) 16. TAPE 17. ANZEIGE FÜR AUSSTEUERUNG UND LIMITER EMI-300 Downloaded from www.Manualslib.com manuals search engine... -
Seite 24: Rückseite
Stellung des Master 1 Reglers abhängig. 22. SCHALTER FÜR EMI-300 BETRIEBSARTEN Mit diesem Schalter wird der EMI-300 zwischen den Betriebsarten Stereo, Mono und Bridge umgeschel- tet. Beachten sie beim Umschalten unbedingt die Hinweise auf den Seiten 24, 25 und 26. -
Seite 25: Line-Eingänge (5 X)
(s. Seite 27). 27. RECORDING-AUSGANG An diesem Stereo-Ausgang liegen alle aktiven Line-und Mikrofon-Signale an. Das Signal ist nur von den Mikrofonreglern (2) und (3) bzw. vom Line-Volumenregler (4) abhängig. EMI-300 Downloaded from www.Manualslib.com manuals search engine... -
Seite 26: Betriebsarten
Betriebsarten Betriebsarten Der EMI-300 kann in den 3 Betriebsarten Stereo, Mono und Bridge betrieben werden, die mit dem AMP ROUTING Schalter (22) angewählt werden. Da die Wahl der Betriebsart den Anschluss der Boxen beein- flusst, sollten sie als erstes eine zu ihrer Anwendung passende Betriebsart auswählen. Suchen sie aus den unten aufgeführten Anwendungen die für Sie passende heraus. -
Seite 27: Anschluss Der Boxen
Impedanzen unter 4 Ohm können die Endstufen überlastet werden. ANSCHLUSS MEHRERER BOXEN Wenn mehrere Boxen an den EMI-300 angeschlossen werden, müssen deren Polari täten beachtet werden um Klangauslöschungen zu vermeiden. Beachten sie in den folgenden Anschlussbeispielen daher stets die korrekte Polarität (+ = Signal / - = Masse). -
Seite 28: Anschluss Der Boxen(Forts.)
Reihen/Parallel-Netzwerke verwenden. Bei beiden Netzwerken ist die Gesamtimpedanz gle- ich den Einzelimpedanzen, d.h. bei Verwendung von Boxen mit 4 Ohm Impedanz ist die Gesamtimpedanz ebenfalls 4 Ohm und somit optimal an den EMI-300 angepasst. EMI-300 Downloaded from www.Manualslib.com... -
Seite 29: Anschluss Der Klangquellen
Inbetriebnahme Inbetriebnahme Before powering up the emi-300, set the gain controls of all used line inputs (27) to center position. Set the Stellen sie die Pegel-Regler (26) aller benutzten Line-Eingänge zunächst auf Mittelstellung. Stellen sie die gain controls of all unused inputs to full counterclockwise position. Set all gain controls on the front panel (2) Pegel-Regler der unbenutzten Eingänge auf 0 (linker Anschlag). -
Seite 30: Insert-Buchsen
Stellung des MASTER 2 Reglers abhängig. trol.If you are operating your EMI-300 in stereo mode, you can use the MASTER 2 output to connect another Wird der EMI-300 im Stereo-Modus betrieben, kann über diesen Ausgang eine zweite Endstufe power amplifier for increasing your available system power. -
Seite 31: Technische Daten
........Ausgangsbuchse: XLR symmetrisch (1 = Masse, 2 = signal + (hot), 3 = signal - (cold)) Rec Out........................1 x Cinch (stereo) Klirrfaktor (THD)..........................< 0.1% Frequenzgang........................18 - 25.000 Hz Gewicht............................13kg Abmessungen ....................383(B)x483(H)x90(T)mm ............................19" / 2HE EMI-300 Downloaded from www.Manualslib.com manuals search engine... - Seite 32 Inter-M, Ltd. (Korea) began operations in 1983. Since then, Inter-M has grown to become one of the largest manufacturers of professional audio and commercial sound electronics equipment in the world. Inter-M has gained worldwide recognition for its own branded products, as well as private label manufacturing of electronics sold under other names (OEM).