There’s no need to remove your device from its case when powering up, AuraPack-10 Wireless Charging Pad can charge through most lightweight cases. Charge any USB powered devices with the ultra-fast dual USB charging ports.
Seite 3
USB powered devices. • Universal Connectivity: AuraPack-10 is compatible with all Qi compatible devices. • Safe & Reliable: AuraPack-10 is totally safe & dependable as it features over-charging & short-circuit protection Precautions Please read all safety instructions and warnings thoroughly before using this product.
Seite 4
English Appearance & Interface Description 1. USB 2 Port 2. USB 1 Port 3. USB-C Input Port 4. Micro-USB Input Port 5. Lightning Input Port 6. Power Button 7. LED Battery Level Display 8. Wireless Charging Area...
Seite 5
LED Battery Level Display Charging AuraPack-10 back-up battery • Connect one end of the Lightning Cable to AuraPack-10 and the other end to a desktop/laptop or a USB Power Adapter. The Battery Level LED display will indicate “IN” that shows the back-up battery is charging normally.
Seite 6
English Correct disposal of this Product (Waste Electrical & Electronic Equipment (WEEE) Your product is designed and manufactured with high quality materials and components which can be recycled and reused. This symbol means that electrical and electronic equipment, at their end of-life should be disposed of separately from your household waste.
Seite 7
Spanish Descripción del aspecto y la interfaz 1. Puerto USB 2 2. Puerto USB 1 3. Puerto de entrada USB-C 4. Puerto de entrada Micro USB 5. Puerto de entrada Lightning 6. Botón de encendido 7. Indicador LED de nivel de batería 8.
Seite 8
LED de Nivel de batería. Carga de la batería de respaldo AuraPack-10 • Conecte un extremo del Cable Lightning al AuraPack-10 y el otro extremo a una computadora de sobremesa o portátil o un adaptador de alimentación USB. El indicador LED del nivel de la batería indicará...
Seite 9
French Aspect & Description Interface 1. Port 2 USB 2. Port 1 USB 3. Port Entrée USB-C 4. Port Entrée Micro-USB 5. Port d’Entrée 6. Bouton d’Alimentation 7. Affichage LED Niveau de Batterie 8. Zone de Charge Sans Fil...
Seite 10
L’affichage LED du niveau de batterie affiche « IN », ce qui indique que la batterie se recharge normalement. • Connectez une extrémité du câble USB-C à l’AuraPack-10 et l’autre extrémité à un ordinateur de bureau/ordinateur portable ou à un adaptateur d’alimentation USB.
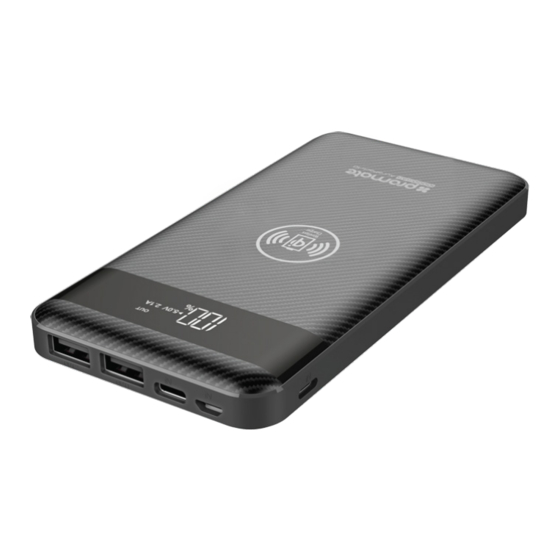
Seite 11
German Beschreibung von Aussehen & Interface 1. USB-2-Anschluss 2. USB-1-Anschluss 3. USB-C-Eingang 4. Micro-USB-Eingang 5. Lightning-Eingang 6. Netztaste 7. LED-Batteriestandsanzeige 8. Drahtloser Ladebereich...
Seite 12
Ende an einen Desktop/ Laptop oder einen USB-Netzadapter an. Die LED-Batteriestand- sanzeige zeigt „EIN“ an und zeigt damit, dass der Ersatzakku normal aufgeladen wird. • Schließen Sie ein Ende des USB-C-Kabels an den AuraPack-10 und das andere Ende an einen Desktop/ Laptop oder einen USB-Netzadapter an. Die LED-Batteriestandsan- zeige zeigt „EIN“...
Seite 13
Portuguese Aparência e descrição da interface 1. Entrada USB 2 2. Entrada USB 1 3. Entrada de cabo USB 4. Entrada de Micro-USB 5. Entrada com proteção pará-raios 6. Botão de ligar 7. Visor de nível de bateria de LED 8.
Seite 14
“IN” que significa que a bateria de reserva está carregando normalmente. Carregando aparelhos recarregáveis com USB usando a entrada USB • Plugue o cabo USB na porta de saída USB da bateria de reserva AuraPack-10 e a outra extremidade ao aparelho.
Seite 15
Romanian Descrierea a aspectului a interfeței 1. Portul USB 2 2. Portul USB 1 3. Portul de alimentare USB-C 4. Portul de alimentare Micro-USB 5. Portul de alimentare cu curent 6. Întrerupător 7. Display LED a nivelului de încărcare a bateriei 8.
Seite 16
Ecranul LED de arătare a nivelului de încărcare a bateriei Încărcarea acumulatorului de back-up al lui AuraPack-10 • Sǎ conectați un capăt a Cablului de Încărcare la AuraPack-10 iar pe celalalt capăt la un desktop/laptop sau Adaptor USB. Ecranul LED de arătare a nivelului de încărcare a bateriei va arata “IN”...
Seite 18
Russian Описание внешнего вида и интерфейса 1. Порт USB 2 2. Порт USB 1 3. Входной порт USB-C 4. Входной порт Micro-USB 5. Входной порт Lightning 6. Кнопка питания 7. Светодиодный дисплей уровня заряда батареи 8. Зона беспроводной зарядки...
Seite 19
уровня заряда батареи появится "IN", что означает, что выполняется нормальная зарядка резервной батареи. • Подключите один конец кабеля USB-C к AuraPack-10, а другой - к настольному ПК/ноутбуку или к адаптеру питания USB. На светодиодном дисплее уровня заряда батареи появится "IN", что означает, что выполняется нормальная зарядка...
Seite 20
Turkish Görünüm & Arayüz Tanımlaması 1. USB 2 Bağlantı Noktası 2. USB 1 Bağlantı Noktası 3. USB-C Giriş Bağlantı Noktası 4. Mikro-USB Giriş Bağlantı Noktası 5. Lightning Giriş Bağlantı Noktası 6. Güç Düğmesi 7. LED Pil Seviyesi Göstergesi 8. Kablosuz Şarj Alanı...
Seite 21
USB Güç Adaptörüne bağlayın. Pil Seviyesi LED ekranı, yedek pilin normal olarak şarj edildiğini gösteren "IN" i gösterecektir. • Mikro-USB Kablosunun bir ucunu AuraPack-10'a ve diğer ucunu bir masaüstü / dizüstü bilgisayara veya bir USB Güç Adaptörüne bağlayın. Pil Seviyesi LED ekranı, yedek pilin normal olarak şarj edildiğini gösteren "IN"...
Seite 22
Chinese 外观和接口说明 1. USB 2端口 2. USB 1端口 3. USB-C输入端口 4. Micro-USB输入端口 5. Lightning输入端口 6. 电源按钮 7. LED电池电量显示 8. 无线充电区域...