Herunterladen Inhalt Inhalt Diese Seite drucken
Inhaltsverzeichnis

Werbung

Verfügbare Sprachen
  • DE

Verfügbare Sprachen

eLight ONE
eLight ONE
D
MANUALE TECNICO
TECHNICAL MANUAL
MANUEL TECHNIQUE
TECHNISCHE BEDIENUNGSANLEITUNG
MANUAL TECNICO
Rev.01

Werbung

Inhaltsverzeichnis
loading

Inhaltszusammenfassung für TEXA eLight ONE

  • Seite 1 ONE eLight ONE MANUALE TECNICO TECHNICAL MANUAL MANUEL TECHNIQUE TECHNISCHE BEDIENUNGSANLEITUNG MANUAL TECNICO Rev.01...
  • Seite 2 ITALIANO..............5 ENGLISH..............53 FRANÇAIS..............103 DEUTSCH ..............151 ESPAÑOL...............201...
  • Seite 4: Inhaltsverzeichnis

    3.1 Glossario....................12 3.2 Regole Generali...................12 3.3 Sicurezza dell'Operatore..............12 3.4 Sicurezza del Dispositivo..............14 4 INFORMAZIONI AMBIENTALI............16 5 FUNZIONAMENTO DEI DISPOSITIVI RADIO.........17 6 INFORMAZIONI NORMATIVE............18 7 eLIGHT ONE / eLIGHT ONED............19 7.1 eLIGHT ONE..................21 7.2 eLIGHT ONED..................22 8 DESCRIZIONE..................23 9 CARATTERISTICHE TECNICHE.............25...
  • Seite 5 9.1 Misura....................28 10 PREPARAZIONE ALL'USO............29 10.1 Montaggio...................29 11 ALIMENTAZIONE E RICARICA............32 12 ACCENSIONE / SPEGNIMENTO...........34 12.1 Reset....................35 13 COMUNICAZIONE................36 13.1 WiFi....................37 13.2 Bluetooth....................38 14 OPERAZIONI PRELIMINARI............39 14.1 Superfice di Lavoro................40 14.2 Preparazione Veicolo.................41 14.3 Preparazione Dispositivo..............42 14.4 Posizionamento Dispositivo...............43 14.5 Allineamento con il Veicolo..............44 15 ESECUZIONE ANALISI FOTOMETRICA........45 16 MANUTENZIONE................47 16.1 Sostituzione Batterie Puntatore Laser Orientabile......48...
  • Seite 6: Revisione Del Manuale

    MANUALE TECNICO LIGHT ONE / LIGHT ONE-D REVISIONE DEL MANUALE Il presente documento rappresenta la revisione01 del manuale tecnico di eLIGHT ONE / eLIGHT ONE di TEXA S.p.A. Data di emissione: 10/11/2019...
  • Seite 7: Premessa

    TEXA S.p.A. si riserva il diritto di apportare, in qualsiasi momento e senza preavviso, tutte le modifiche ritenute utili per il miglioramento del manuale per una qualsiasi esigenza di carattere tecnico o commerciale.
  • Seite 8: Legenda Dei Simboli Utilizzati

    1 LEGENDA DEI SIMBOLI UTILIZZATI In questo capitolo sono descritti i simboli utilizzati nel manuale. Pericolo Asfissia Pericolo Esplosione Pericolo Alta Tensione Pericolo Incendio / Ustione Pericolo Intossicazione Pericolo Sostanze Corrosive Pericolo Livello Sonoro Pericolo Organi in Moto Pericolo Schiacciamento Pericolo Inciampo Pericolo Radiazione Laser Pericolo Generico...
  • Seite 9: Regole Generali Per La Sicurezza

    2 REGOLE GENERALI PER LA SICUREZZA 2.1 Glossario dei Termini • Operatore: persona qualificata, incaricata di utilizzare il dispositivo. • Dispositivo: il prodotto acquistato. • Ambiente di lavoro: il luogo in cui l’operatore deve svolgere i suoi compiti. 2.2 Regole per la Sicurezza degli Operatori 2.2.1 Regole Generali di Sicurezza •...
  • Seite 10: Pericolo Causato Da Organi In Moto

    Misure di Sicurezza • Assicurarsi sempre che il cambio del veicolo sia in folle (o in posizione di parcheggio nel caso di un veicolo con cambio automatico). • Inserire sempre il freno di sicurezza o di parcheggio sul veicolo. • Bloccare sempre le ruote dei veicolo con gli appositi fermi meccanici. 2.2.4 Pericolo Causato da Organi in Moto I motori dei veicoli presentano parti in movimento, sia da accesi che da spenti (es.: la ventola di raffreddamento è...
  • Seite 11: Pericolo Di Incendio O Di Esplosione

    2.2.6 Pericolo di Incendio o di Esplosione Fonti di pericolo d'incendio e / o esplosione sono: • I carburanti utilizzati dal veicolo ed i vapori da essi rilasciati. • I refrigeranti utilizzati dall’impianto A / C. • L’acido presente nelle batterie del veicolo. Misure di Sicurezza •...
  • Seite 12: Pericolo Intossicazione

    • Non versare o avvicinare liquidi conduttori al motore mentre si opera. • Non lasciare utensili appoggiati alla batteria in modo da evitare contatti accidentali. 2.2.9 Pericolo Intossicazione I tubi utilizzati per il prelievo dei gas possono liberare gas tossico dannoso per l’operatore se sottoposti a temperature superiori a 250 °C o in caso d’incendio.
  • Seite 13: Regole Specifiche Per La Sicurezza Nell'utilizzo Di Elight One E Elight Oned

    NELL’UTILIZZO DI eLIGHT ONE E eLIGHT ONE La tecnologia utilizzata per la progettazione ed il controllo della produzione di eLIGHT ONE / eLIGHT ONED lo rende un dispositivo semplice, affidabile e sicuro durante l’utilizzo. Il personale incaricato di utilizzare gli strumenti di diagnosi e misura ha l’obbligo...
  • Seite 14 Misure di Sicurezza: • Utilizzare i dispositivi di sicurezza personale previsti. • Indossare sempre un abbigliamento idoneo all'ambiente di lavoro. • Prestare attenzione durante le operazioni di regolazione delle parti mobili del dispositivo. La base del dispositivo potrebbe rappresentare un ostacolo sul quale inciampare.
  • Seite 15: Sicurezza Del Dispositivo

    Il raggio proveniente da un prodotto laser di Classe 2 può provocare: abbagliamento, accecamento da flash ed immagini residue, in particolare in condizioni di ambiente scarsamente illuminato. Questo potrebbe avere indirette conseguenze di sicurezza generale, risultanti in disturbo temporaneo della vista o reazioni di spavento / sorpresa.
  • Seite 16 • Non far cadere, scuotere o sottoporre il dispositivo ad urti. • Non effettuare nessun tipo di intervento che possa danneggiare il dispositivo. • Non aprire o smontare Il dispositivo. • Movimentare il dispositivo esclusivamente sulle proprie ruote. • Regolare la posizione della camera ottica esclusivamente tramite l'apposita maniglia.
  • Seite 17: Informazioni Ambientali

    4 INFORMAZIONI AMBIENTALI Non smaltire questo prodotto insieme ad altri rifiuti solidi non differenziati. Per informazioni riguardo lo smaltimento di questo prodotto consultare il pieghevole fornito a corredo.
  • Seite 18: Funzionamento Dei Dispositivi Radio

    La connettività senza fili con tecnologie Bluetooth e WiFi fornisce un metodo standard e sicuro per scambiare informazioni tra dispositivi diversi, utilizzando onde radio. Oltre agli strumenti TEXA utilizzano questo tipo di tecnologia anche prodotti quali: telefoni cellulari, portatili, Computer, stampanti, macchine fotografiche, Pocket PC ecc.
  • Seite 19: Informazioni Normative

    6 INFORMAZIONI NORMATIVE Dichiarazione di Conformità UE Semplificata Il fabbricante, TEXA S.p.A., dichiara che il tipo di apparecchiatura radio eLIGHT ONE / eLIGHT ONE è conforme alle direttive: • EMC 2014/30/EU • LVD 2014/35/EU • ROHS 2011/65/EU Il testo completo della dichiarazione di conformità UE è disponibile...
  • Seite 20: Elight One / Elight Oned

    7 eLIGHT ONE / eLIGHT ONE I centrafari eLIGHT sono dispositivi espressamente realizzati per ottimizzare l'analisi fotometrica e la regolazione dei fanali su tutti i tipi di veicoli. L'utilizzo di Bluetooth e WiFi consentono a questi dispositivi di integrare le funzioni di un normale centrafari con le potenzialità...
  • Seite 21 La camera ottica è regolabile in altezza tramite un sistema di scorrimento su rotelle dotate di cuscinetti che ne consente il posizionamento all'altezza desiderata. La lente Fresnel di grandi dimensioni permette eseguire analisi corrette anche difronte a fari voluminosi e dalla forma irregolare.
  • Seite 22: Elight One

    7.1 eLIGHT ONE eLIGHT ONE è pensato per un utilizzo abbinato alle unità di visualizzazione: • AXONE Nemo • AXONE Nemo 2 • AXONE 5 • PC (equipaggiato con apposito software di diagnosi) Grazie a queste unità di visualizzazione è possibile avvalersi dell'apposito software ed eseguire una completa e precisa analisi fotometrica.
  • Seite 23: Elight Oned

    7.2 eLIGHT ONE eLIGHT ONE è pensato come dispositivo stand-alone, ovvero in grado di eseguire l'analisi fotometrica in totale autonomia senza bisogno di essere collegato ad unità di visualizzazione. eLIGHT ONE è dotato di un touch screen da 7" dotato di staffa orientabile, installato sulla camera ottica.
  • Seite 24: Descrizione

    8 DESCRIZIONE...
  • Seite 25 1. Colonna (con scala centimetrata) 2. Maniglia 3. Ruota gommata 4. Puntatore laser orientabile 5. Apertura laser 6. Touchscreen 7. Camera ottica 8. Lente Fresnel 9. Puntatore laser 10.Apertura laser 11.Puntatore laser 12.Apertura laser 13.Vite per messa in bolla 14.Ruota gommata 15.Vite di bloccaggio posizione 16.Stampante * 17.Pulsante accensione puntatore laser orientabile...
  • Seite 26: Caratteristiche Tecniche

    9 CARATTERISTICHE TECNICHE Costruttore: TEXA S.p.A. Nome prodotto: eLIGHT ONE / eLIGHT ONE Lithium Ion Alimentazione (batteria): 11,1 V 5200 mAh Alimentatore esterno mod. IPC30 • Input: 100-240 Vac 50/60 Hz 700 Alimentatore: • Output: 11,1 Vdc 2000 mAh • Presa: Europlug CEE 7/16...
  • Seite 27 • RJ45 x1 • RS-232 x1 • Touchscreen TFT 7" 800 x 480* • LED Interfaccia utente: (*) solo eLIGHT ONE Temperatura di funzionamento: 5 °C ÷ 45 °C 1 mese: - 20 °C ÷ 60 °C Temperatura di stoccaggio: 3 mesi: - 20 °C ÷...
  • Seite 28 Dimensioni [mm]: Peso: 52 kg • Uso: interno • Altitudine: fino a 2000 m • Pressione atmosferica: 0,7 ÷ 1,04 Condizioni ambientali • Fluttuazioni della tensione alimentazione: ± 10% • Categoria di sovratensioni: II • Grado di inquinamento: 2 IP20 Grado di protezione: (relativo all'involucro) EMC 2014/30/UE...
  • Seite 29: Misura

    9.1 Misura PROPRIETÀ VALORE 0 ÷ 600 mm/10 m Orientamento verticale (verso l'alto e verso il basso): 0 ÷ 6 % 0 ÷ 3,432 ° 0 ÷ 1000 mm/10 m Orientamento orizzontale (verso destra e verso 0 ÷ 10 % sinistra): 0 ÷...
  • Seite 30: Preparazione All'uso

    In questi corsi i tecnici sono seguiti passo passo da personale specializzato al fine di acquisire la maggior dimestichezza possibile nell'utilizzo degli strumenti e dei software proposti e sfruttare al massimo le potenzialità dei prodotti TEXA S.p.A. Per maggiori informazioni riguardo ai servizi di formazione TEXA S.p.A.
  • Seite 31 Serrare le viti con una coppia pari a 12 N m. 4. Agganciare la camera ottica dall'alto sull'apposito supporto successivamente farla ruotare come illustrato. 5. Fissare la camera ottica al supporto serrando le apposite viti con una coppia pari a 3 N...
  • Seite 32 6. Innestare il puntatore laser orientabile sull'apposito perno magnetico. Rimuovere la vite di sicurezza del contrappeso.
  • Seite 33: Alimentazione E Ricarica

    11 ALIMENTAZIONE E RICARICA Il dispositivo è alimentato da una batteria interna ricaricabile agli ioni di litio. La ricarica avviene tramite l'alimentatore modello IPC 30. 1. LED rosso 2. LED verde 3. Connettore per spina 4. Spina * 5. Jack di alimentazione (*) Europlug nell'immagine come esempio.
  • Seite 34 Assicurarsi che la spina dell'alimentatore del dispositivo sia sempre accessibile in modo da garantirne in qualsiasi momento la possibilità di disconnessione dalla rete elettrica. Procedere come segue: 1. Innestare nel connettore la spina adeguata fino a sentire il clic del meccanismo di ritenuta.
  • Seite 35: Accensione / Spegnimento

    2. Attendere che il LED cambi colore da rosso a verde. Il dispositivo è pronto all'uso. NOTA: Nel caso di eLIGHT ONE la fase di accensione è evidenziata anche sul display touchscreen. Il dispositivo è pronto all'uso quando è visualizzata la schermata di home del software.
  • Seite 36: Reset

    12.1 Reset È possibile sbloccare il dispositivo nel caso non risponda più ai comandi. Lo sblocco avviene grazie ad un reset hardware forzato del dispositivo ottenuto premendo l'apposito pulsante. Il reset hardware forza il dispositivo allo spegnimento ed è seguito da un riavvio automatico.
  • Seite 37: Comunicazione

    13 COMUNICAZIONE Il modulo WiFi installato nel dispositivo lo rende in grado di: • connettersi ad internet per ricevere gli aggiornamenti del software installato; • essere utilizzato tramite le unità di visualizzazione. Il modulo Bluetooth installato nel dispositivo lo rende in grado di: •...
  • Seite 38: Wifi

    13.1 WiFi Il dispositivo utilizza la connessione WiFi per connettersi ad internet e ricevere gli aggiornamenti software. La connessione WiFi permette anche l'utilizzo del dispositivo tramite un'unità di visualizzazione. Procedere come segue: 1. Accendere il dispositivo. 2. Accendere l'unità di visualizzazione. * 3.
  • Seite 39: Bluetooth

    13.2 Bluetooth Il dispositivo utilizza la connessione Bluetooth per connettersi ad uno strumento di diagnosi e sfruttare in questo modo le potenzialità diagnostiche messe a disposizione dalla connessione alla centralina del veicolo. La configurazione della comunicazione avviene tramite le apposite funzioni del software.
  • Seite 40: Operazioni Preliminari

    14 OPERAZIONI PRELIMINARI Le modalità di attuazione delle misure e di allestimento sono conformi alle raccomandazioni della norma: • ISO 10604 Osservare in ogni caso disposizioni, leggi ed ordinamenti vigenti nel paese in cui si opera. Per una corretta analisi fotometrica: •...
  • Seite 41: Superfice Di Lavoro

    14.1 Superfice di Lavoro Per poter eseguire una corretta analisi fotometrica è necessario che il dispositivo ed il veicolo siano posizionati su una superficie di lavoro in piano. È comunque possibile eseguire l'analisi fotometrica anche in presenza di dislivelli, a patto che dispositivo e veicolo siano posti sulla stessa superfice e che l'inclinazione della stessa sia minore o uguale a 0,5%.
  • Seite 42: Preparazione Veicolo

    14.2 Preparazione Veicolo Prima di procedere con l'analisi fotometrica è necessario assicurarsi che il veicolo sia nelle condizioni idonee perché il risultato non risulti viziato da fattori esterni. Assicurarsi che il freno di stazionamento resti inserito per tutta la durata delle operazioni sul veicolo. Assicurarsi che: •...
  • Seite 43: Preparazione Dispositivo

    14.3 Preparazione Dispositivo Prima di posizionare il dispositivo davanti al veicolo è necessario eseguire un'operazione di livellamento orizzontale volta alla messa in bolla dello stesso. Il corretto livellamento è verificato tramite la livella sferica posta all'interno della camera ottica. Procedere come segue: 1.
  • Seite 44: Posizionamento Dispositivo

    14.4 Posizionamento Dispositivo Per la corretta esecuzione di un'analisi fotometrica è necessario posizionare correttamente il dispositivo rispetto al veicolo in esame. Procedere come segue: 1. Posizionare il dispositivo davanti al faro a circa 20 - 40 cm. 2. Portare la camera ottica alla stessa altezza del faro, cercando di allineare i centri ottici.
  • Seite 45: Allineamento Con Il Veicolo

    14.5 Allineamento con il Veicolo Per la corretta esecuzione di un'analisi fotometrica è necessario assicurarsi che il dispositivo ed il veicolo siano correttamente allineati. Procedere come segue: 1. Cercare due elementi simmetrici tra loro nella parte frontale del veicolo da utilizzare come punti di riferimento (es.: parti di carrozzeria o i fari stessi).
  • Seite 46: Esecuzione Analisi Fotometrica

    Un'errata regolazione dei fari comporta il rischio abbagliamento per i conducenti degli altri veicoli. Per eseguire un'analisi fotometrica con eLight ONE è necessario disporre anche di un'unità di visualizzazione su cui sia installato l'apposito software.
  • Seite 47 5. Selezionare il tipo di analisi che si desidera eseguire. 6. Seguire le indicazioni fornite a video. 7. Selezionare il veicolo su cui si intende eseguire l'analisi seguendo le istruzioni fornite a video. 8. Selezionare la tipologia di luce del faro in esame. 9.
  • Seite 48: Manutenzione

    16 MANUTENZIONE Questo prodotto non richiede particolari operazioni di manutenzione, tuttavia si raccomanda di: • seguire scrupolosamente le istruzioni riportate nel presente manuale; • mantenere il dispositivo pulito utilizzando prodotti non aggressivi; • ispezionare ed eventualmente serrare periodicamente le viti di fissaggio; •...
  • Seite 49: Sostituzione Batterie Puntatore Laser Orientabile

    16.1 Sostituzione Batterie Puntatore Laser Orientabile Il puntatore laser orientabile è alimentato da 3 batterie AA da 1,5 V. Le batterie devono essere sostituite quando l'intensità del fascio laser diminuisce. Procedere come segue: 1. Spegnere il puntatore laser orientabile. 2. Rimuovere le viti poste ai lati del pulsante di accensione del laser.
  • Seite 50: Note Legali

    17 NOTE LEGALI TEXA S.p.A. Via 1 Maggio, 9 - 31050 Monastier di Treviso - ITALY Cod. Fisc.- N.I. Registro Imprese di Treviso - Part. IVA: 02413550266 Società con socio unico e soggetta ad attività di direzione e coordinamento di Opera Holding S.r.l.
  • Seite 52 2.2.6 Fire and Explosion Hazard...............58 2.2.7 Noise Hazard....................58 2.2.8 High Voltage Hazard.................58 2.2.9 Poisoning Hazard..................59 2.3 General User and Maintenance Warnings...........59 3 SPECIFIC SAFETY RULES FOR USING eLIGHT ONE AND eLIGHT ONED.....................60 3.1 Glossary....................60 3.2 General Rules..................60 3.3 Operator Safety..................60 3.4 Device Safety..................62...
  • Seite 53 9.1 Measurement..................78 10 PREPARING FOR USE..............79 10.1 Assembly....................79 11 POWER SUPPLY AND RECHARGE..........82 12 POWER ON/OFF................84 12.1 Reset....................85 13 COMMUNICATION.................86 13.1 Wi-Fi....................87 13.2 Bluetooth....................88 14 PRELIMINARY OPERATIONS............89 14.1 Work Surface..................90 14.2 Vehicle Preparation................91 14.3 Device Preparation................92 14.4 Device Positioning................93 14.5 Alignment with the Vehicle..............94 15 PHOTOMETRIC ANALYSIS............95 16 MAINTENANCE................97 16.1 Adjustable Laser Pointer Battery Replacement........98...
  • Seite 54: Revision Of The Manual

    LIGHT ONE / LIGHT ONE-D TECHNICAL MANUAL REVISION OF THE MANUAL This document is revision01 of the TEXA S.p.A. eLIGHT ONE / eLIGHT technical manual. Issue date: 10/11/2019...
  • Seite 55: Introduction

    INTRODUCTION Dear Customer, We would like to thank you for choosing a TEXA product for your workshop. We are certain that you will get the greatest satisfaction from it and receive a great deal of help in your work. Please read through the instructions in this manual carefully and keep it for future reference.
  • Seite 56: Legend Of The Symbols Used

    1 LEGEND OF THE SYMBOLS USED The symbols used in the manual are described in this chapter. Asphyxiation Risk Explosion Risk High Voltage Hazard Fire / Burn risk Poisoning Hazard Corrosive Substances Risk Noise Hazard Moving Parts Risk Crushing Risk Risk of Stumbling Laser Radiation Hazard General Risk...
  • Seite 57: General Safety Regulations

    2 GENERAL SAFETY REGULATIONS 2.1 Glossary • Operator: qualified person in charge of using the device. • Device: the purchased product. • Workplace: the place where the operator must carry out her/his work. 2.2 Operator Safety Regulations 2.2.1 General Safety Regulations •...
  • Seite 58: Hazards Caused By Moving Parts

    Safety Precautions: • Always make sure that the vehicle is in neutral gear (or that it is set in parking position in case of a vehicle equipped with automatic transmission). • Always activate the hand brake or parking brake on the vehicle. •...
  • Seite 59: Fire And Explosion Hazard

    2.2.6 Fire and Explosion Hazard The following are potential fires and / or explosion hazards: • The types of fuel used by the vehicle and the vapours released by these fuels. • The refrigerants used by the A/C system. • The acid in the vehicle batteries. Safety Precautions: •...
  • Seite 60: Poisoning Hazard

    • Work with dry hands only. • Keep conductive liquids away from the engine while working. • Never leave tools on the battery in order to avoid accidental contacts. 2.2.9 Poisoning Hazard The hoses used to extract the refrigerants can release toxic gases, dangerous to the operator if exposed to temperatures higher than 250 °C or in case of a fire.
  • Seite 61: Specific Safety Rules For Using Elight One And Elight Oned

    The personnel in charge of using the diagnostic and measuring tools is required to follow the general safety rules and to use the eLIGHT ONE /eLIGHT ONE device for its intended use only. Furthermore, they are required to carry out the maintenance as described in this manual.
  • Seite 62 • Always wear appropriate clothing for the work environment. • Be careful when adjusting the moving parts of the device. The base of the device may be an obstacle that could cause you to stumble. Safety Measures: • Be careful when operating near the device. For a correct positioning of the device, for the purpose of the photometric analysis, specific laser pointers must be used.
  • Seite 63: Device Safety

    Laser: Safety Measures: • Do not point the laser beam towards people, especially the face and eyes • Do not look directly at the laser beam, not even while wearing protective glasses. 3.4 Device Safety The device was designed to be used in the environmental conditions indicated in the Technical Features chapter.
  • Seite 64 The device was manufactured to be electrically safe and to work with specific supply voltage levels. Failure to comply with the specifications related to the power supply may impair the device's efficiency. Safety measures: • Do not wet the device with water or other liquids. •...
  • Seite 65: Environmental Information

    4 ENVIRONMENTAL INFORMATION Do not dispose of this product with other undifferentiated solid waste. For information regarding the disposal of this product please see the pamphlet supplied.
  • Seite 66: Operation Of The Radio Devices

    The wireless connectivity with Bluetooth and WiFi technology supplies a standard and reliable method to exchange information between different devices, using radio waves. Other than TEXA products, even products such as cellular phones, portable devices, computers, printers, cameras, Pocket PCs, etc.
  • Seite 67: Regulatory Information

    6 REGULATORY INFORMATION Simplified EU Declaration of Conformity The manufacturer, TEXA S.p.A., declares that the type of radio equipment eLIGHT ONE / eLIGHT ONE is compliant with the following directives: • EMC 2014/30/EU • LVD 2014/35/EU • ROHS 2011/65/EU The complete text of the EU declaration of conformity is available at...
  • Seite 68: Elight One / Elight Oned

    7 eLIGHT ONE / eLIGHT ONE The eLIGHT headlight testers are tools specifically designed to optimise the photometric analysis and headlight adjustment on all types of vehicles. Use of the Bluetooth and Wi-Fi technologies allows these devices to integrate the functions of a normal headlight tester with the potentials of a diagnostic tool.
  • Seite 69 The column on which the optical box is installed can rotate by approximately 15° for better alignment with the vehicle. The optical box can be adjusted in height thanks to a sliding system based on rollers that allows positioning it at the desired height. The large Fresnel lens allows carrying out correct analyses even on large, irregularly-shaped headlights.
  • Seite 70: Elight One

    7.1 eLIGHT ONE eLIGHT ONE is designed for use in combination with the following display units: • AXONE Nemo<enfasi-non-traducibile dex-child-pos='1' stile='grassetto'>AXONE Nemo</enfasi-non-traducibile> • AXONE Nemo 2<enfasi-non-traducibile dex-child-pos='1' stile='grassetto'>AXONE Nemo 2</enfasi-non-traducibile> • AXONE 5<enfasi-non-traducibile dex-child-pos='1' stile='grassetto'>AXONE 5</ enfasi-non-traducibile> • PC (equipped with specific diagnostic software) These display units allow using the specific software to carry out a complete and precise photometric analysis.
  • Seite 72: Elight One[Sup]D[/Sup]

    7.2 eLIGHT ONE[sup]D[/sup] eLIGHT ONE[sup]D[/sup] is designed as a stand-alone tool, i.e. it can carry out the photometric analysis autonomously without needing to be connected to a display unit. eLIGHT ONE[sup]D[/sup] has a 7" touchscreen display with adjustable bracket, installed on the optical box.
  • Seite 74: Description

    8 DESCRIPTION...
  • Seite 75 1. Column (with centimetre scale) 2. Handle 3. Rubber wheel 4. Adjustable laser pointer 5. Laser opening 6. Touchscreen 7. Optical box 8. Fresnel lens 9. Laser pointer 10.Laser opening 11.Laser pointer 12.Laser opening 13.Levelling screw 14.Rubber wheel 15.Position locking screw 16.Printer * 17.Adjustable laser pointer ON button 18.Ventilation grid...
  • Seite 76: Technical Features

    9 TECHNICAL FEATURES Manufacturer: TEXA S.p.A. eLIGHT ONE / eLIGHT ONE[sup]D[/ Product name: sup] Lithium Ion Power supply (battery): 11,1 V 5200 mAh External charger mod. IPC30 • Input: 100-240 Vac 50/60 Hz 700 Charger: • Output: 11.1 Vdc 2000 mAh •...
  • Seite 77 • RJ45 x1 • RS-232 x1 • 7" TFT touchscreen 800 x 480* • LED User interface: (*) only eLIGHT ONE[sup]D[/sup] Operating temperature: 5 °C ÷ 45 °C 1 month: - 20 °C ÷ 60 °C Storage temperature: 3 months: - 20 °C ÷ 45 °C 1 year: - 20 °C ÷...
  • Seite 78 Dimensions [mm]: Weight: 52 kg • Use: Internal • Altitude: up to 2000 m • Atmospheric pressure: 0.7 ÷ 1.04 Environmental conditions • Supply voltage fluctuations: ± 10% • Overvoltage category: II • Pollution degree: 2 IP20 Protection degree: (casing) EMC 2014/30/UE Directives: LVD 2014/35/UE...
  • Seite 79: Measurement

    9.1 Measurement PROPERTY VALUE 0 ÷ 600 mm/10 m Vertical orientation (upward and downward): 0 ÷ 6 % 0 ÷ 3,432 ° 0 ÷ 1000 mm/10 m Horizontal orientation (to the right and to the left): 0 ÷ 10 % 0 ÷...
  • Seite 80: Preparing For Use

    Their goal is to give these technicians as much familiarity with the tools and their software as possible. This way the technicians will learn how to make the best use of TEXA S.p.A. products. For more information regarding training courses offered by TEXA S.p.A., visit the website www.texa.com.
  • Seite 81 3. Tighten the screws with a torque of 12 Nm. 4. Fasten the optical box to the specific support from above and then rotate it as illustrated. 5. Secure the optical box to the support tightening specific screws with a torque of 3 Nm.
  • Seite 82 6. Position the adjustable laser pointer specific magnetic pin. Remove counterweight's safety screw.
  • Seite 83: Power Supply And Recharge

    11 POWER SUPPLY AND RECHARGE The device is powered by an internal rechargeable lithium-ion battery. The charge is provided by the IPC 30 charger. 1. Red LED 2. Green LED 3. Plug connector 4. Plug * 5. Power supply jack (*) Europlug in the image as an example.
  • Seite 84 Make sure the device's power plug can always be accessed so that it is possible to disconnect it from the mains at any time. Proceed as follows: 1. Insert the appropriate plug into the connector until the locking mechanism clicks into place.
  • Seite 85: Power On/Off

    2. Wait for the LED to change colour from red to green. The device is now ready for use. NOTE: In eLIGHT ONE[sup]D[/sup] , the power ON phase is also visible on the touchscreen display. The device is ready for use when the software home screen is displayed.
  • Seite 86: Reset

    12.1 Reset The device can be unlocked if it no longer responds to the commands. The device is unlocked thanks to a forced hardware reset achieved by pressing the specific button. The hardware reset forces the device to turn off and is followed by an automatic restart.
  • Seite 87: Communication

    13 COMMUNICATION The Wi-Fi module installed in the device makes it able to: • connect to the Internet, to receive updates for the installed software; • be used through the display units. The Bluetooth module installed in the device makes it able to: •...
  • Seite 88: Wi-Fi

    13.1 Wi-Fi The device uses the Wi-Fi connection to connect to the Internet and receive the software updates. The Wi-Fi connection also allows using the device through a display unit. Proceed as follows: 1. Turn on the device. 2. Turn on the display unit. * 3.
  • Seite 89: Bluetooth

    13.2 Bluetooth The device uses the Bluetooth connection to connect to a diagnostic tool and thus make the most of the diagnostic potentials offered by the connection to the vehicle control unit. The configuration of the communication takes place through specific software functions.
  • Seite 90: Preliminary Operations

    14 PRELIMINARY OPERATIONS The measurement and equipment actuation modes are compliant with the provisions of the standard: • ISO 10604 In any case, observe the provisions, laws and regulations in force in the country you are working in. For a correct photometric analysis: •...
  • Seite 91: Work Surface

    14.1 Work Surface For a correct photometric analysis, the device and the vehicle must be positioned on a flat work surface. The photometric analysis can also be performed on a slope, as long as the device and vehicle are positioned on the same surface and the slope is equal to or lower than 0.5%.
  • Seite 92: Vehicle Preparation

    14.2 Vehicle Preparation Before proceeding with the photometric analysis, make sure the vehicle is in suitable conditions so that the result will not be jeopardised by external factors. Make sure the parking brake remains engaged throughout the operations on the vehicle. Make sure that: •...
  • Seite 93: Device Preparation

    14.3 Device Preparation Before positioning the device in front of the vehicle, a horizontal levelling operation is required in order to set the device level with the work surface. The correct levelling can be checked with the round level inside the optical box. Proceed as follows: 1.
  • Seite 94: Device Positioning

    14.4 Device Positioning For a correct photometric analysis, the device must be positioned correctly with respect to the vehicle being tested. Proceed as follows: 1. Position the device in front of the vehicle, at approx. 20 - 40 cm. 2. Set the optical box at the same height as the headlight, trying to align the optical centres.
  • Seite 95: Alignment With The Vehicle

    14.5 Alignment with the Vehicle For a correct photometric analysis, the device and vehicle must be properly aligned. Proceed as follows: 1. Find two symmetrical elements in the front part of the vehicle, to be used as reference points (e.g. vehicle body parts or the headlights themselves). 2.
  • Seite 96: Photometric Analysis

    An incorrect headlight adjustment may blind the other drivers. In order to carry out a photometric analysis with eLight ONE, you also need a display unit with the specific software installed. Using the software's diagnostic functions requires the use of a VCI and the activation of a specific license.
  • Seite 97 7. Select the vehicle you wish to carry out the analysis on by following the on- screen instructions. 8. Select the type of light of the headlight being tested. 9. Carry out the photometric analysis on the first headlight. 10. Carry out any operations required to correct the light beam. * The headlight adjustment operations aimed at correcting the projected light beam must comply with the vehicle manufacturer's provisions.
  • Seite 98: Maintenance

    16 MAINTENANCE This product does not require special maintenance; however, we recommend that you: • carefully follow the instructions provided in this manual; • keep the device clean using non-aggressive products; • periodically inspect the fastening screws and tighten them if necessary; •...
  • Seite 99: Adjustable Laser Pointer Battery Replacement

    16.1 Adjustable Laser Pointer Battery Replacement The adjustable laser pointer is powered by 3 AA 1.5 V batteries. The batteries must be replaced when the intensity of the laser beam decreases. Proceed as follows: 1. Turn off the adjustable laser pointer. 2.
  • Seite 100: Legal Notices

    17 LEGAL NOTICES TEXA S.p.A. Via 1 Maggio, 9 - 31050 Monastier di Treviso - ITALY Tax Code - Company Register of Treviso ID No. - VAT No.: 02413550266 Single-shareholder company subject to the direction and coordination activities of Opera Holding S.r.l.
  • Seite 102 2.2.8 Risque de choc électrique..............108 2.2.9 Risque d 'empoisonnement..............109 2.3 Précautions générales d'utilisation et d'entretien ......109 3 CONSIGNES SPÉCIFIQUES DE SÉCURITÉ POUR L'UTILISATION DE eLIGHT ONE E eLIGHT ONE[sup]D[/sup]........110 3.1 Glossaire....................110 3.2 Règles Générales................110 3.3 Sécurité de l'opérateur...............110 3.4 Sécurité du Dispositif................112 4 INFORMATIONS ENVIRONNEMENTALES........114...
  • Seite 103 9.1 Mesure....................126 10 PRÉPARATION À L'EMPLOI............127 10.1 Montage...................127 11 ALIMENTATION ET RECHARGE..........130 12 ALLUMAGE / EXTINCTION............132 12.1 Réinitialiser..................134 13 COMMUNICATION...............135 13.1 WiFi....................136 13.2 Bluetooth..................137 14 OPÉRATIONS PRÉLIMINAIRES..........138 14.1 Surfaces de travail................139 14.2 Préparation du Véhicule..............140 14.3 Préparation du Dispositif..............141 14.4 Positionnement du Dispositif............142 14.5 Alignement avec le véhicule.............143 15 EXÉCUTION ANALYSE PHOTOMÉTRIQUE.......144 16 ENTRETIEN..................146...
  • Seite 104: Révision Du Manuel

    MANUEL TECHNIQUE LIGHT ONE / LIGHT ONE-D RÉVISION DU MANUEL Le document présent constitue la révision01 du manuel technique eLIGHT ONE / eLIGHT ONE[sup]D[/sup] de TEXA S.p.A. Date d'émission : 10/11/2019...
  • Seite 105: Au Préalable

    La lecture et la compréhension du manuel sert aussi à éviter des dommages aux personnes et aux choses résultant d'un usage impropre du produit. TEXA S.p.A se réserve le droit d'apporter à tout moment et sans préavis, toutes les modifications jugées utiles à l'amélioration du manuel d'utilisation ou toute autre exigence à...
  • Seite 106: Légende Des Symboles Utilisés

    1 LÉGENDE DES SYMBOLES UTILISÉS Les symboles utilisés dans le manuel sont décrits dans ce chapitre. Risque d'asphyxie Risque d'explosion Risque de haute tension Incendie / Risque de brûlure Risque d 'empoisonnement Risque lié à des substances corrosives Risque lié au bruit Risque lié...
  • Seite 107: Règles Générales De Sécurité

    2 RÈGLES GÉNÉRALES DE SÉCURITÉ 2.1 Glossaire • Opérateur :personne qualifiée chargée d'utiliser le dispositif. • Dispositif : le produit acheté. • Lieu de travail : lieu où l'opérateur doit effectuer son travail. 2.2 Règles de sécurité de l'opérateur 2.2.1 Règles de sécurité générales •...
  • Seite 108: Risques Générés Par Les Éléments Mobiles

    Mesures de sécurité : • S'assurer que la vitesse du véhicule soit au point-mort (ou en position parking si doté d'une boite de vitesse automatique). • Toujours serrer le frein à main ou le frein de parking du véhicule. • Toujours bloquer les roues du véhicule à l'aide de cales. 2.2.4 Risques générés par les éléments mobiles Les moteurs des véhicules comportent des éléments mobiles, tant lorsque le véhicule est en mouvement qu'à...
  • Seite 109: Risque D'incendie Et D'explosion

    • Eviter les éclaboussures d'électrolyte sur la peau, les yeux et les vêtements, il s'agit en effet d'un composé très toxique et corrosif. 2.2.6 Risque d'incendie et d'explosion Les risques potentiels d'incendie et/ou d'explosion sont : • Les carburants utilisés par le véhicule et l'émission de vapeurs. •...
  • Seite 110: Risque D 'Empoisonnement

    • Ne PAS toucher les câbles à haute tension lorsque le moteur est en marche. • S'assurer de disposer d'une isolation à la terre adaptée avant toute manipulation/ utilisation d'outils. • Travailler avec les mains sèches. • Maintenir les liquides conducteurs à distance du moteur lors de l'exécution des opérations.
  • Seite 111: Consignes Spécifiques De Sécurité Pour L'utilisation De Elight One E Elight One[Sup]D[/Sup]

    La technologie utilisée pour la conception et le contrôle de production de eLIGHT ONE / eLIGHT ONED en font un appareil simple à utiliser, fiable et sûr. Le personnel chargé d'utiliser les instruments de diagnostic est tenu de respecter les consignes générales de sécurité, d'utiliser le dispositif eLIGHT ONE /eLIGHT ONE[sup]D[/sup] pour l'usage prévu et de procéder aux...
  • Seite 112 • Utiliser les équipements de sécurité personnels prévus. • Porter toujours un vêtement de travail adéquat. • Prêter attention lors des opérations de réglage des parties mobiles du dispositif. La base du dispositif pourrait représenter un obstacle de trébuchement. Consignes de sécurité : •...
  • Seite 113: Sécurité Du Dispositif

    Le rayon provenant d'un produit laser de Classe 2 peut provoquer : l'éblouissement, aveuglement par flash et images floues, en particulier en condition d'éclairage faible. Ceci pourrait avoir des conséquence indirectes sur la sécurité en général, une perturbation temporaire de la vue ou réactions de crainte / surprise.
  • Seite 114 Consignes de sécurité : • Ne pas laisser tomber, secouer ni donner de coups au dispositif. • Éviter toute intervention susceptible d'endommager le dispositif. • Ne pas ouvrir ni démonter le dispositif. • Déplacer le dispositif exclusivement sur leurs propres roues. •...
  • Seite 115: Informations Environnementales

    4 INFORMATIONS ENVIRONNEMENTALES Ne pas éliminer ce produit ensemble aux autres déchets non recyclables. Pour les informations concernant l'élimination de ce produit, consulter le dépliant fourni.
  • Seite 116: Fonctionnement Des Dispositifs Radio

    La connectivité sans fil basée avec la technologie Bluetooth est un moyen sûr pour échanger des informations entre plusieurs dispositifs utilisant des ondes radio. A l'instar d'autres produits (autres que les dispositifs TEXA) utilisent également cette technologie : téléphones et appareils portables, ordinateurs, imprimantes, appareils photo, ordinateurs de poche, etc.
  • Seite 117: Informations Sur Les Normes

    6 INFORMATIONS SUR LES NORMES Déclaration de conformité CE Simplifiée Le fabricant TEXA S.p.A., déclare que le type d'appareil radio eLIGHT ONE / eLIGHT ONE[sup]D[/sup] est conforme aux directives : • EMC 2014/30/EU • LVD 2014/35/EU • ROHS 2011/65/EU Le texte complet de déclaration de conformité CE est disponible à...
  • Seite 118: Elight One / Elight One[Sup]D[/Sup]

    7 eLIGHT ONE / eLIGHT ONE[sup]D[/sup] Les dispositifs de réglage des phares eLIGHT sont des dispositifs réalisés pour optimiser l'analyse photométrique et le réglage des phares sur tous types de véhicules. L'utilisation de Bluetooth et WiFi permet à ces dispositifs d'intégrer les fonctions d'un dispositif normal de réglage des phares avec tout le potentiel d'un...
  • Seite 119 La caméra optique est réglable en hauteur à travers un système de coulissement sur roulettes dotées de coussinets qui permet de se positionner à la hauteur souhaitée. La lentille Fresnel de grandes dimensions permet d'effectuer l'analyse correcte aussi sur les phares volumineux et avec des formes irrégulières.
  • Seite 120: Elight One

    La connexion entre le dispositif et l'unité de visualisation intervient via WiFi. eLIGHT ONE peut être connecté via Bluetooth à un instrument de diagnostic : • NAVIGATOR NANO S • NAVIGATOR TXTs Grâce au dispositif de diagnostic, il est possible d'effectuer l'activation sélective...
  • Seite 121: Elight One[Sup]D[/Sup]

    à dire en mesure de réaliser une analyse photométrique en pleine autonomie sans être connecté à l'unité de visualisation. eLIGHT ONE[sup]D[/sup] est doté d'un écran tactile de 7" avec un support orientable, installé sur la caméra optique. Il est toute façon possible de connecter le dispositif aux unités de visualisation : •...
  • Seite 122: Description

    8 DESCRIPTION...
  • Seite 123 1. Colonne (avec échelle graduée en centimètres) 2. Poignée 3. Roue en catouchouc 4. Pointeur laser orientable 5. Ouverture laser 6. Écran tactile 7. Chambre noire 8. Lentille Fresnel 9. Pointeur laser 10.Ouverture laser 11.Pointeur laser 12.Ouverture laser 13.Vis pour mise à niveau 14.Roue en catouchouc 15.Vis de blocage de position 16.Imprimante *...
  • Seite 124: Caractéristiques Techniques

    9 CARACTÉRISTIQUES TECHNIQUES Constructeur : TEXA S.p.A. eLIGHT ONE / eLIGHT ONE[sup]D[/ Nom du produit : sup] Lithium Ion Alimentation (batterie): 11,1 V 5200 mAh Alimentateur externe mod. IPC30 • Entrée : 100-240 Vac 50/60 Hz 700 Alimentateur : • Sortie : 11,1 Vdc 2000 mAh •...
  • Seite 125 • RS-232 x1 • Écran tactile TFT 7" 800 x 480* • LED Interface utilisateur : (*) seulement eLIGHT ONE[sup]D[/ sup] Température de fonctionnement : 5 °C ÷ 45 °C 1 mois: - 20 °C ÷ 60 °C Température de stockage : 3 mois: - 20 °C ÷...
  • Seite 126 Dimensions [mm] : Poids : 52 kg • Usage : interne • Altitude : jusqu'à 2000 m • Pression atmosphérique : 0,7 ÷ 1,04 atm Conditions environnementales • Fluctuations tension d'alimentation : ± 10% • Catégorie de surtensions : II •...
  • Seite 127: Mesure

    9.1 Mesure PROPRIÉTÉ VALEUR 0 ÷ 600 mm/10 m Orientation verticale (vers le haut et le bas) : 0 ÷ 6 % 0 ÷ 3,432 ° 0 ÷ 1000 mm/10 m Orientation horizontale (vers la droite et vers la 0 ÷ 10 % gauche) : 0 ÷...
  • Seite 128: Préparation À L'emploi

    10 PRÉPARATION À L'EMPLOI TEXA S.p.A. met à disposition des ses clients des cours de formation professionnelle. Durant ces cours, les techniciens sont suivis pas à pas par un personnel spécialisé pour garantir à l'opérateur une familiarité majeure dans l'utilisation des instruments et des logiciels pour optimiser l'utilisation des produits TEXA S.p.A.
  • Seite 129 Serrer les vis avec un couple de serrage de 12 N m. 4. Accrocher la chambre noire depuis le haut sur le support relatif puis la pivoter comme illustré. 5. Fixer la chambre noire au support en serrant les vis avec un couple de serrage de 3 N m.
  • Seite 130 Ficher le pointeur laser orientable pivot magnétique. 7. Enlever la vis de sécurité du contre-poids.
  • Seite 131: Alimentation Et Recharge

    11 ALIMENTATION ET RECHARGE Le dispositif est alimenté par une batterie interne rechargeable aux ions de lithium. La recharge intervient à travers l'alimentateur modèle IPC 30. 1. LED rouge 2. LED verte 3. Connecteur pour fiche 4. Fiche * 5. Jack d'alimentation (*) Europlug comme illustré.
  • Seite 132 Le débranchement du dispositif se fait à travers la fiche de l'alimentateur externe. S'assurer que la fiche de l'alimentateur du dispositif soit toujours accessible de façon à garantir à tout moment la possibilité de la débrancher. Procéder comme suit : 1.
  • Seite 133: Allumage / Extinction

    2. Patienter que le voyant à LED change de couleur de rouge à vert. Le dispositif est prêt à l'emploi. REMARQUE : Dans le cas de eLIGHT ONE[sup]D[/sup] la phase d'allumage est mise en évidence aussi sur l'écran tactile. Le dispositif est prêt à l'emploi quand la page-écran d'accueil du logiciel apparaît.
  • Seite 134 Pour éteindre le dispositif, appuyer sur le bouton et patienter le voyant à LED s'éteigne.
  • Seite 135: Réinitialiser

    12.1 Réinitialiser Il est possible de débloquer le dispositif si les commandes ne répondent plus. Le déblocage intervient grâce à une réinitialisation matériel forcée du dispositif à travers le bouton relatif. La réinitialisation matériel force le dispositif à l'extinction et suivie d'un redémarrage automatique.
  • Seite 136: Communication

    13 COMMUNICATION Le module WiFi installé sur le dispositif permet de : • se connecter à internet pour recevoir les mises à jour du logiciel installé ; • l'utiliser à travers les unités de visualisation. Le module Bluetooth installé sur le dispositif permet de : •...
  • Seite 137: Wifi

    13.1 WiFi Le dispositif utilise la connexion WiFi pour se connecter à Internet et recevoir les mises à jour du logiciel. Le connexion WiFi permet aussi d'utiliser le dispositif à travers une unité de visualisation. Procéder comme suit : 1. Allumer le dispositif. 2.
  • Seite 138: Bluetooth

    13.2 Bluetooth Le dispositif emploie la connexion Bluetooth pour se connecter à un instrument de diagnostic et exploiter tout le potentiel de diagnostic du calculateur du véhicule. La configuration de la communication intervient à travers les fonctions logiciel relatives. Procéder comme suit : 1.
  • Seite 139: Opérations Préliminaires

    14 OPÉRATIONS PRÉLIMINAIRES Les modalités d'actionnement des mesures et d'équipement sont conformes aux recommandations de la norme : • ISO 10604 Observer dans tous les cas les dispositions, lois et ordonnances en vigueur dans le pays en question. Pour une analyse correcte photométrique : •...
  • Seite 140: Surfaces De Travail

    14.1 Surfaces de travail Pour effectuer une analyse correcte photométrique, il faut que le dispositif et le véhicule soient positionnés sur une surface plane de travail. Il est de toute de façon possible d'effectuer une analyse photométrique aussi en présence de dénivellements, pourvu que le dispositif et le véhicule soient positionnés sur la même surface et que l'inclinaison du sol soit égale ou inférieure à...
  • Seite 141: Préparation Du Véhicule

    14.2 Préparation du Véhicule Avant de procéder à l'analyse photométrique, il faut s'assurer que le véhicule soit dans de bonnes conditions pour que le résultat ne soit pas affecté par des facteurs externes. S'assurer que le frein de stationnement soit tiré pendant toute la durée des opérations sur le véhicule.
  • Seite 142: Préparation Du Dispositif

    14.3 Préparation du Dispositif Avant de positionner le dispositif devant le véhicule, il faut effectuer une opération de nivellement horizontal afin de le mettre à niveau. Le bon nivellement est vérifié à travers le niveau sphérique placé à l'intérieur de la chambre noire. Procéder comme suit : 1.
  • Seite 143: Positionnement Du Dispositif

    14.4 Positionnement du Dispositif Pour l'exécution correcte d'une analyse photométrique, il faut bien positionner le dispositif par rapport au véhicule en question. Procéder comme suit : 1. Positionner le dispositif devant le phare à environ 20 - 40 cm. 2. Porter la chambre noire à la même hauteur du phare, en essayant d'aligner les centres optiques.
  • Seite 144: Alignement Avec Le Véhicule

    14.5 Alignement avec le véhicule Pour l'exécution correcte d'une analyse photométrique, il faut s'assurer que le dispositif et le véhicule soient bien alignés. Procéder comme suit : 1. Chercher deux éléments symétriques entre eux dans la partie frontale du véhicule, à utiliser comme points de référence (ex. parties de carrosserie ou phares).
  • Seite 145: Exécution Analyse Photométrique

    Pour effectuer une analyse photométrique avec eLight ONE, il faut disposer aussi d'une unité de visualisation sur laquelle est installé le logiciel. L'utilisation des fonctions de diagnostic du logiciel nécessite l'emploi d'une VCI et l'activation d'une licence spécifique.
  • Seite 146 6. Suivre les indications fournies à l'écran. Sélectionner le véhicule sur lequel effectuer l'analyse en suivant les instructions à l'écran. 8. Sélectionner le type d'éclairage du phare en question. 9. Effectuer l'analyse photométrique sur le premier phare. 10. Effectuer les éventuelles opérations correctives du faisceau lumineux. * Les opérations de réglage du phare dans le but de corriger le faisceau lumineux projeté...
  • Seite 147: Entretien

    16 ENTRETIEN Ce produit ne demande aucune opération particulière d'entretien. Il est recommandé toutefois de : • suivre scrupuleusement les instructions reportées dans le présent manuel ; • garder le dispositif propre en utilisant des produits nettoyants non agressifs ; •...
  • Seite 148: Remplacement Batterie Pointeur Laser Orientable

    16.1 Remplacement batterie Pointeur laser orientable Le pointeur laser orientable est alimenté par 3 batteries AA de 1,5 V. Les batteries doivent être remplacées quand l'intensité du faisceau laser diminue. Procéder comme suit : 1. Éteindre le pointeur laser orientable. 2.
  • Seite 149: Mentions Légales

    17 MENTIONS LÉGALES TEXA S.p.A. Via 1 Maggio, 9 - 31050 Monastier di Treviso - ITALY Code fiscale.- N.I. Registre des sociétés de Trevise - N° TVA: 02413550266 Société avec actionnaire unique et assujettie aux activités de direction et de coordination de Opera Holding S.r.l.
  • Seite 150 2.2.5 Verbrennungsgefahr................156 2.2.6 Brand- und Explosionsgefahr..............157 2.2.7 Lärmgefährdung..................157 2.2.8 Hochspannungsgefahr................157 2.2.9 Vergiftungsgefahr...................158 2.3 Allgemeine Gebrauchs- und Wartungshinweise........158 3 eLIGHT ONE UND eLIGHT ONE[sup]D[/sup]: SPEZIFISCHE SICHERHEITSVORSCHRIFTEN FÜR DEN ANWENDER....159 3.1 Glossar....................159 3.2 Allgemeine Vorschriften..............159 3.3 Sicherheit für den Anwender..............159 3.4 Gerätesicherheit.................162 4 INFORMATIONEN ZUM UMWELTSCHUTZ........164...
  • Seite 151 9.1 Messung.....................176 10 VORBEREITUNG FÜR DEN GEBRAUCH........177 10.1 Zusammenbau.................177 11 SPANNUNGSVERSORGUNG UND LADEN........180 12 EINSCHALTEN / AUSSCHALTEN..........182 12.1 Reset....................183 13 KOMMUNIKATION...............184 13.1 WiFi (WLAN)..................185 13.2 Bluetooh...................186 14 VORBEREITENDE MAßNAHMEN..........187 14.1 Arbeitsfläche..................188 14.2 Vorbereitung des Fahrzeugs............189 14.3 Vorbereitung des Gerätes..............190 14.4 Positionierung des Gerätes..............191 14.5 Ausrichten auf das Fahrzeug............192 15 DURCHFÜHRUNG DER PHOTOMETRISCHEN ANALYSE..193 16 WARTUNG..................196...
  • Seite 152: Überarbeitung Der Bedienungsanleitung

    TECHNISCHE BEDIENUNGSANLEITUNG LIGHT ONE / LIGHT ONE-D ÜBERARBEITUNG DER BEDIENUNGSANLEITUNG Dieses Dokument ist die Überarbeitung / Rev. 0101 der Technischen Bedienungsanleitung eLIGHT ONE / eLIGHT ONE[sup]D[/sup] von TEXA S.p.A. Herausgabedatum: 10/11/2019...
  • Seite 153: Einleitung

    EINLEITUNG Lieber Kunde, wir danken Ihnen, dass Sie sich für Ihre Werkstatt für eines unserer TEXA Geräte entschieden haben. Wir sind sicher, dass es Sie zufrieden stellen und Ihnen eine große Hilfe bei der Arbeit sein wird. Bitte lesen Sie die in dieser Bedienungsanleitung enthaltenen Anweisungen aufmerksam durch.
  • Seite 154 © Copyright- Datenbankrechte 2019. Inhalt dieser Bedienungsanleitung ist durch Copyright- und Datenbankrechte geschützt. Alle Rechte sind gemäß den einschlägigen Bestimmungen und internationalen Vereinbarungen vorbehalten.
  • Seite 155: Legende Der Verwendeten Symbole

    1 LEGENDE DER VERWENDETEN SYMBOLE In diesem Kapitel werden die in der Bedienungsanleitung verwendeten Symbole beschrieben. Erstickungsgefahr Explosionsgefahr Hochspannungsgefahr Brand-/Verbrennungsgefahr Vergiftungsgefahr Verätzungsgefahr Lärmgefährdung Gefahren durch bewegliche Teile Quetschgefahr Stolpergefahr Gefahr Laserstrahlung Allgemeine Gefahren Wichtige Information...
  • Seite 156: Allgemeine Sicherheitsvorschriften

    2 ALLGEMEINE SICHERHEITSVORSCHRIFTEN 2.1 Glossar • Bediener: Mit der Benutzung des Gerätes beauftragte Fachkraft. • Gerät: Das gekaufte Erzeugnis. • Arbeitsplatz: Der Ort, an dem der Bediener seine Arbeit durchführen muss. 2.2 Sicherheitsvorschriften für die Bediener 2.2.1 Allgemeine Sicherheitsvorschriften • Der Bediener muss das Gerät mit klarem Kopf und nüchtern verwenden. Die Einnahme von Drogen oder Alkohol vor oder während der Arbeit mit dem Gerät ist strikt verboten.
  • Seite 157: Gefahren Durch Bewegliche Teile

    Sicherheitsmaßnahmen: • Sicherstellen, dass bei Fahrzeugen mit Schaltgetriebe kein Gang eingelegt ist. Bei Fahrzeugen mit Automatikgetriebe muss der Wählhebel auf Parkposition gestellt sein. • Stets die Handbremse oder Feststellbremse des Fahrzeugs anziehen. • Blockieren Sie die Räder des Fahrzeugs immer mit den entsprechenden Unterlegkeilen.
  • Seite 158: Brand- Und Explosionsgefahr

    • Elektrolytspritzer auf Haut, Augen oder Kleidung vermeiden. Diese Substanz ist ätzend und hochgradig giftig. 2.2.6 Brand- und Explosionsgefahr Potentielle Brand- und/oder Explosionsgefahrenquellen sind: • Die vom Fahrzeug verwendeten Kraftstoffe und die von diesen Kraftstoffen freigesetzten Dämpfe. • Die von der Klimaanlage verwendeten Kältemittel. •...
  • Seite 159: Vergiftungsgefahr

    • Vor dem Anschließen oder Abziehen von Kabeln stets die Versorgungsspannung abtrennen. • Auf keinen Fall die Hochspannungskabel berühren, wenn der Motor läuft. • Masseisoliert arbeiten. • Nur mit trockenen Händen arbeiten. • Halten Sie leitfähige Flüssigkeiten während der Arbeit vom Motor fern. •...
  • Seite 160: Elight One Und Elight One[Sup]D[/Sup]: Spezifische Sicherheitsvorschriften Für Den Anwender

    Anweisungen instandhalten. 3.1 Glossar Bediener: Fachpersonal für die Verwendung des Diagnosegerätes. Gerät: Jedes Gerät eLIGHT ONE / eLIGHT ONE[sup]D[/sup] 3.2 Allgemeine Vorschriften • Der Bediener muss über ein Grundwissen in Mechanik, Automobiltechnik und Autoreparaturen verfügen. Darüber hinaus muss er über die während der Eigendiagnose und den Messungen eventuell auftretenden Gefahren informiert sein.
  • Seite 161 Das Gerät ist derart konstruiert und realisiert, dass das Risiko durch bewegliche Teile gequetscht zu werden, auf ein Minimum reduziert wird. Eine für die Arbeitsumgebung unangemessene Kleidung und Unachtsamkeit bei der Verwendung des Gerätes erhöhen die Verletzungsgefahr des Bedieners. Sicherheitsmaßnahmen: •...
  • Seite 162 Die zugängliche Laserstrahlung ist für das Auge ungefährlich, solange keine optischen Instrumente (z.B. Lupen, Linsen, Teleskope) vor den Laseraustritt positioniert verwendet werden. Ein vor die Laseraustrittsöffnung positioniertes optisches Instrument verkleinert den Strahlquerschnitt des Laserstrahls, wodurch die zugängliche Laserstrahlung für das Auge gefährlich wird. Sicherheitsmaßnahmen: •...
  • Seite 163: Gerätesicherheit

    3.4 Gerätesicherheit Das Gerät wurde für die Verwendung unter den im Kapitel Technische Daten angegebenen Umgebungsbedingungen entwickelt. Die Verwendung des Gerätes in Umgebungen mit Temperatur- und Feuchtigkeitsbedingungen, die von den angegebenen abweichen, kann die Funktionsfähigkeit beeinträchtigen. Sicherheitsmaßnahmen: • Das Gerät in trockenen Räumen aufbewahren oder benutzen. •...
  • Seite 164 Die elektromagnetische Verträglichkeit des Gerätes garantiert bei Prüfungen Kompatibilität herkömmlichen Fahrzeugtechnologien (z. B. : Motorkontrolle, ABS usw.). Im Falle einer Fehlfunktion wenden Sie sich bitte an den Händler.
  • Seite 165: Informationen Zum Umweltschutz

    4 INFORMATIONEN ZUM UMWELTSCHUTZ Dieses Produkt darf nicht zusammen mit anderen ungetrennten festen Abfällen entsorgt werden. Für weitere Informationen zur Entsorgung dieses Produkts beziehen Sie sich bitte auf das mitgelieferte Begleitheft.
  • Seite 166: Betrieb Der Funkvorrichtungen

    Geräten anhand des von ihnen erzeugten Funksignals und bauen dann eine Verbindung mit ihnen auf. Die Texa-Geräte führen eine Auswahl durch und schlagen nur jene Geräte vor, die mit Texa kompatibel sind. Damit wird das Vorhandensein anderer Kommunikations- oder Störquellen jedoch nicht ausgeschlossen.
  • Seite 167: Normverweise

    6 NORMVERWEISE Vereinfachte EU-Konformitätserklärung Der Hersteller TEXA S.p.A. erklärt hiermit, dass der Funkgerätetyp eLIGHT ONE / eLIGHT ONE[sup]D[/sup] mit den folgenden Richtlinien übereinstimmt: • EMC 2014/30/EU • LVD 2014/35/EU • ROHS 2011/65/EU Die Komplettfassung der EU-Konformitätserklärung können Sie unter der folgenden Internetadresse herunterladen und anzeigen:...
  • Seite 168: Elight One / Elight One[Sup]D[/Sup]

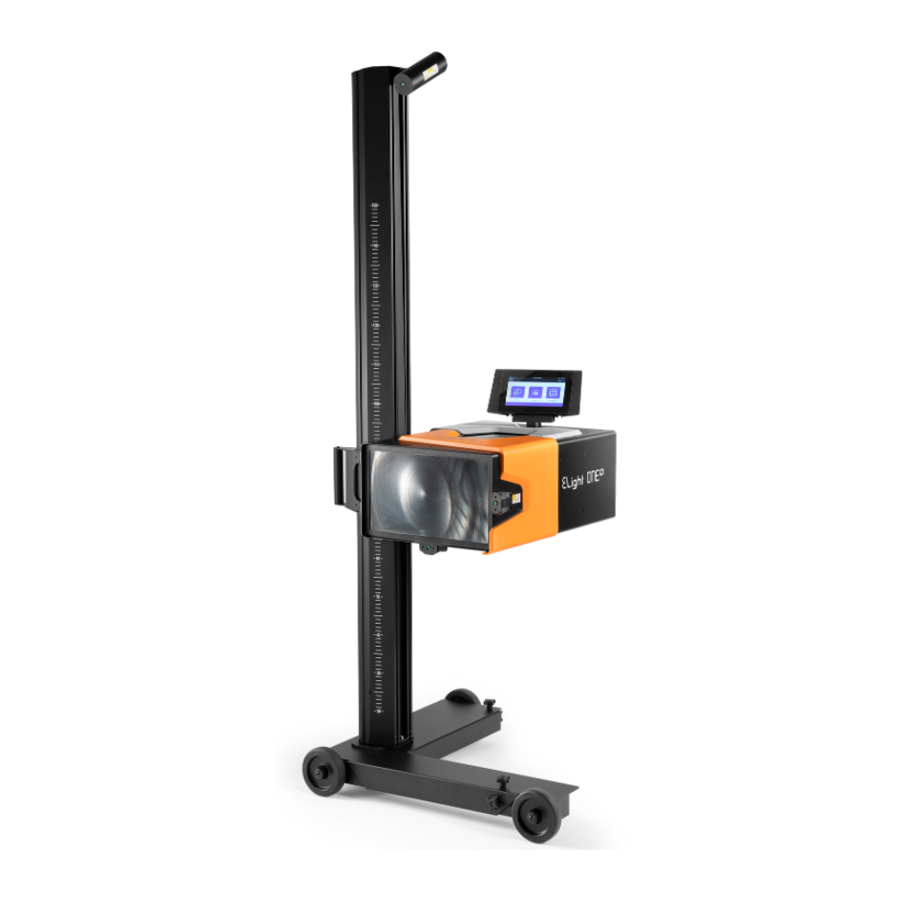
    7 eLIGHT ONE / eLIGHT ONE[sup]D[/sup] Scheinwerfereinstellgeräte eLIGHT sind Optimierung photometrischen Messung und der Einstellung der Scheinwerfer an allen Fahrzeugtypen realisiert worden. Dank der Nutzung von Bluetooth und WLAN (WiFi) können diese Geräte die Funktionen eines üblichen Scheinwerfereinstellgerätes mit den Leistungen eines Diagnosegerätes ergänzen.
  • Seite 169 Die Säule, an der der Optikkasten montiert ist, kann zum besseren Ausrichten des Gerätes bzw. Ausfluchten am Fahrzeug um etwa 15° gedreht werden. Der Optikkasten kann mittels eines Gleitschuhsystems auf die gewünschte Höhe eingestellt werden. Dank der großdimensionierten Fresnel-Linse können auch Scheinwerfer unterschiedlichster Formen und Größen korrekt gemessen werden.
  • Seite 170: Elight One

    7.1 eLIGHT ONE eLIGHT ONE ist für die Verwendung mit folgenden Anzeigegeräten ausgelegt: • AXONE Nemo • AXONE Nemo 2 • AXONE 5 • PC (mit entsprechender Diagnose-Software) Dank dieser Anzeigegeräte können Sie mit der entsprechenden Software eine komplette und präzise photometrische Analyse durchführen.
  • Seite 171: Elight One[Sup]D[/Sup]

    7.2 eLIGHT ONE[sup]D[/sup] eLIGHT ONE[sup]D[/sup] ist ein sogenanntes Stand-Alone-Gerät, d.h. es führt autonom und ohne erforderlichen Anschluss an ein Anzeigegerät die photometrische Analyse durch. eLIGHT ONE[sup]D[/sup] ist mit einem 7-Zoll-Touchscreen mit verstellbarem Haltebügel zur Installation am Optikkasten ausgestattet. Das Gerät kann jedoch auch mit folgenden Anzeigegeräten verbunden werden: •...
  • Seite 172: Beschreibung

    8 BESCHREIBUNG...
  • Seite 173 1. Säule (mit Zentimeterskala) 2. Griff 3. Gummiräder 4. Schwenkbares Lasermodul 5. Laseraustrittsöffnung 6. Touchscreen 7. Optikkasten 8. Fresnel-Linse 9. Lasermodul 10.Laseraustrittsöffnung 11.Lasermodul 12.Laseraustrittsöffnung 13.Nivellierschraube 14.Gummirad 15.Feststellschraube 16.Drucker * 17.Einsschalttaste schwenkbares Lasermodul 18.Lüftungsgitter 19.Nivellierschraube 20.Gummirad 21.Feststellschraube 22.USB-Anschluss 23.USB-Anschluss 24.RJ45-Port 25.LED 26.Versorgungsanschluss 27.Antenne 28.Serielle Steckverbindung RS-232...
  • Seite 174: Technische Daten

    9 TECHNISCHE DATEN Hersteller: TEXA S.p.A. eLIGHT ONE / eLIGHT ONE[sup]D[/ Produktname: sup] Lithium Ion Spannungsversorgung (Akku): 11,1 V 5200 mAh Externes Netzteil Mod. IPC30 • Input: 100-240 Vac 50/60 Hz 700 Netzteil: • Output: 11,1 Vdc 2000 mAh • Buchse: Eurostecker CEE 7/16...
  • Seite 175 • RJ45 x1 • RS-232 x1 • Touchscreen TFT 7" 800 x 480* • LED Benutzerschnittstelle: (*) nur eLIGHT ONE[sup]D[/sup] Betriebstemperatur: 5 °C ÷ 45 °C 1 Monat: - 20 °C ÷ 60 °C Lagertemperatur: 3 Monate: - 20 °C ÷ 45 °C 1 Jahr: - 20 °C ÷...
  • Seite 176 Abmessungen [mm]: Gewicht: 52 kg • Verwendung: intern • Höhe: bis 2000 m • Luftdruck: 0,7 ÷ 1,04 atm Umgebungsbedingungen • Spannungsschwankungen: ± 10% • Überspannungskategorie: II • Verschmutzungsgrad: 2 IP20 Schutzklasse: (des Gehäuses) EMC 2014/30/UE Richtlinien: LVD 2014/35/UE RoHS2 2011/65/UE ETSI 301 489-1 Elektromagnetische Verträglichkeit:...
  • Seite 177: Messung

    9.1 Messung EIGENSCHAFT WERT 0 ÷ 600 mm/10 m Vertikale Ausrichtung (nach oben und unten): 0 ÷ 6 % 0 ÷ 3,432 ° 0 ÷ 1000 mm/10 m Horizontale Ausrichtung (nach rechts und links): 0 ÷ 10 % 0 ÷ 5,720 ° 0 ÷...
  • Seite 178: Vorbereitung Für Den Gebrauch

    10 VORBEREITUNG FÜR DEN GEBRAUCH TEXA bietet seinen Kunden Schulungskurse an. In diesen Schulungskursen folgen die Reparaturtechniker Schritt für Schritt den Anweisungen des Lehrpersonals, dessen Ziel es ist, sie so gut wie möglich mit den Geräten und deren Software vertraut zu machen. Dadurch lernen die Reparaturtechniker die korrekte Verwendung und somit optimale Nutzung der TEXA S.p.A Produkte.
  • Seite 179 1. Die Basis mit dem Rädern auf die Fläche stellen. Die Säule mittels der entsprechenden Schrauben an der Basis befestigen. 3. Die Schrauben mit einem Anzugsmoment von 12 Nm zuschrauben. 4. Den Optikkasten von oben entsprechenden Halterung einsetzen und dann wie dargestellt drehen.
  • Seite 180 Den Optikkasten an der Halterung durch Anziehen der entsprechenden Schrauben mit einem Anzugsmoment von 3 Nm befestigen. schwenkbare Lasermodul (Ausrichtlaser) am Magnetbolzen einhängen. Die Sicherheitsschraube des Gegengewichts entfernen.
  • Seite 181: Spannungsversorgung Und Laden

    11 SPANNUNGSVERSORGUNG UND LADEN Das Gerät wird durch einen aufladbaren internen Lithium-Ionen-Akku mit Spannung versorgt. Der Ladevorgang erfolgt durch das Netzteil Modell IPC 30. 1. Rote LED 2. Grüne LED 3. Steckverbinder 4. Stecker * 5. Stromversorgungs-Klinkenstecker (*) Eurostecker in der Abbildung als Beispiel. Ausschließlich Stecker verwenden, die für die Steckdosen Ihrer Werkstatt geeignet sind.
  • Seite 182 Sicherstellen, dass der Stecker des Gerätenetzteils stets gut zugänglich ist, damit er jederzeit vom Stromnetz getrennt werden kann. Bitte wie folgt vorgehen: 1. In den Steckverbinder den richtigen Stecker einstecken, bis ein Klick des Einrastmechanismus zu hören ist. 2. Den Klinkenstecker des externen Netzteils an die Anschlussbuchse seitlich am Gerät anschließen.
  • Seite 183: Einschalten / Ausschalten

    2. Abwarten, bis die LED von rot auf grün wechselt. Das Gerät ist nun betriebsbereit. HINWEIS: Im Fall des eLIGHT ONE[sup]D[/sup] wird die Einschaltphase auch auf dem Touchscreen-Display angezeigt. Das Gerät ist betriebsbereit, sobald der Homebildschirm der Software angezeigt wird.
  • Seite 184: Reset

    12.1 Reset Das Gerät kann entriegelt werden, wenn es nicht mehr auf die Befehle reagiert. Die Entriegelung erfolgt durch einen erzwungenen Hardware-Reset des Gerätes durch Drücken auf die entsprechende Taste. Mit dem Hardware-Reset wird das Gerät ausgeschaltet, gefolgt von einem automatischen Neustart. Die Reset-Taste befindet sich innen im Gerät und ist durch Öffnen der entsprechenden Öffnung an der Unterseite des Optikkastens zugänglich.
  • Seite 185: Kommunikation

    13 KOMMUNIKATION Dank des im Gerät installierten WiFi- bzw. WLAN-Modul, kann das Gerät: • sich mit Internet verbinden, um die Aktualisierungen der installierten SW zu erhalten; • über die Anzeigegeräte verwendet werden. Dank des im Gerät installierten Bluetooth-Moduls, kann das Gerät: •...
  • Seite 186: Wifi (Wlan)

    13.1 WiFi (WLAN) Das Gerät verbindet sich über WLAN mit dem Internet, und erhält so die Softwareaktualisierungen. Die WLAN-Verbindung ermöglicht zudem die Nutzung des Gerätes über ein Anzeigegerät. Bitte wie folgt vorgehen: 1. Das Gerät einschalten. 2. Das Anzeigegerät einschalten. * 3.
  • Seite 187: Bluetooh

    13.2 Bluetooh Das Gerät verbindet sich über Bluetooth mit einem Diagnosegerät und nutzt so die von der Verbindung mit dem Steuergerät des Fahrzeugs zur Verfügung gestellten Diagnosemöglichkeiten. Die Kommunikation wird mittels der entsprechenden Softwarefunktionen konfiguriert. Bitte wie folgt vorgehen: 1. Das Diagnosegerät (VCI) an die OBD-Buchse des Fahrzeugs anschließen. 2.
  • Seite 188: Vorbereitende Maßnahmen

    14 VORBEREITENDE MAßNAHMEN Die Verfahren zur Durchführung der Messungen und der Vorbereitung der Prüffläche entsprechen der Norm: • ISO 10604 jeden Fall sind Benutzerland geltenden Bestimmungen, Gesetze und Vorschriften zu befolgen. Voraussetzungen für eine korrekte photometrische Analyse: • Das Gerät und das Fahrzeug müssen auf einer angemessenen Arbeits- bzw. Aufstellfläche positioniert sein.
  • Seite 189: Arbeitsfläche

    14.1 Arbeitsfläche Zur Durchführung einer korrekten photometrischen Messung müssen das Gerät und das Fahrzeug auf einer ebenen Arbeitsfläche positioniert sein. Wenn das nicht möglich sein sollte, müssen das Scheinwerfereinstellgerät und Fahrzeug zumindest einer Fläche gleichmäßigem Höhenunterschied platziert werden. Diese darf eine Neigung von 0,5 % nicht überschreiten.
  • Seite 190: Vorbereitung Des Fahrzeugs

    14.2 Vorbereitung des Fahrzeugs Vor Durchführung der photometrischen Analyse sicherstellen, dass das Fahrzeug sich in einem Zustand befindet, dass das Ergebnis nicht durch externe Faktoren verfälscht werden kann. Sicherstellen, dass die Feststellbremse während der Vorgänge am Fahrzeug angezogen bzw. aktiviert bleibt. Sicherstellen, dass: •...
  • Seite 191: Vorbereitung Des Gerätes

    14.3 Vorbereitung des Gerätes Vor der Positionierung des Gerätes vor dem Fahrzeug muss eine horizontale Nivellierung desselben durchgeführt werden, damit es eben zum Fahrzeug steht. Die korrekte Nivellierung (horizontale Ausrichtung) wird mit der Dosenlibelle (Wasserwaage) im Optikkasten überprüft. Bitte wie folgt vorgehen: 1.
  • Seite 192: Positionierung Des Gerätes

    14.4 Positionierung des Gerätes Für die korrekte Durchführung einer photometrischen Messung muss das Gerät korrekt vor dem zu prüfenden Fahrzeug und Scheinwerfer platziert sein. Bitte wie folgt vorgehen: 1. Das Gerät ca. 20-40 cm vor dem zu prüfenden Scheinwerfer positionieren. 2.
  • Seite 193: Ausrichten Auf Das Fahrzeug

    14.5 Ausrichten auf das Fahrzeug Für die korrekte Durchführung einer photometrischen Analyse bzw. Prüfung müssen das Gerät und das Fahrzeug korrekt zueinander ausgerichtet sein. Bitte wie folgt vorgehen: 1. Zwei zueinander symmetrische Elemente bzw. Teile im vorderen Bereich des Fahrzeugs als Bezugspunkte suchen, beispielsweise die beiden Scheinwerferränder oder Karosserieteile.
  • Seite 194: Durchführung Der Photometrischen Analyse

    Leuchtweitenregulierung besteht die Gefahr, dass die Fahrer anderer Fahrzeuge geblendet werden. Für die Durchführung einer photometrischen Messung mit dem eLight ONE brauchen Sie ein Anzeigegerät, auf das die entsprechende Software installiert wird. Zur Nutzung der Diagnosefunktionen der Software braucht man wiederum ein Diagnosegerät (VCI) sowie die Aktivierung einer...
  • Seite 195 5. Die gewünschte Messung auswählen. 6. Den Bildschirmanleitungen folgen. Das Fahrzeug auswählen, an dem die Messung entsprechend der Bildschirmanweisungen durchgeführt werden soll. 8. Die Lichtart des zu prüfenden Scheinwerfers auswählen. 9. Die photometrische Messung am ersten Scheinwerfer durchführen. 10. Die Leuchtweite eventuell korrigieren. * Die Einstellvorgänge des Lichts zur Leuchtweitenregulierung müssen entsprechend den Herstellervorgaben durchgeführt werden.
  • Seite 196 • Die Bereitstellung des Scheinwerfer-Steuergerätes im Modus "Einstellung" (sofern vom Fahrzeughersteller vorgesehen). Für weitere Information siehe Bedienungsanleitung der Software.
  • Seite 197: Wartung

    16 WARTUNG Diese Produkt erfordert keine spezielle Wartung, dennoch sollten die folgenden Hinweise beachtet werden: • Die in dieser Anleitung aufgeführten Anweisungen genauestens befolgen; • Das Gerät sauber halten, keine aggressiven Reinigungsmittel verwenden; • Die Befestigungsschrauben in regelmäßigen Zeitabständen überprüfen und ggf. anziehen;...
  • Seite 198: Batteriewechsel Schwenkbares Lasermodul (Ausrichtlaser)

    16.1 Batteriewechsel Schwenkbares Lasermodul (Ausrichtlaser) Das schwenkbare Lasermodul (Ausrichtlaser) wird über drei 1.5 V (AA) Batterien mit Spannung versorgt. Die Batterien müssen ausgetauscht werden, sobald die Laserstrahlintensität abnimmt bzw. der Laserstrahl schwächer wird. Bitte wie folgt vorgehen: 1. Das schwenkbare Lasermodul ausschalten. Die an den Seiten der Einschalttaste des Lasermoduls befindlichen Schrauben entfernen.
  • Seite 199: Rechtliche Hinweise

    17 RECHTLICHE HINWEISE TEXA S.p.A. Via 1 Maggio, 9 - 31050 Monastier di Treviso - ITALY Steuernr. - Handelsregister Treviso - Umsatzsteuer-ID: 02413550266 Ein-Personen-Gesellschaft unter Leitung und Koordinierung der Opera Holding S.r.l. Voll eingezahltes Grundkapital 1.000.000 € - Registereintrag Nr. 208102 Gesetzlicher Vertreter Bruno Vianello Tel.: +39 0422.791.311...
  • Seite 200 3.2 Normas Generales................208 3.3 Seguridad del Operador..............208 3.4 Seguridad del Dispositivo..............210 4 INFORMACIÓN AMBIENTAL............212 5 FUNCIONAMIENTO DE LOS DISPOSITIVOS RADIO....213 6 INFORMACIÓN SOBRE NORMATIVAS........214 7 eLIGHT ONE / eLIGHT ONE[sup]D[/sup]........215 7.1 eLIGHT ONE..................217 7.2 eLIGHT ONE[sup]D[/sup]..............218 8 DESCRIPCION................220 9 CARACTERÍSTICAS TÉCNICAS...........222...
  • Seite 201 9.1 Medida....................225 10 PREPARACION PARA EL USO...........226 10.1 Montaje.....................226 11 ALIMENTACION Y RECARGA.............229 12 ENCENDIDO / APAGADO............231 12.1 Reset....................233 13 COMUNICACION................234 13.1 WiFi....................235 13.2 Bluetooth..................236 14 OPERACIONES PRELIMINARES..........237 14.1 Superficie de Trabajo...............238 14.2 Preparación Vehículo...............239 14.3 Preparación Dispositivo..............240 14.4 Posicionamiento Dispositivo.............241 14.5 Alineación con el Vehículo;..............242 15 EJECUCION ANALISIS FOTOMETRICO........243 16 MANTENIMIENTO................245...
  • Seite 202: Revision Del Manual

    MANUAL TECNICO LIGHT ONE / LIGHT ONE-D REVISION DEL MANUAL El presente documento representa la revisión01 del manual técnico de eLIGHT ONE / eLIGHT ONE[sup]D[/sup] de TEXA S.p.A. Fecha de emisión: 10/11/2019...
  • Seite 203: Premisa

    La lectura y comprensión de este manual le ayudará a evitar daños a cosas y a personas causados por un uso incorrecto del producto al que se refiere. TEXA S.p.A. se reserva el derecho de aportar en cualquier momento y sin ningún preaviso, todas las modificaciones que crea útiles para mejorar el manual o por exigencias de carácter técnico o comercial.
  • Seite 204: Leyenda De Símbolos Usados

    1 LEYENDA DE SÍMBOLOS USADOS Los símbolos usados en este manual se describen en este capítulo. Riesgo de asfixia Riesgo de explosión Riesgo de alta tensión Riesgo de incendio / quemaduras Riesgo de envenenamiento Riesgo por sustancias corrosivas Riesgo de ruidos Riesgo por piezas móviles Riesgo de aplastamiento Peligro Tropiezo (obstáculo)
  • Seite 205: Normas Generales De Seguridad

    2 NORMAS GENERALES DE SEGURIDAD 2.1 Glosario • Operador (técnico): persona cualificada responsable de utilizar el dispositivo. • Dispositivo: el producto adquirido. • Lugar de trabajo: lugar en el que el operario realiza su trabajo. 2.2 Normas de seguridad del operario 2.2.1 Normas generales de seguridad •...
  • Seite 206: Riesgos Provocados Por Piezas En Movimiento

    Precauciones de seguridad • Asegúrese de que el vehículo esté en punto muerto (o en posición de estacionamiento en caso de vehículos con cambio automático). • Active siempre el freno de mano o el freno de estacionamiento en el vehículo. •...
  • Seite 207: Riesgo De Incendio Y Explosión

    2.2.6 Riesgo de incendio y explosión Fuentes de riesgo de incendio y/o explosión son: • Los tipos de carburante usados por el vehículo y los vapores liberados por estos carburantes. • Los refrigerantes usados por el sistema A/C. • El ácido en las baterías del vehículo. Precauciones de seguridad •...
  • Seite 208: Riesgo De Envenenamiento

    • NO toque los cables de alta tensión cuando el motor esté en marcha. • Asegúrese de estar aislado del suelo cuando manipule/use las herramientas. • Trabaje exclusivamente con las manos secas. • Mantenga los líquidos conductores alejados del motor cuando esté trabajando. •...
  • Seite 209: Normas Especificas Para La Seguridad En El Uso De Elight One Y Elight One[Sup]D[/Sup]

    3 NORMAS ESPECIFICAS PARA LA SEGURIDAD EN EL USO DE eLIGHT ONE Y eLIGHT ONE[sup]D[/sup] La tecnología usada para el diseño y control de la fabricación del eLIGHT ONE / eLIGHT ONED hace que sea un dispositivo fiable, sencillo y seguro en su utilización.
  • Seite 210 Medidas de seguridad: • Urilizar los equipos de seguridad (protección) personal previstos. • Llevar siempre ropas idóneas en el ambiente (entorno) de trabajo. • Prestar atención durante las operaciones de regulación de las partes móviles del dispositivo. La base del dispositivo podría representar un obstáculo en el que tropezar.
  • Seite 211: Seguridad Del Dispositivo

    El rayo proveniente de un producto láser de Clase 2 puede provocar: deslumbramiento, ceguera por flash e imágenes restantes, particularmente en condiciones de ambiente poco iluminado. Esto podría tener indirectas consecuencias en la seguridad general, traducidas en perturbaciones temporales de la vista o reacciones de miedo /sorpresa.
  • Seite 212 • No realizar ningún tipo de intervención que pueda dañar el dispositivo. • No abrir ni desmontar el dispositivo. • Mover el dispositivo exclusivamente con las propias ruedas. • Regular la posición de la cámara óptica exclusivamente a través de la correspondiente manilla (asa).
  • Seite 213: Información Ambiental

    4 INFORMACIÓN AMBIENTAL No eliminar este producto junto a otros residuos sólidos no diferenciados. Para informaciones referentes a la eliminación de este producto consultar el folleto que lo acompaña.
  • Seite 214: Funcionamiento De Los Dispositivos Radio

    La conectividad sin cables con tecnologías Bluetooth y WiFi ofrece un método standard y seguro para intercambiar información entre dispositivos diversos, utilizando ondas de radio. Además de los instrumentos de TEXA utilizan este tipo de tecnología también productos como: teléfonos móviles, portátiles, ordenadores, impresoras, cámaras fotográficas, Pocket PC etc.
  • Seite 215: Información Sobre Normativas

    6 INFORMACIÓN SOBRE NORMATIVAS Declaración de conformidad UE Simplificada El fabricante, TEXA S.p.A., declara que el tipo de instrumento radio eLIGHT ONE / eLIGHT ONE[sup]D[/sup] es conforme a las directivas: • EMC 2014/30/EU • LVD 2014/35/EU • ROHS 2011/65/EU El texto completo de la declaración de conformidad UE está...
  • Seite 216: Elight One / Elight One[Sup]D[/Sup]

    7 eLIGHT ONE / eLIGHT ONE[sup]D[/sup] Los centrafaros eLIGHT son dispositivos expresamente realizados para optimizar el análisis fotométrico y la regulación de los faros en todo los tipos de vehículos. El uso de Bluetooth y WiFi permiten a estos dispositivos integrar las funciones de un normal centrafaros con las potencialidades de un dispositivo de diagnosis.
  • Seite 217 La columna en la que está montada la cámara óptica puede girar unos 15º para una mejor alineación con el vehículo. La cámara óptica es regulable en altura a través de un sistema de desplazamiento sobre ruedas dotadas de cojinetes que permite su posicionamiento a la altura deseada.
  • Seite 218: Elight One

    7.1 eLIGHT ONE eLIGHT ONE está pensado para un uso combinado con als unidades de visualización: • AXONE Nemo • AXONE Nemo 2 • AXONE 5 • PC (equipado con el correspondiente software de diagnosis) Gracias a estas unidades de visualización es posible servirse del correspondiente software y efectuar un completo y preciso análisis fotométrico.
  • Seite 219: Elight One[Sup]D[/Sup]

    ONE[sup]D[/sup] está dotado de un touch screen de 7" dotado de abrazadera orientable, instalado en la cámara óptica. De todas formas es posible conectar el dispositivo a las unidades de visualización.
  • Seite 221: Descripcion

    8 DESCRIPCION...
  • Seite 222 1. Columna (con escala graduada en centímetros) 2. Manilla (asa) 3. Rueda neumática 4. Puntero láser orientable 5. Apertura láser 6. Touchscreen (Pantalla táctil) 7. Cámara óptica 8. Lente Fresnel 9. Puntero láser 10.Apertura láser 11.Puntero láser 12.Apertura láser 13.Tornillos para la nivelación 14.Rueda neumática 15.Tornillo de bloqueo posición 16.Impresora *...
  • Seite 223: Características Técnicas

    9 CARACTERÍSTICAS TÉCNICAS Fabricante: TEXA S.p.A. eLIGHT ONE / eLIGHT ONE[sup]D[/ Nombre del producto: sup] Lithium Ion Alimentación (batería): 11,1 V 5200 mAh Alimentador externo mod. IPC30 • Input (entrada): 100-240 Vac 50/60 Hz 700 mA Alimentador: • Output (salida): 11,1 Vdc 2000 •...
  • Seite 224 • Touchscreen (pantalla táctil) TFT 7" 800 x 480* Interfaz usuario: • LED (*) sólo eLIGHT ONE[sup]D[/sup] Temperatura de funcionamiento: 5 °C ÷ 45 °C 1 mes: - 20 °C ÷ 60 °C Temperatura de almacenamiento: 3 meses: - 20 °C ÷ 45 °C 1 año: - 20 °C ÷...
  • Seite 225 Dimensiones [mm]: Peso: 52 kg • Uso: interno • Altitud: hasta los 2000 m • Presión atmosférica: 0,7 ÷ 1,04 atm Condiciones ambientales • Fluctuaciones de la tensión de alimentación: ± 10% • Categoría de sobretensiones: II • Grado de contaminación: 2 IP20 Grado de protección: (relativo al envoltorio)
  • Seite 226: Medida

    9.1 Medida PROPRIEDAD VALOR 0 ÷ 600 mm/10 m Orientación vertical (hacia arriba y hacia abajo): 0 ÷ 6 % 0 ÷ 3,432 ° 0 ÷ 1000 mm/10 m Orientación hprizontal (hacia la derecha y hacia la 0 ÷ 10 % izquierda): 0 ÷...
  • Seite 227: Preparacion Para El Uso

    En estos cursos los técnicos son seguidos paso a paso por personal especializado para que se familiaricen con el uso de los instrumentos y del software propuesto y extraer al máximo la potencialidad de los productos TEXA S.p.A. Para mayor información relativa a los servicios de formación TEXA S.p.A.
  • Seite 228 3. Apretar los tornillos con un par de apriete de 12 N m. 4. Enganchar la cámara óptica al correspondiente soporte y sucesivamente hacerla girar como mostrado. 5. Fijar la cámara óptica al soporte apretando correspondientes tornillos con un par de apriete igual a 3 N m.
  • Seite 229 6. Introducir el puntero láser orientable correspondiente perno magnético. Quitar los tornillos de seguridad del contrapeso.
  • Seite 230: Alimentacion Y Recarga

    11 ALIMENTACION Y RECARGA El dispositivo está alimentado por una batería interna recargable de iones de litio. La recarga se produce a través de un alimentador modelo IPC 30. 1. LED rojo 2. LED verde 3. Conector para clavija 4. Conector * 5.
  • Seite 231 El medio para desconectar el dispositivo de la red eléctrica es el conector (clavija) del alimentador externo. Asegurarse de que siempre se pueda acceder al conector (clavija) del alimentador del dispositivo para garantizar en todo momento la posibilidad de desconexión de la red eléctrica. Proceder como sigue: 1.
  • Seite 232: Encendido / Apagado

    2. Esperar hasta que el LED cambie de color de rojo a verde. El dispositivo está listo para ser usado. NOTA: En caso de eLIGHT ONE[sup]D[/sup] la fase de encendido también se indica en el display touchscreen (pantalla táctil). El dispositivo está preparado para el uso cuando se visualiza la pantalla de home del software.
  • Seite 233 Para apagar el dispositivo presionar en el pulsador y esperar a que el LED se apague.
  • Seite 234: Reset

    12.1 Reset Es posible desbloquear el dispositivo en el caso de que haya dejado de responder a los mandos. El desbloqueo se produce gracias a un reset hardware forzado del dispositivo obtenido presionando el correspondiente pulsador. El reset hardware fuerza el dispositivo a su apagado y posterior reinicio automático.
  • Seite 235: Comunicacion

    13 COMUNICACION El módulo WiFi instalado en el dispositivo lo hace capaz de: • conectarse a internet para recibir las actualizaciones del software instalado; • utilizarse a través de la unidad de visualización. El módulo Bluetooth instalado en el dispositivo lo hace capaz de: •...
  • Seite 236: Wifi

    13.1 WiFi El dispositivo utiliza la conexión WiFi para conectarse a internet y recibir las actualizaciones del softwar. La conexión WiFi también permite el uso del dispositivo a través de una unidad de visualización. Proceder como sigue: 1. Encender el dispositivo. 2.
  • Seite 237: Bluetooth

    13.2 Bluetooth El dispositivo utiliza la conexión Bluetooth para conectarse a un instrumento de diagnosis y aprovechar así las potencialidades diagnósticas disponibles a través de la conexión a la centralita del vehículo. La configuración de la comunicación se produce a través de las correspondientes funciones del software.
  • Seite 238: Operaciones Preliminares

    14 OPERACIONES PRELIMINARES Las modalidades de actuación de las medidas y del equipameinto son conformes a las recomendaciones de la norma: • ISO 10604 Observar siempre las disposiciones, las leyes y las reglas vigentes en el país en el que se tarbaja. Para un correcto análisis fotométrico: •...
  • Seite 239: Superficie De Trabajo

    14.1 Superficie de Trabajo Para poder efectuar un correcto análisis fotométrico es necesario que el dispositivo y el vehículo estén situados en una superficie de trabajo plana. De todas formas también es posible efectuar el análisis fotométrico en presencia de desniveles, con la condición de que el dispositivo y el vehículo estén situados en la misma superficie y que la inclinación de la misma sea menor o igual a 0,5%.
  • Seite 240: Preparación Vehículo

    14.2 Preparación Vehículo Antes de proceder con el análisis fotométrico es necesario asegurarse de que el vehículo esté en las condiciones idóneas para que el resultado no resulte viciado por factores externos. Asegurarse de que el freno de estacionamiento permanezca accionado por todo el tiempo que duren las operaciones en el vehículo.
  • Seite 241: Preparación Dispositivo

    14.3 Preparación Dispositivo Antes de posicionar el dispositivo delante del vehículo es necesario efectuar una operación de nivelación horizontal para nivelarlo. La correcta nivelación se verifica a través del nivel esférico situado dentro de la cámara óptica. Proceder como sigue: 1.
  • Seite 242: Posicionamiento Dispositivo

    14.4 Posicionamiento Dispositivo Para la correcta ejecución de un análisis fotométrico es necesario posicionar correctamente el dispositivo respecto al vehículo que se está examinando. Proceder como sigue: 1. Posicionar el dispositivo delante del faro, a unos 20 - 40 cm. 2.
  • Seite 243: Alineación Con El Vehículo

    14.5 Alineación con el Vehículo; Para la correcta ejecución de un análisis fotométrico es necesario asegurarse de que el dispositivo y el vehículo estén correctamente alineados. Proceder como sigue: 1. Buscar dos elementos simétricos entre sí en la parte delantera (frontal) del vehículo para usarlos como puntos de referencia (ej.: partes de la carrocería o los propios faros).
  • Seite 244: Ejecucion Analisis Fotometrico

    Una errónea regulación de los faros implica el riesgo de deslumbramiento para los conductores de los demás vehículos. Para efectuar un análisis fotométrico con eLight ONE es necesario disponer también de una unidad de visualización en la que esté instalado el correspondiente software.
  • Seite 245 5. Seleccionar el tipo de análisis que se desea efectuar. 6. Seguir las indicaciones suministradas en pantalla. 7. Seleccionar el vehículo en el que se quiere efectuar el análisis siguiendo las instrucciones que aparecen en pantalla. 8. Seleccionar el tipo de la luz del faro que se está examinando. 9.
  • Seite 246: Mantenimiento

    16 MANTENIMIENTO Este producto no precisa de operaciones particulares de mantenimiento, sin embargo se aconseja: • seguir atentamente las instrucciones recogidas en el presente manual; • mantener el dispositivo limpio utilizando productos no agresivos; • inspeccionar y eventualmente apretar periódicamente los tornillos de fijación; •...
  • Seite 247: Sustitución Baterías Puntero Láser Orientable

    16.1 Sustitución Baterías Puntero Láser Orientable El puntero láser orientable está alimenatdo por 3 baterías (pilas) AA de 1,5 V. Las baterías (pilas) deben sustituirse cuando la intensidad del haz láser disminuye. Proceder como sigue: 1. Apagar el puntero láser orientable 2.
  • Seite 248: Informacion Legal

    17 INFORMACION LEGAL TEXA S.p.A. Via 1 Maggio, 9 - 31050 Monastier di Treviso - ITALY Cod. Fisc. -N.I. Registro Mercantil de Treviso - Part. IVA 02413550266 Sociedad unipersonal y sujeta a actividad de dirección y coordinación de Opera Holding S.r.l.

Diese Anleitung auch für:

Elight one d

Inhaltsverzeichnis