Fisher-Price X0057 Bedienungsanleitung
Quicklinks

Verwandte Anleitungen für Fisher-Price X0057


Inhaltszusammenfassung für Fisher-Price X0057
- Seite 1 X0057 X0057 www.fisher-price.com www.fisher-price.com...
- Seite 2 • Para la colocación de las pilas se necesita un destornillador de estrella (no incluido). Hoito • En Fisher-Price, modificamos regularmente nuestros productos a fin de mejorarlos • Pyyhi tuote miedolla pesuaineliuoksella kostutetulla pyyhkeellä. Älä upota veteen. y ofrecer a nuestros consumidores un producto con la mayor calidad posible. Por •...
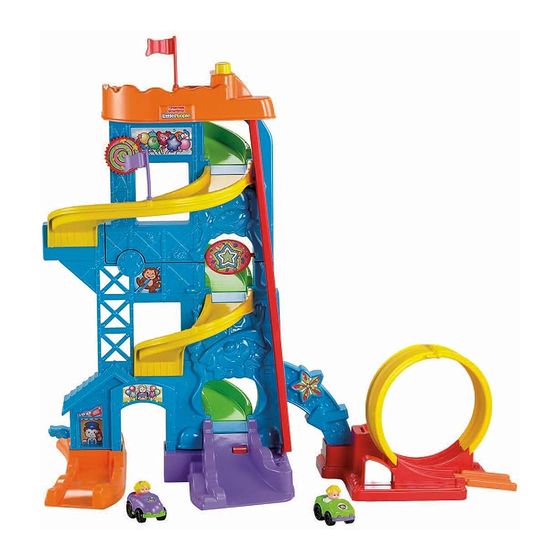
- Seite 3 Assembled Parts Éléments à assembler Teile Onderdelen Parti montate Piezas de montaje Dele Peças montadas Osat Deler Delar för montering Μέρη Συναρμολόγησης 3 Ramps (Labeled 1) Ramp (Labeled 2) 3 rampes (Étiquetées 1) Rampe (Étiquetée 2) 3 Rampenteile (gekennzeichnet mit einer 1) Rampenteil (gekennzeichnet mit einer 2) 3 hellingbanen (met nummer 1) Hellingbaan (met nummer 2)
- Seite 4 Battery Installation Installation des piles Einlegen der Batterien Het plaatsen van de batterijen Come inserire le pile Colocación de las pilas Isætning af batterier Instalação das Pilhas Paristojen asennus Innsetting av batterier Batteriinstallation Τοποθέτηση Μπαταριών • El compartimento de las pilas está situado en la parte inferior del juguete. 1,5V x 3 •...
- Seite 5 Battery Safety Information • Estrarre le pile quando il giocattolo non viene utilizzato per periodi di tempo In exceptional circumstances, batteries may leak fluids that can cause a chemical prolungati. Estrarre sempre le pile scariche dal giocattolo. Eliminare le pile con la burn injury or ruin your product.
- Seite 6 Sikkerhetsinformasjon om batteriene I unntakstilfeller kan batteriene lekke væsker som kan føre til kjemiske brannsår eller ødelegge produktet. Slik unngår du batterilekkasje: • Ikke bruk gamle og nye batterier eller ulike typer batterier sammen: alkaliske, standard (karbon/sink) eller oppladbare (nikkel/kadmium). •...
- Seite 7 Assembly Assemblage Zusammenbau In elkaar zetten Montaggio Montaje Sådan samles produktet Montagem Kokoaminen Montering Montering Συναρμολόγηση Lower Wall Mur inférieur CAUTION ATTENTION Unteres Wandteil Unteres Wandteil Onderste muurdeel Onderste muurdeel VORSICHT WAARSCHUWING Parete inferiore Parete inferiore Pared inferior Pared inferior AVVERTENZA PRECAUCIÓN Nederste væg...
- Seite 8 • Introducir cuatro tornillos en los agujeros de la pared y apretarlos. • Colocar duas das bases numa superfície plana, como mostra a imagem. • Inserir a montagem da parede em cada base e empurrar para encaixar. • Før 4 skruer ind i hullerne i vægsamlingen, og spænd dem. Atenção: A parede foi concebida para encaixar nas bases de duas formas.
- Seite 9 Top Ramp Rampe supérieure Oberes Rampenteil Bovenste hellingbaan Rampa superiore Rampa superior Øverste rampe Rampa superior Ylin ramppi Øverste rampe Base Toppramp Base Επάνω Ράμπα Basis Onderstuk Base Base Underdel Base Jalustakappale Sokkel Basdel Βάση • Fit the bottom of the arch into the remaining base. Push to "snap" in place. Hint: The arch is designed to fit into the base one way.
- Seite 10 Ramp (Labeled 3) Rampe (Étiquetée 3) Rampenteil (gekennzeichnet mit einer 3) Hellingbaan (met nummer 3) Rampa (numero 3) Rampa (identificada con el número 3) Ramps (Labeled 1) Rampe (mærket 3) Rampes (Étiquetées 1) Rampa (marcada 3) Rampenteile (gekennzeichnet mit einer 1) Ramppi (merkitty numerolla 3) Hellingbanen (met nummer 1) Rampe (merket 3)
- Seite 11 • Drehen Sie die Einheit vorsichtig um. • Ta fram rampen som är märkt med 2. • Stecken Sie die Enden des dritten mit einer 1 gekennzeichneten Rampenteils in die • Sätt i rampens ändar i de återstående öppningarna i väggen. Schlitze der Wandheinheit.
- Seite 12 Loop-the-Loop Ramp Loop-the-Loop Ramp Rampe looping Rampe looping Looping-Rampe Looping-Rampe Looping Looping Rampa parabolica Rampa parabolica Looping Looping Long Ramp Looprampe Looprampe Rampe longue Looping-rampa Looping-rampa Lange Rampe Silmukkaramppi Silmukkaramppi Lange helling Loop-rampe Loop-rampe Rampa lunga Loopramp Loopramp Rampa larga Λουπ...
- Seite 13 Decoration Décoration Anbringen der Aufkleber Stickers plakken Decorazione Colocación de los adhesivos Dekoration Decoração Koristelu Klistremerker Dekoration Αυτοκόλλητα • Place the labels exactly as shown in the illustrations. • Anbring mærkaterne nøjagtigt som vist på illustrationerne. • For best results, avoid repositioning a label once it has been applied. •...
- Seite 14 Fun Songs and Sounds! Musiques et sons amusants ! Lustige Melodien und Geräusche! Grappige liedjes en geluidjes! Simpatiche canzoncine e suoni! ¡Música y sonidos divertidos! Sjove sange og lyde! Música e sons divertidos! Hauskoja sävelmiä ja ääniä! Morsomme sanger og lyder! Skoj med melodier och ljud! Μουσική...
- Seite 15 • Slide the vehicles down the ramps for double roller coaster action! • Watch the vehicle drive through the loop-the-loop. • Faire glisser les voitures sur les deux grandes boucles des rampes. • Le véhicule effectue un looping. • Die Autos die Rampen für eine wilde Fahrt nach unten fahren lassen ! •...
- Seite 16 CANADA ASIA Questions? 1-800-432-5437. Mattel Canada Inc., 6155 Freemont Blvd., Mississauga, Mattel East Asia Ltd, Room 1106, South Tower, World Finance Centre, Harbour City, Ontario L5R 3W2. Tsimshatsui, HK, China. GREAT BRITAIN MALAYSIA Mattel UK Ltd, Vanwall Business Park, Maidenhead SL6 4UB. Diimport &...