Herunterladen Inhalt Inhalt Diese Seite drucken
AFRISO DTA 10 Betriebsanleitung

AFRISO DTA 10 Betriebsanleitung

Digitaler tankinhaltsanzeiger
Vorschau ausblenden Andere Handbücher für DTA 10:
Inhaltsverzeichnis

Werbung

Verfügbare Sprachen

Verfügbare Sprachen

Betriebsanleitung
Operating instructions
Notice technique
Instrukcja eksploatacji
Version: 02.2020.0
ID: 900.000.0700
Copyright 2020 AFRISO-EURO-INDEX GmbH. Alle Rechte vorbehalten.
DTA 10
Lindenstraße 20
74363 Güglingen
Telefon +49 7135 102-0
Service +49 7135 102-211
Telefax +49 7135 102-147
info@afriso.com
www.afriso.com

Werbung

Inhaltsverzeichnis
loading

Inhaltszusammenfassung für AFRISO DTA 10

  • Seite 1 Betriebsanleitung Operating instructions Notice technique Instrukcja eksploatacji DTA 10 Copyright 2020 AFRISO-EURO-INDEX GmbH. Alle Rechte vorbehalten. Lindenstraße 20 74363 Güglingen Telefon +49 7135 102-0 Service +49 7135 102-211 Telefax +49 7135 102-147 info@afriso.com Version: 02.2020.0 www.afriso.com ID: 900.000.0700...
  • Seite 2: Digitaler Tankinhaltsanzeiger

    Betriebsanleitung Digitaler Tankinhaltsanzeiger DTA 10 Copyright 2020 AFRISO-EURO-INDEX GmbH. Alle Rechte vorbehalten. Lindenstraße 20 74363 Güglingen Telefon +49 7135 102-0 Service +49 7135 102-211 Telefax +49 7135 102-147 info@afriso.com Version: 02.2020.0 www.afriso.com ID: 900.000.0700...
  • Seite 3 Über diese Betriebsanleitung Über diese Betriebsanleitung Diese Betriebsanleitung beschreibt den Digitalen Tankinhaltsanzeiger „DTA 10“ (im Folgenden auch „Produkt“). Diese Betriebsanleitung ist Teil des Produkts. • Sie dürfen das Produkt erst benutzen, wenn Sie die Betriebsanleitung vollständig gelesen und verstanden haben.
  • Seite 4: Warnhinweise Und Gefahrenklassen

    Ihnen vorgesehene Verwendung geeignet ist. Berücksichtigen Sie dabei mindestens folgendes: • Alle am Einsatzort geltenden Bestimmungen, Normen und Sicherheits- vorschriften • Alle für das Produkt spezifizierten Bedingungen und Daten • Die Bedingungen der von Ihnen vorgesehenen Anwendung DTA 10...
  • Seite 5: Informationen Zur Sicherheit

    Erfahrungen in der Lage sein, mögliche Gefährdungen vorherzusehen und zu erkennen, die durch den Einsatz des Produkts entstehen können. Den Fachkräften müssen alle geltenden Bestimmungen, Normen und Sicherheitsvorschriften, die bei Arbeiten an und mit dem Produkt beachtet werden müssen, bekannt sein. DTA 10...
  • Seite 6: Transport Und Lagerung

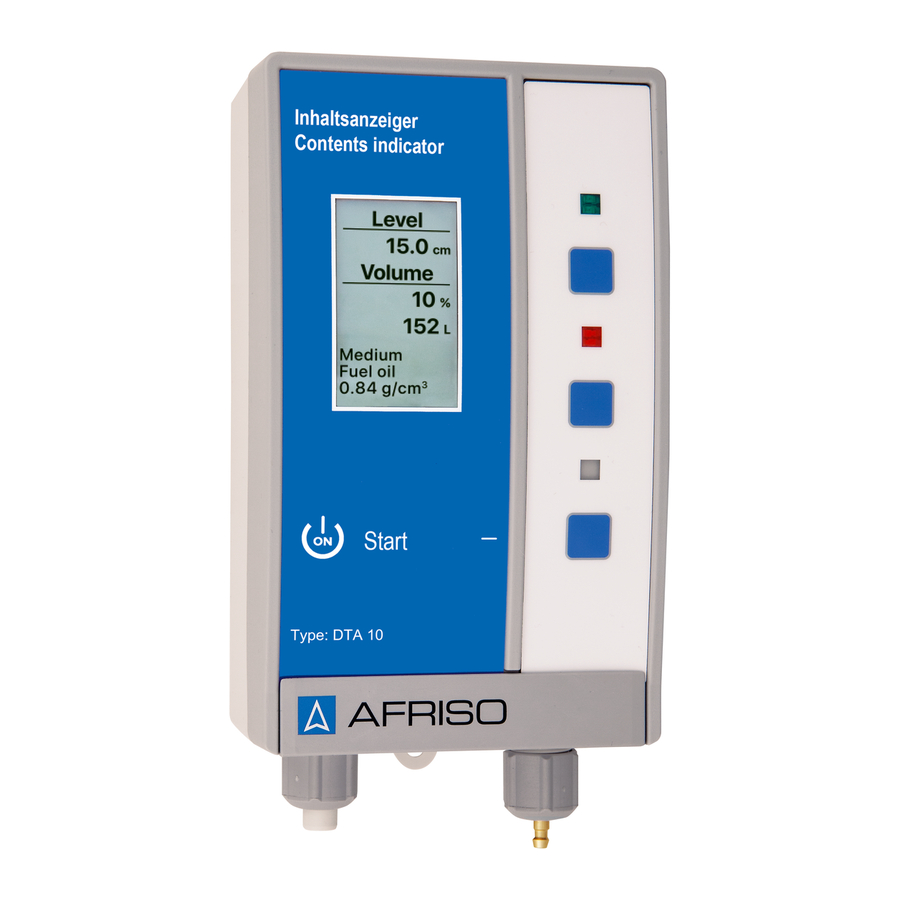
    Benutzen Sie für den Transport die Originalverpackung. • Lagern Sie das Produkt nur in trockener, sauberer Umgebung. • Stellen Sie sicher, dass das Produkt bei Transport und Lagerung stoßge- schützt ist. Nichtbeachtung dieser Anweisungen kann zu Sachschäden führen. DTA 10...
  • Seite 7 Auswertegerät enthält in einem schlagfesten Kunststoffgehäuse das Display und die Bedienelemente. A. Digitales Display B. Keine Funktion C. Obere Taste (Ende/Sprache) D. Keine Funktion E. Mittlere Taste (Info/Parameter) F. Keine Funktion G. Untere Taste (Start) H. Anschluss für Messleitung I. Blindstopfen J. Batteriefach (für 9V-Blockbatterie) DTA 10...
  • Seite 8: Produktbeschreibung

    Produktbeschreibung Abmessungen 65 mm 100 mm 60 mm DTA 10...
  • Seite 9 H. Nagelschelle (25 Stück) G1½ a x G1 i, G2 a x G1½ i I. Schlauchadapter D. PVC-Schlauch (100 cm) E. PVC-Schlauch (15 cm) mit Zubehör-Beutel (ohne Abbildung) mit Schlauchverbinder (zum zwei Schrauben und zwei Dübeln für Anschluss an Metallleitungen) Wandbefestigung DTA 10...
  • Seite 10 Alarm (in Prozent) Wenn die untere Taste gedrückt wird, misst das Produkt den Füllstand im Tank. Wenn während einer Messung der eingestellte prozentuale Minimalfüllstand unterschritten wird, erfolgt eine optische Alarmierung. Hierbei blinkt die Hin- tergrundbeleuchtung des Displays rot. DTA 10...
  • Seite 11: Zulassungsdokumente, Bescheinigungen, Erklärungen

    (30 x 50 mm) mit Hintergrundbe- leuchtung - Blau = Betrieb - Rot = Alarm - Grün = Parametrierung Volumen-Anzeige in Liter (5-stellig), in % und Füllhöhe in cm Temperatureinsatzbereich Umgebung 0/50 °C Lagerung -20/65 °C Medium 0/50 °C Spannungsversorgung Nennspannung 9V-Blockbatterie DTA 10...
  • Seite 12 Produktbeschreibung Parameter Wert Messbereich (Tankhöhe) Heizöl Max. 4,0 m Wasser Max. 3,5 m Variabel abhängig von der Dichte Elektromagnetische Verträglichkeit (EMV) (2014/30/EU) Störaussendung EN 61000-6-3 Störfestigkeit EN 61000-6-1 Elektrische Sicherheit Schutzart IP 20 (EN 60529) DTA 10...
  • Seite 13: Montage

    1. Befestigen Sie die obere Schraube an der Wand. 2. Hängen Sie das Auswertegerät ein. 3. Richten Sie das Auswertegerät aus. 4. Befestigen Sie das Auswertegerät an der Wand mit einer Schraube an der unteren Lasche. DTA 10...
  • Seite 14: Elektrischer Anschluss

    Nichtbeachtung dieser Anweisungen kann zu Sachschäden führen. 5.2.1 Batterie einsetzen/anschließen Die 9V-Blockbatterie ist werksseitig nicht in das Auswertegerät einge- setzt. Die Blockbatterie befindet sich im Zubehörbeutel. 1. Öffnen Sie mit einem Schlitz- schraubendreher den Deckel des Batteriefachs. DTA 10...
  • Seite 15 Montage 2. Schließen Sie die 9V-Blockbatte- rie an. 3. Schieben Sie die 9V-Blockbatterie in das Batteriefach (Einbaulage beachten). 4. Schließen Sie den Deckel des Batteriefachs. DTA 10...
  • Seite 16 1. Lassen Sie das Fußteil (H) bis auf den Tankboden herunter. 2. Ziehen Sie die Verschraubung (F) so fest, dass sich die Messleitung nicht mehr verschieben lässt. 3. Befestigen Sie, falls nötig, die Messleitung (G) mit den beigeleg- ten Nagelschellen. DTA 10...
  • Seite 17 Wenn Sie eine vorhandene Messleitung nutzen, stellen Sie sicher, dass die Messleitung bis zum Tankboden reicht. Die Messleitung (PVC) kann bei Kontakt mit Heizöl mit der Zeit hart werden. Eine Verhärtung der Messleitung beeinträchtigt die Funktion des Produkts nicht. DTA 10...
  • Seite 18 A. Anschlussstutzen mit konischem Gewinde B. Schlauch C. Gewicht Ø 9 mm 1. Prüfen Sie, ob der Kunststoffflansch des Batterietanks über eine mit einem Blindstopfen verschlossenen Bohrung Ø 10 mm bis Ø 10,5 mm verfügt. 2. Entfernen Sie den Blindstopfen. DTA 10...
  • Seite 19 - Das Produkt startet eine Mes- sung automatisch. 2. Halten Sie die obere Taste so lange gedrückt, bis das Produkt zur Sprachauswahl wechselt (siehe "Sprache auswählen"). 3. Drücken Sie die obere oder untere Taste, um die gewünschte Spra- che einzustellen. DTA 10...
  • Seite 20 Wenn Sie die Sprachauswahl auf ??? stehen lassen, zeigt das Display bei jedem neuen Einschalten wieder die Sprachauswahl an. Produkt parametrieren Für die Parametrierung stehen drei Tasten zur Verfügung. Das Display zeigt an, welcher Menüpunkt bearbeitet wird. Die Menüpunkte sind nacheinander beschrieben. DTA 10...
  • Seite 21: Sprache Wechseln

    2. Drücken Sie die obere oder untere Taste, um die gewünschten Spra- che einzustellen. 3. Wechseln Sie in den nächsten Menüpunkt. 6.2.2 Medium einstellen Sie können folgende Medien wählen: • Wasser (Dichte 1 g/cm³) • Heizöl (Dichte 0,84 g/cm³) • Variabel (Dichte einstellbar von 0,5 - 1,5 g/cm³) DTA 10...
  • Seite 22 Alarm einstellen Sie können folgende Werte wählen: • 0 % bis 100 % 1. Drücken Sie die obere oder untere Taste (Einzelschritte) oder halten Sie die jeweilige Taste so lange gedrückt, bis Sie die gewünschte Pro- zentzahl eingestellt haben. DTA 10...
  • Seite 23: Parametrierung Beenden

    2. Drücken Sie die mittlere Taste 2 x. - Der Batteriestatus und die Softwareinformationen des Produkts werden angezeigt. 3. Halten Sie die mittlere Taste gedrückt. - Das Display wechselt in das Parametermenü. - Die eingegebenen Parameter können erneut geändert werden. Start (C) Messung starten. DTA 10...
  • Seite 24: Betrieb

    Wenn die Messleitung länger als 20 m ist, führen Sie eine zweite Messung durch. Batteriestatus-/Softwareanzeige 1. Drücken Sie die mittlere Taste 2 x. - Der Batteriestatus und die Soft- wareinformationen des Produkts werden angezeigt. 2. Drücken Sie die mittlere Taste erneut 1 x. - Das Display wechselt in die Hauptanzeige. DTA 10...
  • Seite 25 Betrieb Produkt ausschalten 1. Drücken Sie die obere Taste 1 x, um das Produkt auszuschalten. Wenn längere Zeit keine Taste gedrückt wird, schaltet sich das Pro- dukt automatisch aus. DTA 10...
  • Seite 26: Wartung

    Tankdaten (siehe Kapi- tel "Produkt in Betrieb Tankform falsch einge- nehmen") geben Prüfen Sie die Messlei- Messleitung reicht nicht tung im Tank bis zum Tankboden Messleitung ist undicht Sonstige Störungen Bitte wenden Sie sich an die AFRISO-Service Hotline DTA 10...
  • Seite 27: Außerbetriebnahme Und Entsorgung

    2. Entsorgen Sie die Batterie und das Produkt getrennt voneinander. Rücksendung Vor einer Rücksendung Ihres Produkts müssen Sie sich mit uns in Verbin- dung setzen. Gewährleistung Informationen zur Gewährleistung finden Sie in unseren Allgemeinen Geschäftsbedingungen im Internet unter www.afriso.com oder in Ihrem Kauf- vertrag. DTA 10...
  • Seite 28: Ersatzteile Und Zubehör

    Verwenden Sie nur Original Ersatz- und Zubehörteile des Herstellers. Nichtbeachtung dieser Anweisung kann zu Sachschäden führen. Produkt Artikelbezeichnung Art.-Nr. Abbildung Digitaler Tankinhaltsanzei- 52145 ger DTA 10 mit Pneumofix Typ 2 Digitaler Tankinhaltsanzei- 52155 ger DTA 10 Ersatzteile und Zubehör Artikelbezeichnung Art.-Nr.
  • Seite 29 Operating  instructions Digital tank contents indicator DTA 10 Copyright 2020 AFRISO-EURO-INDEX GmbH. All rights reserved. Lindenstraße 20 74363 Güglingen Telephone +49-7135-102-0 Service +49-7135-102-211 Telefax +49-7135-102-147 info@afriso.com Version: 02.2020.0 www.afriso.com ID: 900.000.0700...
  • Seite 30 The manufacturer shall not be liable in any form whatsoever for direct or con- sequential damage resulting from failure to observe these operating instruc- tions or from failure to comply with directives, regulations and standards and any other statutory requirements applicable at the installation site of the prod- uct. DTA 10...
  • Seite 31 Take into account the consequences of installing or integrating the product into a system or a plant. DTA 10...
  • Seite 32: Information On Safety

    Personal protective equipment Always wear the required personal protective equipment. When performing work on and with the product, take into account that hazards may be present at the installation site which do not directly result from the product itself. DTA 10...
  • Seite 33: Transport And Storage

    Use the original packaging when transporting the product. • Store the product in a clean and dry environment. • Verify that the product is protected against shocks and impact during trans- port and storage. Failure to follow these instructions can result in equipment damage. DTA 10...
  • Seite 34 A. Digital display B. No function C. Upper key (End/Language) D. No function E. Centre key (Info/Parameters) F. No function G. Lower key (Start) H. Connection for measuring line I. Blind plug J. Battery compartment (for 9 V monobloc battery) DTA 10...
  • Seite 35: Product Description

    Product description Dimensions 65 mm 100 mm 60 mm DTA 10...
  • Seite 36: Scope Of Delivery

    G1½ a x G1 i, G2 a x G1½ i D. PVC hose (100 cm) Bag of accessories (not shown) with E. PVC hose (15 cm) with hose con- two screws and two dowels for wall nector (for connection to metal mounting pipes) DTA 10...
  • Seite 37: Application Example

    When the lower key is pressed, the product measures the level in the tank. If during a measurement, the level is below the adjusted minimum level a visual alarm is triggered. The backlight of the display flashes red. DTA 10...
  • Seite 38 - Red = Alarm - Green = Parameterisation Volume indication in litres (5 digits), in % and liquid level in cm Operating temperature range Ambient 0/50 °C Storage -20/65 °C Medium 0/50 °C Supply voltage Nominal voltage 9 V monobloc battery DTA 10...
  • Seite 39 Measuring range (tank height) Fuel oil Max. 4.0 m Water Max. 3.5 m Variable Depends on density Electromagnetic compatibility (EMC) (2014/30/EU) Emitted interference EN 61000-6-3 Noise immunity EN 61000-6-1 Electrical safety Degree of protection IP 20 (EN 60529) DTA 10...
  • Seite 40: Mounting The Product

     Verify that the permissible ambient temperature is not exceeded. 1. Mount the upper screw to the wall. 2. Fit the control unit. 3. Align the control unit. 4. Fasten the control unit by screw- ing the bottom lug to the wall. DTA 10...
  • Seite 41: Electrical Connection

    5.2.1 Inserting/connecting the battery The 9 V monobloc battery is not factory-installed in the control unit. The monobloc battery is contained in the bag of accessories. 1. Open the cover of the battery compartment using a slotted screwdriver. DTA 10...
  • Seite 42 Mounting 2. Connect the 9 V monobloc bat- tery. 3. Push the 9 V monobloc battery into the battery compartment (ver- ify correct mounting position). 4. Close the cover of the battery compartment. DTA 10...
  • Seite 43 1. Lower the bottom part (H) to the bottom of the tank. 2. Tighten the screw connection (F) so that the measuring line can no longer be moved. 3. Use the enclosed nail cable clips to fasten the measuring line (G), if necessary. DTA 10...
  • Seite 44 The measuring line (PVC) may harden over time if it is in contact with fuel oil. Hardening of the measuring line does not interfere with the operation of the product. DTA 10...
  • Seite 45 (A). The plastic flanges are provided for filling, venting or withdrawal. The mounting kit is installed in one of the plastic flanges (A). A. Plastic flange A. Connection piece with conical thread B. Hose C. Weight Ø 9 mm DTA 10...
  • Seite 46 2. Drill a vertical hole Ø 10 mm through the plastic flange. 3. Remount the plastic flange. 4. Push the weight (C) and the hose (C) through the hole. 5. Screw the connection piece (A) into the hole. DTA 10...
  • Seite 47 (see "Selecting the lan- guage"). 3. Press the upper or the lower key to set the required language. 4. Press the centre key 1 x. - The selected language is set and the display changes to the next menu setting. DTA 10...
  • Seite 48: Selecting The Language

    6.2.1 Changing the language 1. Hold down the upper key until the product switches to the language selection. 2. Press the upper or the lower key to set the required language. 3. Switch to the next menu item. DTA 10...
  • Seite 49 Adjusting the alarm You can select the following values: • 0 % to 100 % 1. Press the upper or lower key (individual steps) or hold down the corre- sponding key until you have set the required percentage. DTA 10...
  • Seite 50 2. Press the centre key 2 x. - The battery status and software information are displayed. 3. Hold down the centre key. - The display changes to the first parameters menu. - The parameters entered can be changed again. Start (C) Starting a measurement. DTA 10...
  • Seite 51: Starting A Measurement

    If the measuring line is longer than 20 m perform a second measurement. Battery status 1. Press the centre key 2 x. - The battery status and software information are displayed. 2. Press the centre key again 1 x. - The display changes to normal mode. DTA 10...
  • Seite 52: Switching Off The Product

    Operation Switching off the product 1. Press the upper key 1 x to switch off the product. If no key is pressed for an extended period of time, the product switches off automatically. DTA 10...
  • Seite 53: Maintenance

    (see chapter "Commissionin Incorrect tank shape g the product") entered Check the measuring Measuring line does not line in the tank reach down to the tank bottom Leak in measuring line Other malfunctions Contact the AFRISO service hotline DTA 10...
  • Seite 54: Decommissioning / Disposal

    2. Dispose of the product and of the battery separately. Returning the device Get in touch with us before returning your product. Warranty See our terms and conditions at www.afriso.com or your purchase contract for information on warranty. DTA 10...
  • Seite 55: Spare Parts And Accessories

    Failure to follow these instructions can result in equipment damage. Product Product designation Part no. Figure Digital tank contents indica- 52145 tor DTA 10 with Pneumofix type 2 Digital tank contents indica- 52155 tor DTA 10 Spare parts and accessories Product designation Part no.
  • Seite 56: Notice Technique

    Notice technique Indicateur numérique de niveau de réservoir DTA 10 Copyright 2020 AFRISO-EURO-INDEX GmbH. Tous droits réservés. Lindenstraße 20 74363 Güglingen Téléphone +49 7135 102-0 Service clientèle +49 7135 102-211 Téléfax +49 7135 102-147 info@afriso.com Version: 02.2020.0 www.afriso.com ID: 900.000.0700...
  • Seite 57 La présente notice technique La présente notice technique Cette notice technique contient la description de l'indicateur numérique de niveau de réservoir DTA 10 (dénommé ci-après "produit"). Cette notice tech- nique fait partie du produit. • Utilisez le produit seulement après que vous aurez lu et compris intégra- lement la notice technique.
  • Seite 58 à l'aide d'un procédé reconnu et prenez toutes les mesures de sécurité nécessaires correspondant au résultat. Prenez aussi en compte les conséquences possibles du montage ou de l'intégration du produit dans un système ou une installation. DTA 10...
  • Seite 59: Informations Sur La Sécurité

    Équipement de protection individuelle Utilisez toujours l'équipement de protection individuel requis. En travaillant sur le produit et avec celui-ci, tenez compte des dangers susceptibles de se présenter sur le lieu d'installation lesquels n'émanent pas directement du produit. DTA 10...
  • Seite 60: Transport Et Stockage

    Utilisez l'emballage d'origine pour le transport. • Stockez le produit dans un lieu sec et propre. • Assurez-vous que le produit est à l'abri des chocs pendant le transport et le stockage. La non-observation de ces instructions peut causer des dommages maté- riels. DTA 10...
  • Seite 61 C. Touche supérieure (arrêt/ langue) D. Sans fonction E. Touche de milieu (info/para- mètres) F. Sans fonction G. Touche inférieure (démarrage) H. Raccord pour conduite de mesure I. Bouchon d'obturation J. Logement de pile (pour pile monobloc 9 V) DTA 10...
  • Seite 62: Description Du Produit

    Description du produit Dimensions 65 mm 100 mm 60 mm DTA 10...
  • Seite 63: Composants Fournis

    G2 a x G1½ male Sachet d'accessoires (non représen- D. Tuyau PVC (100 cm) tés) avec deux vis et deux chevilles E. Tuyau PVC (15 cm) avec raccord pour fixation au mur tuyau (pour branchement aux tubes en métal) DTA 10...
  • Seite 64: Exemple D'application

    Lorsque la touche inférieure est enfoncée, le produit mesure le niveau de remplissage dans le réservoir. Au cours d'une mesure, si le niveau minimal réglable en pourcentage est dépassé, une alarme visuelle est déclenchée. Dans ce cas, le rétroéclairage de l'affichage clignote (rouge). DTA 10...
  • Seite 65 - Vert = paramétrage Affichage du volume en litres (à 5 chiffres), en % et niveau de remplissage en cm Plage de température Ambiante 0/50 °C Stockage -20/65 °C Fluide 0/50 °C Alimentation Tension nominale Pile monobloc 9 V DTA 10...
  • Seite 66 Plage de mesure (hauteur du réservoir) Fuel Max. 4,0 m Max. 3,5 m Autre En fonction de la densité Compatibilité électromagnétique (CEM) (2014/30/UE) Émission EN 61000-6-3 Immunité EN 61000-6-1 Sécurité électrique Degré de protection IP 20 (EN 60529) DTA 10...
  • Seite 67: Montage

     Assurez-vous que la température ambiante autorisée n'est pas dépas- sée. 1. Introduisez la vis supérieure dans le mur. 2. Accrochez l'unité de commande. 3. Alignez l'unité de commande. 4. Fixez l'unité de commande sur la paroi en vissant la vis dans la patte inférieure. DTA 10...
  • Seite 68: Branchement Électrique

    A la livraison, la pile monobloc 9 V n'est pas encore placée dans l'unité de commande. La pile monobloc se trouve dans le sachet d'accessoires. 1. Ouvrez le couvercle du logement de la pile à l'aide d'un tournevis plat. DTA 10...
  • Seite 69 Montage 2. Branchez la pile monobloc 9 V. 3. Insérez la pile monobloc 9 V dans le logement de pile (respectez la position de montage). 4. Fermez le couvercle du logement de pile. DTA 10...
  • Seite 70 2. Serrez le raccord à vis (F) de sorte que la conduite de mesure ne se déplace plus. 3. Si nécessaire, fixez la conduite de mesure (G) à l'aide des serre- câbles à clou fourni. DTA 10...
  • Seite 71 En cas d'utilisation de conduites de mesure déjà en place, assurez-vous que la conduite de mesure va jusqu'au fond du réservoir. La conduite de mesure (PVC) peut durcir si elle est en contact avec du fuel. Le durcissement de la conduite de mesure n'altère pas le fonctionnement du produit. DTA 10...
  • Seite 72 B. Tuyau flexible C. Poids Ø 9 mm 1. Vérifiez si la bride en plastique du réservoir de batterie présente un trou de Ø 10 mm à Ø 10,5 mm fermé par un bouchon d'obturation. 2. Retirez le bouchon d'obturation. DTA 10...
  • Seite 73: Mise En Service

    - Le produit effectue une mesure automatiquement. 2. Maintenez enfoncée la touche supérieure jusqu'à ce que le pro- duit passe à la sélection de la langue (voir "Sélectionner la langue"). 3. Appuyez sur la touche supérieure ou inférieure pour régler la langue souhaitée. DTA 10...
  • Seite 74 Paramétrage du produit Trois touches sont disponibles pour le paramétrage. L'écran indique quel menu est en cours dʼédition. Les menus sont décrits les uns après les autres. DTA 10...
  • Seite 75: Changer La Langue

    2. Appuyez sur la touche supérieure ou inférieure pour régler la langue souhaitée. 3. Passez au menu suivant. 6.2.2 Régler le fluide Vous pouvez sélectionner l'un des liquides suivants : • Eau (densité 1 g/cm³) • Fuel (densité 0,84 g/cm³) • Autres (densité réglable de 0,5 à 1,5 g/cm³) DTA 10...
  • Seite 76: Régler L'alarme

    Vous pouvez sélectionner une valeur de : • 0 % à 100 % 1. Appuyez sur la touche supérieure ou inférieure (pas à pas) ou mainte- nez enfoncée la touche correspondante jusqu'à ce que vous ayez réglé le pourcentage souhaité. DTA 10...
  • Seite 77 - Le produit affiche l'état de la pile et les informations sur le logiciel. 3. Maintenez enfoncé la touche du milieu. - L'affichage passe au premier menu de paramètres. - Les paramètres entrés peuvent être modifiés à nouveau. Start (C) Démarrer la mesure. DTA 10...
  • Seite 78 1. Appuyez 2 fois sur la touche du milieu. - Le produit affiche l'état de la pile et les informations sur le logiciel. 2. Appuyez à nouveau 1 fois sur la touche du milieu. - L'affichage principal s'affiche. DTA 10...
  • Seite 79 Service Éteindre le produit 1. Pour éteindre le produit, appuyez 1 fois sur la touche supérieure. Au bout de quelques secondes le produit s'éteint automatiquement si aucune autre action n'est effectuée. DTA 10...
  • Seite 80: Intervalles De Maintenance

    Erreur d'entrée de la vice") forme du réservoir Vérifiez la conduite de Conduite de mesure mesure dans le réser- n'atteint pas le fond du voir réservoir Conduite de mesure non étanche Autre dérangement Veuillez contacter l'AFRISO Service Hot- line DTA 10...
  • Seite 81: Mise Hors Service Et Élimination

    2. Éliminez la pile séparément du produit. Retour Avant de retourner le produit, il faut que vous preniez contact avec nous. Garantie Les informations sur la garantie figurent dans nos "Conditions générales de vente" sur le site www.afriso.com ou dans votre contrat d'achat. DTA 10...
  • Seite 82: Pièces Détachées Et Accessoires

    La non-observation de ces instructions peut causer des dommages maté- riels. Produit Désignation de l'article Référence Figure Indicateur numérique de 52145 niveau de réservoir DTA 10 avec Pneumofix type 2 Indicateur numérique de 52155 niveau de réservoir DTA 10 Pièces détachées et accessoires Désignation de l'article Référence...
  • Seite 83: Instrukcja  Eksploatacji

    Instrukcja  eksploatacji Cyfrowy wskaźnik poziomu DTA 10 Copyright 2020 AFRISO-EURO-INDEX GmbH. Wszelkie prawa zastrzeżone. Lindenstraße 20 74363 Güglingen Telefon +49 7135 102-0 Obsługa klienta +49 7135 102-211 Telefaks +49 7135 102-147 info@afriso.com Version: 02.2020.0 www.afriso.com ID: 900.000.0700...
  • Seite 84 Objaśnienia do niniejszej instrukcji eksploatacji Objaśnienia do niniejszej instrukcji eksploatacji Niniejsza instrukcja eksploatacji opisuje cyfrowy wskaźnik poziomu „DTA 10“ (poniżej zwany także „produktem“). Niniejsza instrukcja eksploatacji jest czę- ścią produktu. • Produkt wolno użytkować dopiero po całkowitym przeczytaniu i pełnym zro- zumieniu instrukcji eksploatacji.
  • Seite 85 W tym celu trzeba uwzględnić co najmniej następujące wymogi: • wszystkie warunki, normy oraz przepisy bezpieczeństwa obowiązujące w miejscu użytkowania produktu, • wszystkie warunki i dane przewidziane w specyfikacji produktu, • warunki przewidziane dla planowanego przez użytkownika zastosowania. DTA 10...
  • Seite 86: Informacje Na Temat Bezpieczeństwa

    Ze względu na swoje wykształcenie zawodowe, wiedzę i doświadczenia pra- cownicy wykwalifikowani muszą być w stanie przewidzieć i rozpoznać możliwe zagrożenia, które mogą powstawać z tytułu użytkowania produktu. DTA 10...
  • Seite 87: Transport I Składowanie

    • Do celów transportowych należy wykorzystywać oryginalne opakowanie. • Produkt należy przechowywać wyłącznie w suchym i czystym otoczeniu. • Należy upewnić się, że podczas transportu i składowania produkt jest chro- niony przed uderzeniami. Nieprzestrzeganie niniejszych zaleceń może doprowadzić do powstania szkód materialnych. DTA 10...
  • Seite 88: Opis Produktu

    A. wyświetlacz cyfrowy B. brak funkcji C. górny przycisk (koniec/język) D. brak funkcji E. środkowy przycisk (informacja/ parametry) F. brak funkcji G. dolny przycisk (start) H. przyłącze przewodu pomiaro- wego I. zaślepka J. kieszeń na baterię (bateria 9V) DTA 10...
  • Seite 89 Opis produktu Wymiary 65 mm 100 mm 60 mm DTA 10...
  • Seite 90 D. wąż z polichlorku winylu PVC (100 cm) torebka z osprzętem (bez ilustracji) E. wąż z polichlorku winylu PVC zawierająca dwie śruby oraz dwa kołki (15 cm) z łącznikiem wężowym (do do mocowania na ścianie podłączania przewodów metalo- wych) DTA 10...
  • Seite 91 • alarm (w procentach). Po wciśnięciu dolnego przycisku produkt dokonuje pomiaru poziomu napełnie- nia zbiornika. Jeżeli wartość pomiaru spadnie poniżej ustawionego w procentach, minimal- nego poziomu napełnienia, włącza się alarm wizualny. Przy tym podświetlenie wyświetlacza miga kolorem czerwonym. DTA 10...
  • Seite 92 (30 x 50 mm) z podświetleniem - niebieski = tryb pracy - czerwony = alarm - zielony = parametryzacja wskaźnik pojemności w litrach (5- pozycyjny), w % oraz poziom napeł- nienia w cm Dopuszczalny zakres temperatur otoczenie 0/50 °C DTA 10...
  • Seite 93 Zakres pomiarowy (wysokość zbiornika) olej opałowy maksymalnie 4,0 m woda maksymalnie 3,5 m zmienne w zależności od gęstości Kompatybilność elektromagnetyczna (EMC) (2014/30/WE) emisja zakłóceń EN 61000-6-3 odporność na zakłócenia EN 61000-6-1 Bezpieczeństwo elektryczne stopień ochrony IP 20 (EN 60529) DTA 10...
  • Seite 94: Montaż Produktu

     Należy przestrzegać, żeby nie została przekroczona dopuszczalna tempe- ratura otoczenia. 1. Zamocować górną śrubę w ścia- nie. 2. Zawiesić analizator. 3. Ustawić analizator w prawidłowej pozycji. 4. Przymocować analizator do ściany śrubą przy wykorzystaniu dolnej wypustki. DTA 10...
  • Seite 95 Nieprzestrzeganie niniejszych zaleceń może doprowadzić do powstania szkód materialnych. 5.2.1 Montaż / podłączanie baterii Fabrycznie bateria 9 V nie jest zainstalowana w analizatorze. Bateria 9 V znajduje się w torebce z osprzętem. 1. Wkrętakiem płaskim otworzyć pokrywkę kieszeni na baterię. DTA 10...
  • Seite 96 Montaż 2. Podłączyć baterię 9 V. 3. Wsunąć baterię 9 V do kieszeni przeznaczonej na baterię (prze- strzegać prawidłowej pozycji mon- tażowej). 4. Zamknąć pokrywkę kieszeni na baterię. DTA 10...
  • Seite 97 1. Podstawę (H) opuścić aż na dno zbiornika. 2. Śrubunek (F) dociągnąć tak mocno, żeby przewodu pomiaro- wego nie można już było przesu- nąć. 3. W razie potrzeby zamocować przewód pomiarowy (G) przy pomocy załączonych trzymaków kablowych wbijanych. DTA 10...
  • Seite 98 W razie użytkowania już wcześniej ułożonego przewodu pomiarowego należy upewnić się, że przewód pomiarowy sięga do dna zbiornika. W razie styczności z olejem opałowym przewód pomiarowy (polichlorek winylu PVC) może twardnieć wraz z upływem czasu. Stwardnienie przewodu pomia- rowego nie zakłóca działania produktu. DTA 10...
  • Seite 99 A. króciec przyłączeniowy z gwintem stożkowym B. przewód giętki C. ciężarek Ø 9 mm 1. Należy sprawdzić, czy kołnierz z tworzywa sztucznego zbiornika bateryj- nego jest wyposażony w otwór Ø 10 mm do Ø 10,5 mm zamykany zaślepką. DTA 10...
  • Seite 100: Uruchamianie Produktu

    - Produkt uruchamia automatycz- nie pomiar. 2. Przytrzymać górny przycisk w pozycji wciśniętej aż do przełącza- nia się produktu na tryb selekcji języków (patrz "Wybór języka"). 3. Wcisnąć górny albo dolny przycisk w celu ustawienia pożądanego języka. DTA 10...
  • Seite 101 • polski. Jeśli selekcja języków zostanie pozostawiona na ustawieniu ???, wyświe- tlacz po każdym ponownym włączeniu będzie znów pokazywał selekcję języków. Parametryzacja produktu Parametryzację umożliwiają trzy przyciski. Wyświetlacz wskazuje, który punkt menu podlega edytowaniu. Punkty menu są opisane kolejno. DTA 10...
  • Seite 102 2. Wcisnąć górny albo dolny przycisk w celu ustawienia pożądanego języka. 3. Przejść do kolejnego punktu menu. 6.2.2 Ustawianie czynnika Istnieje możliwość wyboru następujących czynników: • woda (gęstość 1 g/cm³), • olej opałowy (gęstość 0,84 g/cm³), • zmienne (gęstość regulowana w zakresie od 0,5 - 1,5 g/cm³). DTA 10...
  • Seite 103 6.2.6 Ustawianie alarmu Istnieje możliwość wyboru następujących wartości: • 0 % do 100 %. 1. Wcisnąć górny lub dolny przycisk (pojedyncze kroki) lub przytrzymać odnośny przycisk w pozycji wciśniętej aż do ustawienia pożądanej war- tości procentowej. DTA 10...
  • Seite 104 2. Wcisnąć środkowy przycisk 2 x. - Następuje wyświetlenie stanu baterii oraz informacji o oprogramowaniu produktu. 3. Przytrzymać środkowy przycisk w pozycji wciśniętej. - Na wyświetlaczu pojawia się menu parametrów. - Wprowadzone parametry można ponownie zmienić. Start (C) Uruchamianie pomiaru. DTA 10...
  • Seite 105 Wyświetlanie stanu baterii / informacji o oprogramowaniu 1. Wcisnąć środkowy przycisk 2 x. - Następuje wyświetlenie stanu baterii oraz informacji o oprogra- mowaniu produktu. 2. Ponownie wcisnąć środkowy przy- cisk 1 x. - Na wyświetlaczu pojawia się podstawowe ustawienie menu. DTA 10...
  • Seite 106 Eksploatacja Wyłączanie produktu 1. W celu wyłączenia produktu wci- snąć górny przycisk 1 x. Produkt wyłącza się automatycznie, jeśli przez dłuższy czas nie zostanie wciśnięty żaden przycisk. DTA 10...
  • Seite 107: Czynności Konserwacyjne

    Konserwacja Konserwacja Okresy międzykonserwacyjne Termin Czynność w razie potrzeby wymienić baterię Czynności konserwacyjne 1. Należy postępować zgodnie z opisem z rozdziału "Montaż / podłączanie baterii" . - Przy wymianie baterii ustawienia pozostają zapisane w pamięci urządze- nia. DTA 10...
  • Seite 108: Usuwanie Usterek

    (patrz dłowo rozdział "Uruchamianie produktu"). kształt zbiornika wpro- wadzony nieprawidłowo skontrolować przewód pomiarowy w zbiorniku przewód pomiarowy nie sięga do dna zbiornika przewód pomiarowy jest nieszczelny pozostałe zakłócenia proszę skontaktować się z infolinią serwisową AFRISO DTA 10...
  • Seite 109 2. Baterię i produkt poddać oddzielnie utylizacji. Zwrot Przed zwrotną wysyłką produktu wymagany jest kontakt z producentem. Gwarancja Informacje dotyczące gwarancji są dostępne w naszych Ogólnych Warunkach Handlowych w internecie pod adresem www.afriso.com lub w umowie kupna. DTA 10...
  • Seite 110: Części Zamienne I Wyposażenie Dodatkowe

    Nieprzestrzeganie niniejszego zalecenia może doprowadzić do powstania szkód materialnych. Produkt Nazwa artykułu Numer artykułu Ilustracja cyfrowy wskaźnik poziomu 52145 DTA 10 z zestawem Pneumofix typ 2 cyfrowy wskaźnik poziomu 52155 DTA 10 Części zamienne i wyposażenie dodatkowe Nazwa artykułu Numer artykułu...

Inhaltsverzeichnis