Herunterladen Inhalt Inhalt Diese Seite drucken
Inhaltsverzeichnis

Werbung

Verfügbare Sprachen
  • DE

Verfügbare Sprachen

  • DEUTSCH, seite 34
テーブルトップスタンド
Table top stand
Support de couverture de table
Tischständer
Supporto di tavolo
Tafelbladstaander
Soporte de mesa
PDK-TS12
取扱説明書
Operating instructions
Mode d'emploi
Bedienungsanleitung
Istruzioni per l'uso
Gebruiksaanwijzing
Manual de instrucciones

Werbung

Inhaltsverzeichnis
loading

Inhaltszusammenfassung für Pioneer PDK-TS12

  • Seite 1 テーブルトップスタンド Table top stand Support de couverture de table Tischständer Supporto di tavolo Tafelbladstaander Soporte de mesa PDK-TS12 取扱説明書 Operating instructions Mode d’emploi Bedienungsanleitung Istruzioni per l’uso Gebruiksaanwijzing Manual de instrucciones...
  • Seite 2: Inhaltsverzeichnis

    このたびは、 パイオニアの製品をお買い求めいただきまして 本 製 品 は 弊 社 製 デ ジ タ ル ハ イ ビ ジ ョ ン プ ラ ズ マ テ レ ビ まことにありがとうございます。 お使いになる前には取扱説 PDP-506HD / PDP-436HD / PDP-436SX専用のテーブル 明書をよくお読みになり、安全に正しくご使用ください。 ま トップスタンドです。 たお読みになったあとも、 この取扱説明書は大切に保管して その他の機器への取り付けに関しては対応しておりません。 ください。 詳しくは、お買い求めの販売店にご相談ください。...
  • Seite 3: 同梱された部品の確認

    取扱説明書(本書) × 1 (M8 × 30mm:シルバー)× 2 Table top stand Support de couverture de table Tischständer Supporto di tavolo Tafelbladstaander Soporte de mesa PDK-TS12 支柱 L × 2[長い支柱] 取付ねじ (M8 × 40mm:黒)× 2 Operating instructions Mode d’emploi Bedienungsanleitung Istruzioni per l’uso...
  • Seite 4: スタンドの組み立て方

    スタンドの組み立て方 ご注意  支柱とスタンドを取付ねじ で固定する(左 必ず平坦なテーブルなどの上で取り付けをしてください。 右 4 カ所) ねじは穴に対して垂直に挿入し、 必要以上に強く締めつけないで 付属の六角レンチを使用して、はじめに上側の取付ね ください。 じを仮止めし、そのあと下側の取付ねじを仮止めして 組み立て手順 ください。 取り付ける支柱を選定する イラスト:支柱 S 使用時 (3 ページの「支柱使用・不使用一覧」参照) 下記を参照してお客様のお買い上げになったプラズマテレ 穴が大きい方 が手前です ビの種類や、スピーカーに応じた支柱を選んでください (2 種類のうち、1 種類を使います) 。 お客様のお買い上げのプラズマテレビが PDP-506HD / PDP-436HD の場合 【使用する支柱:支柱 S(短い支柱) 】 取付ねじ 使用する支柱: (M8 × 16mm:シルバー) 支柱...
  • Seite 5: プラズマテレビの取り付け方

    プラズマテレビの取り付け方 イラスト:支柱L 使用時 プラズマテレビは質量が 50V 型モデル(スピーカーな し)で約 32kg、43V型モデル(スピーカーなし)で約 注意 26kg、 43V型一体モデル (PDP-436SX) で約 32kg あり、奥行きがなく不安定なため、取り付けおよび設置 は必ず 2 人以上で行ってください。 ご注意 必ず平坦で安定した場所で取り付けをしてください。 ねじは穴に対して垂直に挿入し、 必要以上に強く締めつけないで ください。 『スタンドの組み立て方』の手順を参照して、 お客様のお買い上げ 取付ねじ になったプラズマテレビの種類やスピーカーの設定に応じた支柱が (M8 × 30mm:シルバー) 確実に取り付いていることを確認してください。 取り付け手順 取付ねじ または取付ねじ でプラズマテレ ビを固定する プラズマテレビをスタンドに取り付ける 付属の六角レンチを使用して、本体矢印部を固定してく プラズマテレビの下側矢印にスタンドの支柱を合わせて、 ださい。 垂直にゆっくり挿入してください。...
  • Seite 6: 前後角度調整機構

    前後角度調整機構 本スタンドはお客様のお好みに合わせて、前後約 2゚の範囲 前後傾き固定ボルトを締める(左右 2 カ所) で傾きを調整することができます。 左右の前後傾き固定ボルトを付属の C レンチで下方向に ご注意  回し、しっかり締めつけてください。 完全に締めつけるまで、本体上部を手で押さえてくだ 角度調整は必ずプラズマテレビを設置したあとに さい。 行ってください。 必ず平坦なテーブルなどの上で行ってください。 前後傾き固定ボルト 角度調整中は必ず本体上部を手で押さえてください。 調整手順 締める 前後傾き固定ボルトを付属の C レンチで緩め る(左右 2 カ所) 必ず本体上部を手で押さえながら、左右の前後傾き固定 ボルトを付属の C レンチで上方向に回し、緩めてくださ い。 ※イラストは PDP-436HD です。 前後傾き固定ボルト 前後傾き固定ボルトがしっかりと締めつけられ 緩める ているか、再度確認してください お好みの角度に合わせる プラズマテレビをゆっくり動かし、お好みの角度に合わ...
  • Seite 7: ラックなどに設置する場合

    ラックなどに設置する場合 プラズマテレビを取り付けた本製品をラックなどに移動、 設 設置上のご注意 置する場合は、下記の点にご注意ください。 テーブルトップスタンドの前側および後側は、 必ず下図の指 移動時のご注意 示以上のスペースを確保して設置してください。 長い距離の移動をする際は、 先にスピーカーを取り外 ラック し、次にプラズマテレビ本体もスタンドから取り外 30mm 以上 30mm 以上 後 側 し、別々に移動してください。 注意 プラズマテレビをスタンドから取り外す場合は、 事故を 防止するために 「プラズマテレビをスタンドから取り外 す場合」 (10 ページ)の手順を必ず守ってください。 ラックなどに設置する際のご注意 ラックなどに設置する際は、 プラズマテレビの下部と裏 前 側 側の取っ手を持ってください。スピーカーを持つと変 注意 形、破損の原因となります。 テーブルトップスタンド プラズマテレビ プラズマテレビ スタンドがラックからはみ出すと、 破損や転倒など思 PDP-506HD / PDP-436HD わぬ事故の原因となります。...
  • Seite 8: ケーブル処理のしかた

    ケーブル処理のしかた 付属のケーブルバインダーを使用して、 ケーブル類をまとめ ケーブルバインダーの使い方 てください。 スタンドの回転台上の穴にケーブルバインダー ご注意 を差す ケーブルの根元に力が加わらないように注意してください。 プラズマテレビ PDP-506HD/PDP-436HD の場合 ケーブルバインダー ケーブル類をまとめて、 ケーブルバインダー上 に置く プラズマテレビ PDP-436SX の場合 ケーブルバインダーをロックする ケーブルバインダーの外し方 図中の矢印の部分を 押すとロック が外れます。...
  • Seite 9: 転倒防止

    転倒防止 (設置後は転倒防止の備えを必ず行ってください) ラックや床などに固定する方法 壁を利用する方法 (イラストは 43V 型です) 市販のねじを使って図のように固定してください。 プラズマテレビに転倒防止用ボルトを取り付け る(2 カ所) ご注意 ご注意  床に固定する際のねじは、呼び径 転倒防止用ボルトは、 プラズマテレビ (PDP-506HD / PDP- M6、長さ 20mm 以上のものを使用 436HD /PDP- 436SX:日本向けモデル)に付属していま してください。 す。 20mm以上 壁、 柱などのがんじょうな部分に、 丈夫なヒモ またはくさりでしっかりと固定する 左右対称に同様の作業を行ってください。 ヒモまたはくさりの長さはスタンド回転分の余裕を もって設定してください。 ご注意 ヒモまたはくさり、 取付具は本製品およびプラズマテレビには付属 していません。市販品をご使用ください。 床固定ねじ取付位置(下図はスピーカーなし) 単位:mm 552 (PDP-506HD) 552 (PDP-506HD)
  • Seite 10: プラズマテレビをスタンドから取り外す場合

    プラズマテレビをスタンドから取り外す場合 プラズマテレビの下側と取っ手を持って、ゆっ プラズマテレビをスタンドから取り外す場合は、 事故を くり垂直に持ち上げる(PDP-506HD/PDP- 防止するために以下の手順を必ず守ってください。 注意 436HD の場合) ご注意 はじめに、 前後傾き固定ボルトが確実に締まっ PDP-436SX の場合は、プラズマテレビ本体の横と下部を ていることを確認する 持ってください。 あらかじめ平らな床などにプラズマテレビを寝 手順2で用意したシートの上に、 画面を下側に かせるスペースを作り、 キズおよび破損が生じ して静かに置く ないようにシートを敷く ご注意 スピーカーを取り外す 再度プラズマテレビをスタンドに取り付ける場合は、 左右の支 柱が同じ傾き設定であることを確認してください。 「プラズマテレビの取り付け方」 (5ページ) の手 順 2、3 を参照し、取付ねじ(4 本)を外す ご注意 4 ページの手順 2 のねじ(M8 × 16mm:シルバー)は外さ ないでください。支柱が外れて転倒する危険があります。...
  • Seite 11 寸法図 PDP-506P/PDP-436P 取り付け時(スピーカーなし) 1224 (PDP-506P) / 1076 (PDP-436P) 125.1 162.9 ※支柱 L 使用時には高さ 853 (PDP-506P)/768(PDP-436P)となります。 PDP-436SX 取り付け時 1076 104.1 159.9 2005パイオニア株式会社 禁無断転載...
  • Seite 12: Cautions

    ¶ Consult your dealer if you encounter any difficulties Improper installation is extremely dangerous because it with this installation. may result in it falling over or other accident. ¶ Pioneer is not liable for any damage resulting from improper installation, improper use, modification, or Installation Location natural disasters.
  • Seite 13: Checking The Enclosed Parts

    Support de couverture de table Tischständer Supporto di tavolo Support columns L x 2 Tafelbladstaander Soporte de mesa [long columns] PDK-TS12 Installation screws 3 (M8 x 40 mm: black) x 2 Operating instructions Mode d’emploi Bedienungsanleitung Istruzioni per l’uso Gebruiksaanwijzing...
  • Seite 14: Assembling The Stand

    Assembling the Stand Note Secure the support column to the stand Always assemble it on a flat table etc. with the Installation screws 1 (4 locations Insert the screws in the holes vertically and do not tighten on the left and right). them with more force than necessary.
  • Seite 15: Attaching The Plasma Display

    Attaching the Plasma Display The weight of a 50 inch Plasma Display (without Illustration: when using support columns L speakers) is about 32 kg (70.5 lbs), that of a 43 inch model (without speakers) is about 26 kg (57.3 lbs), Caution they have no depth, and are unstable.
  • Seite 16: Forward/Backward Angle Of Inclination Adjustment Mechanism

    Forward/Backward Angle of Inclination Adjustment Mechanism On this stand, you can adjust the angle of inclination of the Tighten the forward/backward inclination Plasma Display within a range of approximately 2° forward anchor bolts (2 locations on the left and or backward according to your preference. right).
  • Seite 17: Installing The Product On A Rack Etc

    Installing the Product on a Rack etc. Installation precautions Be sure to observe the following precautions when moving or installing this product with a Plasma Display into a rack or Make sure that you always secure a space at least as large other enclosure.
  • Seite 18: Preparing The Cables

    Preparing the Cables Using the cable binders Use the enclosed cable binders to bind the cables. Note Insert the cable binder through the hole on Be very careful not to apply force to the bases of the cables. the top of the rotating platform of the stand.
  • Seite 19: Preventing Equipment From Falling Over

    Preventing Equipment from Falling Over After installing the stand, be sure to take special care to ensure that the Plasma Display will not fall over. Using a wall for stabilization Stabilizing on table or floor (43 inch display model in the figure) Stabilize the equipment as shown in the diagram using Attaching falling prevention bolts to the screws that are available on the market.
  • Seite 20: Fixing The Rotation To The Front

    Fixing the rotation to the front Stabilize the equipment as shown in the diagram using screws that are available on the market. Note Use a screw that has a nominal diameter of 4 mm (3/16 inch) and length from 20 to 30 mm (13/16 to 1-3/16 inch) to fix the rotation to the front.
  • Seite 21: Dimensions Diagram

    Dimensions Diagram Unit: mm (inch) When installing the PDP-S38 or the PDP-S37 speakers 1407 (55-13/32) [50 inch display model] * 1379 (54-5/16) [50 inch display model] * (3-5/8) 1259 (49-19/32) [43 inch display model] * 1231 (48-15/32) [43 inch display model] * (29/32) 125.1 (4-15/16)
  • Seite 22 (6-7/16) 577 (22-23/32) 380 (14-31/32) * When using the support columns L, the height is 853 (33-19/32) [50 inch display model] / 768 (30-1/4) [43 inch display model]. Published by Pioneer Corporation. Copyright © 2005 Pioneer Corporation. All rights reserved.
  • Seite 23: Attention

    Nous vous remercions d’avoir choisi un produit Pioneer. Veuillez Attention lire attentivement ce mode d’emploi pour savoir comment utiliser correctement et en toute sécurité votre support. Nous vous conseillons de conserver soigneusement ce mode d’emploi à Ce produit est un support conçu exclusivement pour les écrans à...
  • Seite 24: Vérification Des Pièces Contenues Dans Le Carton D'emballage

    Support de couverture de table Tischständer Supporto di tavolo Colonnes de support L x 2 unités Tafelbladstaander Soporte de mesa [Colonnes longues] PDK-TS12 Vis d’installation 3 (M8 x 40 mm : noir) x 2 unités Operating instructions Mode d’emploi Bedienungsanleitung Istruzioni per l’uso...
  • Seite 25: Assemblage Du Support

    Assemblage du support Remarques Fixez les colonnes sur le support à l’aide des Pour monter le support, travaillez toujours sur une surface plane. vis d’installation 1 (2 sur le côté gauche et 2 Introduisez les vis à la verticale et ne les serrez pas plus que sur le côté...
  • Seite 26: Installation Et Fixation De L'écran À Plasma

    Installation et fixation de l’écran à plasma Le poids d’un écran à plasma 50 pouces (seul sans les Illustration lorsque l’on utilise les colonnes de support L. haut-parleurs) est de 32 kg environ et celui d’un modèle 43 pouces (seul sans les haut-parleurs) de 26 kg environ. Attention Leur largeur étant limitée, ils ne sont pas stables.
  • Seite 27: Mécanisme D'ajustement De L'angle D'inclinaison En Avant Et En Arrière

    Mécanisme d’ajustement de l’angle d’inclinaison en avant et en arrière Lors de cette étape, vous pouvez choisir de régler l’angle Serrez les boulons d’ancrage servant à régler d’inclinaison de l’écran à plasma de 2° environ en avant ou en l’inclinaison en avant et en arrière arrière.
  • Seite 28: Installation Du Produit Sur Une Étagère, Etc

    Installation du produit sur une étagère, etc. Précautions d’installation Les précautions suivantes doivent être strictement observées lorsque vous déplacez ou installez le produit avec un écran à Veillez à toujours ménager devant et derrière le support un espace plasma sur une étagère ou dans un espace limité. au moins égal à...
  • Seite 29: Préparation Des Câbles

    Préparation des câbles Utilisation des serre-câbles Utilisez les serre-câbles pour regrouper les câbles. Remarque Insérez le serre-câble dans les orifices se Veillez à ne pas forcer la base des câbles. trouvant au-dessus de la plate-forme pivotante du support. Installation des haut-parleurs PDP-S38 et PDP-S37 Serre-câbles Rassemblez les câbles et placez-les dans le serre-câble.
  • Seite 30: Prévenir Le Basculement Et La Chute De L'équipement

    Prévenir le basculement et la chute de l’équipement Après avoir installé le support, veillez à prendre les précautions nécessaires pour que l’écran à plasma ne tombe pas. Position de fixation sur une table ou au sol Utilisation d’un mur pour stabiliser le support (Modèle d’écran 43 pouces comme indiqué...
  • Seite 31: Fixation De La Rotation À L'avant

    Fixation de la rotation à l’avant Stabilisez le support comme indiqué sur le schéma à l’aide de vis vendues dans le commerce. Remarque utilisez une vis de 4 mm de diamètre et longue de 20 à 30 mm afin de fixer la rotation à...
  • Seite 32: Schéma Indiquant Les Dimensions

    Schéma indiquant les dimensions Unité : mm Installation des haut-parleurs PDP-S38 et PDP-S37 1407 [Ecran d'affichage 50 pouces] * 1379 [Ecran d'affichage 50 pouces] * 1259 [Ecran d'affichage 43 pouces] * 1231 [Ecran d'affichage 43 pouces] * 125,1 162,9 * En cas d’utilisation des colonnes de support L, la hauteur est de 853 mm (écran de 50 pouces) et de 768 mm (écran de 43 pouces). Montage pivotant : fixées à...
  • Seite 33 162,9 * En cas d’utilisation des colonnes de support L, la hauteur est de 853 mm (écran de 50 pouces) et de 768 mm (écran de 43 pouces). Publication de Pioneer Corporation. © 2005 Pioneer Corporation. Tous droits de reproduction et de traduction réservés.
  • Seite 34: Sicherheitshinweise

    Eine falsche Installation ist sehr gefährlich, da sie zum Umfallen Sie auf Schwierigkeiten bei der Installation stoßen. des Displays oder einem anderen Unfall führen kann. ¶ Die Firma Pioneer haftet nicht für Schäden, die auf falsche Installationsort Installation, auf inkorrekte Verwendung, auf vorgenommene •...
  • Seite 35: Überprüfen Der Mitgelieferten Teile

    (dieses Dokument): 1 Table top stand Support de couverture de table Tischständer Supporto di tavolo Stützsäulen L: 2 (lange Säulen) Tafelbladstaander Soporte de mesa PDK-TS12 Befestigungsschrauben 3 (M8 x 40 mm, schwarz): 2 Operating instructions Mode d’emploi Bedienungsanleitung Istruzioni per l’uso Gebruiksaanwijzing...
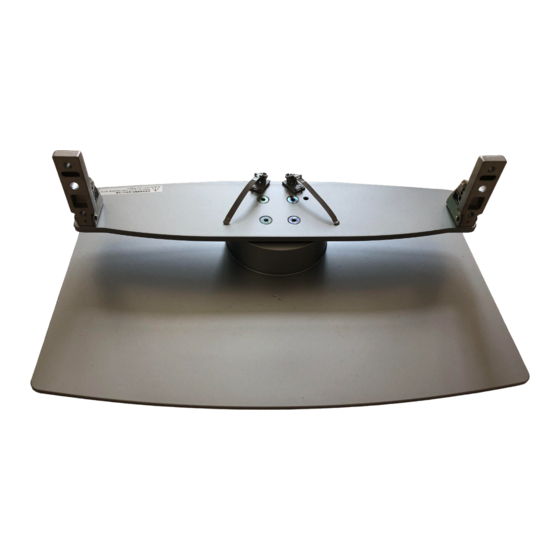
  • Seite 36: Montage Des Ständers

    Montage des Ständers Hinweise Befestigen Sie die Stützsäule mit den Montieren Sie den Ständer immer auf einem ebenen Tisch oder Befestigungsschrauben 1 am Ständer etwas Ähnlichem. (4 Positionen links und rechts). Führen Sie die Schrauben vertikal in die vorgesehenen Schraublöcher ein und ziehen Sie sie nicht mit mehr Kraft als Schrauben Sie zunächst unter Verwendung des mitgelieferten erforderlich an.
  • Seite 37: Montieren Des Plasmadisplays

    Montieren des Plasmadisplays Das Gewicht eines 50-Zoll-Plasmadisplays (ohne Abbildung: Verwendung der Stützsäule L Lautsprecher) beträgt etwa 32 kg und das eines 43-Zoll- Illustrati Lautsprechers (ohne Lautsprecher) etwa 26 kg. Die Vorsicht! Plasmadisplays sind flach, das heißt, sie haben keine Tiefe und sind somit instabil. Daher muss die Montage und Installation von mindestens zwei Personen vorgenommen werden.
  • Seite 38: Justiermechanismus Für Den Neigungswinkel Nach Vorn Und Nach Hinten

    Justiermechanismus für den Neigungswinkel nach vorn und nach hinten Am Tischständer können Sie den Neigungswinkel des Schrauben Sie die Befestigungsschrauben für Plasmadisplays entsprechend Ihren Wünschen innerhalb eines die Einstellung des Neigungswinkels nach vorn Bereichs von etwa 2° und nach hinten einstellen. und nach hinten fest (2 Positionen links und rechts).
  • Seite 39: Installieren Des Produkts Auf Einem Gestell Oder Etwas Ähnlichem

    Installieren des Produkts auf einem Gestell oder etwas Ähnlichem Sicherheitshinweise für die Installation wenn Sie den Ständer mit einem Plasmadisplay fortbewegen oder ihn in einem Gestell oder einem anderen Möbelstück installieren. Vergewissern Sie sich, dass Sie vor und hinter dem Tischständer Sicherheitshinweise für das Fortbewegen immer einen Mindestabstand absichern, wie er im folgenden Diagramm angegeben ist.
  • Seite 40: Verlegen Der Kabel

    Verlegen der Kabel Verwendung der Kabelbänder Verwenden Sie die mitgelieferten Kabelbänder zum übersichtlichen Verlegen der Kabel. Hindurchführung des Kabelbands durch die Hinweis Öffnung auf der Oberseite der Dreh-Plattform Achten Sie bitte sorgfältig darauf, keine Kraft auf die Kabelbasis des Ständers. auszuüben.
  • Seite 41: Mittel Zur Verhütung Des Umstürzens

    Mittel zur Verhütung des Umstürzens Ergreifen Sie nach der Installation des Ständers mit Plasmadisplay spezielle Maßnahmen, die sichern, dass die Einheit nicht umstürzt. Stabilisierung auf einem Tisch oder dem Verwendung einer Wand zur Stabilisierung Fußboden (In der Abbildung ist ein 43-Zoll-Modell dargestellt) Stabilisieren Sie die Anlage unter Verwendung von marktüblichen Befestigen von Sicherungsschrauben zur Schrauben, wie es in der Abbildung unten dargestellt ist.
  • Seite 42: Fixierung Der Drehung An Der Vorderseite

    Fixierung der Drehung an der Vorderseite Stabilisieren Sie die Anlage unter Verwendung von marktüblichen Schrauben, wie es in der Abbildung unten dargestellt ist. Hinweis Verwenden Sie eine Schraube mit einem Nenndurchmesser von 4 mm und einer Länge von 20 – 30 mm zur Fixierung der Drehung an der 20 –...
  • Seite 43: Abbildungen Zu Den Abmessungen

    Abbildungen zu den Abmessungen Einheit: mm Bei Installation der Lautsprecher PDP-S38 oder PDP-S37 1407 [50-Zoll-Display-Modell] * 1379 [50-Zoll-Display-Modell] * 1259 [43-Zoll-Display-Modell] * 1231 [43-Zoll-Display-Modell] * 125,1 162,9 * Bei Verwendung der Stützsäulen L beträgt die Höhe 853 mm (50-Zoll-Display-Modell) / 768 mm (43-Zoll-Display-Modell). Versetzte Installation: Montage mit einem Abstand von etwa 15 mm zwischen den Lautsprechern und dem Display.
  • Seite 44: Ohne Lautsprecher

    Abbildungen zu den Abmessungen Ohne Lautsprecher 1224 [50-Zoll-Display-Modell] 1076 [43-Zoll-Display-Modell] 125,1 162,9 * Bei Verwendung der Stützsäulen L beträgt die Höhe 853 mm (50-Zoll-Display-Modell) / 768 mm (43-Zoll-Display-Modell). Veröffentlicht von Pioneer Corporation. Urheberrechtlich geschützt © 2005 Pioneer Corporation. Alle Rechte vorbehalten.
  • Seite 45: Precauzioni

    Istruzioni per l’uso a portata di mano per Questo prodotto è un supporto di tavolo progettato esclusivamente farvi riferimento in futuro. dalla Pioneer per display a plasma (PDP-5060HD / PDP-4360HD / PDP-506XDE / PDP-436XDE / PDP-506FDE / PDP-436FDE / PDP-506HDG / PDP-436HDG).
  • Seite 46: Verifica Dei Pezzi Contenuti Nella Confezione

    Support de couverture de table Tischständer Supporto di tavolo Colonne di sostegno L x 2 Tafelbladstaander Soporte de mesa [colonne lunghe] PDK-TS12 Viti di installazione 3 (M8 x 40mm, nere) x 2 Operating instructions Mode d’emploi Bedienungsanleitung Istruzioni per l’uso...
  • Seite 47: Montaggio Del Supporto

    Montaggio del Supporto Nota Assicurate la colonna di supporto al supporto Assemblatelo sempre su una superficie piana, ecc. con le viti di installazione 1 (4 posizioni a Inserite le viti nei fori verticalmente e non serratele con una forza sinistra e a destra). maggiore al necessario.
  • Seite 48: Fissaggio Del Display A Plasma

    Fissaggio del Display a Plasma Illustrazione: si riferisce all’utilizzo delle colonne di sostegno L Il peso di un Display a Plasma da 50 pollici (senza altoparlanti) è di circa Kg. 32, il modello da 43 pollici (senza altoparlanti) pesa circa Kg. 26. Non hanno Attenzione profondità...
  • Seite 49: Meccanismo Di Regolazione Dell'inclinazione Dell'angolo In Avanti/Indietro

    Meccanismo di Regolazione dell’Inclinazione dell’Angolo in Avanti/Indietro E’ possibile regolare l’angolo di inclinazione del Display a Plasma Serrare i bulloni di ancoraggio per l’inclinazione sul supporto entro una gamma approssimativa di circa 2° in avanti in avanti/indietro( 2 posizioni a sinistra e a o indietro secondo la vostra preferenza.
  • Seite 50: Installazione Del Prodotto Su Una Struttura Di Sostegno, Ecc

    Installazione del Prodotto su una Struttura di Sostegno, ecc. Precauzioni per l’installazione È necessario prendere queste precauzioni quando si sposta il prodotto e se lo si installa in una struttura di sostegno o altro tipo di alloggiamento. Assicuratevi che la quantità di spazio libero nella parte anteriore e posteriore del supporto di tavolo sia sufficiente, come mostrato in Precauzioni durante lo spostamento questo schema.
  • Seite 51: Preparazione Dei Cavi

    Preparazione dei cavi Uso dei legatori per cavo Per legare i cavi, utilizzate i legatori forniti. Nota Inserite il legatore per cavo attraverso il foro Prestate molta attenzione a non forzare le basi dei cavi. nella parte superiore della piattaforma rotante dello stand.
  • Seite 52: Prendere Precauzioni Contro La Caduta Dell'apparecchio

    Prendere precauzioni contro la caduta dell’apparecchio Dopo avere installato il supporto, assicuratevi di usare particolare attenzione affinché il Display a Plasma non possa cadere. Stabilizzare su un tavolo o sul pavimento Fissare l’apparecchio al muro (la figura illustra il display da 43 pollici) Fissate l’apparecchio come illustrato nello schema, utilizzando le viti reperibili sul mercato.
  • Seite 53: Fissare La Rotazione Verso La Parte Anteriore

    Fissare la rotazione verso la parte anteriore Fissate l’apparecchio come illustrato nello schema, utilizzando le viti reperibili sul mercato. Nota Utilizzate una vite che abbia un normale diametro di 4 mm e una lunghezza da 20 a 30 mm per fissare la rotazione verso la parte anteriore.
  • Seite 54: Diagramma Delle Dimensioni

    Diagramma delle Dimensioni Unità: mm Se installate gli altoparlanti PDP-S38 o PDP-S37 1407 [display da 50 pollici] * 1379 [display da 50 pollici] * 1259 [display da 43 pollici] * 1231 [display da 43 pollici] * 125,1 162,9 * Se usate le colonne di sostegno L, l’altezza è 853 (modello di display da 50 pollici) / 768 (modello di display da 43 pollici) Posizione libera: Fissatelo con uno spazio di circa 15 mm tra gli altoparlanti e il display.
  • Seite 55 125,1 162,9 * Se usate le colonne di sostegno L, l’altezza è 853 (modello di display da 50 pollici) / 768 (modello di display da 43 pollici) Pubblicato da Pioneer Corporation. Copyright © 2005 Pioneer Corporation. Tutti i diritti riservati.
  • Seite 56: Waarschuwingen

    Hartelijk dank voor de aanschaf van dit Pioneer product. Waarschuwingen Lees deze gebruiksaanwijzing aandachtig door voor een veilige en juiste bediening van dit model. Berg de gebruiksaanwijzing veilig op voor het geval u deze later Dit product is een tafelstaander die speciaal is ontworpen voor de wilt raadplegen.
  • Seite 57: Controleer De Meegeleverde Onderdelen

    Table top stand Support de couverture de table Tischständer Supporto di tavolo Steunkolommen L x 2 Tafelbladstaander Soporte de mesa [lange kolommen] PDK-TS12 Montageschroeven 3 (M8 x 40 mm: zwart) x 2 Operating instructions Mode d’emploi Bedienungsanleitung Istruzioni per l’uso Gebruiksaanwijzing...
  • Seite 58: Monteren Van De Staander

    Monteren van de Staander Let op Bevestig de steunkolom met de Monteer de staander op een vlakke tafel, etc. montageschroeven 1 (op 4 plaatsen aan de Voeg twee schroeven verticaal in de gaten en draai ze niet linker- en rechterzijde) aan de staander. steviger vast dan nodig.
  • Seite 59: Bevestiging Van De Plasma-Display

    Bevestiging van de Plasma-Display Het gewicht van een Plasma-Display van 50 inch Illustratie: bij het gebruik van steunkolommen L Illustration: when using support columns L (zonder speakers) bedraagt ongeveer 32 kg; van een model van 43 inch (zonder speakers) bedraagt het Waarschuwing gewicht ongeveer 26 kg.
  • Seite 60: Instellingsmechanisme Voor De Voor- En Achterwaartse Hellingshoek

    Instellingsmechanisme voor de voor- en achterwaartse hellingshoek Bij deze standaard kan de hellingshoek van de Plasma-Display Draai de voor-/achterwaartse binnen een bereik van ongeveer 2° naar wens voorwaarts en hellingsankerbouten aan (2 plaatsen aan de achterwaarts worden ingesteld. linker- en rechterzijde). Let op Draai de voor-/achterwaartse hellingsankerbouten stevig Zorg ervoor dat de hoek pas wordt ingesteld nadat...
  • Seite 61: Installeren Van Het Product Op Een Rek, Etc

    Installeren van het Product op een Rek, etc. Voorzorgsmaatregelen voor installatie Neem de volgende voorzorgsmaatregelen in acht bij het verplaatsen of installeren van dit product met een plasma-display Zorg ervoor dat u aan de voorzijde en achterzijde van de in een rek of andere omkasting. tafelbladstaander minimaal zoveel ruimte heeft als in de figuur Voorzorgsmaatregelen bij verplaatsing hieronder aangegeven.
  • Seite 62: Voorbereiding Van De Kabels

    Voorbereiding van de kabels Kabelbinders gebruiken Gebruik de bijgeleverde kabelbinders om de kabels vast te binden. Let op Steek de kabelbinder door het gat aan de Zorg ervoor dat er geen kracht op de kabels wordt uitgeoefend. bovenzijde van het roterend vlak van de staander.
  • Seite 63: Zorg Ervoor Dat Het Apparaat Niet Omvalt

    Zorg ervoor dat het apparaat niet omvalt Nadat de staander is geïnstalleerd, dient u er uiterst nauwkeurig voor zorg te dragen dat de Plasma- Display niet omvalt. Stabiliteit op de tafel of op de grond Een muur gebruiken voor een stabiele plaatsing Plaats het apparaat stabiel op de grond zoals in het schema (Model met display van 43 inch in de figuur)
  • Seite 64: Vastzetten Van De Draaiing Voorwaarts

    Vastzetten van de draaiing voorwaarts Plaats het apparaat stabiel op de grond zoals in het schema aangegeven met in de winkel verkrijgbare schroeven. Let op Gebruik een schroef met een nominale diameter van 4 mm en een lengte van 20 tot 30 mm om de draaiing voorwaarts vast te zetten.
  • Seite 65: Schema Van Afmetingen

    Schema van afmetingen Eenheid: mm Tijdens het plaatsen van de speakertypes PDP-S38 en PDP-S37 1407 [model met display van 50 inch] * 1379 [model met display van 50 inch] * 1259 [model met display van 43 inch] * 1231 [model met display van 43 inch] * 125,1 162,9 * Wanneer de steunkolommen L worden gebruikt is de hoogte 853 (model met display van 50 inch) / 768 (model met display van 43 inch).
  • Seite 66 1076 [model met display van 43 inch] 125,1 162,9 * Wanneer de steunkolommen L worden gebruikt is de hoogte 853 (model met display van 50 inch) / 768 (model met display van 43 inch). Uitgegeven door Pioneer Corporation. Copyright © 2005 Pioneer Corporation. Alle rechten voorbehouden.
  • Seite 67: Precauciones

    Es muy peligroso realizar una instalación inadecuada, ya que distribuidor. puede tener como resultado la caída de la pantalla o accidentes de ¶ Pioneer no es responsable de ningún daño que pueda otro tipo. derivarse de una instalación o uso inapropiados, modificaciones o desastres naturales.
  • Seite 68: Comprobación De Las Piezas Incluidas

    Support de couverture de table Tischständer Supporto di tavolo Columnas de soporte L x 2 Tafelbladstaander Soporte de mesa [columnas largas] PDK-TS12 Tornillos de instalación 3 (M8 x 40 mm: negros) x 2 Operating instructions Mode d’emploi Bedienungsanleitung Istruzioni per l’uso...
  • Seite 69: Montaje Del Soporte

    Montaje del soporte Nota Asegure la columna en el soporte mediante los Móntelo siempre en una mesa plana o similar. tornillos de instalación 1 (4 posiciones a la Introduzca los tornillos verticalmente en los agujeros y no los derecha e izquierda). apriete más de lo necesario.
  • Seite 70: Montaje De La Pantalla De Plasma

    Montaje de la pantalla de plasma Una pantalla de plasma de 50 pulgadas (sin altavoces) Figura: si se utilizan columnas de soporte L pesa alrededor de 32 kg; una de 43 pulgadas (sin altavoces), alrededor de 26 kg; al no tener fondo, son PRECAUCIÓN inestables.
  • Seite 71: Mecanismo De Ajuste Del Ángulo De Inclinación Delantera Y Posterior

    Mecanismo de ajuste del ángulo de inclinación delantera y posterior Este soporte le permite ajustar el ángulo de inclinación de la Apriete los pernos de anclaje que permiten la pantalla de plasma, hacia delante o hacia atrás, hasta un máximo inclinación delantera y posterior (2 posiciones a de 2°...
  • Seite 72: Instalación Del Producto En Un Bastidor O Similar

    Instalación del producto en un bastidor o similar Precauciones para la instalación Asegúrese de que respeta las siguientes precauciones al desplazar o instalar este producto con una pantalla de plasma en un bastidor o similar. Asegúrese de dejar siempre libre delante y detrás del soporte un espacio de la medida indicada en la siguiente figura, como Precauciones para el desplazamiento mínimo.
  • Seite 73: Preparación De Los Cables

    Preparación de los cables Uso de las bridas para cables Para sujetar los cables, utilice las bridas para cables que se incluyen con el soporte. Pase la brida para cables por el agujero situado Nota en la parte superior de la plataforma giratoria Tenga mucho cuidado de no ejercer fuerza en la base de los cables.
  • Seite 74: Cómo Evitar Que El Equipo Se Caiga

    Cómo evitar que el equipo se caiga Después de instalar el soporte, asegúrese de que toma las medidas necesarias para que la pantalla de plasma no se caiga. Estabilización sobre una base o el suelo Utilización de una pared para estabilizar la pantalla Estabilice el equipo de la forma que se muestra en la figura (en la figura se muestra un modelo de pantalla de 43...
  • Seite 75: Cómo Fijar La Rotación En La Parte Delantera

    Cómo fijar la rotación en la parte delantera Estabilice el equipo de la forma que se muestra en la figura utilizando tornillos disponibles en el mercado. Nota Para fijar la rotación en la parte delantera, utilice un tornillo cuyo diámetro nominal sea de 4 mm y cuya longitud esté...
  • Seite 76: Diagrama De Dimensiones

    Diagrama de dimensiones Unidad: mm Cuando instale los altavoces PDP-S38 o PDP-S37 1407 [modelo de pantalla de 50 pulgadas] * 1379 [modelo de pantalla de 50 pulgadas] * 1259 [modelo de pantalla de 43 pulgadas] * 1231 [modelo de pantalla de 43 pulgadas] * 125,1 162,9 * Si se utilizan las columnas de soporte L, la altura es de 853 (en el modelo de pantalla de 50 pulgadas) / 768 (en el modelo de pantalla de 43 pulgadas).
  • Seite 77 * Si se utilizan las columnas de soporte L, la altura es de 853 (en el modelo de pantalla de 50 pulgadas) / 768 (en el modelo de pantalla de 43 pulgadas). Publicado por Pioneer Corporation. Copyright © 2005 Pioneer Corporation. Todos los derechos reservados.
  • Seite 78 感謝您購買本Pioneer產品。 注意 為使您熟知本機的正確操作方式,務求詳閱本「操作手冊」。 在您閱讀完手冊的內容後,請妥為保存,以備日後參考之用。 這個桌上支架是專為先鋒牌電漿顯示器(PDP-5060HD / PDP- 4360HD / PDP-506XDE / PDP-436XDE / PDP-506FDE / PDP- 重要警示 -- 將位於設備下方的型號和序號記錄下來。 436FDE / PDP-506HDG / PDP-436HDG) 所設計的。如果使用 數字在背面。 其他機種,可能會因為不穩定而造成傷害。想要獲得更進一 型號 步的資訊,請跟你購買顯示器的店家聯絡。 序號 除了詳細的指示,請不要安裝或修改產品。除了那些指示說 保留這些號碼以備不時之需 明,請不要將此支架安裝電漿顯示器,也不要修改或是另有 用途。 安裝 不當的安裝是非常危險的, 因為如此可能會造成翻覆或是其他 意外。 如果您在安裝時遇到任何問題,請與您的經銷商連絡。 Pioneer對於因安裝錯誤、不當使用、修改或天災所造成...
  • Seite 79: 核對隨附零件

    操作手冊(本分文件) ×1 (M8x30mm:銀色) ×2 Table top stand Support de couverture de table Tischständer Supporto di tavolo Tafelbladstaander Soporte de mesa 大型支撐柱狀條 ×2 (長型) PDK-TS12 安裝螺絲 (M8x40mm:黑色) ×2 Operating instructions Mode d’emploi Bedienungsanleitung Istruzioni per l’uso Gebruiksaanwijzing Manual de instrucciones 六角扳手 ×1 C型扳手...
  • Seite 80: 組合支架

    組合支架 附注 將支撐柱狀條用螺絲 鎖入支架(左右共四個 永遠組合在平坦的桌面上。 位置)。 將螺絲以垂直的方式鎖入螺絲孔內,不要將螺絲過度繃緊。 首先使用隨附的六角扳手,將依附在上方的螺絲鬆開, 組合程序 然後再將依附在底部的螺絲鬆開。 圖解: 當使用小型支撐柱狀條 選擇性裝上支撐柱狀條(請參閱第79頁的"使 用/不使用支撐柱狀條表格")。 前面有較大的孔洞 根據你所購買的揚聲器和以下的程序來選擇安裝支撐柱狀 條(兩種支撐柱狀條-,只能使用其中的一種)。 當你所購買的揚聲器型號是PDP-S38或PDP-S37。 【使用支撐柱狀條:小型支撐柱狀條 (短型)】 使用支撐柱狀條: 小型支撐柱狀條(短型) 安裝螺絲 (M8x16mm:銀色) 全面鎖緊安裝用的螺絲(左右共四個位置)。 全面鎖緊隨附的螺絲。 當你購買的揚聲器型號是PDP-S39。 【使用支撐柱狀條:大型支撐柱狀條 (長型)】 附注 無法使用小型支撐柱狀條。 請小心地將沒有用到的支撐柱狀條,六角扳手,C型扳手,操作 手冊一起收好。 使用支撐柱狀條: 大型支撐柱狀條(長型)
  • Seite 81: 安裝電漿顯示器

    安裝電漿顯示器 沒有揚聲器的50吋電漿顯示器重達32公斤,而沒有揚聲器 圖解: 當使用大型支撐柱狀條 的43吋顯示器則有26公斤,他們沒什麼厚度,而且不穩 注意 定,所以當要組合和安裝時,至少需要兩個人來操作。 附注 永遠組合在平坦的桌面上。 將螺絲以垂直的方式鎖入螺絲孔內,不要將螺絲過度繃緊。 請確認你所安裝的支撐柱狀條是根據你所買的揚聲器類型來安裝, 並參考"組合支架"的程序(請參閱第80頁)。 安裝方法 安裝螺絲 將電漿顯示器安裝在支架上。 (M8x30mm:銀色) 將電漿顯示器的底部安裝在支架的支撐柱狀條,如箭頭所 示的方向,並慢慢的以垂直方式插入。除了支架的插入狹 用安裝用的螺絲 將電漿顯示器固定住。 縫以外,請非常小心的不要將支撐柱狀條插入電漿電視的 使用隨附的六角扳手按照箭頭所指的方向安裝電漿顯示 任何地方,如果隨意插入電漿電視的任何零件有可能會導 器。 致電漿面板和接頭的損壞,或是支架彎曲變形。 如下圖所示,將支撐柱狀條 對齊電漿顯示器的底部。 安裝螺絲 (M8x40mm:黑色) 安裝揚聲器。 用安裝用的螺絲 將電漿顯示器固定住。 請參考操作手冊的揚聲器的安裝方法。 請使用隨附的六角扳手來固定。 圖解: 當使用小型支撐柱狀條 安裝螺絲 (M8x30mm:銀色)
  • Seite 82: 前後角度傾斜調整的機械裝置

    前後角度傾斜調整的機械裝置 根據你個人喜好可以調整電漿顯示器傾斜的角度,前後範圍 將往前/往後的傾斜固定閂閂緊(左右共兩個位 大約2度左右。 置)。 附注 使用C型扳手往下轉動以閂緊在左右兩邊的往前/往後傾 安裝好電漿顯示器以後。請調整角度。 斜固定閂。用手握住電漿顯示器的上方直到你已經將固定 閂閂緊。 請安裝在平坦的桌面上或是其他平坦的表面。 當調整角度時,請握住電漿顯示器的上端。 往前/往後的傾斜固定閂 調整步驟 請使用隨附的C型扳手去鬆開往前/往後傾斜的 閂緊 固定閂(左右共兩個位置)。 使用C型扳手往上轉動以鬆開在左邊和右邊的往前/往後 的傾斜固定閂,請確定用手握好電漿顯示器的上方。 *此圖是43吋的顯示器機種 往前/往後的傾斜固定閂 鬆開 再一次確認往前/往後的傾斜固定閂是閂緊 的。 隨個人喜好設定角度。 慢慢搬動電漿顯示器來設定個人喜好的角度。 附注 當調整角度時,請非常小心的不要將手放在如圖箭頭所指的地 方。...
  • Seite 83: 安裝產品在架子上

    安裝產品在架子上 當移動或是安裝在架子上或其他附件上的桌上支架和電漿顯 安裝的預防措施 示器,請確認注意以下的預防措施。 請確認你可以長久將桌上支架最少固定如下圖所標的前面和 移動時的預防措施 後面的距離空間。 架子 當需要將產品移動數公尺以外,請先搬移揚聲器,然 最少30mm 最少30mm 後再從支架搬開電漿顯示器,而後才分別移動揚聲 背面 器,電漿顯示器,和支架。 注意 當從支架拆卸電漿顯示器時,請按照第86頁的"從支 架拆卸電漿顯示器"步驟。 當安裝在架子或是其他附件上的預防措施 當安裝在架子或是其他附件上,請用手握住電漿顯示器的 底部和後面的把手,如果你是握住揚聲器的話,那產品可 前面 注意 能會損壞或是扭曲變形。 桌上支架 電漿顯示器 當安裝PDP-S38或PDP- S37的揚聲器 如果支架超出架子的範圍,將會導致設備碎裂或是翻覆 的意外發生。 從底部和電漿顯示器的把手 當翻轉的時候,請小心不要讓顯示器碰撞到牆面或是周 注意 邊的物體。 握好。 突出很危險。 當安裝PDP-S39的揚聲器 從邊緣和電漿顯示器的把手 角度翻轉的範圍 握好。...
  • Seite 84: 線路準備

    線路準備 請使用隨附的線捆綑綁線路。 使用線捆 附注 透過孔洞,請將線捆插入支架上方的翻轉平台 請小心不要強力拉拔線頭。 上。 當安裝PDP-S38或PDP-S37的揚聲器 線捆 聚集線路並將其放入線捆上。 當安裝PDP-S39的揚聲器 將線捆扣上。 移除線捆 依圖所示的箭頭方向推開線捆, 使其鬆開。...
  • Seite 85: 預防設備翻覆

    預防設備翻覆 在安裝好支架之後,請特別小心確認電漿顯示器不會翻覆。 穩固安裝在桌上或是地上 牢固的安裝在牆上 (圖為43吋顯示機種) 使用市面上有的螺絲如圖所示,可以穩固安裝設備。 嵌入防翻倒的固定閂在電漿顯示器上。 附注 使用堅固的線或是鏈條將適當,穩固的固定在 使用螺絲腳直徑6mm,最少20mm長的 牆上,柱子,或是其他堅固的環境。 螺絲來穩固電漿顯示器在桌上或是地上。 左右邊也按照此種方式進行安裝。 最少20mm 線或是鏈條的長度一定要夠長,這樣才能方便支架自 由的轉動。 附注 請使用市面上專為預防掉落的螺 栓,繩索,鏈條及固定配件。 建議螺栓:標稱直徑8 mm 12到15mm 長度12 至15 mm 防翻倒的固定閂 線或鏈條 注意 裝配 • 要有足夠強度的桌上或是地上才可永久支撐電漿顯示 器。如果強度不夠將可能導致個人傷害和身體的損害。 • 當安裝電漿顯示器時,請先量測安全的尺度,如果發生 緊急狀況,比如地震或是意外,可以避免機台翻覆或是 翻倒。 • 如果你沒有做這預防措施,那麼電漿顯示器有可能會翻 固定前方的旋轉 覆且造成傷害。 •...
  • Seite 86: 從支架拆卸電漿顯示器

    從支架拆卸電漿顯示器 請參閱第81頁的"安裝電漿顯示器"步驟2和步 從支架來拆解電漿顯示器,請參照以下所敘述的步驟,以 驟3,以移除安裝用的螺絲(共4顆螺絲)。 防意外的發生。 注意 附注 首先請確認將往前/往後的傾斜固定閂是閂緊 請勿移除第80頁步驟2的螺絲(M8x16mm:銀色)。如此將會造 成支撐柱狀條滑落和翻覆。 的。 從底部和握好電漿顯示器的把手,並以垂直方 先將平坦地面清空,這樣便能將電漿顯示器平 式提起顯示器。 躺放好,然後舖張紙在上方,便可以防止被刮 如步驟2將電漿顯示器慢慢的以紙張覆蓋,並 傷或其他的傷害。 使螢幕面朝下。 將揚聲器搬開。 附注 當重新將電漿顯示器裝回支架時,請確認左右兩邊的支撐柱狀 條是設定相同的角度。 規格 外部尺寸 577(寬)× 249.5(高)× 380(深)mm (當使用小型支撐柱狀條) 重量 10.5公斤 • 以上的外部規格如有修改,以改善產品品質,恕不另行通知。 尺寸圖 單位:mm 當安裝 PDP-S38 或 PDP-S37 的揚聲器 1407 (50吋顯示器機種)* 1379 (50吋顯示器機種)* 1259 (43吋顯示器機種)* 1231 (43吋顯示器機種)*...
  • Seite 87 尺寸圖 當安裝 PDP-S39 的揚聲器 1076 125.1 162.9 無安裝揚聲器 1224 (50吋顯示器機種) 1076 (43吋顯示器機種) 125.1 162.9 *當使用大型的支撐柱狀條,50吋的顯示器機種長達853mm,而43吋的顯示器機種長達768mm。 日本先鋒公司出版。 版權  2005日本先鋒公司。 版權所有。...
  • Seite 88 PIONEER ELECTRONICS AUSTRALIA PTY. LTD. 178-184 Boundary Road, Braeside, Victoria 3195, Australia, TEL: (03) 9586-6300 PIONEER ELECTRONICS DE MEXICO S.A. DE C.V. Blvd.Manuel Avila Camacho 138 10 piso Col.Lomas de Chapultepec, Mexico,D.F. 11000 TEL: 55-9178-4270 Printed in Japan / Imprimé au Japon <AZR1117-A>...

Inhaltsverzeichnis