Inhaltsverzeichnis
Werbung
Verfügbare Sprachen
Verfügbare Sprachen
Quicklinks
CARDIN ELETTRONICA spa
Via Raffaello, 36
31020 San Vendemiano (TV) Italy
Tel:
Fax:
email (Italian):
email (Europe):
Http:
AUTOMAZIONE PER CANCELLI A BATTENTE
AUTOMATISME POUR PORTAILS BATTANTS
AUTOMATISIERUNG FÜR FLÜGELTORE
AUTOMATISATIE VAN DRAAIHEKKENS
ITALIANO
ATTENZIONE! Prima di iniziare l'installazione leggere
le istruzioni attentamente!
Impianto tipo
Schema di montaggio
Disegni di sblocco
Fissaggio staffa/elettroserratura
Schema elettrico (impianto tipo)
Avvertenze importanti
Istruzioni per l'uso
Istruzione per l'installazione
Collegamento elettrico
Sblocco manuale
Caratteristiche tecniche
ENGLISH
ATTENTION! Before installing this device read the
following instructions carefully!
Installation example
Assembly
Manual release drawings
Fitting the holding brackets/electric lock
Wiring diagrams (installation examples)
Important remarks
User instructions
Installation instructions
Electrical connection
Manual release mechanism
Technical specifi cations
+39/0438.401818
+39/0438.401831
Sales.office.it@cardin.it
Sales.office@cardin.it
www.cardin.it
AUTOMATION FOR HINGED GATES
Pag.
Pag.
Pag.
Pag.
Pag.
Pag.
Pag.
Pag.
Pag.
Pag.
Pag.
Pag.
Pag.
Pag.
Pag.
Pag.
Pag.
Pag.
Pag.
Pag.
Pag.
Pag.
Series
Instruction manual
BL
BL
ZVL240.04
Questo prodotto è stato testato e collaudato nei laboratori della casa costruttrice, la quale ne ha verifi cato la perfetta
corrispondenza delle caratteristiche con quelle richieste dalla normativa vigente.
This product has been tried and tested in the manufacturer's laboratory who have verifi ed that the product
conforms in every aspect to the safety standards in force.
Ce produit a été testé et essayé dans les laboratoires du fabriquant. Pour l'installer suivre attentivement
les instructions fournies.
230Vac
Dieses Produkt wurde in den Werkstätten der Herstellerfi rma auf die perfekte Übereinstimmung ihrer Eigenschaften mit
den von den geltenden Normen vorgeschriebenen getestet und geprüft.
Motors
Dit product werd getest in het labo van de fabrikant, welke heeft nagegaan of dit product in ieder aspekt conform is met
de kracht veiligheidsnormen. Lees aandachtig deze handleiding om de motor te installeren.
ATTENTION! Avant de commencer la pose, lire
attentivement les instructions!
Exemple d'installation
Montage
Dessins du déverrouillage
Fixation de la patte/serrure électrique
Schéma électrique (exemple d'installation)
Conseils importants
Domaine d'application
Instructions pour l'installation
Branchement électrique
Déverrouillage manuel
Caractéristiques techniques
ACHTUNG! Bevor mit der Installation begonnen wird,
sollte die Anleitung aufmerksam gelesen werden!
2
Anlagenart
3-6
Montagegearbeiten
6
Manuelle Entriegelungs Zeichenen
7-8
Anbringung Halterbügel/Elektroverriegelung
9-11
Elektrischer Schaltplan (Anlagenart)
12
Wichtige Hinweise
12
Betriebsanleitung
13
Anleitungen zur Installation
14
Elektrischer anschluss
14
Manuelle Entriegelung
28
Technische Daten
OPGELET! Lees deze handleiding alvorens de installatie
aan te vangen.
2
Installatievoorbeeld
3-6
Montageschema
6
Manuele ontgrendeling
7-8
Montage mogelijkheden/elektrisch slot
9-11
Bedradingschema's (voorbeelden)
15
Belangrijke opmerkingen
15
Gebruikerinstructies
16
Montage instructies
17
Elektrische aansluiting
17
Manuele ontgrendeling
28
Technische specifi caties
1
Model
Automation
200/BL202
200/BL202
200/BL202L
200/BL202L
200/BL202C
200/BL202C
200/BL352
200/BL352
200/BL452
200/BL452
FRANÇAIS
DEUTSCH
NEDERLANDS
Pag.
Pag.
Pag.
Pag.
Pag.
Pag.
Pag.
Pag.
Pag.
Pag.
Pag.
Date
11-11-2003
Pag.
2
Pag.
3-6
Pag.
6
Pag.
7-8
Pag.
9-11
Pag.
18
Pag.
18
Pag.
19
Pag.
20
Pag.
20
Pag.
28
Seite
2
Seite
3-6
Seite
6
Seite
7-8
Seite
9-11
Seite
21
Seite
21
Seite
22
Seite
23
Seite
23
Seite
28
2
3-6
6
7-8
9-11
24
24
25
26
26
28
Werbung
Inhaltsverzeichnis

Verwandte Anleitungen für Cardin Elettronica 200/BL202


Inhaltszusammenfassung für Cardin Elettronica 200/BL202
- Seite 1 Series Instruction manual Model Date CARDIN ELETTRONICA spa ZVL240.04 Automation 11-11-2003 Via Raffaello, 36 Questo prodotto è stato testato e collaudato nei laboratori della casa costruttrice, la quale ne ha verifi cato la perfetta 31020 San Vendemiano (TV) Italy corrispondenza delle caratteristiche con quelle richieste dalla normativa vigente.
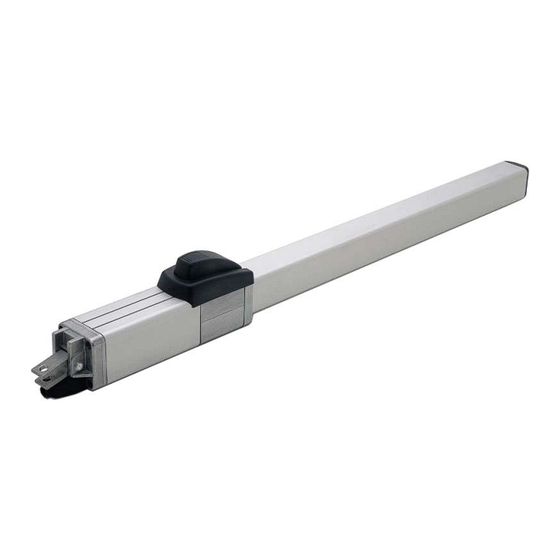
- Seite 2 IMPIANTO TIPO - INSTALLATION EXAMPLE - EXEMPLE D'INSTALLATION - ANLAGENART - INSTALLATIE VOORBEELD 3X1+T 3X1,5+T 3X1+T - 5 0 LEGENDA Motoriduttore Fotocellula interna Fotocellula esterna Scatola di derivazione Lampeggiatore Centralina elettronica Selettore a chiave Interruttore onnipolare con apertura contatti min. 3mm Elettroserratura opzionale 10 Antenna esterna (Cavo coassiale RG58 Impedenza 50Ω) 11 Costa sensibile antischiacciamento...
- Seite 3 200/BL202 - 200/BL202L - 200/BL352 - 200/BL452 SCHEMA DI MONTAGGIO ASSEMBLY MONTAGE MONTAGEGEARBEITEN MONTAGE SCHEMA Nota - Note - Hinweis - Remarque - Nota 200/BL352 e 200/BL452 sono privi di sblocco "9" 200/BL352 and 200/BL452 do not feature manual release "9"...
- Seite 4 DIMENSIONI D'INGOMBRO - EXTERNAL DIMENSIONS - DIMENSIONS D'ENCOMBREMENT - AUSSENABMESSUNGEN - MAXIMALE MOTORAFMETINGEN 200/BL202 1076 CORSA UTILE "A" = 280 mm TRAVEL DISTANCE "A" = 280 mm COURSE UTILE "A" = 280 mm BRUIKBARE KOERS "A" = 280 mm 1000...
- Seite 5 Pour optimiser l'installation, appliquer les données mises en évidence dans les cases en gris. Wichtig! Für eine optimale Installation sind die grau markierten Zahlenwerte zu verwenden. Belangrijk! Gebruik de in het grijs weergegeven afmetingen voor een optimale installatie. 200/BL202 200/BL352 200/BL452 α=0 ° α=90 °...
- Seite 6 ESEMPIO D’INSTALLAZIONE-INSTALLATION EXAMPLE-EXEMPLE D'INSTALLATION-INSTALLATIONSART-INSTALLATIEVOORBEELD SBLOCCO MANUALE - MANUAL RELEASE - DÉVERROUILLAGE MANUEL - MANUELLE ENTRIEGELUNG - MANULE ONTGRENDELING...
- Seite 7 FISSAGGIO STAFFA POSTERIORE (A PILASTRO) - FITTING THE REAR BRACKET (TO A COLUMN) - FIXATION DE LA PATTE POSTÉRIEURE (AU PILIER) - ANBRINGUNG HALTEBÜGEL HINTEN (AN DER SÄULE) - MONTAGE MOGELIJKHEDEN (OP PILAAR) 200/BL202 200/BL202L 200/BL202C 200/BL352 200/BL452 FISSAGGIO STAFFA ANTERIORE (A CANCELLO) - FITTING THE FRONT BRACKET (TO THE GATE) - FIXATION DE LA PATTE ANTÉRIEURE (AU PORTAIL) - ANBRINGUNG HALTEBÜGEL VORNE (AM TOR) - MONTAGE MOGELIJKHEDEN (OP HET HEKKEN)
- Seite 8 STAFFA POSTERIORE REGOLABILE (OPZIONALE) - FITTING THE ADJUSTABLE REAR BRACKET (OPTIONAL) - PATTE POSTÉRIEURE RÉGLABLE (EN OPTION) - HINTERER, EINSTELLBARER HALTEBÜGEL (EXTRA) - MONTAGE OPTIONEEL AFREGEL SYSTEEM (PILAAR) 206/BL201STAP 94 min 131 max STAFFA ANTERIORE REGOLABILE (OPZIONALE) - FITTING THE ADJUSTABLE FRONT BRACKET (OPTIONAL) - PATTE ANTÉRIEURE RÉGLABLE (EN OPTION) - VORNER, EINSTELLBARER HALTEBÜGEL (EXTRA) - MONTAGE OPTIONEEL AFREGEL SYSTEEM (HEKKEN) 206/BL201SUAR ELETTROSERRATURA (OPZIONALE) - ELECTRIC LOCKING DEVICE (OPTIONAL) - SERRURE ÉLECTRIQUE (EN OPTION)
- Seite 9 SCHEMA ELETTRICO IMPIANTO TIPO - STANDARD WIRING DIAGRAM - SCHÉMA ÉLECTRIQUE DE L'EXEMPLE D'INSTALLATION ELEKTRISCHER SCHALTPLAN ANLAGENART - ELEKTRISCH AANSLUITSCHEMA MET CARDIN BESTURINGSKAST PRG811 LD1 LD2 LD3 LD4 LD6 LD7 ANTENNA 230V (EU) 110V (USA) 110-230V~ 110-230V~ PONTICELLI 24V3W 12V15W OUT CH2 PONTICELLI 12V 0...
-
Seite 21: Einige Betrachtungen Zur Sicherheit
WICHTIGE HINWEISE WICHTIGE HINWEISE WICHTIGE HINWEISE DIE FOLGENDEN HINWEISE VOR DER INSTALLATION AUFMERKSAM DURCHLESEN. BESONDERS AUF ALLE IM TEXT ANGEGEBENEN WARNHINWEISE ACHTEN. DIE NICHTBEACHTUNG DERSELBEN KÖNNTE DEN EINWANDFREIEN BETRIEB DES SYS- TEMS • Das vorliegende Handbuch wendet sich an Personen, die zur EINIGE BETRACHTUNGEN ZUR SICHERHEIT Installation von "ELEKTROGERÄTEN"... -
Seite 22: Anleitungen Zur Installation
Haltebügels am Kopfende "2" und der hinteren Gelenkkupplung "1" des Haltebügels am hinteren Ende darf ANBRINGUNG DER VORRICHTUNG 200/BL202- BL202L niemals mehr als 1020 mm beim BL352 und beim BL452 betragen Die Vorrichtung kann sowohl links als auch rechts von der Durchfahrt (siehe Abbildung 8 auf Seite 5). - Seite 23 terial "5" mittels den 4 mitgelieferten Schrauben befestigen (Abb. WICHTIG! Der Getriebemotor besitzt keinen Drehmoment- 2, S. 3). begrenzer, deshalb ist eine elektronische Steuereinheit zur • Die Gewindeschnecke des Antriebes (Teil 4, Abb. 3) bis auf 15mm Drehmomentbegrenzung mit einem maximalem Schub am über die Schließungsstrecke hinausbewegen.
- Seite 27 "norme e certifi cazione". Installation guide The installation guide has been drawn up by Cardin Elettronica with the aim helping the installer to apply the prescriptions of the machine directive in reference to the European harmonised standards. The guide and the documents to be filled out are available from the www.cardin.it site under the section "Standards and...
- Seite 28 Looptijd (90° opening) Condensator 12,5 12,5 12,5 Isolatieklasse Beschermingsgraad Maximum vleugelafmetingen 1,8-3 Maximum vleugelgewicht By CARDIN ELETTRONICA spa Via Raffaello, 36 - 31020 San Vendemiano (TV) Italy Tel: +39/0438.401818 Fax: +39/0438.401831 email (Italian): Sales.offi ce.it@cardin.it email (Europe): Sales.offi ce@cardin.it Http:www.cardin.it...