
Verwandte Anleitungen für Klarstein 10034215


Inhaltszusammenfassung für Klarstein 10034215
- Seite 1 Kraftprotz Fleischwolf Meat Grinder Picadora Hachoir à viande Tritacarne 10034215...
-
Seite 3: Inhaltsverzeichnis
Español 23 Vor dem ersten Betrieb 4 Français 33 Geräteübersicht 5 Italiano 43 Zusammenbau und Bedienung 6 Demontage 10 Reinigung und Pflege 10 Hinweise zur Entsorgung 1 1 Konformitätserklärung 1 1 TECHNISCHE DATEN Artikelnummer 10034215 Stromversorgung 220-240 V ~ 50/60 Hz Leistung 1800 W Abmessungen (BxTxH) 410x210x426 mm... -
Seite 4: Sicherheitshinweise
SICHERHEITSHINWEISE • Kinder ab 8 Jahren, psychisch, sensorisch und körperlich eingeschränkte Menschen dürfen das Gerät nur benutzen, wenn sie vorher von einer für sie verantwortlichen Aufsichtsperson ausführlich mit den Funktionen und den Sicherheitsvorkehrungen vertraut gemacht wurden und die damit verbundenen Risiken verstehen. •... -
Seite 5: Geräteübersicht
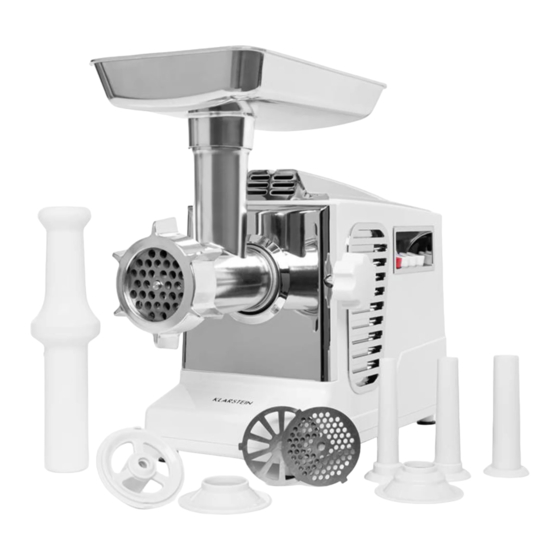
GERÄTEÜBERSICHT Stopfer Lochscheibe (fein) Trichterplatte Schneidemesser Gehäuse Lochscheibe (mittel) Taste REVERSE (Umkehrtaste) Befestigungsring Taste LOW Lochscheibe (grob) Taste HIGH Wurst-Aufsatz Taste STOP & RESET Kibbeh-Aufsätze Befestigungsring Fülltrichter (fein) Kopfanschluss Fülltrichter (mittel) Kopf Fülltrichter (grob) Schnecke... -
Seite 6: Zusammenbau Und Bedienung
ZUSAMMENBAU UND BEDIENUNG Halten Sie den Kopf und stecken Sie ihn in den Anschluss. Achten Sie beim Einsetzen darauf, dass der Kopf leicht geneigt ist (siehe Bild 1). Wenn Sie den Kopf eingesetzt haben, drehen Sie ihn den Uhrzeigersinn, bis er fest sitzt (siehe Bild 2). Setzen Sie die Schnecke mit dem langen Ende zuerst in den Kopf ein und drehen Sie sie leicht, bis sie im Motorgehäuse sitzt (siehe Bild 3). - Seite 7 Setzen Sie die gewünschte Lochscheibe auf das Schneidemesser (siehe Bild 5). Halten Sie die Lochscheibe mit einer Hand fest, während sie mit der anderen Hand den Befestigungsring festschrauben (siehe Bild 6). Ziehen Sie den Befestigungsring nicht zu fest an. Befestigen Sie die Trichterplatte auf dem Kopf. Stellen Sie das Gerät auf eine feste Arbeitsplatte.
- Seite 8 Faschieren WARNUNG Verletzungsgefahr! Schieben Sie das Fleisch niemals von Hand in den Trichter. Verwenden Sie immer den Stopfer. Schneiden Sie alle Lebensmittel in Stücke. Wir empfehlen Ihnen sehnenloses, knochenloses und fettfreies Fleisch zu verwenden und es auf eine Größe von etwa 2x2x6 cm zu schneiden, damit es leicht in die Trichteröffnung passt.
- Seite 9 Entfernen Sie vor der Schrauben Sie Geben Sie die Befestigen der Kibbeh- Befestigungsring fest. Hackfleischmischung Aufsätze die Lochscheibe Ziehen Sie ihn aber nicht für die Rollen in den und das Schneidemesser. zu fest an. Trichter und stellen Sie Setzen Sie den Kibbeh- Hackfleischrollen her.
-
Seite 10: Demontage
DEMONTAGE • Vergewissern Sie sich, dass der Motor vollständig gestoppt ist. • Ziehen Sie den Stecker aus der Steckdose. • Demontieren Sie die Teile Sie, indem Sie die Schritte 1-6 in umgekehrter Reihenfolge (siehe unten) ausführen. Hinweis: Die Lochscheibe lässt sich leichter entfernen, wenn Sie einen Schraubenzieher zwischen Schneidemesser und Lochscheibe stecken und sie damit lösen. -
Seite 11: Hinweise Zur Entsorgung
HINWEISE ZUR ENTSORGUNG Befindet sich die linke Abbildung (durchgestrichene Mülltonne auf Rädern) auf dem Produkt, gilt die Europäische Richtlinie 2012/19/EU. Diese Produkte dürfen nicht mit dem normalen Hausmüll entsorgt werden. Informieren Sie sich über die örtlichen Regelungen zur getrennten Sammlung elektrischer und elektronischer Gerätschaften. -
Seite 13: Technical Data
CONTENT Safety Instructions 14 Before first Use 14 Product Overview 15 Assembly and Operation 16 Disassembly 20 Cleaning and Care 20 Hints on Disposal 21 Declaration of Conformity 21 TECHNICAL DATA Item number 10034215 Power supply 220-240 V ~ 50/60 Hz Power 1800 W Dimensions (WxDxH) 410x210x426 mm... -
Seite 14: Safety Instructions
SAFETY INSTRUCTIONS • This device may be only used by children 8 years old or older and persons with limited physical, sensory and mental capabilities and / or lack of experience and knowledge, provided that they have been instructed in use of the device by a responsible person who understands the associated risks. -
Seite 15: Product Overview
PRODUCT OVERVIEW Food pusher Perforated disc (fine) Hopper plate Cutting blades Case Perforated disc (medium) REVERSE button Fixing ring LOW button Perforated disc (coarse) HIGH button Sausage attachment STOP & RESET button Kibbeh attachments Fixing ring Funnel (fine) Head connection Funnel (medium) Head Funnel (coarse) -
Seite 16: Assembly And Operation
ASSEMBLY AND OPERATION Hold the head and insert it into the connection. When inserting, make sure that the head is slightly inclined (see Figure 1). When you have inserted the head, turn it clockwise until it is firmly seated (see Figure 2). First insert the snail with the long end into the head and turn it slightly until it is seated in the motor housing (see Fig. - Seite 17 Place the desired perforated disc on the cutting blade (see Fig. 5). Hold the perforated disc with one hand while tightening the fixing ring with the other hand (see picture 6). Do not tighten the fixing ring too tightly. Mount the hopper plate on the head. Place the unit on a solid worktop. The air outlet on the floor and on the side of the motor housing should be kept free and not blocked.
- Seite 18 Mincing meat WARNING Risk of injury! Never push the meat into the funnel by hand. Always use a food pusher. Cut all food into pieces. We recommend that you use tendonless, boneless and fat-free meat and cut it to a size of eta 2x2x6 cm so that it fi ts easily into the funnel opening. •...
- Seite 19 Before attaching the Place the Kibbeh Tighten the fastening ring. Kibbeh attachments, attachments together on Do not overtighten it. Put remove the perforated disc the snail shaft. the minced meat mixture and the cutting blade. for the rolls into the funnel and make minced meat rolls.
-
Seite 20: Disassembly
DISASSEMBLY • Make sure that the engine is completely stopped. • Disconnect the plug from the socket. • Disassemble the parts by performing steps 1-6 in reverse order (see below). Note: It is easier to remove the perforated disc by inserting a screwdriver between the cutting blade and the perforated disc to loosen it. -
Seite 21: Hints On Disposal
HINTS ON DISPOSAL According to the European waste regulation 2012/19/EU this symbol on the product or on its packaging indicates that this product may not be treated as household waste. Instead it should be taken to the appropriate collection point for the recycling of electrical and electronic equipment. -
Seite 23: Datos Técnicos
Antes del primer uso 24 Vista general del aparato 25 Montaje y funcionamiento 26 Desmontaje 30 Limpieza y cuidado 30 Retirada del aparato 31 Declaración de conformidad 31 DATOS TÉCNICOS Número de artículo 10034215 Alimentación 220-240 V ~ 50/60 Hz Potencia 1800 W Dimensiones (AnxPrxAl) 410x210x426 mm... -
Seite 24: Instrucciones De Seguridad
INSTRUCCIONES DE SEGURIDAD • Este aparato puede ser utilizado por niños mayores de 8 años y personas con discapacidades físicas, sensoriales y mentales y/o con falta de experiencia y conocimientos, siempre y cuando hayan sido instruidos sobre el uso del aparato y comprendan los peligros y riesgos asociados. -
Seite 25: Vista General Del Aparato
VISTA GENERAL DEL APARATO Empujador Disco perforado (fino) Placa de tolva Cuchillas del cortador Carcasa Disco perforado (medio) Botón REVERSE (Botón de Anillo de fijación reversión) Botón LOW Disco perforado (grueso) Botón HIGH Accesorio para salchichas Botón STOP & RESET Accesorio Kibbeh Anillo de fijación Tolva (fino) -
Seite 26: Montaje Y Funcionamiento
MONTAJE Y FUNCIONAMIENTO Sujete la cabeza e introdúzcala en el conector. Al insertar, asegúrese de que el cabezal esté ligeramente inclinado (véase la figura 1). Cuando haya insertado el cabezal, gírelo en el sentido de las agujas del reloj hasta que quede bien asentado (véase la figura 2). - Seite 27 Coloque el disco perforado deseado en la cuchilla de corte (véase la fig. 5). Sujete el disco perforado con una mano mientras aprieta el anillo de fijación con la otra mano (ver figura 6). No apriete demasiado el anillo de fijación. Monte la placa de la tolva en el cabezal.
- Seite 28 Fragmentación de carne ADVERTENCIA Peligro de lesiones! No introduzca nunca la carne a mano en la tolva. Siempre usa el empujador. Corte todos los alimentos en trozos. Recomendamos utilizar carne sin tendones, deshuesada y sin grasa y cortarla a un tamaño de unos 2x2x6 cm para que encaje fácilmente en la abertura de la tolva.
- Seite 29 Antes de colocar los Apriete el anillo de Ponga la mezcla de carne accesorios Kibbeh, retire fijación. No lo apriete picada para los rollos en el disco perforado y la demasiado fuerte. el embudo y haga rollos cuchilla. Coloque los de carne picada.
-
Seite 30: Desmontaje
DESMONTAJE • Asegúrese de que el motor esté completamente parado. • Desconecte el enchufe de la toma de corriente. • Desmonte las piezas siguiendo los pasos 1-6 en orden inverso (ver abajo). Nota: Es más fácil extraer el disco perforado insertando un destornillador entre la cuchilla de corte y el disco perforado para aflojarlo. -
Seite 31: Retirada Del Aparato
RETIRADA DEL APARATO Si el aparato lleva adherida la ilustración de la izquierda (el contenedor de basura tachado) entonces rige la normativa europea, directiva 2012/19/UE. Este producto no debe arrojarse a un contenedor de basura común. Infórmese sobre las leyes territoriales que regulan la recogida separada de aparatos eléctricos y electrónicos. -
Seite 33: Fiche Technique
Consignes de sécurité 34 Avant la première utilisation 34 Aperçu de l‘appareil 35 Assemblage et utilisation 36 Démontage 40 Nettoyage et entretien 40 Informations sur le recyclage 41 Déclaration de conformité 41 FICHE TECHNIQUE Numéro d'article 10034215 Alimentation 220-240 V ~ 50/60 Hz Puissance 1800 W Dimensions (LxPxH) 410x210x426 mm... -
Seite 34: Consignes De Sécurité
CONSIGNES DE SÉCURITÉ • Cet appareil peut être utilisé par des enfants de 8 ans ou plus et des personnes ayant des capacités physiques, sensorielles et mentales limitées et / ou dénuées d‘expérience et de connaissances, à condition d‘avoir été instruits au fonctionnement de l‘appareil par une personne responsable et d‘en comprendre les risques associés. -
Seite 35: Aperçu De L'appareil
APERÇU DE L‘APPAREIL Poussoir Disque perforé (fin) Plaque de l'entonnoir Couteau Corps de l'appareil Disque perforé (moyen) Touche REVERSE (marche arrière) Bague de fixation Touche LOW Disque perforé (gros) Touche HIGH Accessoire à saucisse Touche STOP & RESET Accessoires à Kibbeh Bague de fixation Entonnoir d'alimentation (fin) Raccordement de la tête... -
Seite 36: Assemblage Et Utilisation
ASSEMBLAGE ET UTILISATION Tenez la tête et insérez-la dans le raccordement. Lors de l‘insertion, assurez-vous que la tête est légèrement inclinée (voir figure 1). Lorsque vous avez inséré la tête, tournez-la dans le sens des aiguilles d’une montre jusqu’à ce qu’elle soit bien en place (voir figure 2). - Seite 37 Placez le disque perforé choisi sur la lame de coupe (voir Figure 5). Tenez le disque perforé d’une main tout en serrant la bague de fixation de l’autre main (voir figure 6). Ne serrez pas trop la bague de fixation. Fixez la plaque de l‘entonnoir sur la tête.
- Seite 38 Pour hacher MISE EN GARDE Risque de blessure ! ne poussez jamais la viande à la main dans l‘entonnoir. Utilisez toujours le poussoir. Couper tous les aliments en morceaux. Nous vous recommandons d’utiliser une viande sans tendon, sans os et sans graisse et de la couper au format 2 x 2 x 6 cm, afi n qu’elle se glisse facilement dans l’ouverture de l’entonnoir.
- Seite 39 Retirez le disque perforé et Serrez la bague de Mettez le mélange de le couteau avant de fixer fixation, mais pas trop. viande hachée pour les les accessoires à Kibbeh. rouleaux dans l'entonnoir Placez les accessoires et préparez les rouleaux Kibbeh ensemble sur de viande hachée.
-
Seite 40: Démontage
DÉMONTAGE • Assurez-vous que le moteur est complètement arrêté. • Débranchez la fiche de la prise. • Démontez les pièces en suivant les étapes 1 à 6 dans l‘ordre inverse (voir ci- dessous). Remarque : Le disque perforé s’enlève plus facilement si vous utilisez un Insérez le tournevis entre la lame de coupe et le disque perforé... -
Seite 41: Informations Sur Le Recyclage
INFORMATIONS SUR LE RECYCLAGE Vous trouverez sur le produit l’image ci-contre (une poubelle sur roues, barrée d‘une croix), ce qui indique que le produit se trouve soumis à la directive européenne 2012/19/UE. Renseignez- vous sur les dispositions en vigueur dans votre région concernant la collecte séparée des appareils électriques et électroniques. - Seite 43 INDICE Avvertenze di sicurezza 44 Prima di procedere all’utilizzo 44 Descrizione del dispositivo 45 Assemblaggio e utilizzo 46 Smontaggio 50 Pulizia e manutenzione 50 Smaltimento 51 Dichiarazione di conformità 51 DATI TECNICI Numero articolo 10034215 Alimentazione 220-240 V ~ 50/60 Hz Potenza 1800 W Dimensioni (LxPxA) 410x210x426 mm...
-
Seite 44: Avvertenze Di Sicurezza
AVVERTENZE DI SICUREZZA • Questo dispositivo può essere utilizzato da bambini a partire da 8 anni e da persone con limitate capacità fi siche e psichiche o con conoscenza ed esperienza limitate, solo se sono stati istruiti sulle modalità d’uso e comprendono i rischi e i pericoli connessi. -
Seite 45: Descrizione Del Dispositivo
DESCRIZIONE DEL DISPOSITIVO Pestello Disco forato (fine) Pannello con imbuto Lama Alloggiamento Disco forato (medio) Tasto REVERSE (invertire) Anello di fissaggio Tasto LOW Disco forato (grossolano) Tasto HIGH Attacco per salsicce Tasto STOP & RESET Attacchi Kibbeh Anello di fissaggio Imbuto di riempimento (fine) Attacco testa Imbuto di riempimento (medio) - Seite 46 ASSEMBLAGGIO E UTILIZZO Tenere la testa e inserirla nell’attacco. Quando la si inserisce, assicurarsi che la testa sia leggermente inclinata (v. immagine 1). Una volta inserita la testa, ruotarla in senso orario fino a fissarla (v. immagine 2). Inserire l’elica nella testa, iniziando dal lato lungo e ruotarla leggermente, fino a quando è...
- Seite 47 Posizionare il disco forato desiderato sulla lama (v. immagine 5). Tenere il disco saldamente con una mano, mentre con l’altra si avvita l’anello di fissaggio (v. immagine 6). Non stringere eccessivamente l’anello. Fissare il pannello con imbuto sulla testa. Posizionare il dispositivo su un piano di lavoro stabile.
- Seite 48 Tritare AVVERTENZA • Pericolo di lesione! Non spingere mai la carne nell’imbuto con le mani. Utilizzare sempre un pestello. Tagliare tutti gli alimenti a pezzetti. Consigliamo di utilizzare carne priva di nervi, ossa e grasso, e di tagliarla in pezzi di circa 2x2x6 cm, in modo che entri facilmente nell’apertura dell’imbuto.
- Seite 49 Prima di fissare l’attacco Avvitare saldamente Mettere la miscela di per Kibbeh, rimuovere il l’anello di fissaggio, ma carne trita per le polpette disco forato e la lama. senza esagerare. nell’imbuto e procedere a Posizionare gli attacchi formare le polpette. per Kibbeh sull’albero dell’elica.
-
Seite 50: Pulizia E Manutenzione
SMONTAGGIO • Assicurarsi che il motore sia completamente fermo. • Staccare la spina dalla presa elettrica. • Smontare i componenti seguendo al contrario i passaggi da 1 a 6 (v. sotto). Nota: il disco forato può essere rimosso più facilmente se si inserisce un cacciavite tra lama e disco e lo si stacca. -
Seite 51: Smaltimento
SMALTIMENTO Se sul prodotto è presente la figura a sinistra (il cassonetto mobile sbarrato), si applica la direttiva europea 2012/19/UE. Questi prodotti non possono essere smaltiti con i rifiuti normali. Informarsi sulle disposizioni vigenti sulla raccolta separata di dispositivi elettrici ed elettronici. Non smaltire i vecchi dispositivi con i rifiuti domestici.