TARGUS WIRELESS STOW-N-GO KEYPAD Introduction Congratulations on your purchase of a Targus Wireless Stow-N-Go Keypad. The keypad is designed with a built-in cavity to store the USB receiver, eliminating the potential misplacement of the receiver and to provide ease of traveling with the keypad.
Targus Wireless Stow-N-Go Keypad Operating System • Windows 2000/XP ® • Windows Vista™ Installing the Batteries Battery Cover Receiver Keypad - back view 1 Remove the battery cover from the back of the keypad. 2 Insert the supplied batteries, making sure that the positive (+) and negative (-) ends of each battery match the polarity indicators inside the battery housing.
Seite 7
Targus Wireless Stow-N-Go Keypad 3 Slide the battery cover back into position until it “clicks” fi rmly into place. Connecting the Receiver and Installing the Default Drivers To connect the receiver: 1 Remove the receiver from the back of the keypad.
Seite 8
Targus Wireless Stow-N-Go Keypad Turning the Keypad On and Off • To power on the battery, use the on/off switch located on the back of the keypad. • To power off the battery, use the on/off switch located on the back of the keypad. This feature should be used when traveling to prevent power loss.
Seite 9
Targus Wireless Stow-N-Go Keypad Connection Button On/Off Switch The LED on the receiver will fl ash for 60 seconds to indicate ID search mode. 2 During this time, press and release the connection button on the back of the calculator/keypad.
Seite 10
Targus Wireless Stow-N-Go Keypad Using the Keypad Defi nition of the Keypad Keys: NumLock on - inserts a decimal point NumLock off - deletes a number NumLock on - enters “0” on the display NumLock off - emulates the Insert key NumLock on - enters “00”...
Seite 11
Targus Wireless Stow-N-Go Keypad NumLock on - enters “7” on the display Home NumLock off - emulates the Home key NumLock on - enters “8” on the display NumLock off - moves the cursor up one line of text NumLock on - enters “9” on the display...
Targus Wireless Stow-N-Go Keypad Operating Hints For optimal performance and RF reception: • Place the receiver at least 20cm away from all electrical devices, such as your monitor, speakers or external storage devices. Power Management • To extend the life of your batteries, power off the battery with the on/off switch located on the back of the keypad while traveling or when you’re not using it.
Targus Wireless Stow-N-Go Keypad Troubleshooting What do I do if the keypad does not work? • Make sure that the polarity of the batteries is correct. The positive (+) and negative (-) ends of each battery must match the positive (+) and negative (-) connections in the battery housing.
Seite 14
Targus Wireless Stow-N-Go Keypad • Increase the distance between the receiver and the base units of other wireless devices. • Turn off any wireless devices and their base units that are near the keypad’s receiver. • If you are using the keypad on a metal surface, move it and the receiver to a non-metal surface.
Seite 27
STOW-N-GO ™ Úvod Gratulujeme Vám k zakoupení bezdrátové klávesnice Targus STOW-N-GO ™. Z konstruk ního hlediska je klávesnice ešena tak, že má vestav nou dutinu, do které se (kv li riziku jeho špatného umíst ní) vkládá USB p ijíma , takže s ní m žete i pohodln cestovat.
Seite 28
Targus Wireless Stow-N-Go Keypad Opera ní systém • Windows 2000/XP ® • Windows Vista™ Vkládání baterií Kryt baterie P ijíma Bloková klávesnice - pohled zezadu 1 Vyndejte kryt baterie ze zadní ásti klávesnice. 2 Vložte p iložené baterie; dbejte p itom na to, aby kladné...
Seite 29
Targus Wireless Stow-N-Go Keypad 3 Zasu te kryt baterie zp t na místo, dokud nezaslechnete z etelné “cvaknutí”. P ipojování p ijíma e a instalace standardních ovlada P ipojení p ijíma e: 1 Odstra te p ijíma ze zadní ásti blokové klávesnice.
Seite 30
Targus Wireless Stow-N-Go Keypad Zapínání a vypínání blokové klávesnice • Bateriové napájení m žete zapnout pomocí vypína e na zadní stran blokové klávesnice. • Bateriové napájení m žete vypnout pomocí vypína e na zadní stran klávesnice. Tuto funkci byste m li využívat p i cestování, abyste zabránili výpadk m napájení.
Seite 31
Targus Wireless Stow-N-Go Keypad Spojovací tla ítko Vypína LED dioda p ijíma e se na dobu 60 vte in rozbliká, což znamená, že nyní b ží v režimu identifi ka ního vyhledávání. 2 B hem této doby stiskn te a uvoln te spojovací tla ítko na zadní...
Seite 32
Targus Wireless Stow-N-Go Keypad Práce s blokovou klávesnicí Defi nice kláves blokové klávesnice: NumLock zapnuto - vloží desetinnou árku NumLock vypnuto - vymaže íslo NumLock zapnuto - vloží “0” na display NumLock vypnuto - vyrovná se klávese Insert NumLock zapnuto - vloží “00”...
Seite 33
Targus Wireless Stow-N-Go Keypad NumLock zapnuto - vloží “7” na display NumLock vypnuto - vyrovná se klávese Home Home NumLock zapnuto - vloží “8” na display NumLock vypnuto - p esune kurzor o jednu stránku výše v textu NumLock zapnuto - vloží “9” na display NumLock vypnuto - vyrovná...
Seite 34
Targus Wireless Stow-N-Go Keypad Pokyny k ovládání za ízení Pro optimální výkon a p íjem RF: • Umíst te p ijíma ve vzdálenosti nejmén 20 cm od všech dalších elektrických za ízení, nap . od monitoru, reproduktor , externích pam ových za ízení apod.
Seite 35
Targus Wireless Stow-N-Go Keypad Odstra ování poruch Co mám d lat, když zjistím, že klávesnice nefunguje? • Ov te správnou polaritu baterií. Umíst ní všech baterií podle jejich kladných (+) a záporných (-) pól se musí shodovat se zna ením pro p ipojení kladných (+) a záporných (-) pól v otvoru pro baterie.
Seite 36
Targus Wireless Stow-N-Go Keypad • Zv tšete vzdálenost mezi p ijíma em a základnami ostatních bezdrátových za ízení. • Vypn te všechna bezdrátová za ízení jejich základny(p ijíma e), které se nacházejí v blízkosti p ijíma e blokové klávesnice. • Pokud se vaše klávesnice b hem své innosti nachází...
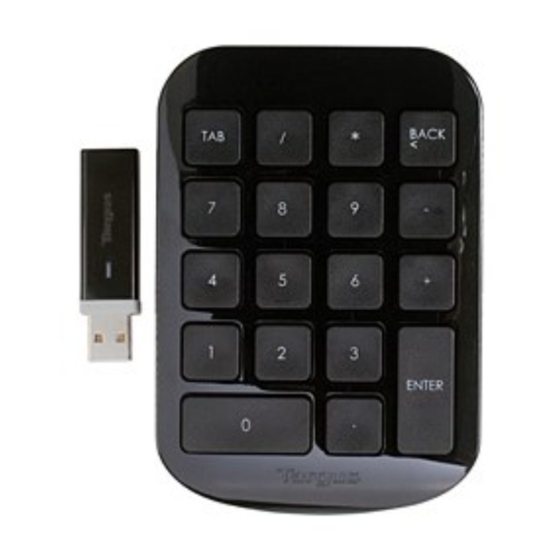
KABELLOSER STOW-N-GO ZIFFERNBLOCK VON TARGUS Einleitung Herzlichen Glückwunsch zum Kauf des kabellosen Stow- N-Go Ziffernblocks von Targus. Der Ziffernblock besitzt eine eingebaute Aufbewahrung für den USB-Empfänger, wodurch ein potenzielles Verlegen des Empfängers vermieden und das Reisen mit dem Ziffernblock erleichtert wird.
Targus Wireless Stow-N-Go Keypad Betriebssystem • Windows 2000/XP ® • Windows Vista™ Batterien einlegen Deckel vom Batteriefach Empfänger Ziffernblock - Ansicht von hinten 1 Den Deckel vom Batteriefach an der Rückseite des Ziffernblocks abnehmen. 2 Die mitgelieferten Batterien einlegen. Der Plus (+) und Minus (-) Pol der Batterien muss mit den Polaritätssymbolen...
Seite 40
Targus Wireless Stow-N-Go Keypad 3 Den Deckel zum Batteriefach zuschieben, bis es “klickt”. Anschluss des Empfängers und Installation des Standardtreibers Den Empfänger anschließen: 1 Den Deckel vom Batteriefach an der Rückseite des Ziffernblocks abnehmen. 2 Den USB-Empfänger an eine freie USB-Buchse am Computer anschließen.
Seite 41
Targus Wireless Stow-N-Go Keypad An- und Ausschalten des Ziffernblocks • Um den Batteriebetrieb einzuschalten, muss der an der Rückseite des Ziffernblocks sitzende An/Aus-Schalter benutzt werden. • Um den Batteriebetrieb auszuschalten, muss der an der Rückseite des Ziffernblocks sitzende An/Aus-Schalter benutzt werden.
Seite 42
Targus Wireless Stow-N-Go Keypad An/Aus-Schalter Anschlussknopf Die LED-Leuchte am Empfänger wird 60 Sekunden blinken, um den ID-Suchmodus anzuzeigen. 2 In dieser Zeit muss der Anschlussknopf an der Rückseite des Ziffernblocks kurz gedrückt werden. Wenn die Kommunikationsverbindung hergestellt ist, wird die LED-Leuchte am Empfänger aufhören zu blinken.
Seite 43
Targus Wireless Stow-N-Go Keypad Bedienung des Ziffernblocks Tastendefi nitionen: NumLock an - Dezimalpunkt wird eingefügt NumLock aus - eine Zahl wird gelöscht NumLock an - “0” erscheint auf der Anzeige NumLock aus - emuliert die Ins-Taste (Einfügen) NumLock an – Eingabe “00”...
Seite 44
Targus Wireless Stow-N-Go Keypad NumLock an - “7” erscheint auf der Anzeige NumLock aus - emuliert die Pos1-Taste Home NumLock an - “8” erscheint auf der Anzeige NumLock aus - der Kursor wird eine Textzeile nach oben bewegt NumLock an - “9” erscheint auf der Anzeige...
Targus Wireless Stow-N-Go Keypad Bedienungshinweise Zur bestmöglichen Leistung und zum besten RF- Empfang: • Empfänger mindestens 20cm allen Elektrogeräten, wie Monitor, Lautsprechern oder externen Speichergeräten aufstellen. Energie sparen • Zur Verlängerung der Lebensdauer der Batterie kann die Batterie mittels des an der Rückseite des Ziffernblocks befi...
Targus Wireless Stow-N-Go Keypad Fehlerbehebung tun, wenn Ziffernblock nicht funktioniert? • Die Polarität der Batterien überprüfen. Der positive (+) und negative (-) Pol der Batterie muss mit dem positiven (+) und negativen (-) Anschluss im Batteriefach übereinstimmen. • Der USB-Stecker des Empfängers muss fest an die USB-Buchse des Computers angeschlossen sein.
Seite 47
Targus Wireless Stow-N-Go Keypad • Kabellose Geräte und ihre Grundgeräte/Sockel ausschalten, die sich in der Nähe des Tastenfeldempfängers befi nden. • Wird der Ziffernblock auf einer Metallfl äche verwendet, sollten er und der Empfänger auf eine nicht metallische Fläche gestellt werden.
Targus Wireless Stow-N-Go Keypad Spezifi kationen Betriebsfrequenz 2.4 GHz Betriebsdistanz Bis zu 10 Meter Betriebsspannung Ziffernblock: 2,4 V Empfänger: Betriebsstromstärke Ziffernblock: 10 mA maximal Empfänger: 16 mA maximal Pausieren-Modus Ziffernblock: Unter 300 uA Abmessungen Ziffernblock: 155 x 92 x 26 mm Empfänger:...
Seite 49
STOW-N-GO™ NUMERISK TASTATUR Introduktion Tillykke med købet af Targus Trådløst Stow-N-Go Numerisk Tastatur. USB-modtageren kan klikkes fast på selve tastaturet, når det ikke er i brug, så modtageren ikke bliver væk og tastaturet et nemt at have med i tasken.
Seite 50
Targus Wireless Stow-N-Go Keypad Operativsystem • Windows 2000/XP ® • Windows Vista™ Installering af Batterier Låge til batterirum Modtager Tastatur - set bagfra 1 Fjern lågen til batterirummet fra bagsiden af tastaturet. 2 Isæt de leverede batterier og sørg for at de positive (+) og negative (-) poler på...
Seite 51
Targus Wireless Stow-N-Go Keypad 3 Lågen til batterirummet glider på plads, indtil det “klikker” på plads. Forbindelse af Modtager forbindes og Installering af Drivere Sådan forbindes modtageren: 1 Tag modtageren ud fra bagsiden af tastaturet. 2 Sæt USB modtageren i en ledig USB port på din computer.
Seite 52
Targus Wireless Stow-N-Go Keypad Tænd og sluk for Tastaturet • Batteriet tændes ved at bruge tænd/sluk knappen bagpå tastaturet. • Batteriet slukkes ved at bruge tænd/sluk knappen bagpå tastaturet. Denne funktion bruges under rejse for at undgå strømtab. • Tastaturet tændes ved at trykke på NumLock tasten, som sidder lige over knap nummer syv.
Seite 53
Targus Wireless Stow-N-Go Keypad Forbindelsesknap Tænd/sluk knap LED på modtageren blinker i 60 sekunder for at indikere ID søgefunktion. 2 I denne periode trykkes og slippes forbindelsesknappen bagpå lommeregneren/tastaturet. Når en kommunikationsforbindelse er etableret, stopper LED på modtageren med at blinke.
Seite 54
Targus Wireless Stow-N-Go Keypad Bruge tastaturet Defi nition af Tastaturets Taster: NumLock tændt - indsætter en decimal NumLock slukket - fjerner et tal NumLock tændt - viser “0” i displayet NumLock slukket - emulerer Insert tasten NumLock tændt - viser “00”...
Seite 55
Targus Wireless Stow-N-Go Keypad NumLock tændt - viser “7” i displayet Home NumLock slukket - emulerer Home tasten NumLock tændt - viser “8” i displayet NumLock slukket - fl ytter cursoren op til forrige tekstlinie NumLock tændt - viser “9” i displayet...
Seite 56
Targus Wireless Stow-N-Go Keypad Betjeningshints For optimal præstation og RF modtagelse: • Placér modtageren mindst 20cm væk fra alle elektriske apparater, så som din skærm, dine højttalere eller eksterne lagringsapparater. Strømstyrelse • Dine batteriers liv forlænges ved at slukke for batteriet med tænd/sluk knappen bagpå...
Seite 57
Targus Wireless Stow-N-Go Keypad Problemløsning Hvad gør jeg, hvis tastaturet ikke virker? • Sørg for at polerne på batterierne sidder rigtigt. De positive (+) og negative (-) ender på batteriet skal matche de positive (+) og negative (-) forbindelser i batterirummet.
Seite 58
Targus Wireless Stow-N-Go Keypad • Øg distancen mellem modtageren og andre apparaters baseenheder. • Sluk andre trådlødse apparater og deres baseenheder, som står tæt på tastaturets modtager. • Hvis du bruger tastaturet på en metaloverfl ade, fl yttes det og modtageren til en overfl ade, som ikke er lavet af metal.
Seite 60
TARGUS TRAADITA STOW-N-GO KLAVIATUUR Sissejuhatus Õnnitleme teid Targus traadita Stow-N-Go klaviatuuri ostmise puhul. See klaviatuur on kujundatud sisseehitatud avaga USB vastuvõtjale, välistades vastuvõtja võimaliku kaduma minemise ning tagades mugavuse klaviatuuriga koos liikumisel. Sisu Lisaks sellele kasutusjuhendile sisaldab pakend: • traadita klaviatuuri •...
Seite 61
Targus Wireless Stow-N-Go Keypad Operatsioonisüsteem • Windows 2000/XP ® • Windows Vista™ Patareide paigaldamine Patareikate Vastuvõtja Klaviatuur - vaade tagant 1 Eemaldage klaviatuuri tagaküljelt patareikate. 2 Sisestage kaasasolevad patareid, veendudes, et iga patarei positiivne (+) ja negatiivne (-) ots vastab polaarsusmärgetele patareikambri sees.
Seite 62
Targus Wireless Stow-N-Go Keypad 3 Libistage patareikate tagasi oma kohale kuni see “klõpsatab” kindlalt kinni. Vastuvõtja ühendamine ja vaikedraiverite installimine Vastuvõtja ühendamiseks: 1 Eemaldage vastuvõtja klaviatuuri tagant. 2 Sisestage USB vastuvõtja oma arvuti vabasse USB porti. Windows® 2000/XP/Vista puhul ilmub “Found New Hardware”...
Seite 63
Targus Wireless Stow-N-Go Keypad Klaviatuuri sisse- ja väljalülitamine • Patareitoite sisse lülitamiseks kasutage klaviatuuri tagaküljel asuvat on/off lülitit. • Patareitoite välja lülitamiseks kasutage klaviatuuri tagaküljel asuvat on/off lülitit. Seda valikut tuleks kasutada reisimisel, et vältida toite kulumist. • Klaviatuuri sisselülitamiseks vajutage NumLock klahvi, mis asub otse number seitsme klahvi all.
Seite 64
Targus Wireless Stow-N-Go Keypad Ühendusnupp On/Off lüliti Vastuvõtja LED-tuli vilgub 60 sekundit märkimaks ID otsingurežiimi. 2 Selle aja jooksul peate vajutama ja vabastama kalkulaatori/klaviatuuri tagaküljel asuvat ühendusnuppu. Ühenduse loomise järel lõpetab vastuvõtja LED-tuli vilkumise. Te olete nüüd valmis klaviatuuri kasutamiseks.
Seite 65
Targus Wireless Stow-N-Go Keypad Klaviatuuri kasutamine Klaviatuuri klahvide selgitus: NumLock sees - sisestab komakoha NumLock väljas - kustutab numbri NumLock sees - sisestab displeile arvu “0” NumLock väljas - asendab Insert klahvi NumLock sees - sisestab “00” NumLock väljas - sisestab koma ( , ) NumLock sees - sisestab displeile arvu “1”...
Seite 66
Targus Wireless Stow-N-Go Keypad NumLock sees - sisestab displeile arvu “7” Home NumLock väljas - asendab Home klahvi NumLock sees - sisestab displeile arvu “8” NumLock väljas - liigutab kursorit ühe tekstirea võrra üles NumLock sees - sisestab displeile arvu “9”...
Seite 67
Targus Wireless Stow-N-Go Keypad Nõuanded kasutamiseks Optimaalseks tööks ja signaali vastuvõtuks: • Asetage vastuvõtja vähemalt 20cm kaugusel kõigist elektrilistest seadmetest nagu monitorid, kõlarid või välised salvestusseadmed. Toitehaldus • Patareide eluea pikendamiseks tuleb klaviatuuri patareitoide tagaküljel asuva on/off lülitiga reisimise või mittekasutamise ajaks välja.
Seite 68
Targus Wireless Stow-N-Go Keypad Veaotsing Mida teha, kui klaviatuur ei tööta? • Veenduge, et patareide polaarsus on õige. Iga patarei positiivne (+) ja negatiivne (-) ots peab vastama patareikambri positiivsele negatiivsele ühendusele. • Kontrollige, et vastuvõtja USB pistik on kindlalt teie arvuti USB pordiga ühendatud.
Seite 69
Targus Wireless Stow-N-Go Keypad • Suurendage vastuvõja ja traadita seadmete põhiosade vahelist kaugust. • Lülitage välja kõik vastuvõtja läheduses asuvad traadita seadmed ja nende põhiosad. • Kui te kasutate klaviatuuri metallpinnal, siis tõstke nii klaviatuur, kui vastuvõtja mittemetallist pinnale. Metallid nagu raud, alumiinium või vask blokeerivad raadiosageduslikud ülekanded ning võivad aeglustada...
STOW-N-GO KEYPAD Introducción Felicidades por su compra de la teclado inalámbrica Targus. El teclado está diseñado con una abertura para guardar el receptor USB, lo que elimina la posibilidad de extraviarlo y permite transportar el teclado con facilidad. Contenido Además de esta guía para el usuario, este paquete incluye: •...
Seite 72
Targus Wireless Stow-N-Go Keypad Sistema operativo • Windows 2000/XP ® • Windows Vista™ Cómo instalar las pilas Cubierta de las pilas Receptor teclado - vista posterior 1 Retire la cubierta de las pilas de la parte posterior del teclado. 2 Instale las pilas suministradas, verifi cando que los polos positivo (+) y negativo (-) de cada pila coincidan con los indicadores de polaridad ubicados dentro del receptáculo...
Seite 73
Targus Wireless Stow-N-Go Keypad 3 Deslice la cubierta de las pilas hasta que se trabe en su sitio. Cómo conectar el receptor e instalar los drivers predeterminados Para conectar el receptor: 1 Retire el receptor de la parte posterior del teclado.
Seite 74
Targus Wireless Stow-N-Go Keypad Cómo encender y apagar la teclado. • Para encender las pilas, use el interruptor de encendido/ apagado ubicado en la parte posterior del teclado. • Para apagar las pilas, use el interruptor de encendido/ apagado ubicado en la parte posterior del teclado.
Seite 75
Targus Wireless Stow-N-Go Keypad Botón de conexión Interruptor de encendido/ apagado El diodo electroluminiscente (LED, por sus siglas en inglés) del receptor brillará en forma intermitente durante 60 segundos para indicar el modo de búsqueda de la identifi cación. 2 Durante ese lapso, oprima y suelte el botón de conexión ubicado en la parte posterior de la calculadora/teclado.
Seite 76
Targus Wireless Stow-N-Go Keypad Cómo usar la teclado Defi nición de las teclas del teclado: Con NumLock activado - inserta un puntodecimal Con NumLock desactivado – borra un número Con NumLock activado -inserta un “0” en la pantalla Con NumLock desactivado - emula la tecla Insertar Con NumLock activado –...
Seite 77
Targus Wireless Stow-N-Go Keypad Con NumLock activado - inserta un “7” en la pantalla Home Con NumLock desactivado - emula la tecla Inicio Con NumLock activado - inserta un “8” en la pantalla Con NumLock desactivado - mueve el cursor a la línea de texto superior...
Targus Wireless Stow-N-Go Keypad Consejos de operación Para un funcionamiento y recepción de RF óptimos: • Coloque el receptor a al menos 20cm de distancia de todos los dispositivos eléctricos, tal como su monitor, o los dispositivos externos de almacenamiento.
Targus Wireless Stow-N-Go Keypad Resolución de problemas ¿Qué hago si el tecladokeypad no funciona? • Verifi que que los polos de las pilas estén orientados correctamente. Los polos positivo (+) y negativo (-) de cada pila deben coincidir con los indicadores de polaridad ubicados dentro del receptáculo de las pilas.
Seite 80
Targus Wireless Stow-N-Go Keypad • Aumente la distancia entre el receptor y las unidades de base de los demás dispositivos inalámbricos. • Apague todos los dispositivos inalámbricos y sus unidades de base, que se encuentren cerca del receptor del teclado.
Targus Wireless Stow-N-Go Keypad Especifi caciones Frecuencia 2.4 GHz Distancia efectiva Hasta 10m de distancia Voltaje Teclado: 2.4V Receptor: Corriente Teclado: 10 mA máximo Receptor: 16 mA máximo Modo inactivo Teclado: Menos de 300 uA Dimensiones Teclado: 155 x 92 x 26 mm...
Seite 82
TARGUS LANGATON STOW-N-GO NÄPPÄIMISTÖ Esittely Onneksi olkoon. Olet Targus langattoman Stow-N-Go näppäimistön uusi omistaja! Näppäimistö sisältää USB- vastaanottimelle tarkoitetun säilytyslokeron, ja näin vastaanotin pysyy helposti tallessa ja matkustaminen näppäimen kanssa helpottuu. Sisältö Tämän käyttöohjeen lisäksi pakkaus sisältää: •Langattoman näppäimistön •USB-vastaanottimen •Yhden (1) AA-pariston...
Targus Wireless Stow-N-Go Keypad Käyttöjärjestelmä • Windows 2000/XP ® • Windows Vista™ Paristojen asennus Paristosuoja Vastaanotin Näppäimistö - takapuoli 1 Poista näppäimistön takapuolella sijaitseva paristosuojan kansi. 2 Asenna pakkaukseen kuuluvat paristot varmistaen, että pariston + ja - navat vastaavat paristosuojan merkintöjä.
Seite 84
Targus Wireless Stow-N-Go Keypad 3 Liuta paristosuojan kansi paikalleen, kunnes kuulet naksahduksen. Vastaanottimen yhdistäminen ja ajureiden asennus Vastaanottimeen yhdistäminen 1 Irrota vastaanotin näppäimistön takana sijaitsevasta suojasta. 2 Yhdistä USB-vastaanotin tietokoneesi vapaaseen USB- porttiin. Windows® 2000/XP/Vista -käyttöjärjestelmien käyttäjät: “Found New Hardware” tai “Auto-detect of a HID device”- viesti ilmestyy näytölle ajurin latauksen merkiksi.
Seite 85
Targus Wireless Stow-N-Go Keypad Näppäimistön käynnistys ja sammutus •Pariston käynnistämiseksi sinun tulee käyttää näppäimistön takaosassa sijaitsevaa käynnistys/sammutuskytkintä. • Pariston sammuttamiseksi sinun tulee käyttää näppäimistön takaosassa sijaitsevaa käynnistys/ sammutuskytkintä. Tätä toimintoa tulisi käyttää matkustettaessa pariston virran säästämiseksi. • Näppäimistön käynnistämiseksi paina suoraan numero seitsemän yläpuolella sijaitsevaa NumLock-painiketta.
Seite 86
Targus Wireless Stow-N-Go Keypad Yhteyspainike Käynnistys/ sammutuspainike Vastaanottimen LED-merkkivalo vilkkuu 60 sekunnin ajan merkkinä ID-etsintätilasta. 2 Valon vilkkuessa paina ja pohjaan ja vapauta laskimen/ näppäimistön takaosassa sijaitseva yhteyspainike. Kun yhteys on luotu, vastaanottimen LED-merkkivalo lopettaa vilkunnan. Laite on nyt käyttövalmis.
Seite 87
Targus Wireless Stow-N-Go Keypad Näppäimistön käyttö Näppäimistön painikkeet: NumLock päällä - lisää desimaalipilkun NumLock pois päältä - poistaa numeron NumLock päällä - lisää “0”:n näytölle NumLock off - käyttäytyy insert-painikkeena NumLock päällä - lisää “00”:n NumLock pois päältä - lisää pilkun ( , ) NumLock päällä...
Seite 88
Targus Wireless Stow-N-Go Keypad NumLock päällä - lisää “7”:n näytölle NumLock pois päältä - käyttäytyy Home- Home näppäimenä NumLock päällä - lisää “8”:n näytölle NumLock pois päältä - siirtää kursorin yhden ylöspäin tekstistä NumLock päällä - lisää “9”:n näytölle NumLock pois päältä - käyttäytyy Page Up- PgUp näppäimenä...
Seite 89
Targus Wireless Stow-N-Go Keypad Vinkkejä käyttäjälle Parhaan mahdollisen käytettävyyden ja radiotaajuuden aikaansaamiseksi • Aseta vastaanotin vähintään 20 cm:n etäisyydelle muista sähkölaitteista, kuten näytöistä, kaiuttimista tai ulkoisista sälityslaitteista. Virransäätö • Maksimoidaksesi pariston käyttöikä, käytä näppäimistön takaosassa sijaitsevaa virtakatkaisinta käynnistääksesi ja sammuttaaksesi laite silloin, kun se ei ole käytössä.
Seite 90
Targus Wireless Stow-N-Go Keypad Ongelmatilanteissa Mitä teen, jos näppäimistö ei toimi? • Tarkasta, että pariston navat vastaavat paristosuojan merkintöjä. Pariston + ja - napojen tulee vastata paristosuojan + ja - napoja. •Tarkasta, että vastaanottimen USB-johto on tukevasti kiinnitetty tietokoneesi USB-porttiin.
Seite 91
Targus Wireless Stow-N-Go Keypad • vastaanotin mahdollisimman kauas muista langattomista laitteista. • Sammuta kaikki näppäimistön vastaanottimen läheisyydessä sijaitsevat langattomat laitteet ja niiden emoyksiköt. •Jos käytät näppäimistöä metallipinnan päällä, niin siirrä se ja vastaanotin ei-metalliselle pinnalle. Metallit, kuten rauta, alumiini tai kupari estävät radiotajuuden välityksen ja saattavat hidastaa näppäimistön toimintanopeutta tai...
Seite 93
STOW-N-GO À TARGUS Introduction Félicidades pour votre achat d’un clavier sans fi l à Targus. Le clavier comprend un compartiment de rangement intégré pour y placer le récepteur USB, ce qui élimine le risque d’égarer celui-ci et facilite le transport du clavier.
Targus Wireless Stow-N-Go Keypad Système d’exploitation • Windows 2000/XP ® • Windows Vista™ Installation des piles Couvercle des piles Récepteur Clavier - vue arrière 1 Retirez le couvercle du compartiment des piles, à l’arrière du clavier. 2 Insérez les piles fournies, en veillant à orienter les bornes positives (+) et négatives (-) des piles selon les indications...
Seite 95
Targus Wireless Stow-N-Go Keypad 3 Glissez le couvercle du compartiment des piles en place jusqu’à ce qu’il se ferme en cliquant. Connexion du récepteur et installation des pilotes par défaut Pour connecter le récepteur : 1 Sortez le récepteur du clavier par l’arrière.
Seite 96
Targus Wireless Stow-N-Go Keypad Pour allumer et éteindre le clavier • Pour mettre les piles en circuit, utilisez l’interrupteur de marche- arrêt situé à l’arrière du clavier. • Pour mettre les piles hors circuit, utilisez l’interrupteur de marche-arrêt situé à l’arrière du clavier.
Seite 97
Targus Wireless Stow-N-Go Keypad Touche de connexion Interrupteur marche-arrêt La DEL du récepteur clignotera 60 secondes pour indiquer la mise en mode de recherche ID. 2 Pendant ce temps, enfoncez momentanément la touche de connexion à l’arrière du clavier à calculatrice incorporée.
Targus Wireless Stow-N-Go Keypad Utilisation du clavier Défi nition des touches du clavier NumLock allumé - insertion du signe décimal NumLock éteint - supprime un chiffre NumLock allumé - insère un « 0 » sur l’affi cheur NumLock éteint - émule la touche Insertion NumLock allumé...
Seite 99
Targus Wireless Stow-N-Go Keypad NumLock allumé - insère « 7 » sur l’affi cheur NumLock éteint - émule la touche Début Home NumLock allumé - insère « 8 » sur l’affi cheur NumLock éteint - déplace le curseur sur la ligne supérieure...
Targus Wireless Stow-N-Go Keypad Conseils pratiques Performances et réception RF optimales : • Éloignez le récepteur d’au moins 20 centimètres de tout dispositif électrique (exemples : moniteur, hautparleurs et mémoires externes). Rappels • Pour prolonger l’autonomie des piles, mettez les piles hors circuit au moyen de l’interrupteur de marche-arrêt situé...
Targus Wireless Stow-N-Go Keypad Dépannage Que dois-je faire si le keypad ne fonctionne pas? • Vérifi ez que les piles sont installées avec la bonne polarité. Les bornes positives (+) et négatives (-) des piles doivent correspondre aux connexions positives (+) et négatives (-) du compartiment des piles.
Seite 102
Targus Wireless Stow-N-Go Keypad • Éloignez le récepteur des modules de base des autres dispositifs sans fi l. • Éteignez tout dispositif sans fi l, ainsi que son module de base, se trouvant à proximité du récepteur du clavier. • Si vous utilisez le keypad sur une surface métallique, déplacez-le, ainsi que le récepteur;...
Seite 115
TARGUS BEŽI NA STOW-N-GO TIPKOVNICA Uvod estitamo na kupovini Targus beži ne Stow-N-Go tipkovnice. Tipkovnica je oblikovana sa ugra enom šušljinom za spremnaje USB prijamnika, uklanjaju i potencijalno pogrešno stavkljanje prijamnika omogu uju i lako u krtanja s tipkovnicom. Sadržaj Uz ove korisni ke upute, ovaj paket sadrži:...
Seite 116
Targus Wireless Stow-N-Go Keypad Operativni Sustav • Windows 2000/XP ® • Windows Vista™ Instalacija Baterija Poklopac Baterija Prijamnik Tipkovnica-stražnji pogled 1 Uklonite poklopac za baterije na stražnjem dijelu tipkovnice 2 Umetnite isporu ene baterije, paze i da pozitivni (+) i negativni (-) pol na kraju svake baterije odgovaraju indikatorima unutar spremnika UPOZORENJE: TIJEKOM ZAMJENE BATERIJA MOŽETE RABITI...
Seite 117
Targus Wireless Stow-N-Go Keypad 3 Vratite poklopac baterija na mjesto dok ne škljocne na jestu. Spajanje prijamknika i instalqacija tvorni kih pogona Da biste spojili prijamnik: 1 Uklonite prijamnik sa stražnjeg dijela tipkovnice 2 Uklju ite USB prijamnik na slobodan USB ulaz na vašem ra unalu Windows®...
Seite 118
Targus Wireless Stow-N-Go Keypad Uklju ivanje/isklju ivanje tipkovnice • kako biste porkenuli baterije uporabite U/IZ sklopku smještenu na stražnjem dijelu tipkovnice. • kako biste isklju ili baterije uporabite U/IZ sklopku na stražnjem dijelu tipkovnice. Ovu biste zna ajku trebali rabiti tijekom putovanja radi uštede energije .
Seite 119
Targus Wireless Stow-N-Go Keypad Konekcijsko Puce U/IZ sklopka LED na prijamniku blješti 60 sekunda kako bi nazna io ID potraga mod 2 Tijekom ovog vbremena, pritisnite i otpustite konekcijsko puce na stražnjem dijelu kalkulatora/tipkovnice Kada je komunikacijska veza uspostavljena, LED na prijamniku prestaje bljeskati Sada možete rabiti tipkovnicu.
Seite 120
Targus Wireless Stow-N-Go Keypad Uporaba tipkovnice Defi nicije tipki tipkovnice: NumLock u -ume e decimalnu to ku NumLock iz -briše broj NumLock u - upisuje “0”na ekran NumLock iz - emulira Insert tipku NumLock u - upisuje “00” NumLock iz - ume e zarez ( , ) NumLock u - upisuje “1”na ekran...
Seite 121
Targus Wireless Stow-N-Go Keypad NumLock u - upisuje “7” na ekran NumLock iz - emuliraa Home tipku Home NumLock u - upisuje “8” na ekran NumLock iz - pomi e kursor jednu liniju gore u tekstru NumLock u - upisuje “9” na ekran...
Seite 122
Targus Wireless Stow-N-Go Keypad Trikovi za upravljanje Za optimalan rad i RF recepciju: • Smjestite rpijamnik barem 20cm od elektrilnih ure aja, poput monitora, zvu nika ili ure aja za vanjsku pohranu. Upravljanje napajanjem • Kako bi produžili vijek vaših baterija, isklju ite baterije na U/IZ sklopki smještenoj an stražnjem dijelu tipkovnice dok...
Targus Wireless Stow-N-Go Keypad Rješavanje problema Što da radim ako tipkovnica ne radi? • Pazite da je polaritet baterija ispravan. Pozitivni (+) ni negaitvni (-) polaritet baetrija moraju se podudarati s pozitivnim (+) i negativnim (-) poalritetima unutar ku išta .
Seite 124
Targus Wireless Stow-N-Go Keypad • Pove ajte udaljenost izme u prijamnika i osnovne jedinice drugih beži nih ure aja. • Iskljulite bilo koji beži ni ure aj njegovu osnovn jedinicu koji je blizu prijamnika tipkovnice • Ako rabite tipkovnicu na metalnoj podlozi, uklonite je a prijamnik stavite na nemetalnu podlogu.
Seite 126
TARGUS DRÓTNÉLKÜLI STOW-N-GO BILLENTY ZET Bevezetés Köszönjük, hogy a Targus drótnélküli Stow-N-Go billenty zet mellett döntött. A billenty zeten található egy nyílás az USB vev tárolására, a vev esetleges rossz behelyezésének elkerülésére és a billenty zet egyszer útközben történ használatára.
Seite 127
Targus Wireless Stow-N-Go Keypad Operációs rendszer • Windows 2000/XP ® • Windows Vista™ Az elemek telepítése Elemfed Billenty zet - hátulnézet 1 Vegye le az elemfed t a billenty zet hátuljáról. 2 Helyezze be a mellékelt elemeket és ügyeljen arra, hogy az egyes elemek pozitív (+) és negatív (-) végei...
Seite 128
Targus Wireless Stow-N-Go Keypad 3 “Kattanásig” csúsztassa vissza az elemfed t a helyére. A vev csatlakoztatása és az alapértelmezett illeszt programok telepítése A vev csatlakoztatása: 1 Távolítsa el a vev t a billenty zet hátuljából. 2 Dugja be az USB vev t egy szabad USB csatlakozóba a számítógépén.
Seite 129
Targus Wireless Stow-N-Go Keypad A billenty zet be- és kikapcsolása • Az elem bekapcsolásához nyomja meg a billenty zet hátoldalán található be/ki gombot. • Az elem kikapcsolásához nyomja meg a billenty zet hátoldalán található be/ki gombot. Ezt a funkciót utazás közben...
Seite 130
Targus Wireless Stow-N-Go Keypad Csatlakozás gomb Be/ki gomb A vev n a LED 60 másodpercig villog, ami az ID keresési módot jelzi. 2 Eközben nyomja meg és engedje el a számológép/ billenty zet hátoldalán található csatlakozás gombot. A kommunikációs kapcsolat létrehozásakor a vev n található...
Seite 131
Targus Wireless Stow-N-Go Keypad A billenty zet használata A billenty zetgombok meghatározása: NumLock be - tizedes vessz t szúr be NumLock ki - kitöröl egy számot NumLock be - a “0” számot írja be a képerny re NumLock ki - az Insert gombot helyettesíti NumLock be - “00”...
Seite 132
Targus Wireless Stow-N-Go Keypad NumLock be - a “7” számot írja be a képerny re Home NumLock ki - a Home gombot helyettesíti NumLock be - a “8” számot írja be a képerny re NumLock ki - egy sorral feljebb mozgatja a kurzort a szövegben...
Seite 133
Targus Wireless Stow-N-Go Keypad Felhasználási tanácsok Az optimális teljesítmény és RF vétel érdekében: • A vev t legalább 20 cm távolságban helyezze el az összes elektromos készülékt l, így a monitortól, hangszórótól vagy küls tárolóeszközökt l. Áramkezelés • Az elem élettartamának kib vítése érdekében utazás közben, vagy ha nem használja a billenty zetet, az...
Seite 134
Targus Wireless Stow-N-Go Keypad Hibajavítás Mi a teend , ha a billenty zet nem m ködik? • Ellen rizze, hogy az elemek polaritása megfelel -e. Az egyes elemek pozitív (+) és negatív (-) végeinek meg kell felelniük a pozitív (+) és negatív (-) csatlakozásoknak az elemházban.
Seite 135
Targus Wireless Stow-N-Go Keypad • Növelje a távolságot a vev és egyéb drótnélküli eszközök bázisegysége között. • Kapcsoljon ki minden drótnélküli eszközt és azok bázisegységeit a billenty zet vev jének közelében. • Ha a billenty zetet fémes felületen használja, akkor a billenty zetet és a vev t is helyezze át egy nem fémes...
Seite 137
KEYPAD Introduzione Congratulazioni per aver acquistato un tastierino wireless Targus. Il tastierino e’ provvisto di uno scomparto incorporato per conservare il ricevitore USB, eliminando cosi’ l’eventualita’ di mettere il ricevitore fuori posto e rendendo piu’ facili i viaggi con il tastierino.
Targus Wireless Stow-N-Go Keypad Sistema operativo • Windows 2000/XP ® • Windows Vista™ Inserimento delle batterie Coperchio Batterie Ricevitore Tastierino - visto di dietro 1 Rimuovere il coperchio dello scomparto posto sul retro del tastierino. 2 Inserire le batterie fornite, assicurandosi che il polo positivo (+) e quello negativo (-) di ciascuna batteria corrisponda con gli indicatori di polarità...
Seite 139
Targus Wireless Stow-N-Go Keypad 3 Riposizionare il coperchio del comparto batterie assicurandosi che sia ben inserito. Connessione del ricevitore ed installazione dei driver predefi niti Per connettere il ricevitore: 1 Rimuovere il ricevitore dal retro del tastierino. 2 Inserire il ricevitore USB in una porta USB disponibile del Vostro computer.
Seite 140
Targus Wireless Stow-N-Go Keypad Accensione e spegnimento del Tastierino • Per mettere in funzione le batterie, usate il pulsante on/off situato sul retro del tastierino. • Per spegnere le batterie, usate il pulsante on/off situato sul retro del tastierino. • Per accendere il tastierino, premete il tasto NumLock, situato direttamente sopra il tasto del numero sette.
Seite 141
Targus Wireless Stow-N-Go Keypad Bottone di connessione Pulsante di accensione Il LED del ricevitore lampeggerà per 60 secondi per indicare la modalità di ricerca ID. 2 Durante questo periodo, premete e rilasciate il tasto di connessione situato sul retro del tastierino.
Seite 142
Targus Wireless Stow-N-Go Keypad Utilizzo del Tastierino Defi nizione dei tasti del tastierino: Num Lock on - inserisce una virgola decimale Num Lock off - cancella un numero Num Lock on - immette “0” sul display Num Lock off - emula il tasto Insert Num Lock on - immette “00”...
Seite 143
Targus Wireless Stow-N-Go Keypad Num Lock on - immette “7” sul display Home Num Lock off - emula il tasto Home Num Lock on - immette “8” sul display Num Lock off - sposta il cursore sulla linea di testo soprastante Num Lock on - immette “9”...
Seite 144
Targus Wireless Stow-N-Go Keypad Consigli operativi Per ottimali prestazioni e ricezioni RF: • Collocate il ricevitore ad almeno 20cm da tutte le apparecchiature elettriche, come monitor, speakers o apparati esterni di storage. Cose da ricordare • Per allungare la vita delle vostre batterie, spegnete le batterie tramite il pulsante on/off situato sul retro del tastierino durante gli spostamenti o quando non è...
Targus Wireless Stow-N-Go Keypad Risoluzione dei problemi Cosa devo fare se il tastierino non funziona? • Assicuratevi che la polarità delle batterie sia corretta. Il polo positivo (+) e quello negativo (-) di ciascuna batteria deve corrispondere al collegamento positivo (+) e a quello negativo (-) dello scomparto batterie.
Seite 146
Targus Wireless Stow-N-Go Keypad • Aumentate la distanza tra il ricevitore e le unità di base degli altri apparati wireless. • Spegnete gli altri apparati wireless e le loro unità di base situati nelle vicinanze del ricevitore del tastierino. • Se state utilizzando il tastierino su una superfi cie metallica, spostate sia questo che il ricevitore su una superfi...
Seite 147
Targus Wireless Stow-N-Go Keypad Specifi che Frequenza operativa 2.4 GHz Distanza operativa Fino a 10 mt Voltaggio operativo Tastierino: 2.4V Ricevitore: Corrente Operativa Tastierino: massimo 10mA Ricevitore: massimo 16mA Modalità di Tastierino: Al di sotto di 300 uA sospensione Dimensioni...
Seite 148
TARGUS BEVIEL STOW-N-GO PAGALBIN KLAVIAT RA žanga Sveikiname sigijus „Targus“ beviel „Stow-N-Go“ pagalbin klaviat r . Pagalbin klaviat ra sukurta su ertme, skirta laikyti USB imtuv , sumažinant galim neteising imtuvo d jim ir suteikiant lengvesn keliavim su pagalbine klaviat ra.
Seite 149
Targus Wireless Stow-N-Go Keypad Operacin sistema • Windows 2000/XP ® • Windows Vista™ Baterij d jimas Baterij dangtelis Imtuvas Pagalbin klaviat ra – vaizdas iš galo 1 Nuo pagalbin s klaviat ros galin s pus s nuimkite baterij dangtel .
Targus Wireless Stow-N-Go Keypad 3 Stumkite baterijos dangtel viet , kol jis „spragtel s“. Imtuvo prijungimas ir numatyt j tvarkykli digimas Nor dami prijungti imtuv : 1 Nuo pagalbin s klaviat ros galin s pus s nuimkite imtuv . 2 USB imtuv kiškite laisv j s kompiuterio USB lizd .
Seite 151
Targus Wireless Stow-N-Go Keypad Pagalbin s klaviat ros jungimas ir išjungimas • Nor dami jungti baterij , naudokite „on/off” ( jungti/ išjungti) jungikl , esant galin je pagalbin s klaviat ros pus je. • Nor dami išjungti baterij , naudokite „on/off” ( jungti/ išjungti) jungikl , esant galin je pagalbin s klaviat ros...
Seite 152
Targus Wireless Stow-N-Go Keypad Ryšio mygtukas jungimo/ išjungimo jungiklis LED, esantis ant imtuvo, mirks s 60 sekundži , kas rodo ID paieškos režim . 2 Šiuo metu, paspauskite ir atleiskite ryšio mygtuk , esant skai iuotuvo/pagalbin s klaviat ros galin je pus je.
Seite 153
Targus Wireless Stow-N-Go Keypad Pagalbin s klaviat ros naudojimas Pagalbin s klaviat ros klaviš reikšm s: NumLock on – rašo dešimtainio skai iaus kablel , NumLock off – ištrina skai i NumLock on – ekrane parašo “0”, NumLock off – imituoja „Insert“ ( terpti) klaviš...
Seite 154
Targus Wireless Stow-N-Go Keypad NumLock on – ekrane parašo “7”, NumLock off – imituoja „Home“ (pradžia) klaviš Home NumLock on – ekrane parašo “8”, NumLock off – perkelia žymekl viena teksto eilute aukštyn NumLock on – ekrane parašo “9”, NumLock off –...
Seite 155
Targus Wireless Stow-N-Go Keypad Eksploatacijos patarimai Optimaliai funkcijai ir RD (radijo dažnio) pri mimui: • Imtuv d kite mažiausiai 20 cm atstumu nuo vis elektrini prietais , pvz. j s monitories, garsiakalbiai ir išoriniai kaupikliai. Maitinimo valdymas • Nor dami pailginti baterijos tarnavimo laik , kai keliaujate, ar nenaudojate, „on/off”...
Seite 156
Targus Wireless Stow-N-Go Keypad Gedim šalinimas K daryti, jei pagalbin klaviat ra neveikia? • sitikinkite, ar teisingas baterij poliariškumas. Teigiamas (+) ir neigiamas (-) kiekvienos baterijos poliai turi atitikti teigiam (+) ir neigiam (-) kontaktus baterij skyrelyje. • Patikrinkite, ar USB jungtis tvirtai kišta j s kompiuterio USB lizd .
Seite 157
Targus Wireless Stow-N-Go Keypad • Padidinkite atstum tarp imtuvo ir kitos beviel s rangos pagrindinio mazgo. • Išjunkite visus bevielius prietaisus bei j pagrindinius mazgus, kurie yra šalia pagalbin s klaviat ros imtuvo. • Jei pagalbin klaviat r naudojate ant metalinio paviršiaus, j perkelkite ant nemetalinio paviršiaus.
Seite 159
TARGUS BEZVADU STOW-N-GO KLAVIAT RA Ievads Apsveicam, ka esat ieg d jies Targus bezvadu Stow- N-Go klaviat ru. Klaviat r ir ieb v ta vieta USB uztv r jam, lai nov rstu nepareizi novietotu uztv r ju un atvieglotu ce ošanu ar klaviat ru.
Seite 160
Targus Wireless Stow-N-Go Keypad Oper t jsist ma • Windows 2000/XP ® • Windows Vista™ Bateriju ievietošana Bateriju nodal juma v ci š Uztv r js Klaviat ra - skats no aizmugures 1 No emiet bateriju nodal juma v ci u klaviat ras aizmugur .
Seite 161
Targus Wireless Stow-N-Go Keypad 3 Ieb diet bateriju nodal juma v ci u atpaka viet l dz tas noklikš . Uztv r ja pievienošana un noklus juma dzi u uzst d šana Lai pievienotu uztv r ju: 1 Iz emiet uztv r ju no klaviat ras aizmugures.
Seite 162
Targus Wireless Stow-N-Go Keypad Klaviat ras iesl gšana un izsl gšana • Lai iesl gtu bateriju, izmantojiet iesl gšanas/izsl gšanas sl dzi, kas atrodas klaviat ras aizmugur . • Lai izsl gtu bateriju, izmantojiet sl dzi, kas atrodas klaviat ras aizmugur . Š opcija j izmanto ce ojot, lai nov rstu jaudas pazušanu.
Seite 163
Targus Wireless Stow-N-Go Keypad Savienojuma poga On/Off (Iesl gt/ izsl gt) sl dzis LED indikators uz uztv r ja mirgos 60 sekundes, lai nor d tu ID mekl šanas rež mu. 2 Šaj laika posm nospiediet un atlaidiet savienojuma pogu, kas atrodas kalkulatora/klaviat ras aizmugur .
Seite 164
Targus Wireless Stow-N-Go Keypad Klaviat ras izmantošana Klaviat ras defi n cija Tausti i: NumLock iesl gts - ievieto decim lo punktu NumLock izsl gts - izdz š ciparu NumLock iesl gts - raksta “0” displej NumLock izsl gts - l dzin s Insert tausti a funkcij m NumLock iesl gts - raksta “00”...
Seite 165
Targus Wireless Stow-N-Go Keypad NumLock iesl gts - raksta “7” displej NumLock izsl gts - l dzin s Home Home tausti amu NumLock iesl gts - raksta “8” displej NumLock izsl gts - pavirza kursoru vienu rindu uz augšu NumLock iesl gts - raksta “9” displej...
Seite 166
Targus Wireless Stow-N-Go Keypad Padomi darb bai Optim lai RF uztveršanas darb bai: • Novietojiet uztv r ju vismaz 20 cm att lum no vis m elektriskaj m ier c m, piem ram, monitora, ska ru iem vai r j m uzglab šanas ier c m.
Seite 167
Targus Wireless Stow-N-Go Keypad Trauc jummekl šana Ko dar t, ja klaviat ra nestr d ? • P rliecinieties, ka bateriju polarit te ir pareiza. Katras baterijas pozit vajiem (+) un negat vajiem (-) galiem ir j sakr t ar pozit vajiem (+) un negat vajiem (-) savienojumiem bateriju ietvar .
Seite 168
Targus Wireless Stow-N-Go Keypad • Palieliniet distanci starp peles uztv r ju un citu bezvada ier u pamata iek rt m. • Izsl dziet jebkuru ier ci un t s pamata iek rtas, kas atrodas blakus klaviat ras uztv r jam.
Seite 170
USB-ontvanger. U hoeft dus nooit naar de ontvanger te zoeken en het toetsenbord is handig om op reis mee te nemen. Inhoud Naast deze handleiding bevat de verpakking eveneens: • draadloze Targus toetsenbord • USB-ontvanger • 1 AA-batterij Systeemvereisten Hardware •...
Targus Wireless Stow-N-Go Keypad Besturingssysteem • Windows 2000/XP ® • Windows Vista™ Plaatsing van de batterijen Batterij Luikje Ontvanger toetsenbord - achteraanzicht 1 Verwijder het batterijenluikje van de achterkant van het toetsenbord. 2 Plaats de meegeleverde batterijen en zorg ervoor dat...
Seite 172
Targus Wireless Stow-N-Go Keypad 3 Schuif het batterijenluikje terug. U hoort een “klik” wanneer het goed is geplaatst. Aansluiting ontvanger installatie standaard stuurprogramma’s Aansluiting van de ontvanger: 1 Verwijder de ontvanger van de achterkant van het toetsenbord. 2 Sluit de USB-ontvanger aan op een beschikbare USBpoort van uw computer.
Seite 173
Targus Wireless Stow-N-Go Keypad De het toetsenbord in- en uitschakelen • De batterijen schakelt u in via de aan-/uit-schakelaar achteraan het toetsenbord. • De batterijen schakelt u uit via de aan-/uit-schakelaar achteraan het toetsenbord. • Het toetsenbord schakelt u in door te drukken op de NumLock-toets direct boven de cijfertoets zeven.
Seite 174
Targus Wireless Stow-N-Go Keypad Verbindingsknop Aan-/uitschakelaar De lichtdiode op de ontvanger knippert gedurende 60 seconden om te wijzen op de ID-zoekmodus. 2 Gedurende deze tijd drukt u de verbindingsknop achteraan de rekenmachine/het toetsenbord in en laat u de knop los.
Seite 175
Targus Wireless Stow-N-Go Keypad Gebruik van toetsenbord Defi nitie van de toetsen op het toetsenbord: NumLock aan - voegt een komma in NumLock uit - verwijdert een getal NumLock aan - voert “0” in het scherm in NumLock uit - simuleert de toets Insert (invoegen) NumLock aan –...
Seite 176
Targus Wireless Stow-N-Go Keypad NumLock aan - voert “7” in het scherm in Home NumLock uit - simuleert de toets Home NumLock aan - voert “8” in het scherm in NumLock uit - verplaatst de cursor naar één tekstregel hoger NumLock aan - voert “9”...
Seite 177
Targus Wireless Stow-N-Go Keypad Tips bij de werking Voor de beste resultaten en de beste RF-ontvangst: • Plaats de ontvanger ten minste 20cm verwijderd van alle elektrische toestellen, zoals uw monitor, speakers of externe opslagapparatuur. Geheugensteuntjes • De batterijen zullen langer werken, indien u de batterij...
Targus Wireless Stow-N-Go Keypad Problemen oplossen Wat doe ik indien de keypad niet werkt? • Controleer of de polariteit van de batterijen correct is. De positieve (+) en negatieve (-) uiteinden van iedere batterij moeten overeenstemmen met de positieve (+) en negatieve (-) aansluitingen in het batterijencompartiment.
Seite 179
Targus Wireless Stow-N-Go Keypad • Verhoog de afstand tussen de ontvanger en de basistoestellen van andere draadloze apparatuur. • Schakel alle draadloze apparatuur en hun basistoestellen in de nabijheid van de ontvanger van het toetsenbord uit. • Indien u het keypad op een metalen oppervlak gebruikt, verplaatst u het toestel met de ontvanger naar een niet-metalen oppervlak.
Seite 180
Targus Wireless Stow-N-Go Keypad Specifi caties Werkingsfrequentie 2.4 GHz Werkingsafstand Tot 10 m Bedrijfsspanning toetsenbord: 2.4V Ontvanger: Stroom toetsenbord: 10 mA maximaal Ontvanger: 16 mA maximaal Modus Onderbreken toetsenbord: minder dan 300 uA Afmetingen toetsenbord: 155 x 92 x 26 mm...
Seite 181
TARGUS TRÅDLØST STOW-N-GO™ TASTATUR Introduksjon Gratulerer med kjøpet av et Targus trådløst Stow-N-Go tastatur. Tastaturet er designet med et innebygd hulrom for å lagre USB-mottakeren slik at mottakeren ikke blir borte, og for å gjøre det enklere å reise med tastaturet.
Seite 182
Targus Wireless Stow-N-Go Keypad Operativsystem • Windows 2000/XP ® • Windows Vista™ Installere batterier Batterideksel Mottaker Tastatur - sett bakfra 1 Fjern batteridekselet fra baksiden av tastaturet. 2 Sett inn de medfølgende batteriene, og sørg for at den positive (+) og negative (-) enden av hvert batteri stemmer overens med polaritetsindikatorene inne i batterihuset.
Seite 183
Targus Wireless Stow-N-Go Keypad 3 Skyv batteridekselet tilbake på plass til du hører et “klikk”. Koble til mottakeren og installere standard drivere For å koble til mottakeren: 1 Fjern mottakeren fra baksiden av tastaturet. 2 Plugg USB-mottakeren inn i en tilgjengelig USB-port på...
Seite 184
Targus Wireless Stow-N-Go Keypad Slå tastaturet på og av • For å slå batteriet på, bruk på/av-bryteren på baksiden av tastaturet. • For å slå batteriet av, bruk på/av-bryteren på baksiden av tastaturet. Denne funksjonen bør brukes på reiser for å...
Seite 185
Targus Wireless Stow-N-Go Keypad Tilkoblingsknapp På/Av-bryter LED på mottakeren vil blinke i 60 sekunder for å indikere ID-søkemodus. 2 I løpet av denne tiden, trykk og slipp tilkoblingsknappen på baksiden av kalkulatoren/tastaturet. Når en kommunikasjonsforbindelse er opprettet, vil LED på mottakeren slutte å blinke.
Seite 186
Targus Wireless Stow-N-Go Keypad Bruke tastaturet Defi nisjon av tastene på tastaturet: NumLock på - setter inn et desimalkomma NumLock av - sletter et nummer NumLock på - setter inn “0” på displayet NumLock av - samme som Insert-tasten NumLock på - setter inn “00”...
Seite 187
Targus Wireless Stow-N-Go Keypad NumLock på - setter inn “7” på displayet Home NumLock av - samme som Home-tasten NumLock på - setter inn “8” på displayet NumLock av - fl ytter markøren opp en tekstlinje NumLock på - setter inn “9” på displayet...
Seite 188
Targus Wireless Stow-N-Go Keypad Hint for operasjon For optimal ytelse og RF-mottaking: • Plasser mottakeren minst 20 cm unna alt elektrisk utstyr, slik som skjermen, høyttalerne eller eksterne lagringsenheter. Strømsparing • For å forlenge batterienes levetid, slå batteriene av med på/av-bryteren som du fi...
Seite 189
Targus Wireless Stow-N-Go Keypad Feilsøking Hva gjør jeg om tastaturet ikke virker? • Sørg for at polaritetsforholdet for batteriene er korrekt. Den positive (+) og negative (-) enden av hvert batteri må stemme overens med den positive (+) og negative (-) enden i batterihuset.
Seite 190
Targus Wireless Stow-N-Go Keypad • Øk avstanden mellom mottakeren og basisenhetene av andre trådløse enheter. • Slå av trådløse enheter og deres basisenheter som er i nærheten av tastaturets mottaker. • Hvis du bruker tastaturet på en metalloverfl ate, fl ytt det og mottakeren til en ikke-metallisk overfl...
Seite 192
BEZPRZEWODOWA KLAWIATURA NUMERYCZNA TARGUS STOW-N-GO™ Wst p Dzi kujemy Pa stwu zakup bezprzewodowej klawiatury numerycznej Targus Stow-N-Go. Klawiatura posiada wbudowan komor do przechowywania odbiornika USB, co zapobiega jego zagubieniu oraz u atwia przenoszenie klawiatury. Zawarto opakowania Niniejsze opakowanie zawiera: • Klawiatura bezprzewodowa •...
Seite 193
Targus Wireless Stow-N-Go Keypad Wymagania systemowe • Windows 2000/XP ® • Windows Vista™ Instalacja baterii Pokrywa baterii Odbiornik Klawiatura numeryczna – widok z ty u 1 Zdejmij pokryw komory baterii na spodzie klawiatury. 2. W ó rodka bateri (dostarczon razem z klawiatur ).
Seite 194
Targus Wireless Stow-N-Go Keypad 3 Wsu pokryw baterii na miejsce. Klikni cie zatrzasku pokrywy oznacza prawid owe jej zamkni cie. Pod czenie odbiornika i instalacja sterowników domy lnych Aby pod czy odbiornik: 1 Wyjmij odbiornik z komory na spodzie klawiatury.
Seite 195
Targus Wireless Stow-N-Go Keypad W cznie i wy czanie klawiatury • Aby w czy zasilanie, u yj prze cznika w /wy (on/off) znajduj cego si na spodzie klawiatury. • Aby wy czy zasilanie, u yj prze cznika w /wy (on/off) na spodzie klawiatury.
Seite 196
Targus Wireless Stow-N-Go Keypad Przycisk po czenia Prze cznik w / wy (on/off) 60-sekundowe miganie diody LED w odbiorniku b dzie sygnalizowa tryb wyszukiwania kodu ID. 2. Nale y wówczas wcisn i zwolni przycisk po czenia znajduj cy si na spodzie kalkulatora/klawiatury.
Seite 197
Targus Wireless Stow-N-Go Keypad U ytkowanie klawiatury numerycznej Funkcje klawiszy: NumLock w czony – wstawia separator dziesi tny. NumLock wy czony – usuwa znak NumLock w czony – wstawia znak „0” NumLock wy czony – duplikuje klawisz Insert NumLock w czony – wstawia znaki „00”...
Seite 198
Targus Wireless Stow-N-Go Keypad NumLock w czony – wstawia znak „7” NumLock wy czony – duplikuje klawisz Home Home NumLock w czony – wstawia znak „8” NumLock wy czony – przesuwa kursor o jeden wiersz w gór NumLock w czony – wstawia znak „9”...
Seite 199
Targus Wireless Stow-N-Go Keypad Wskazówki dotycz ce u ytkowania W celu uzyskania optymalnej wydajno ci i zapewnienia w a ciwego odbioru fal radiowych: • Umie odbiornik w odleg o ci przynajmniej 20 cm od urz dze elektrycznych, takich jak monitor, g o niki, czy zewn trze no niki danych.
Targus Wireless Stow-N-Go Keypad Rozwi zywanie problemów Co zrobi , je li klawiatura nie dzia a? • Upewnij si , e bieguny baterii s pod czone prawid owo. Bieguny dodatnie (+) i ujemne (-) baterii powinny styka si odpowiednio z dodatnim (+) i ujemnym (-) stykiem w komorze baterii.
Seite 201
Targus Wireless Stow-N-Go Keypad • Oddal odbiornik od stacji bazowych innych urz dze bezprzewodowych. • Wy cz urz dzenia bezprzewodowe znajduj ce si pobli u odbiornika. • W przypadku u ytkowania klawiatury na metalowej powierzchni, umie na powierzchni niemetalowej. Metale, takie jak...
KEYPAD Introdução Parabéns pela sua compra da Teclado Sem Fios da Targus. O teclado foi desenhado com uma cavidade construída nele próprio para armazenar o receptor USB, eliminando a potencial má colocação do receptor e providenciando facilidade de deslocação com o teclado.
Targus Wireless Stow-N-Go Keypad Sistema Operativo • Windows 2000/XP ® • Windows Vista™ Instalação das Pilhas Tampa Pilha Receptor Teclado - visão da parte traseira 1 Remova a tampa das pilhas da parte traseira do teclado. 2 Insira as pilhas fornecidas, assegurando-se de que as...
Seite 205
Targus Wireless Stow-N-Go Keypad 3 Deslize a tampa das pilhas para a sua posição, até ouvir um “click” indicando que está fi rmemente no lugar. Conexão do Receptor e Instalação das Drivers Padrão Para fazer a conexão do receptor: 1 Remova a tampa das pilhas da parte traseira do teclado.
Seite 206
Targus Wireless Stow-N-Go Keypad Ligar e Desligar a Teclado • Para ligar as pilhas, use o interruptor de on/off (ligar/ desligar), localizado na parte traseira do teclado. • Para desligar as pilhas, use o interruptor de on/off (ligar/ desligar), localizado na parte traseira do teclado.
Seite 207
Targus Wireless Stow-N-Go Keypad Botão de conexão Interruptor de On/Off (Ligar/Desligar) O LED do receptor piscará durante 60 segundos, para indicar o modo de pesquisa de ID. 2 Durante este tempo, pressione e liberte o botão de conexão existente na parte traseira da combinação calculador/do teclado.
Seite 208
Targus Wireless Stow-N-Go Keypad Utilização da Teclado Defi nição das Teclas do Teclado: NumLock seleccionada - insere um ponto decimal NumLock não seleccionada - apaga um número NumLock seleccionada - entra “0” na tela NumLock não seleccionada -imita a tecla Insert (Inserir) NumLock seleccionada - entra “00”...
Seite 209
Targus Wireless Stow-N-Go Keypad NumLock seleccionada - entra “0” na tela NumLock não seleccionada - imita a tecla Insert Home (Inserir) NumLock seleccionada - entra “0” na tela NumLock não seleccionada - movimenta o cursor para aima, uma linha de texto NumLock seleccionada - entra “0”...
Seite 210
Targus Wireless Stow-N-Go Keypad Sugestões de Operação Para um desempenho e uma recepção FR óptimas: • Coloque o receptor a pelo menos 20cm de distância de todos os aparelhos eléctricos, tais como o seu monitor, autofalantes ou dispisitvos externos de armazenamento de dados.
Targus Wireless Stow-N-Go Keypad Resolução de Problemas Que fazer seokeypad não funciona? • Assegure-se de que a polaridade das pilhas está correcta. As extremidades positiva (+) e negativa (-) de cada pilha devem corresponder às conexões positiva (+) e negativa (-) na caixa das pilhas.
Seite 212
Targus Wireless Stow-N-Go Keypad • Aumente a distância entre o receptor e as unidades base de outros aparelhos sem fi o. • Desligue todos os aparelhos sem fi o, e as suas unidades base, que estejam perto do receptor do teclado.
Targus Wireless Stow-N-Go Keypad Especifi cações Frequência de Operação 2.4 GHz Distância de Operação Até 10 m Voltagem de Operação Teclado: 2.4V Receptor: Corrente de Operaçao Teclado: 10mA máximo Receptor: 16mA máximo Modo em Suspensão Teclado: Abaixo de 300 uA Dimensões...
Seite 214
TASTATUR F R FIR TARGUS STOW-N-GO Introducere Felicit ri pentru achizi ionarea tastaturii f r fi r Targus Stow-N-Go. Tastatura este proiectat cu un loca pentru receptorul USB, prevenindu-se astfel eventuala pierdere i permi ându-v s v deplasa i u or cu tastatura.
Seite 215
Targus Wireless Stow-N-Go Keypad Sistem de operare • Windows 2000/XP ® • Windows Vista™ Instalarea bateriilor Capac carcas baterii Receptor Tastatur - vedere din spate 1 Îndep rta i capacul cavit ii pentru baterii din spatele tastaturii. 2 Introduce i bateriile, asigurându-v c semnele (+) i (-) de la capetele fi...
Seite 216
Targus Wireless Stow-N-Go Keypad 3 Glisa i capacul bateriei pân ajunge în pozi ia în care face “clic”. Conectarea receptorului i instalarea driverelor implicite Pentru a conecta receptorul: 1 Îndep rta i receptorul din spatele tastaturii. 2 Introduce i receptorul USB într-un port USB liber al computerului dvs.
Seite 217
Targus Wireless Stow-N-Go Keypad Închiderea/deschiderea tastaturii • Pentru a activa bateria, folosi i comutatorul “on/off” afl at pe spatele tastaturii. • Pentru a dezactiva bateria, folosi i comutatorul “on/ off”, afl at pe spatele tastaturii. Este recomandat s foloseasc aceast caracteristic în cazul în care c l tori i, pentru a preveni irosirea energiei.
Seite 218
Targus Wireless Stow-N-Go Keypad Buton conectare Comutator “On/Off” LED-ul receptorului va clipi timp de 60 secunde pentru a indica faptul c a început c utarea ID-ului. 2 În acest timp, ap sa i i elibera i butonul pentru conectare de pe spatele calculatorului/tastaturii.
Seite 219
Targus Wireless Stow-N-Go Keypad Folosirea tastaturii Defi nirea func iilor tastelor: NumLock activat - insereaz o virgul pentru zecimale NumLock dezactivat - terge un num r NumLock activat - insereaz “0” în datele afi ate NumLock dezactivat - imit tasta “Insert”...
Seite 220
Targus Wireless Stow-N-Go Keypad NumLock activat - insereaz “7” în datele afi ate Home NumLock dezactivat - imit tasta “Home” NumLock activat - insereaz “8” în datele afi ate NumLock dezactivat - mut cursorul cu o linie de text mai sus NumLock activat - insereaz “9”...
Targus Wireless Stow-N-Go Keypad Ponturi pentru o bun func ionare Pentru o func ionare i pentru o recep ie RF optim : • A eza i receptorul la cel pu in 20 cm distan de orice dispozitiv electric, cum ar fi monitorul, difuzoarele sau dispozitivele pentru memorie extern .
Seite 222
Targus Wireless Stow-N-Go Keypad Ghid de rezolvare a problemelor Ce face i dac nu func ioneaz tastatura? • Asigura i-v de faptul c polaritatea bateriilor este cea corect . Capetele pozitiv (+) i negativ (-) ale fi ec rei baterii trebuie s corespund cu contactele pozitiv (+) i negativ (-) din carcasa bateriei.
Seite 223
Targus Wireless Stow-N-Go Keypad • M ri i distan a dintre receptor i unit ile principale ale altor dispozitive f r fi r. • Dezactiva i orice alte dispozitive f r fi r i unit ile principale ale acestora, afl ate în apropierea receptorului tastaturii.
Seite 236
TARGUS TRÅDLÖS STOW-N-GO TANGENTBORD Introduktion Grattis till ditt köp av Targus trådlösa Stow-N-Go tangentbord. Tangentbordet är designat med en inbyggt hålighet för att lagra USB mottagaren, vilket eliminerar risken att du förlägger mottagaren och erbjuder enkelhet när du är på resande fot.
Targus Wireless Stow-N-Go Keypad Operativsystem • Windows 2000/XP ® • Windows Vista™ Sätta i batterierna Batterilucka Mottagare Tangentbord - sett bakifrån 1 Ta bort batteriluckan på baksidan av tangentbordet. 2 Sätt i medföljande batterier, se till att de positiva (+) och negativa (-) ändarna på...
Seite 238
Targus Wireless Stow-N-Go Keypad 3 För tillbaka batteriluckan tills dess att den “klickar” på plats. Anslut mottagaren och installera förinstallerad drivrutin. För att ansluta mottagaren: 1 Ta bort mottagaren från baksidan på tangentbordet. 2 Sätt i USB mottagaren i ett tillgängligt USB uttag på din dator.
Seite 239
Targus Wireless Stow-N-Go Keypad Sätter på och stänger av tangentbordet • För att sätta på batteriförsörjningen, använd på/av knappen placerad på baksidan av tangentbordet. • För att stänga av batteriförsörjningen, använd på/av knappen placerad på baksidan av tangentbordet. Den här funktionen bör användas när du är på...
Seite 240
Targus Wireless Stow-N-Go Keypad Anslutningsknapp På/av knapp LED lampan på mottagaren kommer att blinka i 60 sekunder för att indikera ID-sökningsläge. Under här tiden, tryck släpp anslutningsknappen på baksidan miniräknaren/ tangentbordet. När en kommunikationsförbindelse är etablerad, kommer LED lampan på mottagaren att sluta blinka. .
Targus Wireless Stow-N-Go Keypad Använda tangentbordet Defi nition av tangenterna på tangentbordet: NumLock på - lägger till ett decimaltecken NumLock av - tar bort en siffra NumLock på - “0” framträder I displayfönstret NumLock av - emulerar tilläggstangenten NumLock på - “00” framträder NumLock av - lägger till ett komma...
Seite 242
Targus Wireless Stow-N-Go Keypad NumLock på - “7” framträder på displayen Home NumLock av - emulerar hemtangenten. NumLock på - “8” framträder på displayen NumLock av - fl yttar piltangenten en textrad. NumLock på - “9” framträder på displayen PgUp NumLock av - emulerar tangenten sida upp.
Seite 243
Targus Wireless Stow-N-Go Keypad Användningstips För optimal användning och RF mottagning: • Placera mottagaren minst 20cm bort ifrån alla elektriska enheter, såsom din bildskärm, högtalare eller externa lagringsenheter. Elhantering • För att förlänga livslängden på dina batterier, stäng av batterierna med på/av knappen placerad på baksidan av tangentbordet medan du reser eller när du inte använder...
Seite 244
Targus Wireless Stow-N-Go Keypad Felsökning Vad gör jag om tangentbordet inte fungerar? • Se till att polariteten på batterierna är korrekt. Positiva (+) och negativa (-) ändarna på varje batteri måste matcha positiva (+) och negativa (-) anslutningar i batterifacket.
Seite 245
Targus Wireless Stow-N-Go Keypad • Öka avståndet mellan mottagare och basenheterna på dina trådlösa enheter. • Stäng av alla trådlösa enheter och deras basenheter som är i närheten av tangentbordets mottagare. • Om du använder tangentbordet på ett metallunderlag, fl ytta den och mottagaren till ett icke-metall underlag.
Seite 247
BREZŽI NA TIPKOVNICA TARGUS STOW-N-GO Uvod estitke za nakup brezži ne tipkovnice Targus Stow- N-Go. Tipkovnica je izdelana z vgrajeno vdolbino za shranjevanje USB sprejemnika, s katero onemogo ite morebitno napa no postavitev sprejemnika in tako zagotavljate preprostost pri prenosu tipkovnice.
Targus Wireless Stow-N-Go Keypad Operacijski sistem • Windows 2000/XP ® • Windows Vista™ Vstavljanje baterij Pokrov predala za baterije Sprejemnik Tipkovnica - pogled z zadnje strani 1 Odstranite pokrov predala za baterije na zadnji strani tipkovnice. 2 Vstavite priložene baterije in se prepri ajte, da se bosta ujemala pozitivni (+) in negativni (-) pol baterije z simboli polarnosti v baterijskem predalu.
Seite 249
Targus Wireless Stow-N-Go Keypad 3. Pokrov baterijskega predala ponovno potisnite v položaj, dokler ne zaslišite glasen “klik”. Priklop sprejemnika in namestitev privzetih gonilnikov Kako priklopite sprejemnik: 1 Odstranite sprejemnik z zadnje strani tipkovnice. 2 Priklopite USB sprejemnik v USB vrata na ra unalniku, ki so prosta.
Seite 250
Targus Wireless Stow-N-Go Keypad Vklop in izklop tipkovnice • Za vklop baterije uporabite stikalo vklop/izklop, ki je na zadnji strani tipkovnice. • Za izklop baterije uporabite stikalo vklop/izklop, ki je na zadnji strani tipkovnice. To funkcijo uporabite med potovanjem, da bi var evali z elektriko.
Seite 251
Targus Wireless Stow-N-Go Keypad Gumb za povezavo Stikalo vklop/ izklop LED na sprejemniku bo utripal 60 sekund, da bi ozna il iskalni na in ID. 2 V tem asu pritisnite in spustite gumb za povezovanje na zadnji strani ra unalnika/tipkovnice.
Seite 253
Targus Wireless Stow-N-Go Keypad NumLock vklopljena - vstavi “7” na zaslon NumLock izklopljena - oponaša tipko Domov Home NumLock vklopljena - vstavi “8” na zaslon NumLock izklopljena - premakne kurzor za eno vrstico v besedilu navzgor NumLock vklopljena - vstavi “9” na zaslon NumLock izklopljena - oponaša tipko Ena...
Seite 254
Targus Wireless Stow-N-Go Keypad Nasveti za uporabo Za optimalno zmogljivosti in kakovost sprejema RF: • Sprejemnik namestite najmanj 20 cm vstran od elektri nih naprav kot so zaslon, zvo niki ali zunanji spomin. Upravljanje z elektriko • Da bi podaljšali življenjsko dobo baterije, izklopite baterijo med potovanjem ali, e je ne potrebujete s stikalom vklop/ izklop, ki je na zadnji strani tipkovnice.
Targus Wireless Stow-N-Go Keypad Odpravljanje motenj Kaj moramo storiti, e tipkovnica ne deluje? • Prepri ajte se, da je usmerjenost polov baterij pravilna. Pozitivni (+) in negativni (-) pol baterije se morata ujemati s pozitivno (+) in negativno (-) oznako na ohišju baterije.
Seite 256
Targus Wireless Stow-N-Go Keypad • Pove ajte razdaljo med sprejemnikom tipkovnice in osnovnimi enotami drugih brezvrvi nih naprav. • Izklopite vse brezži ne naprave in njihove osnovne enote, ki so v bližini sprejemnika tipkovnice. • e uporabljate tipkovnico na kovinskih površinah, premaknite tipkovnico in sprejemnik na nekovinske površine.
Seite 258
BEZDRÔTOVÁ KLÁVESNICA TARGUS STOW-N-GO Úvod Gratulujeme k zakúpeniu bezdrôtovej klávesnice Targus Stow-N–Go. Klávesnica je vyrobená so zabudovaným priestorom pre USB prijíma , o eliminuje prípadné zlé umiestnenie prijíma a a zabezpe uje pohodlné cestovanie s klávesnicou. Obsah Balenie, okrem tejto užívate skej príru ky, obsahuje: •...
Seite 259
Targus Wireless Stow-N-Go Keypad Opera ný systém • Windows 2000/XP ® • Windows Vista™ Inštalácia batérií Kryt na batérie Prijíma Klávesnica – poh ad zozadu 1 Odstrá te kryt na batérie v zadnej asti klávesnice. 2 Vložte batérie tak, aby sa polarita batérií – plus (+) a mínus (-) zhodovala so symbolmi v priestore pre batérie.
Seite 260
Targus Wireless Stow-N-Go Keypad 3 Zasu te kryt na batérie spä tak, aby pevne zapadol na svoje miesto. Pripojenie prijíma a a inštalácia priradených ovláda ov Pripojenie prijíma a: 1 Odstrá te prijíma zo zadnej asti klávesnice. 2 Zapojte USB prijíma do vo ného USB portu na vašom po íta i.
Seite 261
Targus Wireless Stow-N-Go Keypad Zapnutie a vypnutie klávesnice • Na zapnutie batérií použite vypína on/off (Zap./Vyp.) na zadnej strane klávesnice. • Na vypnutie batérií použite vypína on/off (Zap./Vyp.) na zadnej strane klávesnice. Táto funkcia by mala by použitá pri cestovaní, aby sa zabránilo stratám v napájaní.
Seite 262
Targus Wireless Stow-N-Go Keypad Pripájací ovláda Vypína On/ Off (Zap./Vyp.) LED indikátor na prijíma i bude blika 60 sekúnd, aby signalizoval, že prijíma je v režime vyh adávania ID. 2 Po as tohto intervalu stla te a uvo nite pripájací ovláda na zadnej strane kalkula ky/klávesnice.
Seite 263
Targus Wireless Stow-N-Go Keypad Používanie klávesnice Defi nícia klávesov: NumLock on – vkladanie desatinnej iarky NumLock off – vymaže íslo NumLock on – zadáva na displeji „0“ NumLock off – nahrádza kláves Insert (Vklada ) NumLock on – zadáva „00“...
Seite 264
Targus Wireless Stow-N-Go Keypad NumLock on – zadáva na displeji „7“ NumLock off – nahrádza kláves Home Home (Domov) NumLock on – zadáva na displeji „8“ NumLock off – posúva kurzor o riadok vyššie NumLock on – zadáva na displeji „9“...
Seite 265
Targus Wireless Stow-N-Go Keypad Prevádzkové pokyny Na optimálnu prevádzku a príjem RF: • Umiestnite prijíma minimálne 20 cm od elektrických zariadení, ako sú: monitor, reproduktory alebo externé pamä ové zariadenia. Šetrenie zdroja napájania • Na pred ženie životnosti batérií vypnite batérie použitím vypína a on/off (Zap./Vyp.) na zadnej strane klávesnice...
Targus Wireless Stow-N-Go Keypad Riešenie problémov o mám robi , ke klávesnica nefunguje? • Uistite sa, že polarita batérií je správna. Plus (+) a mínus (-) na každej batérii sa musí zhodova so symbolmi plus (+) a mínus (-) na konektoroch v priestore pre batérie.
Seite 267
Targus Wireless Stow-N-Go Keypad • Zvä šite vzdialenos medzi prijíma om a základnými jednotkami ostatných bezdrôtových zariadení. • Vypnite všetky bezdrôtové zariadenia a ich základné jednotky, ktoré sa nachádzajú v blízkosti prijíma a klávesnice. • Ak používate klávesnicu na kovovej podložke, presu te ju aj prijíma na nekovový...
TARGUS KABLOSUZ STOW-N-GO TU TAKIMI Giri Targus Kablosuz Stow-N-Go Tu Takımı ürününü satın aldı ınız için te ekkür ederiz. Tu takımı, alıcının yanlı yerle tirilmesi olasılı ını ortadan kaldıran ve tu takımıyla seyahat kolaylı ı sa layan USB alıcısını saklamak için yerle ik bir bo lukla tasarlanmı...
Seite 270
Targus Wireless Stow-N-Go Keypad letim Sistemi • Windows 2000/XP ® • Windows Vista™ Pilleri Yerle tirme Pil Kapa ı Alıcı Tu takımı – arkadan görünüm 1 Tu takımının arkasından pil kapa ını çıkarın. 2 Verilen pilleri, artı (+) ve eksi (-) uçların pil yuvasının içindeki...
Seite 271
Targus Wireless Stow-N-Go Keypad 3 Yerine tam olarak oturup “klik” sesi duyulana kadar pil kapa ını yerine kaydırın. Alıcıyı Ba lama ve Varsayılan Sürücüleri Yükleme Alıcıyı ba lamak için: 1 Tu takımının arkasından alıcıyı çıkarın. 2 USB alıcısını bilgisayardaki kullanılabilir bir USB ba lantısına takın.
Seite 272
Targus Wireless Stow-N-Go Keypad Tu Takımını Kapatma ve Açma • Pili açmak için tu takımının arkasındaki açma/kapama dü mesini kullanın. • Pili kapamak için tu takımının arkasındaki açma/kapama dü mesini kullanın. Bu özellik, seyahat sırasında güç kaybını engellemek için kullanılmalıdır.
Seite 273
Targus Wireless Stow-N-Go Keypad Ba lantı Dü mesi Açma/Kapama Dü mesi ID arama modunda oldu unu belirtmek için alıcının üzerindeki LED 60 saniye yanıp söner. 2 Bu sürede, hesap makinesinin/tu takımının arkasındaki ba lantı dü mesine basın ve bırakın. leti im ba lantısı kuruldu unda, alıcının üzerindeki LED ı...
Seite 274
Targus Wireless Stow-N-Go Keypad Tu Takımını Kullanma Tu Takımı Tu larının tanımı: NumLock açık – ondalık virgül ekler NumLock kapalı - bir rakam siler NumLock açık – ekrana “0” rakamını girer NumLock kapalı - Insert tu unun görevini yapar NumLock açık – “00” girer NumLock kapalı...
Seite 275
Targus Wireless Stow-N-Go Keypad NumLock açık – ekrana “7” rakamını girer NumLock kapalı - Home tu unun görevini Home yapar NumLock açık – ekrana “8” rakamını girer NumLock kapalı – imleç tu unu metinde bir satır yukarı ta ır NumLock açık – ekrana “9” rakamını girer NumLock kapalı...
Seite 276
Targus Wireless Stow-N-Go Keypad Kullanma puçları Optimal performans ve RF alımı için: • Alıcıyı monitör, hoparlör ve harici depolama cihazları gibi tüm elektrikli cihazlardan en az 20 cm uza a yerle tirin. Güç Yönetimi • Pilin ömrünü uzatmak için seyahat ederken veya kullanmadı...
Targus Wireless Stow-N-Go Keypad Sorun Giderme Tu takımı çalı mıyorsa ne yapabilirim? • Pillerin kutuplarının do ru oldu undan emin olun. Her pilin artı (+) ve eksi (-) uçları pil yuvasındaki artı (+) ve eksi (-) ba lantılarla e le melidir.
Seite 278
Targus Wireless Stow-N-Go Keypad • Alıcı ile di er kablosuz cihazların istasyon üniteleri arasındaki mesafeyi artırın. • Tu takımının alıcısının yakınındaki kablosuz cihazları ve istasyon ünitelerini kapatın. • Tu takımını metal yüzeyde kullanıyorsanız, tu takımını ve alıcıyı metal olmayan yüzeye ta ıyın. Demir, alüminyum veya bakır gibi metaller radyo frekansı...