ABB CL-LDC.L Montageanweisung
Quicklinks
07/06 1SVC440796M2000
Montageanweisung
Installation Instructions
Notice d'installation
CL-LDC.L...
CL-LDD...
CL-LER...
CL-LET...
CL-LEC...
CL-LDT...
CL-LDR...
1SVC440795M1000
A
1SVC440795M1100
Istruzioni per il montaggio
Instrucciones de montaje
Lebensgefahr durch elektrischen Strom!
Nur Elektrofachkräfte und elektrotechnisch
unterwiesene Personen dürfen die im Folgen-
den beschriebenen Arbeiten ausführen.
Die Stromversorgungsgeräte sind Einbaugeräte.
Beachten Sie für die Installation der Geräte die
länderspezifischen Vorschriften.
Electric current! Danger to life!
Only skilled or instructed persons may carry out the
following operations. The power supply units are
mounting devices. The national regulations/
specifications must be observed for the installation
of the devices.
Tension électrique dangereuse !
Seules les personnes qualifiées et averties doivent
exécuter les travaux ci-après. Les blocs d'alimentation
sont des appareils faisant partie intégrante d'une
installation. Veuillez respecter les normes de mise en
œuvre spécifiques aux différents pays.
Tensione elettrica: Pericolo di morte!
Solo persone abilitate e qualificate possono eseguire
le operazioni di seguito riportate. Gli alimentatori
sono unità per montaggio interno. Per l'installazione
degli apparecchi è necessario rispettare le normative
specifiche di ciascun paese.
¡Corriente eléctrica! ¡Peligro de muerte!
El trabajo a continuación descrito debe ser realizado
por personas cualificadas y advertidas. Las fuentes de
alimentación son aparatos de montaje. Para la
instalación de los aparatos han de tenerse en cuenta
las normativas/especificaciones a nivel local.
1/20

Inhaltszusammenfassung für ABB CL-LDC.L
- Seite 1 07/06 1SVC440796M2000 Montageanweisung Istruzioni per il montaggio Installation Instructions Instrucciones de montaje Notice d’installation CL-LDC.L… Lebensgefahr durch elektrischen Strom! Nur Elektrofachkräfte und elektrotechnisch CL-LDD… unterwiesene Personen dürfen die im Folgen- den beschriebenen Arbeiten ausführen. CL-LER… Die Stromversorgungsgeräte sind Einbaugeräte. Beachten Sie für die Installation der Geräte die CL-LET…...
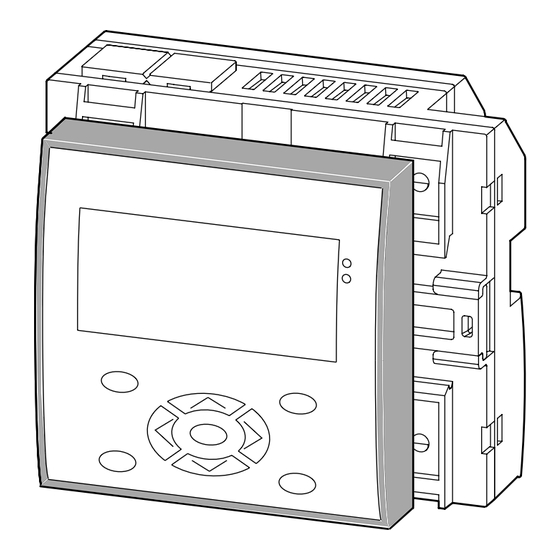
- Seite 2 Frontansicht – Front view – Face avant – Vista frontale – Vista de frente CL-LDR… CL-LDC.L… CL-LDT… a Spannungsversorgung a Voltage supply DC: 24 V DC, AC: 85 bis 264 V AC 50/60 Hz DC: 24 V DC, AC: 85 to 264 V AC 50/60 Hz b Eingänge...
- Seite 3 CL-LEC… CL-LER.2O CL-LER.18… CL-LET.20… a Alimentation a Tensione di alimentazione DC: 24 V CC, AC: 85 à 264 V CA 50/60 Hz DC: 24 V DC, AC: 85 a 264 V AC 50/60 Hz b Entrées b Ingressi c Connecteurs pour mise en réseau (NET) c Collegamento di rete NET d CL-LDR…, CL-LDT…...
- Seite 4 Digital-Eingänge, Analog-Eingänge, Analog-Ausgang – Digital inputs, analog inputs, analog output – Entrées TOR, entrées analogiques, sortie analogique – Ingressi digitali, ingressi analogici, uscita analogica – Entradas digitales, entradas analógicas, salida analógica CL-LDC.L…DC2 + CL-LDR…, CL-LDC.L…DC2 + CL-LDT… I1 – I4 3.3 mA 24 V H 28.8 V...
- Seite 5 Digital-Eingänge, Erweiterung – Digital inputs, expansion – Entrées TOR, extension – Ingressi digitali, espansione – Entradas digitales, ampliación CL-LER.18DC2, CL-LET.20DC2 R1–R12 = 3.3 mA; 24 V 28.8 V 1 f 15 V 0 F 5 V +24 V > 1 A 0.5 –...
- Seite 6 Relais-Ausgänge – Relay outputs – Sorties à relais – Uscite a relè – Salidas con relé CL-LDR…, CL-LER.18… 10 000 000 CL-LDR… 0 V H, N F 8 A/B 16 L1, L2, L3 (115/250 V h) +24 V H CL-LER.2O 24 V H 8 A 10 000 000 115 V h 8 A...
- Seite 7 Anschluss – Connection – Raccordement – Collegamento – Conexión Zentrale Erweiterung – Central expansion – Extension centralisée – Espansione locale – Ampliación centralizada CL-LAS.TK011 (CL-LINK) CL-LER… CL-LDC.L… CL-LET… Dezentrale Erweiterung – Remote expansion – Extension décentralisée – Espansione remota – Ampliación descentralizada CL-LAS.TK011 (CL-LINK) E+ E–...
- Seite 8 Temperaturbereich: – LCD-Anzeige im Bereich 0 bis 55 °C lesbar – Betauung des Gerätes unbedingt verhindern! Temperature range: Plage de température : – LCD display legible in range 0 to 55 °C Campo temperatura: – On no account allow condensation to form on the device! Margen de temperatura: -25…+55 °C –...
- Seite 9 Verschlusskappe entfernen – Warnung! Remove sealing cap – Retirer cache – Die Schnittstelle ist geschlossen zu halten. Rimuovere calotta di chiusura – Quitar tapón Elektrostatische Entladungen können bei geöffneter Schnittstelle das Gerät zerstören. Warning! stecken – fit – enficher – 2a 2b The interface must be kept closed.
- Seite 10 – yellow – jaune – giallo – amarillo braun – brown – marron – marrone – marrón grau – grey – gris – grigio – gris Terminal-Betrieb – Terminal operation – Funzionamento terminale – Funcionamiento terminal – Funcionamiento terminal CL-LDC.L… CL-LDC.L… CL-LAD.TK006 POW-Side...
- Seite 11 Netzwerk NET – NET network – Réseau NET – Rete NET – Red NET Baudrate/Leitungslänge – Baud rate/cable length – Vitesse de transmission/ longueur des câbles – Velocità di trasmissione in baud/lunghezza linea – Teilnehmeradresse – Slave address – Adresse des participants – Velocidad de transmisión/longitud de cable Indirizzo utente –...
- Seite 12 Netzwerk NET Topologien – Network NET topologies – Topologies réseau NET – Topologie di rete NET – Topologías de la red NET Netzverbindung durch das Gerät geschleift – Network connection looped through the device – Câblage réseau à l’aide du té interne – Collegato di rete tramite l’apparecchio – Conexión de red NET rectificada mediante el aparato R 1 - 12 S 1 - 8...
- Seite 13 Schutzhaube – Protective cover – Capot – Calotta di protezione – Tapa protectora a CL-LDD… b Titan-Blende – Titanate plate – Obturateur titane – Piastra in titanio – Tapa de titanio c CL-LAD.FD011 Lage der Haube – Position of the shroud – Position du capot – Posizione della calotta – Posición de la caperuza Membrane –...
- Seite 14 CL-LDD… CL-LDD… Enclosure plate (CL-LDC.L… with top-hat rail 1 to 4 mm, others 1 to 6 mm) Pared de caja (CL-LDC.L… con guía simétrica 1 a 4 mm, en otro caso 1 a 6 mm) Fixing ring Anillo de fijación CL-LDC.L…...
- Seite 15 Demontage des Gerätes – Dismantling the device – Démontage d’appareil – Smontaggio dell’apparecchio – Desmontaje del aparato E/A-Baugruppe entfernen – Remove I/O module – Retirer module E/S – Rimuovere il modulo di I/O – Quitar módulo E/S Warnung ! Zerstörungsgefahr! Nur im spannungsfreien Zustand erlaubt! Warning! Risk of destruction ! Only permitted if the device is de-energized !
- Seite 16 ¡Atención! Sin un 3. soporte adicional sólo se pueden utilizar aparatos de ampliación con una anchura total de 2 UM. CL-LER… CL-LDC.L… CL-LET… 3. Stütze – 3rd support – 3e support – 3o supporto – 3. apoyo Demontage – Dismantling – Démontage – Smontaggio – Desmontaje 3.
- Seite 17 Montage – Fitting – Montaggio – Montaje auf 35-mm-Hutschiene – on 35 mm top-hat rail – sur profilé-support 35 mm – su guida DIN 35 mm – sobre guía simétrica de 35 mm auf Montageplatte (waagerecht) on mounting plate (horizontal) sur plaque de montage (horizontal) su piastra di montaggio (orizzontale) sobre placa de montaje (horizontal)
- Seite 18 CL-LDC.L… CL-LDC… 28.25 g0.2 28.25 13.7 86.5 38.75 38.75 g0.2 16.25 16.25 29.5 107.5 CL-LDR…, CL-LDT… CL-LDD… + CL-LDC.L… + CL-LAD.FD011 CL-LDR…, CL-LDT… 88.1 107.5 86.5 1 – 6 88.2 CL-LAD.FD001 CL-LDC.L… 43.2 33.7 22.5 88.5 1 – 4 18/20...
- Seite 19 CL-LER…, CL-LET…, CL-LEC… 16.25 16.25 47.5 107.5 56.5 35.5 Bohrschablone M 1 : 1 Template for holes, scale 1 : 1 Gabarit de perçage, échelle 1 : 1 Dima di foratura, scala 1 : 1 Plantilla para taladros, escala 1 : 1 22.5 19/20...
- Seite 20 Cet équipement est acceptable pour utilisation dans les EMPLACEMENTS DANGEREUX DE CLASSE I, DIVISION 2, GROUPES A, B, C ET D AVERTISSEMENT : « RISQUE D’EXPLOSION. NE PAS DÉBRANCHER TANT QUE LE CIRCUIT EST SOUS TENSION, A MOINS QU’IL NE S’AGISSE D’UN EMPLACEMENT NON DANGEREUX » 20/20 © 2006 by ABB Stotz-Kontakt GmbH Änderungen 07/06 1SVC440796M2000 DE13 Doku/Eb...