Herunterladen Inhalt Inhalt Diese Seite drucken
Klarstein 10027905 Bedienungsanleitung

Klarstein 10027905 Bedienungsanleitung

Zerkleinerer und entsafter

Werbung

Verfügbare Sprachen
  • DE

Verfügbare Sprachen

  • DEUTSCH, seite 1
Zerkleinerer
und Entsafter
10027905

Werbung

Inhaltsverzeichnis
loading

Inhaltszusammenfassung für Klarstein 10027905

  • Seite 1 Zerkleinerer und Entsafter 10027905...
  • Seite 2: Sicherheitshinweise

    Sehr geehrter Kunde, wir gratulieren Ihnen zum Erwerb Ihres Gerätes. Lesen Sie die folgenden Hinweise sorgfältig durch und befol- gen Sie diese, um möglichen Schäden vorzubeugen. Für Schäden, die durch Missachtung der Hinweise und unsachgemäßen Gebrauch entstehen, übernehmen wir keine Haftung. Lieferumfang 1 x Zerkleinerergefäß...
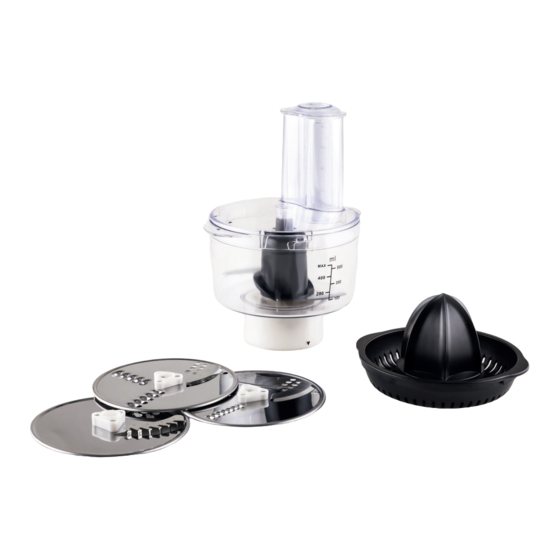
  • Seite 3: Messer Und Geeignete Lebensmittel

    Messer und geeignete Lebensmittel Messerscheiben Die Messerscheiben lassen sich beidseitig benutzen. Mit der einen Seiten schneiden sie die Lebensmittel in Scheiben, mit der anderen Seite zerkleinern sie Lebensmittel. • Diese Lebensmittel lassen sich in Scheiben schneiden: Käse, Karotten, Kartoffeln, Kohl, Gurke, Zucchini, rote Bete und Zwiebel. •...
  • Seite 4 Schritt 2 Entfernen Sie den Deckel vom Zerkleinererge- fäß, indem Sie ihn gegen den Uhrzeigersinn ab- drehen. Setzen Sie das Zerkleinerergefäß auf das Verbin- dungsstück und achten Sie darauf, dass der Pfeil auf dem Gefäß dabei in einer Linie mit dem Pfeil auf dem Verbindungsstück ist (Bild unten rechts).
  • Seite 5 Schritt 4 Setzen Sie den zusammengebauten Zerkleinerer in die Zubehöröffnung oben an der Küchenma- schine und achten Sie darauf, dass der Pfeil dabei auf den Kreis zeigt. Drehen Sie den Zerkleinerer im Uhrzeigersinn, bis beide Pfeile aufeinander zeigen. Schritt 5 Wählen Sie dann ob Sie den großen oder den kleinen Schieber verwenden möchten.
  • Seite 6 Schritt 6 Sobald Sie mit dem Zerkleinern fertig sind, he- ben und senken Sie den Schieber mehrere Male, damit nicht so viele Reste auf der Messerscheibe verbleiben. Halten Sie den Zerkleinerer an, indem Sie den Geschwindigkeitsregler auf „0“ drehen. Ziehen Sie den Stecker aus der Steckdose, bevor Sie das Zubehör abnehmen.
  • Seite 7 So benutzen Sie das Häckselmesser Schritt 1 Stellen Sie die Küchenmaschine auf eine ebene Arbeitsfläche und versichern Sie sich, dass es fest steht. Versichern Sie sich, dass die vordere Abdeckung (Bild oben links) geschlossen ist. Drücken Sie auf die Entriegelungstaste oben an der Zubehörabdeckung.
  • Seite 8 Schritt 3 Setzen Sie das Häckselmesser auf das Verbin- dungsstück. Passen Sie auf, dass Sie sich nicht daran verletzen und halten Sie es nur an dem Griff in der Mitte fest. Schneiden Sie die Lebensmittel in kleine Stücke, und geben Sie die Stücke in das Zerkleinererge- fäß.
  • Seite 9 Schritt 5 Stecken sie den Stecker in die Steckdose. Der Geschwindigkeitsregler leuchtet auf und das Dis- play zeigt Temperatur und Zeit an, während ein Signalton ertönt. Stellen Sie den Geschwindigkeitsregler auf die gewünschte Geschwindigkeit und der Zerkleine- rer startet. Der Timer zählt in 1-Sekunden-Inter- vallen hoch.
  • Seite 10 Schritt 7 Drücken Sie die Abdeckung anschließend wieder auf die Zubehöröffnung. So benutzen Sie die Saftpresse Schritt 1 Stellen Sie die Küchenmaschine auf eine ebene Arbeitsfläche und versichern Sie sich, dass es fest steht. Versichern Sie sich, dass die vordere Abdeckung (Bild oben links) geschlossen ist.
  • Seite 11 Schritt 3 Setzen Sie das Sieb in das Zerkleinerergefäß. Der Pfeil auf dem Sieb sollte auf den Pfeil auf dem Gefäß zeigen. Setzen Sie das Verbindungsstück der Saftpresse auf das Sieb. Setzen Sie den kleinen Aufsatz auf das Ver- bindungsstück. Setzen Sie den großen Aufsatz auf den kleinen.
  • Seite 12 Schritt 6 Sobald Sie fertig sind, halten Sie den Mixer an, indem Sie den Geschwindigkeitsregler auf „0“ drehen. Ziehen Sie den Stecker aus der Steckdo- se, bevor Sie das Zubehör abnehmen. Drehen Sie das Zerkleinerergefäß so, dass der Pfeil . Entnehmen am Gefäß...
  • Seite 13: Packing Content

    Dear Customer, Congratulations on purchasing this equipment. Please read this manual carefully and take care of the following hints to avoid damages. Any failure caused by ignoring the mentioned items and cautions mentioned in the instruction manual are not covered by our warranty and any liability. Packing Content 1 x Processor bowl 0,5 litres 1 x Processor bowl cover with pusher...
  • Seite 14 Blades and suitable Food Cutting plates The cutting plates are reversible: one side slices, the other side shreds. • You can slice: Cheese, carrot, potato, cabbage, cucumber, courgette, beetroot, and onion • You can shred: Cheese, carrot, potato and foods of a similar texture. Thin (julienne style) chipper This plate cuts potatoes for julienne style French fries and firm ingredients for salads, garnishes, casseroles and stir fries (eg carrot, swede, courgette and cucumber).
  • Seite 15 Step 2 Remove the food processor bowl cover from the food processor bowl by rotates it anti-clockwise. Place the food processor bowl onto the food processor connector ensuring that the arrow in the bowl is aligned with the arrow on the con- nector, hold the bowl and turn the connector clockwise until it locks into position.
  • Seite 16 Step 4 Place the food processor assembly in the motor house, so that the arrow is aligned with the circle. Turn it clockwise, so the arrow is aligned with the arrow. Step 5 Choose which pusher you want to use. The pu- sher contains a smaller pusher for processing in- dividual items or thin ingredients.
  • Seite 17 Step 6 At the completion of the processing operation, raising and lowering the pusher several times may help to reduce the amount of food left on the cutting plate. Stop the mixer by returning the speed control to the off “0” position when you have finished processing the food.
  • Seite 18 How to use the S-Blade Step 1 Place the appliance on a flat surface, e.g. a kit- chen counter, and make sure it is standing firmly. Ensure that the protective cover is fitted to the Accessory socket. Press the button, the blender protective cover will be bounced from the swivel arm (see illustration).
  • Seite 19 Step 3 Place the S-blade onto the connector driver. Handle the S-blade with care, they are extremely sharp. Hold the plates by the centre grip. Cut the food up and place into the bowl ensuring it is evenly distributed. Fit the food processor bowl cover onto the bowl, so that the arrow is aligned with the circle.
  • Seite 20 Step 5 Connect the mixer to the power supply. The dis- play will show and beep. Turn the Speed control to the desired setting, the mixer will start. The timer will count up in 1 se- cond intervals. The speed/timer can be changed at any time whilst the mixer is operating.
  • Seite 21 Step 7 Press the blender protective cover into the swivel arm. How to use the Juicer Step 1 Place the appliance on a flat surface, e.g. a kit- chen counter, and make sure it is standing firmly. Ensure that the protective cover is fitted to the Accessory socket.
  • Seite 22 Step 3 Place the sieve in the bowl. So the arrow in the bowl is aligned with the arrow on the sieve. Place the citrus juicer connector onto the sieve. Fit the small squeezer. Fit the large squeezer. NOTE: The small squeezer use to squeeze lemon juicer, also apply to fruit with similar size.
  • Seite 23 Step 6 Stop the mixer by returning the speed control to the off “0” position when you have finished pro- cessing the food. Unplug it from the mains elec- trical supply before you change the accessories, or before you take the appliance apart or when not in use.
  • Seite 24: Incluso Nella Consegna

    Gentile cliente, La ringraziamo per aver scelto il nostro prodotto. La preghiamo di leggere e di seguire attentamente le seguenti istruzioni in modo da evitare eventuali danni. Decliniamo ogni responsabilità in caso di danni dovuti ad una mancata osservanza delle norme di sicurezza e ad un uso improprio del prodotto. Incluso nella consegna 1 x Ciotola del tritatutto da 0,5 litri 1 x Coperchio con bocchettone di riempimento e pestello...
  • Seite 25 Lame e alimenti adatti Lame per affettare Le lame a forma di dischi sono utilizzabili da ambedue i lati. Da un lato affettano, dall’ a ltro tritano gli alimenti. • Alimenti che si possono affettare: Formaggio, carote, patate, cavoli, cetrioli, zucchine, carote rosse e cipolle. •...
  • Seite 26 Fase 2 Rimuovere il coperchio della ciotola del tritatut- to, svitandolo in senso antiorario. Posizionare la ciotola sull’ a lbero connettore, fa- cendo attenzione che la freccia sulla ciotola sia allineata con quella dell’ a lbero connettore (Im- magine sotto a destra). Tenere ferma la ciotola, e avvitare il connettore in senso orario finché...
  • Seite 27 Fase 4 Inserire il tritatutto assemblato nell’ a pertura pos- ta sul robot da cucina, assicurandosi che la freccia indichi il cerchietto. Avvitare il tritatutto in senso orario fino a che le frecce sono allineate. Fase 5 Scegliere se utilizzare il pestello grande o il pestello piccolo.
  • Seite 28 Fase 6 Una volta finito di tritare, sollevare e abbassa- re più volte il pestello in modo da rimuovere la maggior parte dei resti di cibo dalla lama. Impostare la velocità su “0” e il tritatutto si ar- resta. Disinserire la spina dalla presa di corrente prima di rimuovere il tritatutto.
  • Seite 29 Come utilizzare la lama per tritare Fase 1 Posizionare il robot da cucina su una superficie piana e assicurarsi che sia stabile. Assicurarsi che lo sportellino frontale sia chiuso (immagine sopra a sinistra). Premere il tasto di rilascio posto sul coperchio. Il coperchio si solleva e l’...
  • Seite 30 Fase 3 Inserire la lama per tritare nel connettore. Fare attenzione a non ferirsi e afferrare la lama semp- re dal centro. Tagliare gli alimenti in piccoli pezzi e introdurli nella ciotola tritatutto. Assicurarsi che i pezzi si- ano della stessa grandezza. Inserire il coperchio sulla ciotola, facendo atten- zione che la freccia sulla ciotola indichi il cerchi- etto sul coperchio.
  • Seite 31 Fase 5 Inserire la spina nella presa di corrente. La mano- pola regola velocità si illumina e sul display ven- gono indicate la temperatura e l’ o rario, mentre viene emesso un segnale acustico. Posizionare la manopola sul livello di velocità desiderato e il tritatutto si avvia.
  • Seite 32 Fase 7 Abbassare e chiudere il coperchio dell’ a pertura per gli accessori. Come utilizzare lo spremiagrumi Fase 1 Posizionare il robot da cucina su una superficie piana e assicurarsi che sia stabile. Assicurarsi che lo sportellino frontale sia chiuso (immagine sopra a sinistra).
  • Seite 33 Fase 3 Inserire il filtro spremiagrumi sulla ciotola del tritatutto. La freccia sul filtro deve essere allineata con la freccia sulla ciotola. Inserire l’ e lemento connettore dello spremiagrumi sul filtro. Dopodiché inserire prima lo spremiagrumi piccolo e sopra esso lo spremiagrumi grande. NOTA Lo spremiagrumi piccolo è...
  • Seite 34 Fase 6 Una volta terminato, posizionare la manopo- la su “0” e il dispositivo si arresta. Disinserire la spina dalla presa di corrente prima di rimuovere l’ a ccessorio. Ruotare la ciotola del tritatutto in modo che la sua freccia indichi il cerchietto sul dispositivo. Ri- muovere la ciotola.
  • Seite 35: Consignes De Sécurité

    Chère cliente, cher client, Toutes nos félicitations pour l’ a cquisition de ce nouvel appareil. Veuillez lire attentivement les instructions d’utilisation afin d’ é viter d’ é ventuels dommages. Le fabricant ne saurait être tenu pour responsable des dom- mages dus au non-respect des consignes de sécurité et à la mauvaise utilisation de l’ a ppareil. Contenu de l’...
  • Seite 36 Couteau, disques et aliments adéquats Disques coupe-légumes Il est possible d’utiliser les deux faces des disques. L’une sert à couper les aliments en tranches ; l’ a utre à les hacher. • Aliments pouvant être coupés en tranches : Fromage, carottes, pommes de terre, choux, concombres, courgettes, betteraves rouges et oignons. •...
  • Seite 37 Étape 2 Retirer le couvercle du bol en le tournant dans le sens inverse des aiguilles d’une montre. Insérer l’ é lément servant de connexion avec l’ a ppareil sous le bol. S’ a ssurer que la flèche du bol s’ a ligne avec la flèche de l’ é lément de conne- xion (voir illustration du bas à...
  • Seite 38 Étape 4 Insérer à présent le tout dans le compartiment de connexion de l’ a ppareil, situé en haut de ce dernier, de manière à ce que la flèche s’ a ligne avec le rond. Tourner ensuite dans le sens des aiguilles d’une montre jusqu’...
  • Seite 39 Étape 6 Une fois terminé, lever et descendre la cheminée plusieurs fois. Cela aidera à réduire la quantité de reste sur le disque. Éteindre l’ a ppareil en plaçant le bouton de régla- ge de la vitesse sur la position « 0 ». Débrancher l’...
  • Seite 40 Utilisation du couteau Étape 1 Placer l’ a ppareil sur un plan de travail plat et s’ a ssurer qu’il soit bien stable. S’ a ssurer que le cache protecteur frontal (voir il- lustration à gauche) soit bien à sa place. Appuyer sur le bouton de verrouillage, situé...
  • Seite 41 Étape 3 Insérer le couteau dans le bol, sur l’ é lément de connexion. Manipuler le couteau avec prudence et seulement par la prise située au centre, pour ne pas se blesser. Couper préalablement les aliments en petits morceaux puis les mettre dans le bol. S’ a ssurer que tous les morceaux soient de la même gros- seur.
  • Seite 42 Étape 5 Brancher l’ a ppareil. Le bouton de réglage de la vitesse s’ a llume. L’ é cran affiche alors la tempéra- ture (0 °C) et le minuteur (00:00) et un bip re- tentit. Ajuster la vitesse à l’ a ide du bouton de réglage. Le hachoir se met alors en marche.
  • Seite 43: Utilisation Du Presse-Agrumes

    Étape 7 Appuyer sur le rabat pour fermer le comparti- ment de connexion. Utilisation du presse-agrumes Étape 1 Placer l’ a ppareil sur un plan de travail plat et s’ a ssurer qu’il soit bien stable. S’ a ssurer que le cache protecteur frontal (voir il- lustration à...
  • Seite 44 Étape 3 Placer le filtre du presse-agrumes dans le bol. La flèche du filtre et la flèche du bol doivent s’ a ligner. Placer l’ é lément de connexion pour le pressoir sur le filt- re, puis le petit et ensuite le grand pressoir sur l’ é lément de connexion.
  • Seite 45 Étape 6 Une fois terminé, éteindre l’ a ppareil en plaçant le bouton de réglage de la vitesse sur la position « 0 ». Débrancher l’ a ppareil avant de retirer les accessoires. Retirer le bol en le tournant de manière à ce que la flèche du bol fasse face au rond situé...
  • Seite 46: Contenido Del Envío

    Estimado cliente: Le felicitamos por la adquisición de este producto. Lea atentamente el siguiente manual y siga cuidadosamen- te las instrucciones de uso con el fin de evitar posibles daños. La empresa no se responsabiliza de los daños ocasionados por un uso indebido del producto o por haber desatendido las indicaciones de seguridad. Contenido del envío 1x Recipiente de 0,5 litros 1x Tapa con empujador...
  • Seite 47 Cuchillas y alimentos adecuados Discos Los discos son reversibles. Por un lado se encargan de cortar los alimentos y, por otro, de triturarlos. • Los siguientes alimentos pueden cortarse en rodajas: Queso, zanahorias, patatas, col, pepino, calabacín, remolacha roja y cebolla. •...
  • Seite 48 Paso 2 Retire la tapa del recipiente girándola en el senti- do contrario a las agujas del reloj. Encaje el recipiente en el acoplamiento y asegú- rese de que la flecha que aparece en el recipiente coincide con la del acoplamiento. Agarre el recipiente y gire el acoplamiento en el sentido de las agujas del reloj hasta que se haya encajado completamente.
  • Seite 49 Paso 4 Coloque la picadora ya montada en el comparti- mento para accesorios situado en la parte superi- or del robot de cocina. Asegúrese de que la flecha se alinea con el círculo. Gire el recipiente en el sentido de las agujas del reloj hasta que ambas flechas aparezcan alinea- das.
  • Seite 50 Paso 6 Una vez haya terminado con la picadora, suba y baje el empujador varias veces para eliminar la mayor cantidad de restos posible de la cuchilla. Detenga la picadora colocándola en la posición “0”. Desenchufe el aparato antes de retirar los accesorios.
  • Seite 51 Cómo utilizar la cuchilla en S Paso 1 Coloque el robot de cocina en una superficie pla- na y asegúrese de que está firmemente asenta- Asegúrese de que la cubierta superior (ver ilustra- ción arriba a la izquierda) está cerrada. Pulse el botón de desbloqueo situado encima del aparato para abrir el compartimento para acce- sorios.
  • Seite 52 Paso 3 Coloque la cuchilla en S en el acoplamiento. Tome precauciones para no cortarse con la cu- chilla y agárrela solamente por su parte central. Corte los alimentos en trozos pequeños e intro- dúzcalos en el recipiente. Asegúrese de que los trozos están distribuidos de una manera unifor- Coloque la tapa en el recipiente y asegúrese de que la flecha del recipiente coincide con el cír-...
  • Seite 53 Paso 5 Enchufe el aparato. El regulador de velocidad se ilumina y el display indica la temperatura y el tiempo a la vez que se emite un pitido. Ajuste el regulador para conseguir la velocidad deseada y la picadora se accionará. El temporiz- ador cuenta en intervalos de 1 segundo.
  • Seite 54 Paso 7 Coloque de nuevo la cubierta sobre el comparti- mento para accesorios. Cómo utilizar el exprimidor Paso 1 Coloque el robot de cocina en una superficie pla- na y asegúrese de está firmemente asentado. Cerciórese de que la cubierta superior (ver ilust- ración arriba a la izquierda) está...
  • Seite 55 Paso 3 Coloque el colador en el recipiente. La flecha del colador debe coincidir con la del recipiente. Coloque el acoplamiento del exprimidor en el colador. Coloque la pieza pequeña en el acoplamiento y a conti- nuación coloque la pieza más grande sobre la pequeña. ADVERTENCIA: La pieza pequeña está...
  • Seite 56 Paso 6 Una vez haya terminado, detenga el aparato seleccionando el nivel “0” de velocidad. Desen- chufe el aparato antes de retirar los accesorios. Gire el recipiente de tal manera que la flecha del recipiente se alinee con el círculo del aparato y retire el recipiente.

Inhaltsverzeichnis