Caleffi 738107 Installationsanleitung
Digital raumthermostatuhr wandmontage
Inhaltsverzeichnis
WALL MOUNTING DIGITAL CHRONOTHERMOSTAT
CHRONOTHERMOSTAT DIGITAL POUR MONTAGE EN SAILLIE
DIGITAL RAUMTHERMOSTATUHR WANDMONTAGE
CRONOTERMOSTATO DIGITALE DA PARETE
CRONOTERMOSTATO DIGITAL DE PARED
EASY PROGRAM
lm - DECRNN009
10/01
Daily - Weekly, Winter
3 temperature levels + antifreeze
Telephone programmer input
Journalier - Hebdomandaire, Hiver
3 niveaux de température + antigel
Entrée par télécommande téléphonique
Täglich - Wöchentlich, Winter
3 Temperaturstufen + Frostschutz
mit Eingang für Telefonschaltung
Giornaliero - Settimanale, Inverno
3 livelli di temperatura + antigelo
Ingresso per programmatore telefonico
Día - Semanal, Invierno
3 niveles de temperatura + antihielo
Entrada para mando telefónico
/ Summer
/ Eté
/ Sommer
/ Estate
/ Verano
P - 1
Inhaltsverzeichnis

Verwandte Anleitungen für Caleffi 738107


Inhaltszusammenfassung für Caleffi 738107
- Seite 1 WALL MOUNTING DIGITAL CHRONOTHERMOSTAT CHRONOTHERMOSTAT DIGITAL POUR MONTAGE EN SAILLIE DIGITAL RAUMTHERMOSTATUHR WANDMONTAGE CRONOTERMOSTATO DIGITALE DA PARETE CRONOTERMOSTATO DIGITAL DE PARED EASY PROGRAM Daily - Weekly, Winter / Summer 3 temperature levels + antifreeze Telephone programmer input Journalier - Hebdomandaire, Hiver / Eté...
-
Seite 2: Inhaltsverzeichnis
ENGLISH FRANCAIS DEUTSCH Index Index Inhalt Technical specifications and performance Données techniques et performances Technische Daten und Leistungsangaben Chap. 1 Note for contractor Chap. 1 - Instructions pour l'installateur Kap. 1 - Anleitungen für den Installateur 1.1 - Installation guidelines 1.1 - Indications et prescriptions pour l’installation 1.1 - Anleitungen und Vorschriften für die Installation 1.2 - Examples of installation... - Seite 3 ITALIANO ESPANOL Chap. - Kap. - Cap. Page - Seite - Pagina Indice Indice Dati tecnici e prestazioni Datos técnicos y especificaciones P - 5 ÷ P - 9 Cap. 1 - Instrucciones para el instalador Cap. 1 - Istruzioni per l’installatore P - 10 1.1 - Indicazioni e prescrizioni per l’installazione 1.1 - Normas para la instalación...
- Seite 4 The manufacturer reserves Le constructeur se réserve le Der Hersteller behält sich Il costruttore si riserva di El fabricante se reserva la the right to introduce any droit d’apporter sans preavis Voranzeige verpflichtung die introdurre tutte le modifiche facultad de aportar todos las modification without prior toutes modifications néces- Genehmigung alle techni-...
-
Seite 5: Technical Specifications
ENGLISH Technical specifications Performance Supply voltage : 2 x 1.5V alkaline battery - type LR03 (AAA) • 3 adjustable temperature levels, limitable 1.5 V 1050 mA/h • antifreeze 5 °C fixed, escludible Type of action, disconnect and appliance: 1 / B / U / Electronic •... -
Seite 6: Données Techniques
FRANCAIS Données techniques Performances Alimentation: 2 x 1,5 V piles alcalines type LR03 (AAA) • 3 niveaux de température réglable et limitables 1,5 V 1050 mA/h • antigel 5 °C fixe et désactivable Type d’action, déconnexion et appareil: 1 / B / U / Electronique •... -
Seite 7: Technische Daten
DEUTSCH Technische Daten Leistungsangaben • 3 Temperaturstände einschrankbar Versorgung : 2 Batterien Alkali-Stabbatterien 1,5 V: • Frostschutz 5 °C nicht einstellbar - ausschließbar Mod. LR03 (AAA) 1,5 V 1050 mA/h • Betriebsmodus: Winter (Heizung) Antrieb, Trennen der Verbindung und Gerät: 1 / B / U / Elektronisches Gerät Sommer (Klimaanlage) -
Seite 8: Dati Tecnici
ITALIANO Dati tecnici Dati prestazionali Alimentazione : n. 2 pile alcaline Ministilo 1,5 V - mod. LR03 (AAA) • 3 Livelli di temperatura regolabili e limitabili 1,5 V 1050 mA/h • antigelo fisso 5 °C, escludibile. Tipo di azione, disconnessione e apparecchio: 1 / B / U / Elettronico •... -
Seite 9: Datos Técnicos
ESPANOL Datos técnicos Especificaciones Alimentación: 2 pilas alcalinas de 1,5 V - mod. LR03 (AAA) • 3 niveles de temperatura regulables y limitables 1,5 V 1050 mA/h • antihielo 5 °C fija, desactivable • modo de funcionamiento: Tipo de acción, desconexión y aparato: 1 / B / U / Electrónico Invierno (calefacción) -
Seite 10: Installation Guidelines
1 - NOTE FOR 1 - INSTRUCTIONS POUR 1 - ANLEITUNGEN FÜR CONTRACTOR L’INSTALLATEUR DEN INSTALLATEUR 1.1 - Installation guidelines 1.1 - Indications et prescriptions pour 1.1 - Anleitungen und Vorschriften für l’installation die Installation Important: installation and electrical connection of Important: l’installation et le branchement électrique Hinweis: Die Installation und der elektrische devices and appliances must be carried out by skilled... -
Seite 11: Istruzioni Per L'installatore
1 - ISTRUZIONI PER 1 - INSTRUCCIONES PARA L’INSTALLATORE EL INSTALADOR Fig. 1 1.1 - Indicazioni e prescrizioni per 1.1 - Normas para la instalación l’installazione Importante: l'installazione ed il collegamento elettri- Importante: La instalación y la conexión eléctrica de co dei dispositivi ed apparecchiature devono essere los dispositivos y equipos deben ser realizadas por eseguiti da personale qualificato ed in conformità... -
Seite 12: Installing The Chronothermostat
1.3 - Installing the chronothermostat 1.3 - Installation du chronothermostat 1.3 - Installation des Zeitthermostats • Isolate the controlled appliance from the electri • Mettre le dispositif à commander hors tension. • Trennen Sie die zu steuernde Vorrichtung vom cal power supply Stromnetz ab •... -
Seite 13: Installazione Del Cronotermostato
1.3 - Installazione del cronotermostato 1.3 - Instalación del cronotermostato • Disattivare la tensione del dispositivo da coman- • Desactivar la tensión del dispositivo que se de- dare. sea gobernar. • Fijar la base del cronotermostato en la pared o •... -
Seite 14: Electrical Connections
1.4 - Electrical connections 1.4 - Branchements électriques 1.4 - Elektrische Anschlüsse Connect the wires of the controlled appliance to the Raccorder les fils du dispositif à commander au Verbinden Sie die Kabel der zu steuernden Vorrich- terminals located on the back of the chronothermo- bornier situé... -
Seite 15: Collegamenti Elettrici
1.4 - Conexiones eléctricas 1.4 - Collegamenti elettrici Conectar los conductores del dispositivo que se de- Collegare i fili del dispositivo da comandare alla sea gobernar a la regleta que se encuentra en la parte morsettiera posta sulla parte posteriore del corpo del trasera del cuerpo del cronotermostato (fig. -
Seite 16: Key To Display Information
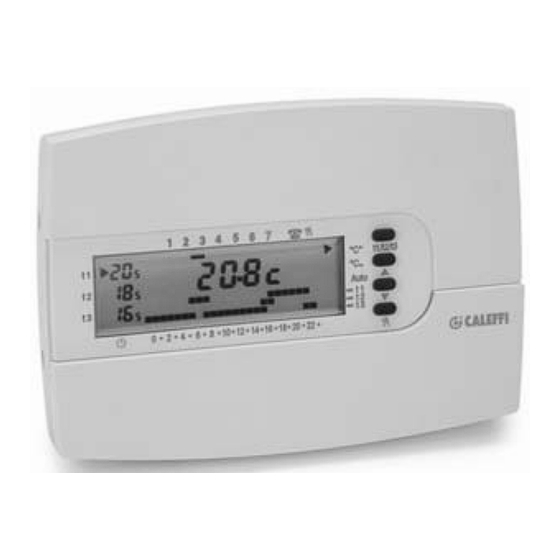
2 - USER INSTRUCTIONS 2 - MODE D’EMPLOI 2 - BEDIENUNGSANLEITUNG POUR L’UTILISATEUR FÜR ANWENDER 2.1 - Key to display information 2.1 - Légende des indications de l’afficheur 2.1 - Auflistung der Anzeigen 1) Comfort temperature t1 1) Température Confort t1 1) Komfort-Temperatur t1 2) Reference temperature 2) Anzeige Bezugstemperatur... -
Seite 17: Legenda Indicazioni Display
2 - ISTRUZIONI D’USO 2 - INSTRUCCIONES PER L’UTILIZZATORE PARA EL USUARIO 2.1 - Legenda indicazioni display 2.1 - Indicaciones del display 1) Temperatura Confort t1 1) Temperatura di Comfort t1 2) Señalización de la temperatura de referencia 2) Segnalazione temperatura di riferimento 3) Visualización 0,5 °C 3) Visualizzazione 0,5 °C 4) Señalización de equipo en funcionamiento... -
Seite 18: Key To Button Functions
2.2 - Key to button functions 2.2 - Légende des fonctions des touches 2.2 - Beschreibung der Tastenfunktionen Confirm (OK) (hours, minutes, day, program Touche confirmation (OK) (heures, minutes, jour, Bestätigungstaste (OK) (Stunde, Minuten, Wo- and all operations requiring confirmation) programme et pour toutes les opérations récla- chentag, Programm sowie sämtliche Vorgänge, mant une confirmation) -
Seite 19: Legenda Funzioni Tasti
2.2 - Legenda funzioni tasti 2.2 - Funciones de las teclas Tasto per conferma (OK) (ore, minuti, giorno, Confirmación (OK) (de hora, minutos, día, pro- programma e per tutte le operazioni dove è ri- grama y todas las operaciones que requieren chiesta la conferma) confirmación) Tasto selezione - visualizzazione programmi... -
Seite 20: Programming The Chronothermostat
2.3 - Programming the chronothermostat 2.3 - Programmation du chronothermostat 2.3 - Programmierung des Zeitthermostats When the batteries are inserted, the device runs a A l’insertion des piles, un cycle d’autotest est lancé. Durch das Einfügen der Batterien wird ein Auto-Test- self-test routine, after which the display will appear A la fin, l’afficheur se présente comme sur la figure Zyklus aktiviert, nach dessen Vollendung die Anzei-... -
Seite 21: Programmazione Del Cronotermostato
Blinking - Clignotant - Blinkend Fig. 3 Lampeggianti - Parpadeante 2.3 - Programmazione del cronotermostato 2.3 - Programación del cronotermostato All'inserimento delle pile si attiva un ciclo di autotest, Al introducir las pilas se activa un ciclo de autotest. al termine del quale il display si presenta come in Una vez finalizado, el display se presenta como en la figura 3 ed il cronotermostato è... -
Seite 22: Free Program P
Si aucun des programmes prévus ne correspond à Nach wenigen Sekunden wird die Raumtemperatur vos besoins, appuyer sur la touche PROG de façon angezeigt, einschließlich der vorgegebenen Betriebs- à faire apparaître le programme P 5, puis suivre la phasen. démarche indiquée dans le paragraphe 2.4. Sollte keines der Programme Ihren Bedürfnissen ent- sprechen, betätigen Sie die Taste PROG , bis das Programm P 5 angezeigt wird. -
Seite 23: Programma Libero P
Nel caso nessuno dei programmi predisposti corri- sponda alle Vostre esigenze, premere il tasto PROG fino all'apparizione del programma P 5, quindi pro- cedere come descritto nel paragrafo 2.4. Fig. 7 Fig. 8 2.4 - Programma libero P 5 2.4 - Programa libre P 5 Il programma P 5 è... - Seite 24 When OK is pressed to confirm, the program set for La programmation des températures du lundi termi- Wenn die Temperaturprogrammierung für Montag Monday is saved in the memory, the dash will blink beendet ist (Abb. 9), drücken Sie auf die Taste OK née (fig.
- Seite 25 Monday lundi Montag lunedí lunes Terminata la programmazione delle temperature per La confirmación (OK) guarda en la memoria el pro- il giorno di lunedì (fig. 9) premere il tasto OK per con- grama del lunes y en el display empiezan a parpa- fermare il programma impostato (in caso di errore dear el guión debajo del día martes (2) y los seg- riprogrammare).
-
Seite 26: Programming Half-Hours
2.5 - Programming half-hours 2.5 - Programmation de la demi-heure 2.5 - Programmierung einer halben Stunde Example - Program: Exemple - Programmer: Beispiel- Programmieren: from 08:00 to 08:30 temperature t1 (comfort) de 08:00 à 08:30 température t1 (confort) von 08:00 Uhr bis 08:30 Uhr Temperatur t1 (Komfort) from 08:30 to 09:00 temperature t3 (economy) de 08:30 à... -
Seite 27: Programmazione Della Mezz'ora
2.5 - Programmazione della mezz'ora 2.5 - Programación cada media hora Esempio - Programmare: Ejemplo - programar: dalle ore 08:00 alle ore 08:30 temp. t1 (comfort) de las 08:00 a las 08:30 la temperatura t1 (confort) Fig. 11 dalle ore 08:30 alle ore 09:00 temp. t3 (economy) y de las 08:30 a las 09:00 la temperatura t3 (ahorro) •... -
Seite 28: Reset
N.B.: In read mode, programs are selected 2 minutes après, le programme P 5 est réinséré auto- angezeigt; nach einer Minute wird automatisch das sequentially by pressing PROG. matiquement. Programm P 5 wieder aufgenommen. N.B.: Au cours de la lecture, on passe d’un pro- Hinweis: Während der Programmanzeige geht man With Read Programs activated, it is possible to gramme au suivant en appuyant sur la touche PROG. - Seite 29 automaticamente; trascorsi 2 minuti, il programma NOTA: Para pasar de un programa al siguiente hay P 5 verrà reinserito automaticamente. que presionar PROG. N.B.: in lettura dei programmi, si passa da un pro- Durante la lectura es posible tanto sustituir el pro- gramma al successivo premendo il tasto PROG.
-
Seite 30: Changing Comfort, Working And Economy Temperatures
2.8 - Changing Comfort, Working and 2.8 - Modification des températures 2.8 - Änderung der Temperaturen Economy temperatures Confort, Activité et Economy Comfort, Betätigung und Economy If the factory set temperatures: Si les températures préétablies: Sofern die vorgegebenen Temperaturen: t1 = 20 °C, t2 = 18 °C, t3 = 16,5 °C (winter) t1 = 20 °C, t2 = 18 °C, t3 = 16,5 °C (hiver) t1 = 20 °C, t2 = 18 °C, t3 = 16,5 °C (Winter) t1 = 20 °C, t2 = 22 °C, t3 = 23,5 °C (summer) -
Seite 31: Modifica Delle Temperature Di Comfort, Attività E Di Economy
2.8 - Modifica delle temperature di 2.8 - Modificación de las temperaturas Fig. 14 Comfort, Attività e di Economy confort, actividad y ahorro Selected temperature set point indicator Nel caso le temperature prefissate: Si las temperaturas preestablecidas: Indice de la plage de température sélectionnée t1 = 20 °C, t2 = 18 °C, t3 = 16,5 °C (per inverno) t1 = 20 °C, t2 = 18 °C, t3 = 16,5 °C (invierno) Zeigt die gewählte Temperaturgruppe an... -
Seite 32: Limiting Settable Temperature Values
2.9 - Limiting settable temperature values 2.9 - Limitation des valeurs de tempéra- 2.9 - Begrenzungen für die einzugebenden ture programmables Temperaturwerte Il est possible de limiter les valeurs: maximum, mini- Folgende Werte können begrenzt werden: max. und/ The maximum and/or minimum temperature settable mum ou les deux, de la température programmable oder min. -
Seite 33: Limitazione Dei Valori Di Temperatura Impostabili
2.9 - Limitación de los valores de 2.9 -Limitazione dei valori di temperatura temperatura programables impostabili Es posible determinar la máxima de temperatura È possibile limitare i valori: massimo, minimo, o en- Blinking - Clignotant - Blinkend programable, la mínima o ambas. La limitación pue- trambi, della temperatura impostabile sul cronoter- Lampeggianti - Parpadeante de aplicarse tanto al funcionamiento de invierno como... - Seite 34 c) Um nur den max. Temperaturwert zu To fix the minimum temperature limit only: Pour fixer uniquement la valeur de tempéra- begrenzen: press t3; the t3 value will be fixed on the display, ture minimale: appuyer sur la touche t3; l’affi- with the indicator blinking alongside.
- Seite 35 c) Per fissare il solo valore minimo di c) Para fijar sólo el valor mínimo de temperatura: temperatura: premere il tasto t3; sul display si blocca il valore di presionar la tecla t3; en el display el valor de t3 t3, affiancato dall’indice lampeggiante.
-
Seite 36: Programming Summer - Winter
2.10 - Programming 2.10 - Programmation 2.10 - Programmierung Summer - Winter Eté - Hiver Sommer - Winter The chronothermostat is factory-set for "winter" op- En usine, votre chronothermostat est prévu pour fonc- Ihr Zeitthermostat wird werkseits für den Betriebs- eration, displayed as: tionner en mode "hiver"... -
Seite 37: Programmazione Estate - Inverno
2.10 - Programmazione 2.10 - Programación Estate - Inverno Verano - Invierno Winter Summer Hiver Eté II Vostro cronotermostato viene predisposto in fab- El cronotermostato viene programado de fábrica Winter Sommer brica per il funzionamento “inverno” visualizzato da: para funcionar en "Invierno" visualizado con la fle- Inverno Estate cha:... -
Seite 38: Changing Hour, Minutes, Day Of The Week - Daylight Saving/Standard Time
2.11 - Changing hour, minutes, day of the 2.11 - Changement de l’heure, des minu- 2.11 - Verstellen der Stunde, der Minuten, week - Daylight saving/standard time tes, du jour de la semaine - change des Wochentags - Umstellung auf ment de l’heure d’été... -
Seite 39: Cambio Ora, Minuti, Giorno Della Settimana - Cambio Ora Legale/Solare
Blinking - Clignotant - Blinkend 2.11 - Cambio ora, minuti, giorno della 2.11 - Cambio de hora, minutos, día de la Lampeggianti - Parpadeante settimana - cambio ora legale/solare semana - cambio de hora legal/solar Mantenere premuto il tasto /Day sino alla com- Mantener presionada la tecla /Day hasta que los parsa dei soli digit dell’ora, lampeggianti (fig. -
Seite 40: Operation In Manual Mode
2.12 - Operation in MANUAL mode - 2.12 - Fonctionnement en MANUEL - 2.12 - MANUELLER Betriebsmodus - There are 2 manual modes, both of which have the Il existe deux modes de fonctionnement manuel, avec Es stehen 2 manuelle Betriebsmodi zur Verfügung, effect of suspending the current program: suspension du programme en cours: durch die das aktuelle Programm unterbrochen wird:... -
Seite 41: Funzionamento In Manuale
2.12 - Funzionamento in MANUALE - 2.12 - Funcionamiento MANUAL - Sono possibili 2 modi di funzionamento manuale, Son posibles 2 modos de funcionamiento manual con con sospensione del programma in corso: los programas suspendidos: Temporary manual Permanent manual a) Funzionamento manuale temporaneo. a) Funcionamiento manual temporal. -
Seite 42: Suspension Of Program For Room Cleaning
2.13 - Suspension du programme pour 2.13 - Unterbrechung des Programms zu 2.13 - Suspension of program for room nettoyage - Reinigungszwecken - cleaning - Uniquement en fonctionnement avec programme (P1 Diese kann lediglich während des Betriebs eines der When operating with programs (P1 ÷ P5), the con- ÷... -
Seite 43: Sospensione Del Programma Per Pulizie
2.13 - Sospensione del programma per 2.13 - Suspensión del programa durante pulizie - la limpieza - Solo in funzionamento da programma (P1 ÷ P5), pre- Sólo durante el funcionamiento automático (P1 ÷ P5) mendo il tasto si avrà lo spegnimento dell’utenza es posible apagar la caldera durante tres horas pre- allacciata per un periodo di 3 ore durante le quali il sionando la tecla... - Seite 44 • Establish how long the absence will be, in hours • Etablir en heures la durée de l’absence (exem- • Berechnen Sie die Länge Ihrer Abwesenheit in (e.g.: 7 days = 168 hours). Maximum Count- ple : 168 heures = 7 jours). Programmation maxi- Stunden (z.B.: 168 Std.
- Seite 45 • Stabilire in termini di ore il periodo di assenza • Establecer, en términos de horas, el periodo de (esempio: 168 ore = 7 gg.). Massimo numero ausencia (por ejemplo: 168 horas = 7 dias). Nú- di ore programmabili in Count-Down = 999 ore. mero máximo de horas para la cuenta regresiva = 999 horas.
-
Seite 46: Ausschließung Des Zeitthermostats
2.15 - Exclusion of the chronothermostat 2.15 - Exclusion du chronothermostat 2.15 - Ausschließung des Zeitthermostats Press and hold button until OFF appears in the Maintenir la touche appuyée jusqu’à ce que l’affi- Halten Sie die Taste solange gedrückt, bis OFF display, to indicate that the chronothermostat is de- cheur ne fasse apparaître le mot OFF, pour indiquer angezeigt wird, dieses Symbol zeigt die Deaktivie-... -
Seite 47: Esclusione Del Cronotermostato
2.15 - Esclusione del cronotermostato 2.15 - Exclusión del cronotermostato Mantenere premuto il tasto sino alla comparsa sul Mantener presionada la tecla hasta que el OFF display della scritta OFF, ad indicare che il cronoter- desaparezca en el display y el cronotermostato que- mostato è... -
Seite 48: Intelligenter Betriebsmodus
Deactivation of telephone programmer forcing: Désactivation du forçage par télécommande té- Deaktivierung des Betriebsmodus über Telefon- schaltung: léphonique: from telephone programmer, by opening of the par télécommande téléphonique, avec l’ouver- über Telefonschaltung, die den Zeitthermostat contact, which returns the chronothermostat to ture du contact, qui remet le chronothermostat bei offenem Kontakt auf den vorherigen the operating mode selected when telephone... -
Seite 49: Funzionamento Intelligente
Disattivazione della forzatura da programmato- Desactivación del mando telefónico: re telefonico: Fig. 27 da programmatore telefonico, con l’apertura del abriendo el contacto desde el mando telefóni- contatto, che riporta il cronotermostato al modo co; el cronotermostato vuelve al modo de fun- t°C t°C di funzionamento presente al momento dell’at-... -
Seite 50: Verbrauchsanzeige Mittels Wiedergabe Der Betriebsstunden
2.18 - Displaying consumption calculated 2.18 - Verbrauchsanzeige mittels Wieder 2.18 - Affichage de la consommation à tra- checking the hours of operation of vers le nombre d’heures de fonction- gabe der Betriebsstunden the appliance nement de l’utilisateur The chronothermostat calculates and memorizes the Le chronothermostat calcule et conserve en mémoire Der Zeitthermostat speichert die Betriebsstundenan- hours of operation of the burner (and/or air condi-... -
Seite 51: Visualizzazione Consumi Attraverso Il Numero Di Ore Di Funzionamento Dell'utenza
2.18 - Visualizzazione consumi attraverso 2.18 - Cálculo del consumo a partir del nú- il numero di ore di funzionamento mero de horas de funcionamiento de dell'utenza la instalación El cronotermostato cuenta y conserva en la memoria II cronotermostato calcola e mantiene in memoria le las horas de funcionamiento de la caldera (y/o del ore di funzionamento della caldaia (e/o condiziona- acondicionador) del día anterior y de todos los días... -
Seite 52: Anzeige Anlage Nicht In Betrieb
2.19 - Indication of system trouble 2.19 - Signal de non-fonctionnement de 2.19 - Anzeige Anlage nicht in Betrieb (e.g.: burner lockout) l’installation (ex.: blocage de la chaudière) (z.B.: Durchlauferhitzer blockiert) In Winter (fig. 29) En Hiver (fig. 29) Im Winter (fig. 29) If, during normal operation (ON blinking), the Si, pendant le fonctionnement normal (indice ON cli- Wenn der Zeitthermostat während seines normalen... -
Seite 53: Segnalazione Di Non Funzionamento Dell'impianto
2.19 - Segnalazione di non funzionamento 2.19 - Señalización de no funcionamiento dell’impianto de la instalación (es.: blocco caldaia) (ej.: caldera bloqueada) In Inverno (fig. 29) En Invierno (fig. 29) Se durante il normale funzionamento (indice ON lam- Si durante el funcionamiento normal (ON parpadean- peggiante) il cronotermostato non rileva, in un arco te) el cronotermostato no detecta en un lapso de 2 di tempo di 2 ore, un incremento significativo di tem-... - Seite 54 2.21 - Activation of pump for 2 minutes 2.21 - Activation de la pompe pendant 2 2.21 - Aktivierung der Pumpe für 2 every day of the year minutes tous les jours de l’année Minuten täglich When this function is selected, the chronothermostat Si la fonction est activée, le relais du chronothermos- Durch die Aktivierung dieser Funktion betätigt das relay will trip every day at 12:00 and activate the con-...
-
Seite 55: Attivazione Pompa Per 2 Minuti Tutti I Giorni Dell'anno
2.21 - Attivazione pompa per 2 minuti 2.21 -Activación de la bomba durante 2 tutti i giorni dell’anno minutos todos los días del año Se la funzione è attivata, il relè del cronotermostato Si esta función está activada, todos los días del año interviene tutti i giorni dell’anno alle ore 12:00, per la a las 12:00 el relé... -
Seite 56: Totale Ausschließung Der Frostschutztemperatur
2.22 - Total deselection of antifreeze 2.22 - Exclusion totale de la température 2.22 - Totale Ausschließung der temperature antigel Frostschutztemperatur This function allows the thermoregulation to be deac- Cette fonction permet de désactiver la régulation ther- Diese Funktion ermöglicht das Deaktivieren der tivated when operating with the antifreeze tempera- mique pendant les périodes de fonctionnement où... -
Seite 57: Esclusione Totale Della Temperatura Antigelo
2.22 - Esclusione totale della temperatura 2.22 - Exclusión total de la temperatura antigelo antihielo Questa funzione consente di disattivare la Esta función permite desactivar la termoregulación termoregolazione nei periodi di funzionamento con durante los períodos de funcionamiento con tempe- impostata la temperatura antigelo t . - Seite 58 3 - FIXED SET OFF 3 - PROGRAMMES DE 3 - PROGRAMME THE PROGRAMS FONCTIONNEMENT UNIVERSTELLBARER FIXES INSERES FUNKTIONEN Program - Programme - Programm - Programma - Programa: All the days of the week - Tous les jours de la semaine - Alle Täge der Woche Comfort - Confort - Komfort - Comfort - Confort Tutti i giorni della settimana - Todos los diás de la semana Working - Activité...
- Seite 59 3 - PROGRAMMI DI 3 - PROGRAMAS DE FUNZIONAMENTO FUNCIONAMIENTO FISSI INSERITI FIJOS Program - Programme - Programm - Programma - Programa: From Monday to Friday - De lundi à vendredi - Montag bis Freitag From Saturday to Sunday - De samedi à dimanche - Samstag und Sonntag Da lunedì...
- Seite 60 P - 60...