DERMAPEN 4 Handbuch
Quicklinks

Verwandte Anleitungen für DERMAPEN 4


Inhaltszusammenfassung für DERMAPEN 4
- Seite 1 User Manual...
- Seite 2 ..................3.5.3 Dermapen 4™ Registration ................... OPERATING INSTRUCTIONS ..............Syncing the Dermapen 4™ - Why Important? ............ Pairing and Updating the Dermapen 4™ via Bluetooth ........................Demo Mode ..................... Scar Treatment (ST) Mode ..................Powering o the Dermapen 4™ ....................
- Seite 3 .................. CARING FOR YOUR DERMAPEN 4™ ....................Cleaning and Maintenance ......................... Storage ......................TROUBLESHOOTING ..................Dermapen 4™ Troubleshooting ......................Entering Test Mode ............DermapenWorld™ Companion App Troubleshooting ..................WARNINGS & CONSIDERATIONS ..................... 10.1 Possible Contraindications ................10.2 Possible Side-E ects of Microneedling ....................
-
Seite 4: Purpose Of Use
During a professional procedure, the Patient usually reclines on a bed or chair. The Operator operates the Dermapen 4™ using one hand, while gently holding the Patient’s skin taut with the other hand, utilising full sterile procedures and DermapenWorld’s recommended protocol... -
Seite 5: Additional Information
1 - INTRODUCTION 1.4 – Additional Information For more information or protocol training contact your local Dermapen™ representative. https://www.dermapenworld.com/contact-us and select your country. 2 - DERMAPEN 4™ SYSTEM 2.1 - Dermapen 4™ Kit Components The Dermapen 4™ system consists of the following components: Dermapen 4™... - Seite 6 2 - DERMAPEN 4™ SYSTEM 2.2 – Dermapen 4™ Features Digital LCD Display DC Power Port Power Port Liquid Seal Flap Direct Drive Ball Guard Seals Guard Seals AOVN™ Valves Battery Bay *AOVN™ : Advanced Oscillating Vertical Needling Technology 16 Needles...
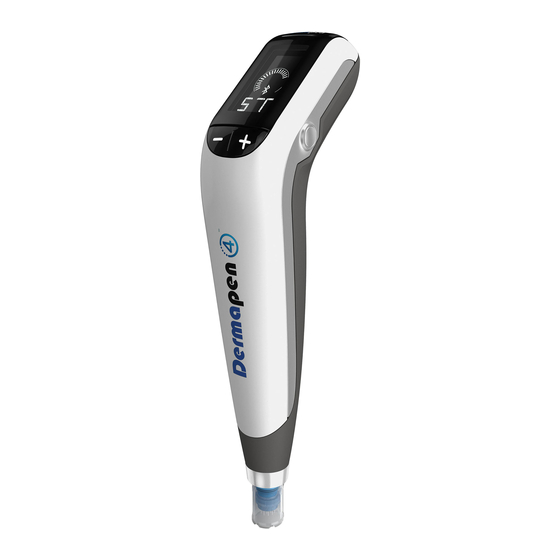
- Seite 7 2 - DERMAPEN 4™ SYSTEM 2.3 – Dermapen 4™ Buttons & 2.4 - LCD Display Layout + Increase Speed + Increase Depth - Decrease Speed - Decrease Depth Primary Button (multifunction, ON/OFF) Dermapen 4™ Status Sync/Update Notifi cation Cartridge Status...
- Seite 8 fi re, personal injury and damage to property. If the Dermapen 4™ is not likely to be used for an extended period of time the battery should be removed. Using the AC Power Adaptor with Dermapen 4™...
-
Seite 9: Before You Begin
Safety Warnings and Operating Instructions presented in this manual. Refer to 10 – Safety Warnings. 3.2 – Getting Started To get started with the Dermapen 4™, fi rst register your clinic and the Dermapen 4™ with the DermapenWorld™ Companion App. The App must be fi rst downloaded to a compatible smartphone or device. - Seite 10 The Dermapen 4™ will power on and begin the Bluetooth pairing sequence. During Bluetooth Pairing: - The Dermapen 4™ will display a blue Status LED, a Sync Symbol and a fl ashing Bluetooth Symbol. The Depth Indication Digits will cycle a 6-digit Bluetooth passkey.
- Seite 11 Once successfully updated, the Dermapen 4™ is ready to be used. If it has been more than 2 months since the last update of the Dermapen 4™ (e.g. due to Bluetooth unavailability), the Dermapen 4™ will remind you by emitting an audible tone, displaying a Sync/Updating Symbol, and displaying the time remaining to sync/update on the Depth Indication Digits (in days, or in hours if less than 48 hours remaining).
-
Seite 12: Demo Mode
4- OPERATING INSTRUCTIONS 4.3 - Demo Mode If your Dermapen 4™ is running in Demo Mode (such as a Dermapen 4™ supplied for demonstration or evaluation purposes), it will operate for the specifi ed demonstration time period only. Once the Demo Mode time period has elapsed, the Dermapen 4™ will display a “Too long since last sync”... - Seite 13 Needle Cartridge installed. If the Needle Cartridge is not installed properly, the LCD screen will display the Cartridge symbol fl ashing on and o . The Dermapen 4™ will not operate until the Cartridge is installed correctly.
- Seite 14 Most treatments are performed at Speeds’ 3 or 4. Dermapen 4’s ST (Scar Treatment) is automatically calibrated at a speed of 60 Htz/sec. For sensitive skin such as Rosacea; test at Speed 2 or 3 before proceeding to Speed 3 or 4.
- Seite 15 • The Dermapen 4™ will emit a double tone to indicate the new depth value has been accepted and the selected depth will be displayed on the Depth Indication Digits.
- Seite 16 For an optimal e ect, it is advisable to remove dead cells of the stratum corneum with an exfoliating product such as Dp Dermaceuticals Micro Derm Exfoliant™ before starting the treatment with Dermapen 4™. A mild microdermabrasion may also be performed. If required, remove all residue of the cleanser with a suitable antiseptic toner or disinfect with Chlorhexidene Solution.
- Seite 17 APPLY DpSLEEVE TO DERMAPEN 4 Power on the Dermapen 4™. If required, sync the Dermapen 4™ via Bluetooth. Select the needle depth and speed of the Dermapen 4™ that best suits the treatment area. Refer to 5.5 – Potential Depth Ranges for guidelines.
- Seite 18 As miniscule puncture channels are created, these enable the infusion of procedural mediums and ‘meso-glides’. * Hold the Dermapen 4™ device in one hand, and gently hold the skin taut with the other hand. *For patient safety and optimal treatment outcomes it is recommended to ONLY use Dp Dermaceuticals™...
- Seite 19 The product may be worn whilst sleeping, post procedures. • For best results it’s recommended to repeat Dermapen 4™ superfi cial treatments every 2-4 weeks and deeper procedures every 6-8 weeks. Anywhere from 4-8 procedures may be required (based on individual patient concerns).
-
Seite 20: Compatible Products
• Store the product in a dry and well-ventilated place at room temperature. • If the Dermapen 4™ is not likely to be used for an extended period of time the battery should be removed. • Keep the product out of the reach of children. - Seite 21 9 - TROUBLESHOOTING 9.1 – Dermapen 4™ Troubleshooting Problem Cause Solution Once powered on, the Dermapen 4™: No Needle Cartridge Remove and refi t Needle • Displays an orange Status LED detected Cartridge to ensure it is • Displays a pulsing Cartridge installed correctly.
- Seite 22 9.2 - Entering Test Mode Test mode is used to validate that the LCD display and motor are functioning correctly, and can be activated from any state where the Dermapen 4™ is powered on and the motor is not running.
- Seite 23 Dermapen 4™ on the skin. • Irregular fi brous tissue deposits in high-risk patients who have not undertaken appropriate treatment measures. 10.3 - Possible Complications Possible complications arising from the use of the Dermapen 4™ include: • Cutaneous eruptions • Infl ammation, erythema •...
-
Seite 24: During Treatment
Do not operate the Dermapen 4™ under water. • Do not operate the Dermapen 4™ in association with fl ammable agents. • To avoid the risk of electric shock, the Dermapen 4™ must only be used with the supplied Power Adaptor. -
Seite 25: Explanation Of Symbols Used In This Manual
10 - WARNINGS & CONSIDERATIONS 10.7 - Electrical Safety (Continued) • Never operate the Dermapen 4™ if it has a damaged cord or plug, if it is not working properly, if it has been dropped, damaged, or exposed to fl uids. •... -
Seite 26: Storage And Transportation
Output Voltage/Current: 5V DC, 2.4A IP Rating: IP21 Protection against electric shock: Class II • Dermapen 4™ Needle Cartridge (Reorder code: DP4-NDL-7; DP4-NDL-33) Needle count: 16 Needle size/shape: 33G, solid needle Cartridge contact zone: Fluted Shroud Needle Material: Surgical grade stainless steel Type BF Applied Part •... -
Seite 27: Warranty Information
12 - WARRANTY INFORMATION This product is manufactured under strict quality control and inspection processes. Standard warranty of the Dermapen 4™ (4MD and 4PRO) Device is to cover the operating period 7 years after the purchase.* Standard warranty for Battery Charger and Battery is 12 months. -
Seite 28: Compliance Statements
The Dermapen device or protocols are not designed to cure diseases. The Dermapen™ and Dp Dermaceuticals™ are to be used as directed. 13.4 – Document Version History Beta copy. -
Seite 29: Inhaltsverzeichnis
14- OTHER LANGUAGES 1 ..................................English 30 ..................................Dutch 44 ..................................French 58 ..................................German 72 ..................................Italian 86 ..................................Polish 100 ................................Portuguese 114 ................................Romanian 128 ..................................Russian 142 ..................................Spanish 156 ...................................Swedish Future Versions - request a electronic copy of your language. Email info@DermapenWorld.com or speak with your local DermapenWorld™... -
Seite 30: Dutch
DUTCH Digitaal LCD Display Netsnoer stroomaansluiting Power Port Liquid afsluitklepje Directe sleepbal Verzegeling Verzegeling AOVN™ opslag Batterij invoer 16 Naalden Veiligheidskapje... - Seite 31 DERMAPEN 4™ SYSTEEM + Sneller + Meer diepte - Langzamer - Minder diepte Hoofdschakelaar (Multi functie, AAN/UIT) Dermapen 4™ Status Sync/Update Melding Cartridge Status Batterijstatus Snelheid ring Snelheid ARC Bluetooth Verbinding Diepte indicatie (mm) Draai power knop kwartslag, om hem vast te...
- Seite 32 Plaats de batterij en zorg ervoor dat de polen goed zitten. Sluit het klepje en zorg dat het goed vast zit. Als de Dermapen 4™ niet werkt, kijk dan of de batterij goed zit en of hij wel helemaal is opgeladen De AC stroom adapter gebruiken voor de Dermapen 4™...
- Seite 33 Druk Register a Pen for an Existing Clinic, en selecteer de kliniek van je lijst. Wanneer je de hoofdknop van de Dermapen 4 1,5 seconde indrukt hoor je een luide toon. De Dermapen 4 zal aan gaan en beginnen met het verbinden met Bluetooth.
- Seite 34 Synchroniseren en updaten is van cruciaal belang voor de Dermapen 4 om er voor te zorgen dat hij nog accuraat werkt op de lange termijn. Dit process zorgt er voor dat de Dermapen 4 zijn interne naald kalibratie altijd geupdate is met mogelijke fi rmware verbeteringen.
- Seite 35 Een enkele toon hoor je voor iedere knop die je indrukt. • De Dermapen zal een dubbele toon laten horen om te laten zien dat de nieuwe snelheid is geaccepteerd, en de geselecteerde snelheid wordt getoond op de Snelheid Indicatie Ring •...
- Seite 36 (respectievelijk). Een enkele toon is te horen voor ieder knopje. • De Dermapen zal een dubbele toon laten horen om te laten zien dat de nieuwe diepte is geaccepteerd, en de geselecteerde diepte wordt getoond op de Diepte Indicatie Cijfers •...
- Seite 37 Voor een optimaal e ect is het aan te raden om de dode cellen te verwijderen met een product zoals Dp Dermaceuticals Micro Derm Exfoliant™ voordat je begint met het behandelen met de Dermapen 4. Een milde microdermabrasie behandeling kan worden uitgevoerd. Als het nodig is kun je alle overblijfselen weghalen met een eenvoudige cleanser met een geschikte toner of je desinfecteert met een Chlorhexidene oplossing.
- Seite 38 Doe de Dermapen 4™ aan. Wanneer nodig, sync de Dermapen 4™ via Bluetooth. Selecteer de naald diepte en de snelheid met de Dermapen 4™ die het best past voor het te behandelen gebied. Kijk bij potentiële diepte bereik voor meer info.
- Seite 39 Houdt het Dermapen 4™ handvat in een hand, en houdt voorzichtig de huid vast met de andere hand *Voor de veiligheid van de patiënten en voor de optimale behandeling is het aan te raden ALLEEN de Dp Dermaceuticals™...
- Seite 40 The product may be worn whilst sleeping, post procedures.AWAY! • Voor de beste resultaten herhaal het Gebruik van Dermapen 4™ voor behandelingen elke 2-4 weken en diepere procedures 6-8 weken. Alles van 4-8 procedures kan nodig zijn (gebaseerd op de patiënt en indicatie). COVER...
-
Seite 41: Probleemoplossing
PROBLEEMOPLOSSING Dermapen 4™ Problemen Probleem Oorzaak Oplossing Wanneer hij aanstaat zal de Dermapen 4™: Geen naald cartridge Verwijder de Naald Cartridge en • Een oranje LED laten zien gevonden zorg er voor dat hij goed zit • Een draaiend Cartridge symbool... - Seite 42 Om het risico op schokken te voorkomen of schade aan het systeem moet de Dermapen 4 alleen gebruikt worden met de geleverde oplader. • Gebruik de Dermapen 4 niet als de kabel kapot is, als het niet werk, als hij gevallen is, kapot is of bloot is gesteld aan vloeisto en. •...
- Seite 43 Draai de Cartridge een kwartslag om hem vast te zetten Houdt de beschermkap vast voordat je gaat behandelen Een Naaldcartridge kan geïnstalleerd worden terwijl de Dermapen 4 aan of uit staat, echter kan de naald motor niet werken zonder een Naaldcartridge Als de Naaldcartridge niet goed is geïnstalleerd zal het LCD scherm een Cartridge symbool...
-
Seite 44: French
FRENCH Écran Numérique LCD Prise d’alimentation AC Sortie d’alimentation de liquide Clapet d’étanchéité Bille de Commande Directe Joints d’étanchéité Joints d’étanchéité Compartiment de Valves AOVN™ batterie 16 Aiguilles Capuchon de sécurité... - Seite 45 + Augmenter la profondeur - Diminuer la vitesse - Diminuer la profondeur Touche principale (multifonctions, Marche/Arrêt) État du Dermapen 4™ Notifi cation de synchronisation/ mise à jour de Cartridge Status l’état de la batterie Speed Ring Angle de vitesse...
- Seite 46 Replacez le couvercle de la batterie et assurez-vous qu’il est bien fermé. Si le Dermapen 4™ ne fonctionne pas, vérifi ez le positionnement de la batterie et Insérez la batterie dans le compartiment de la batterie, en veillant à ce que la polarité soit respectée qu’ils sont complètement chargés.
- Seite 47 1,5 secondes jusqu’à ce que vous entendiez une tonalité audible. Le Dermapen 4™ s’allumera et commencera la séquence d’appairage Bluetooth. Pendant l’appairage Bluetooth : - Le Dermapen 4™ a chera un voyant d’état bleu, un symbole de synchronisation et un symbole Bluetooth clignotant. Les chi res de l’indication de profondeur vont faire un cycle d’une clé...
- Seite 48 Synchronisation du Dermapen 4™ - Pourquoi est-il important? La synchronisation et la mise à jour du Dermapen 4™ est essentielle à la fonctionnalité et à la précision à long terme de votre appareil. Ce processus permet de mettre à jour en permanence les tables internes d’étalonnage des aiguilles du Dermapen 4 ainsi que les progrès du fi...
- Seite 49 Esthétique professionnelle (Model Dermapen 4™ 4PRO): 0.2 mm – 1.0 mm Le Dermapen 4™ est capable de fonctionner à di érents niveaux de vitesse selon le confort du patient et les préférences du praticien. La plupart des traitements sont e ectués à des Vitesses 3 ou 4 (voir annexe 4.4.5).
- Seite 50 (respectivement). Une seule tonalité sera émise pour chaque pression de bouton valide. • Le Dermapen 4™ émettra une double tonalité pour indiquer que la nouvelle valeur de profondeur a été acceptée et la profondeur sélectionnée sera a chée sur les chi res d’indication de profondeur.
- Seite 51 Dp Dermaceuticals Micro Derm Exfoliant™ avant de commencer le traitement avec Dermapen 4™. Une microdermabrasion légère peut également être e ectuée. Si nécessaire, enlever tous les résidus du nettoyant avec un toner antiseptique approprié ou désinfecter avec une solution de chlorhexidène.
- Seite 52 Allumez le Dermapen 4™. Si nécessaire, synchronisez le Dermapen 4™ via le Bluetooth. Sélectionnez la profondeur et la vitesse de l’aiguille du Dermapen 4™ qui convient le mieux à la zone à traiter. Se reporter à la section 5.5 - Plages de profondeurs potentielles pour les lignes directrices.
- Seite 53 à la fois. Au fur et à mesure que de minuscules canaux de ponction sont créés, ceux-ci permettent l’infusion de milieux procéduraux et de “ méso-glissières “. * Tenez la poignée Dermapen 4™ dans une main et tendez doucement la peau avec l’autre main.
- Seite 54 Pour les meilleurs résultats, il est recommandé de répéter les traitements superfi ciels Dermapen 4™ toutes les 2-4 semaines et les procédures plus profondes toutes les 6-8 semaines. N’importe où entre 4 et 8 procédures peuvent être nécessaires (en fonction des préoccupations individuelles du patient).
- Seite 55 DÉPANNAGE Dépannage du Dermapen 4™ Problème Cause Solution Une fois allumé, le Dermapen 4™ : Aucune cartouche Enlever et remonter la cartouche • A che un voyant d’état orange. d’aiguille détectée d’aiguille pour s’assurer qu’elle • A che un symbole de cartouche est installée correctement.
- Seite 56 été endommagé ou exposé à des liquides. • Il n’y a pas de pièces réparables par l’utilisateur à l’intérieur du Dermapen 4™. Ne pas modifi er le matériel de quelque manière que ce soit. Contactez votre fournisseur pour obtenir de l’assistance technique.
- Seite 57 Garder le bouchon protecteur en place jusqu’à la fi n du traitement. Une cartouche peut être installée alors que le Dermapen 4™ est allumé ou éteint, cependant, le moteur d’aiguilletage ne fonctionnera pas sans cartouche d’aiguille installée.
-
Seite 58: German
GERMAN Digitales LCD Display DC Stromanschluss Stromanschluss Flüssigkeits- Siegelklappe Direkt-Antriebs- Kugel Guard Seals Guard Seals AOVN™ Valves Batterie-Lager 16 Nadeln Sicherheitsverschluss... - Seite 59 DERMAPEN 4™ SYSTEM + Geschwindigkeit erhöhen + Tiefe erhöhen - Tiefe verringern - Geschwindigkeit verringern Primärtaste (Multifunktion, AN/AUS) Dermapen 4™ Status Sync/Update Notifi cation Patronen-Status Battery Status Geschwindigkeit Ring Geschwindigkeit sbogen Bluetooth Verbindung Tiefen-Indikator (mm) Drehen Sie den Stromadapter eine...
-
Seite 60: Installation & Einrichtung
Legen Sie die Batterie in das Batterie-Lager und achten Sie dabei auf die korrekte Polarität. Schließen Sie alles wieder und versichern Sie sich, dass alles gut verschlossen ist. Sollte der Dermapen 4™ nicht funktionieren, prüfen Sie die Batteriepolarität und ob diese auch vollständig geladen sind. Nutzung des Strom-Adapters mit Dermapen 4™... - Seite 61 1,5 Sekunden bis Sie einen Ton hören. Der Dermapen 4™ wird sich einschalten und die Bluetooth-Kopplungssequenz starten. Während der Kopplung: - Die Status-LED des Dermapen 4™ wird blau sein und ein Sync Symbol anzeigen und ein Bluetooth-Symbol wird blinken (aktive Verbindung). Der Tiefen-Indikator wird einen 6-stelligen Bluetooth-Hauptschlüssel anzeigen.
- Seite 62 So koppeln Sie den Dermapen 4™ über Bluetooth: Ensure Bluetooth is enabled on your smart device, and the Dermapen 4™ is powered o Gehen Sie sicher, dass Bluetooth auf Ihrem Smart-Gerät aktiviert ist und dass Ihr Dermapen 4™ ausgeschaltet ist.
- Seite 63 Der Dermapen 4™ kann mit verschiedenen Geschwindigkeitsstufen betrieben werden, je nach Patientenkomfort und Präferenz des jeweiligen Anwenders. Die meisten Behandlungen werden mit der Geschwindigkeit 3 oder 4 durchgeführt (siehe Anhang 4.4.5). Dermapen 4’s ST (Narben-Behandlung) ist automatisch auf eine Geschwindigkeit von 60 Hz kalibriert. Für empfi...
- Seite 64 Verwenden Sie die Tiefen-Tasten +/-, um die Nadeltiefe zu erhöhen bzw. zu verringern. Für jeden gültigen Tastendruck wird ein einzelner Ton ausgegeben. • Der Dermapen 4™ gibt einen Doppelton aus, um aufzuzeigen, dass der neue Tiefenwert akzeptiert wurde und die ausgewählte Tiefe wird danach auf dem Tiefen-Indikator angezeigt. •...
-
Seite 65: Reihenfolge Der Behandlung
Für eine optimale Wirkung ist es ratsam, tote Zellen des Stratum corneum mithilfe eines Peelings zu entfernen. Produkte wie Dp Dermaceuticals Micro Derm Exfoliant™ kann vor Beginn der Behandlung mit dem Dermapen 4™ angewandt werden. Eine leichte Mikrodermabrasion kann ebenfalls durchgeführt werden. Entfernen Sie bei Bedarf alle Rückstände des Reinigungsmittels mit einem geeigneten antiseptischen Toner oder desinfi... - Seite 66 REIHENFOLGE DER BEHANDLUNG Schritt 3 – Behandlung mit dem Dermapen 4™: Legen Sie eine aufgeladene Batterie in den Dermapen 4™ ein oder schließen Sie den Stromadapter an (Ersetzten Sie dies zu keinem Zeitpunkt mit anderen Batterien). Legen Sie mit den Händen (Handschuhe) eine sterilisierte Nadelpatrone in die Dermapen 4™...
- Seite 67 Behandlungsregion auf. Da winzige Punktionskanäle gescha en werden, ermöglichen diese die Infusion von Verfahrensmedien und “Meso-Glides”. * Halten Sie den Dermapen 4™ Gri in einer Hand und halten Sie die Haut vorsichtig mit der anderen Hand fest. *Für die Sicherheit des Patienten und optimale Behandlungsergebnisse wird empfohlen, Dp Dermaceuticals™...
- Seite 68 Halten Sie die Primärtaste 3 Sekunden lang gedrückt, bis die Anzeige und die Status- LED ebenfalls ausgehen. • Der Dermapen 4™ kann jederzeit, außer während einer Bluetooth- Synchronisierungswarnung oder während des Test-Modus, ausgeschaltet werden. • Wenn der Dermapen 4™ länger als 2 Minuten inaktiv ist, schaltet er sich automatisch ab.
- Seite 69 • Gibt einen Doppelton von sich Sobald der Dermapen 4™ Synchronisierungs- Synchronisieren Sie den eingeschaltet ist: Warnung Dermapen 4™ so schnell wie • Festes Sync-Symbol möglich über Bluetooth. • Tage oder Stunden warden auf Tiefen-Indikator angezeigt • Gibt einen Ton ab Sobald der Dermapen 4™...
- Seite 70 Flüssigkeiten ausgesetzt wurde. • Es gibt keine vom Anwender zu wartenden Teile im Dermapen 4™. Modifi zieren Sie das Gerät in keiner Weise und wenden Sie sich für technische Unterstützung an den Gerätehersteller. •...
- Seite 71 Symbol aufblinken. Der Dermapen 4™ funktioniert erst, wenn die Patrone korrekt sitzt. Installieren Sie nur eine originale Dermapen 4™ Patrone. Das Einsetzen einer anderen Patrone birgt die Gefahr, dass der Dermapen 4™ beschädigt wird und dass die Garantie erlischt. Reinigung und Instandhaltung •...
-
Seite 72: Italian
ITALIAN Display LCD Digitale Porta di Alimentazione CC Porta di Alimentazione Linguetta di Sigillo Liquida Sfera ad Azionamento Diretto Sigilli Sigilli Valvole AOVN™ Vano Batteria 16 Aghi Tappo di Sicurezza... - Seite 73 SISTEMA DERMAPEN 4™ + Aumentare la velocità + Aumentare la Profonditá - Diminuire la Profondità - Diminuire la velocità Pulsante Principale (multifunzione, ON/OFF) Stato Dermapen 4™ Sincronizzazione/Aggiornament Stato della Cartuccia Notifi ca Stato Batteria Anello di Velocità Arco di Velocità...
- Seite 74 Accensione del Dermapen 4™ Tenere premuto il pulsante principale fi nché il Dermapen 4™ non emetta un segnale acustico. Questo dovrebbe richiedere circa 3 secondi. Il LED di stato si illumina in blu e l’anello di indicazione della velocità inizia a lampeggiare.
- Seite 75 Quando richiesto, tieni premuto il pulsante principale di Dermapen 4 per 1,5 secondi fi no a quando non senti un segnale acustico. Il Dermapen 4™ si accenderà e inizierà la sequenza di accoppiamento Bluetooth. Durante l’accoppiamento Bluetooth: - Il Dermapen 4™ mostrerà un LED blu di stato, un simbolo di sincronizzazione e un simbolo Bluetooth lampeggiante.
- Seite 76 Per accoppiare il Dermapen 4™ via Bluetooth: Assicurati che il Bluetooth sia abilitato sul tuo dispositivo smart e che il Dermapen 4™ sia spento. Quando richiesto, accendi il Dermapen 4™ per iniziare ad Accoppiare il Dermapen 4™ con il tuo dispositivo smart.
- Seite 77 Estetica Professionale (Modello Dermapen 4™ 4PRO): 0,2 mm - 1,0 mm Il Dermapen 4™ è in grado di operare a diversi livelli di velocità in base al comfort del paziente e alle preferenze dell’operatore. La maggior parte dei trattamenti sono eseguiti alle velocità...
- Seite 78 Verrà emesso un singolo tono per ogni pressione di un pulsante valido.. • Il Dermapen 4™ emetterà un doppio tono per indicare che il nuovo valore di profondità è stato accettato e che la profondità selezionata sarà visualizzata sulle Cifre di Indica- zione della Profondità.
- Seite 79 Per un e etto ottimale, si consiglia di rimuovere le cellule morte dello strato corneo con un esfoliante come Dp Dermaceuticals Micro Derm Exfoliant™ prima di iniziare il trattamento con Dermapen 4™. È inoltre possibile eseguire una lieve microdermoabrasione. Se necessario, rimuovere tutti i residui del detergente con un idoneo toner antisettico o disinfettare con soluzione di cloresidene.
- Seite 80 APPLICARE DPSLEEVE AL DERMAPEN 4 Accendere il Dermapen 4™. Se necessario, sincronizzare il Dermapen 4™ via Bluetooth. Selezionare la profondità e la velocità dell’ago del Dermapen 4™ che meglio si adatta all’area di trattamento. Consultare 5.5 - Potenziali Campi di Profondità per Linee Guida.
- Seite 81 La creazione di minuscoli canali di foratura consente l’infusione di mezzi di procedura e di “meso-glides”. * Tenere l’impugnatura del Dermapen 4™ con una mano e tenere delicatamente la pelle tesa con l’altra. *Per garantire la sicurezza del paziente e risultati ottimali del trattamento, si rac- comanda di utilizzare SOLO Dp Dermaceuticals™...
- Seite 82 Per ottenere risultati ottimali, si consiglia di ripetere i trattamenti superfi ciali Dermapen 4™ ogni 2-4 settimane e le procedure più profonde ogni 6-8 settimane. Comunque da 4 a 8 procedure possono essere richieste (in base alle preoccupazioni di ogni pazienti).
-
Seite 83: Risoluzione Dei Problemi
RISOLUZIONE DEI PROBLEMI Dermapen 4™ Risoluzione dei Problemi Problema Causa Soluzione Una volta acceso, il Dermapen 4™: Nessuna Cartuccia Rimuovere e rimontare • Mostra un LED di stato arancione dell’Ago rilevata la Cartuccia dell’Ago per • Mostra il simbolo di una cartuccia... - Seite 84 • Non utilizzare mai il Dermapen 4™ se il cavo o la spina sono danneggiati, se non fun- ziona correttamente, se è caduto, se è stato danneggiato o se è stato esposto a liquidi.
- Seite 85 Tenere il cappuccio protettivo in posizione fi no a poco prima del trattamento. È possibile installare una cartuccia mentre il Dermapen 4™ è acceso o spento; tuttavia, il motore dell’agugliatore non funzionerà senza una cartuccia ad ago installata.
-
Seite 86: Polish
POLISH Wyświetlacz cyfrowy Port zasilania prądem stałym Port zasilania z klapką uszczelniającą Uchwyt napędu Osłony uszczelniające Osłony uszczelniające Wnęka na baterie Zawory osłon uszczelniających AOVN™ 16 igieł Nasadka zabezpieczająca... - Seite 87 + Większa prędkość + Większa głębokość - Mniejsza prędkość - Mniejsza głębokość Przycisk podstawowy (wielofunkcyjny, włączony / wyłączony - ON/OFF) Dioda statusu Dermapen 4™ Synchronizacja / Aktualizacja Ekran statusu Powiadomienie o stanie baterii Prędkości Kartridża Wskaźnik prędkości Łączność Bluetooth Wskaźnik głębokości (mm) Obróć...
- Seite 88 Podłącz zasilacz do gniazdka elektrycznego. Jeśli jest to konieczne, upewnij się, że włącznik zasilania jest włączony. Dermapen 4™ może być zasilany z zasilacza AD / DC z zainstalowaną baterią lub bez niej. Włączanie Dermapen 4™ Naciśnij i przytrzymaj przycisk podstawowy, aż Dermapen 4™ wyemituje sygnał...
- Seite 89 Otwórz aplikację DermapenWorld™ Na ekranie logowania kliknij Create New Account (Zarejestruj) lub Zaloguj się, jeśli twoja klinika ma już konto na DermpenWorld. com PROZONE. (Przejdź do etapu: rejestracja Dermapen 4™ w klinice) i potwierdź The General Privacy Agreement oraz The Terms and Conditions W oknie Create Account wpisz nazwę...
-
Seite 90: Instrukcja Obsługi
• Po udanej aktualizacji Dermapen 4™ jest gotowy do użycia. Jeśli minęło więcej niż 2 miesiące od ostatniej aktualizacji Dermapen 4™ (np. z powodu niedostępności Bluetooth), Dermapen 4™ przypomni Ci o tym, emitując dźwięk, wyświetlając symbol synchronizacji / aktualizacji i wyświetlając czas pozostały do synchronizacji / aktualizacji na wskaźnikach głębokości (w dniach lub w godzinach, jeśli pozostało mniej niż... -
Seite 91: Instrukcja Użycia
Profesjonalny estetyczny (Model Dermapen 4™ PRO): 0.2 mm – 1.0 mm Dermapen 4™ może pracować na różnych poziomach prędkości, zależnie od komfortu pacjen- ta i preferencji lekarza. Większość zabiegów wykonuje się przy prędkościach 3 lub 4 (patrz dodatek 4.4.5). Dermapen 4 ST (Leczenie blizn) jest automatycznie skalibrowany z prędkością... - Seite 92 Użyj przycisków Depth (Głębokość) +/-, aby zwiększyć lub zmniejszyć głębokość igły (odpowiednio). Jeden dźwięk będzie emitowany dla każdego prawidłowego naciśnięcia przycisku. • Dermapen 4™ wyemituje podwójny sygnał dźwiękowy wskazujący, że nowa wartość głębokości została zaakceptowana, a wybrana głębokość zostanie wyświetlona na pierścieniu wskazania głębokości. •...
- Seite 93 Aby uzyskać optymalny efekt, zaleca się usunięcie martwych komórek warstwy rogowej za pomocą środka złuszczającego Dp Dermaceuticals Micro Derm Exfoliant™, przed rozpoczęciem zabiegu z użyciem Dermapen 4™. Można również wykonać łagodną mikrodermabrazję. W razie potrzeby usuń wszystkie pozostałości środkiem oczyszczającym z odpowiednim tonerem antyseptycznym lub zdezynfekuj skórę...
- Seite 94 Dermapen 4™, jak pokazano na rysunku poniżej. NACIĄGNIJ DPSLEEVE NA DERMAPEN 4 Włącz Dermapen 4™. Jeśli to konieczne, zsynchronizuj Dermapen 4™ przez Bluetooth. Wybierz głębokość i prędkość igły Dermapen 4™, która najlepiej pasuje do obszaru leczenia. Patrz 5.5 - Potencjalne zakresy głębokości według rejonu skóry. Kliknij...
- Seite 95 Do tworzących się w wyniku nakłuć mikrokanalików podawane są środki lecznicze i produkty mezoterapeutyczne. * Przytrzymaj uchwyt Dermapen 4™ jedną ręką, a drugą delikatnie przytrzymaj i napinaj skórę. *W celu zapewnienia bezpieczeństwa pacjentów i dla uzyskania optymalnych wyników leczenia zaleca się...
- Seite 96 • W celu uzyskania najlepszych efektów zaleca się powtarzanie zabiegów Dermapen 4™ co 2-4 tygodnie i głębszych procedur co 6-8 tygodni. Konieczne może być zastosowanie od 4 do 8 procedur (w zależności od indywidualnych problemów pacjenta). COVER...
- Seite 97 ROZWIĄZYWANIE Rozwiązywanie problemów Dermapen 4™ Problem Przyczyna Rozwiązanie Gdy Dermapen 4™ jest włączony: Gdy nie wykryty Usuń i włóż ponownie kartridż • Wyświetli się pomarańczowa dioda LED zostanie kartridż z z igłami, żeby upewnić się, że stanu igłami jest poprawnie zainstalowany •...
- Seite 98 Aby uniknąć ryzyka porażenia prądem lub uszkodzenia systemu, Dermapen 4™ może być używany tylko z załączonym zasilaczem. • Nigdy nie używaj Dermapen 4™, jeśli ma uszkodzony przewód lub wtyczkę, jeśli nie działa prawidłowo, został upuszczony, uszkodzony lub wystawiony na działanie płynów. •...
- Seite 99 Utrzymuj nasadkę ochronną na miejscu, i usuń ją dopiero bezpośrednio przed zabiegiem. Kartridż można zainstalować, gdy Dermapen 4™ jest podłączony do źródła zasilania lub wyłączony, jednakże silnik igłowy nie będzie działał bez zainstalowanego kartridża igłowego.
-
Seite 100: Portuguese
PORTUGUESE Mostrador Digital LCD Porta de Alimentação CC Tampa de Vedação de Líquidos da Porta de Alimentação Esfera de Acionamento Direto Vedantes Vedantes Compartimento Válvulas AOVN™ da Bateria 16 Agulhas Tampa de Segurança... - Seite 101 + Aumentar Velocidade + Aumentar Profundidade - Diminuir Velocidade - Diminuir Profundidade Botão Principal (multifunções, ON/OFF) Estado do Dermapen 4™ Aviso de Sincronização/Atualização Estado do Cartucho Estado da Bateria Anel de Velocidade Arco de Velocidade Conexão Bluetooth Indicação de Profundidade...
- Seite 102 Insira a bateria no compartimento, certifi cando-se que é respeitada a polaridade correta. Reponha a tampa do compartimento da bateria e certifi que-se que está bem fechada. Se o Dermapen 4™ não funcionar, verifi que o posicionamento da bateria e assegure que está completamente carregada.
- Seite 103 Quando solicitado, mantenha o Botão Principal do Dermapen 4 premido durante 1,5 segundos até ouvir um tom sonoro. O Dermapen 4™ irá ligar-se e começar a sequência de emparelhamento por Bluetooth. Durante o emparelhamento por Bluetooth: - O Dermapen 4™ irá apresentar um LED de estado azul, um símbolo de sincronização e um símbolo de Bluetooth a piscar.
- Seite 104 fi rmware. Emparelhar e Atualizar o Dermapen 4™ por Bluetooth Depois de ligar o Dermapen 4™ pela primeira vez ou ao conectá-lo a outro dispositivo inteligente, o Dermapen 4™ deverá ser emparelhado por Bluetooth e sincronizado com o aplicativo DermapenWorld™.
- Seite 105 3 ou 4. O tratamento Dermapen 4 ST (Scar Treatment) é automaticamente calibrado a uma velocidade de 60 Htz/seg. No caso de peles sensíveis como a rosácea, aconselha-se a efetuar um teste ou começar com a velocidade 2 ou 3 antes de avançar para a velocidade 3 ou 4.
- Seite 106 (respectivamente). Será emitido um único tom por cada pressão de botão válida. • O Dermapen 4™ emitirá dois tons para indicar que o novo valor de profundidade foi aceite e a profundidade selecionada será apresentada nos dígitos de indicação da pro- fundidade.
- Seite 107 Dp Dermaceuticals Micro Derm Exfoliant™ antes de iniciar o tratamento com o Dermapen 4™. Também pode ser efetuada uma microdermoabrasão suave. Se necessário, remova todos os resíduos do produto de limpeza com um tônico antisséptico adequado ou desinfete a zona com uma solução de clorexidina.
- Seite 108 ORDEM DO TRATAMENTO Passo 3 – Tratamento com o Dermapen 4™: Insira uma bateria carregada no Dermapen 4™, ou ligue o adaptador de alimentação. (Nunca substitua por outras baterias.) Utilizando luvas, insira um cartucho de agulhas esterilizado na extremidade do Dermapen 4™.
- Seite 109 À medida que são criados minúsculos canais de punção, estes permitem a infusão de meios de procedimento e ‘meso-glides’. * Agarre o punho do Dermapen 4™ com uma mão e com a outra mão mantenha a pele ligeiramente esticada.
- Seite 110 • Para resultados ótimos, recomenda-se a repetição dos tratamentos superfi ciais Dermapen 4™ a cada 2-4 semanas e tratamentos mais profundos a cada 6-8 semanas. Podem ser necessários entre 4-8 procedimentos (com base nas preocupações de cada paciente). COVER...
-
Seite 111: Resolução De Problemas
RESOLUÇÃO DE PROBLEMAS Resolução de Problemas do Dermapen 4™ Problema Causa Solução Uma vez ligado, o Dermapen 4™: Não foi detectado Remova e reinstale o cartucho • Apresenta um LED de estado nenhum cartucho de de agulhas para assegurar que... - Seite 112 • Nunca utilize o Dermapen 4™ se tiver um cabo ou fi cha danifi cados, se não estiver a funcionar corretamente, se tiver sofrido uma queda, danos, ou tiver estado exposto a fl...
- Seite 113 Se o cartucho de agulhas não estiver corretamente instalado, o mostrador LCD irá apresentar o símbolo do cartucho a piscar. O Dermapen 4™ não funcionará enquanto o cartucho não estiver corretamente instalado.
-
Seite 114: Romanian
ROMANIAN Afi şaj Digital LCD Port de alimentare DC Lichid fl anşă de etanşare Acţionare directă cu bilă Sigiliu de protectie Sigiliu de protectie Compartiment Supape AOVN™ baterie 16 Ace Capac de siguranţă... - Seite 115 SISTEM DERMAPEN 4™ + Creştere viteză + Creştere adâncime - Reducere viteză - Reducere adâncime Buton principal (multifuncţional, ON/OFF) Stare dispozitiv Dermapen 4™ Notifi care sincronizare/actualizare Stare viteză cartuş Stare baterie Sunet Arc de viteză Conexiune Bluetooth Indicare adâncime (mm) Rotiţi adaptorul de alimentare...
- Seite 116 Conectaţi adaptorul de alimentare în sursa de energie cu curent alternativ AC. Atunci când este necesar, asiguraţi-vă că întrerupătorul de alimentare este pornit. Dispozitivul Dermapen 4™ poate fi alimentat de la adaptorul AD/DC Power cu sau fără ca bateria să fi e instalată.
- Seite 117 1,5 secunde până când auziţi un ton. Dispozitivul Dermapen 4™ va porni şi va începe secvenţa de asociere Bluetooth. În timpul asocierii Bluetooth : - Dispozitivul Dermapen 4™ va afi şa LED-ul de stare de culoarea albastru, un simbol de sincronizare şi un simbol Bluetooth intermitent. Depth Indication Digits va efectua un ciclu de introducere a unei parole Bluetooth din 6 cifre.
- Seite 118 După prima pornire sau conectare a dispozitivului Dermapen 4™ la un alt dispozitiv inteligent, Dermapen 4 ™ va trebui să fi e asociat prin Bluetooth și sincronizat cu aplicaţia DermapenWorld ™. Pentru a sincroniza şi actualiza dispozitivul Dermapen 4™ : Asiguraţi-vă...
- Seite 119 Un singur ton va fi emis pentru fi ecare apăsare validă de buton. • Dispozitivul Dermapen 4™ va emite un ton dublu pentru a indica faptul că valoarea noii viteze a fost acceptată şi că viteza selectată va fi afi şată pe Speed Indication Ring.
- Seite 120 (respectiv). Un singur ton va fi emis pentru fi eacare apăsare validă de buton. • Dispozitivul Dermapen 4™ va emite un ton dublu pentru a indica faptul că valoarea noii adâncimi a fost acceptată, iar adâncimea selectată va fi afi şată pe Depth Indication Digits.
- Seite 121 Pentru un efect optim, se recomandă îndepărtarea celulelor moarte din stratul cornos cu produse exfoliante precum Exfoliantul Dp Dermaceuticals Micro Derm™ înainte de începerea tratamentului cu dispozitivul Dermapen 4™. De asemenea, se poate efectua o uşoară microdermabraziune. În cazul în care este necesar, îndepărtaţi toate urmele demachierii cu un toner antiseptic adecvat sau dezinfectaţi cu Soluţie de Clorhexidina.
- Seite 122 Introduceţi o baterie încărcată în dispozitivul Dermapen 4™ sau conectaţi adaptorul de alimentare. (Nu înlocuiţi în niciun moment cu alte baterii.) Utilizând mănuşi, introduceţi un ac steril în vârful cartuşului dispozitivului Dermapen 4™ . Pentru a ajuta la prevenirea contaminării încrucişate, întindeţi DPSleeve steril peste cartuş...
- Seite 123 Deoarece sunt create canale minuscule de perforare, este permisă folosirea proce- durilor de tratament şi ‘meso-glides’. * Ţineţi mânerul dispozitivul Dermapen 4™ într-o mână, iar cu cealaltă întindeţi uşor pielea. *Pentru siguranţa pacienţilor şi pentru rezultatele optime ale tratamentului, se recomandă...
- Seite 124 Pentru cele mai bune rezultate, se recomandă repetarea tratamentelor superfi ciale Dermapen 4™ la fi ecare 2-4 săptămâni şi proceduri mai complexe la fi ecare 6-8 săptămâni. Pot fi necesare între 4-8 proceduri (în funcţie de necesităţile fi ecărui pacient).
- Seite 125 DEPANAREA Depanarea dispozitivului Dermapen 4™ Problemă Cauză Soluţie Odată pornit, dispozitivul Dermapen 4™: Niciun cartuş cu ac Scoateţi şi repoziţionaţi • Afi şează un LED de stare de culoarea detectat cartuşul cu ac pentru a portocaliu vă asigura că acesta este •...
- Seite 126 Instalarea incorectă a bateriei în dispozitivul Dermapen 4™ sau în încărcătorul de baterii este periculoasă şi poate provoca incendii, vătămări corporale şi deteriorarea bunurilor. În cazul în care dispozitivul Dermapen 4™ nu este utilizat pentru o perioadă lungă de timp, bateriile trebuie să fi e scoase. Nu înlocuiţi niciodată cu alte baterii.
- Seite 127 Păstraţi capacul de protecţie la locul său imediat înainte de tratament. Un cartuş poate fi instalat în timp ce dispozitivul Dermapen 4™ este pornit sau oprit, cu toate acestea, motorul cu ac nu va funcţiona fără instalarea cartuşului cu ac.
-
Seite 128: Russian
RUSSIAN Цифровой ЖК-дисплей Разъем питания постоянного тока Водонепроницаемая крышка разъема питания Шарик прямого привода Защитные уплотнения Защитные уплотнения Отсек для Клапаны AOVN™ аккумулятора 16 иголок Защитная крышка... - Seite 129 СИСТЕМА DERMAPEN 4™ + Увеличение + Увеличение глубины скорости - Уменьшение скорости - Уменьшение глубины Главная кнопка (многофункциональная, ВКЛ/ВЫКЛ) Состояние Dermapen 4™ Уведомление о синхронизации/ обновлении Состояние картриджа Состояние аккумулятора Индикатор скорости Подключение Bluetooth Индикация глубины (мм) Поверните разъем питания на...
- Seite 130 установленным аккумулятором или без него. Включение Dermapen 4™ Нажмите и удерживайте Главную кнопку до тех пор, пока Dermapen 4 ™ не издаст звуковой сигнал. Это займет около 3 секунд. Светодиод состояния будет гореть синим, а кольцевой индикатор скорости будет мигать.
- Seite 131 Нажмите Register a Pen for an Existing Clinic и выберите свою клинику из представленного списка. При появлении соответствующего сообщения, удерживайте Главную кнопку Dermapen 4™ примерно в течение 1,5 секунды до тех пор, пока не услышите звуковой сигнал. Dermapen 4™ включится и начнется последовательное подключение через Bluetooth.
- Seite 132 Когда приложение отобразит «Pen Successfully Updated», нажмите Done для завершения процесса синхронизации обновления. Чтобы подключить Dermapen 4™ через Bluetooth: Убедитесь, что на вашем смартфоне включен Bluetooth, а Dermapen 4™ отключен. При появлении соответствующего сообщения, включите Dermapen 4™ для подключения Dermapen 4™ к вашему смарт-устройству.
- Seite 133 комфортом пациента и предпочтениями пользователей. Большинство сеансов обработки выполняется на скоростях 3 или 4. Настройка ST (Обработка шрамов) Dermapen 4™ автоматически устанавливает скорость в 60 об/с. Для чувствительной кожи, например, с красными угрями, сначала проверьте скорость 2 или 3, прежде чем перейти к скорости 3 или 4.
- Seite 134 Используйте кнопки Глубина +/- для увеличения или уменьшения глубины иглы (соответственно). Каждое допустимое нажатие кнопки будет сопровождаться звуковым сигналом. • Dermapen 4™ издаст двойной звуковой сигнал, указывая на то, что новое значение глубины принято, после чего новая глубина будет отображаться на Цифровом индикаторе глубины. •...
- Seite 135 Для достижения оптимального эффекта желательно удалить мертвые клетки рогового слоя с помощью отшелушивающего средства, такого как Dp Dermaceuticals Micro Derm Exfoliant™ перед началом обработки с помощью Dermapen 4™. Также можно выполнить микродермабразию. При необходимости удалите весь остаток очищающего средства подходящим антисептическим...
- Seite 136 на Картридж и Dermapen 4™, как показано на рисунке. ПРИМЕНЕНИЕ DPSLEEVE К DERMAPEN Включите Dermapen 4™. При необходимости синхронизируйте Dermapen 4™ через Bluetooth. Выберите глубину и скорость иглы Dermapen 4™, которые лучше всего подходят для обработки. См. Потенциальные диапазоны глубины. Нажмите ВЫБЕРИТЕ ГЛУБИНУ, СКОРОСТЬ И ДИАПАЗОН СКОРОСТИ ИГЛЫ...
- Seite 137 зону за раз. По мере создания каналов с минимальным проколом появляется возможность вливать вещества, используемые в процедуре, и ‘meso-glides’. * Держите Dermapen 4™ в одной руке, аккуратно натягивая кожу другой рукой. *Для обеспечения безопасности пациента и получения оптимальных результатов для...
- Seite 138 носить во время сна. • Для достижения наилучших результатов рекомендуется повторять поверхностные процедуры Dermapen 4™ каждые 2-4 недели, а более глубокие процедуры каждые 6-8 недель. В любом случае может потребоваться от 4 до 8 процедур (исходя из индивидуальных проблем пациентов). COVER...
-
Seite 139: Выявление Неисправностей
Выполните синхронизацию • Светодиод состояния горит Dermapen 4™ Dermapen 4™ через Bluetooth. оранжевым • Мигает Символ синхронизации • Раздается двойной звуковой сигнал Во время работы Dermapen 4™: Низкий заряд Замените или зарядите • Светодиод состояния горит аккумулятора аккумулятор при первой оранжевым... - Seite 140 Всегда носите перчатки при использовании устройства Dermapen 4™. • Чтобы избежать заражения, распечатайте Картридж и DpSleeve непосредственно пред началом обработки и убедитесь, что Dermapen 4™ не контактирует с другими объектами. • Всегда дезинфицируйте кожу до и после любой процедуры. •...
- Seite 141 менее, двигатель для движения иглы не будет работать без установленного Игольчатого картриджа. Если Игольчатый картридж установлен неправильно, на ЖК-дисплее отобразится мигающий Символ картриджа. Dermapen 4™ не будет работать до тех пор, пока Картридж не будет установлен правильно. Всегда устанавливайте в Dermapen 4™ оригинальный Картридж. Установка любого другого...
-
Seite 142: Spanish
SPANISH Pantalla Digital LCD Puerto de Alimentación CC Puerto de Alimentación Solapa de Cierre Líquida Bola de Accionamento Directo Sello de Seguridad Sello de Seguridad Compartimiento de Válvulas AOVN™ la Batería 16 Agujas Tapón de Seguridad... - Seite 143 Profundidad Velocidad - Dismunuir la - Disminuis la Profundidad Velocidad Botón Principal (multifunción, ON/OFF) Estado del Dermapen 4™ Sincronizar/Actualizar Notifi cación Estado del Cartucho Estado de la Batería Anillo de Velocidad Arco de Velocidad Conexión Bluetooth Indicador de Profundidad (mm)
- Seite 144 Enchufe el adaptador de alimentación en un tomacorriente de CA. Cuando sea necesario, asegúrese de que el interruptor de la toma de corriente esté encendido. El Dermapen 4™ puede ser alimentado desde el adaptador de corriente CA/CC con o sin la batería instalada. Para Encender el Dermapen 4™...
- Seite 145 1,5 segundos hasta que escuche un sonido. El Dermapen 4™ se encenderá y comenzará la secuencia de asociación Bluetooth. Durante la asociación de Bluetooth: - El Dermapen 4™ mostrará un LED de estado azul, un símbolo de sincronización y un símbolo de Bluetooth parpadeante. Los dígitos de indicación de profundidad indicarán una contraseña Bluetooth de 6 dígitos.
- Seite 146 Cuando la aplicación muestre “Pen Successfully Updated”, pulse Done para completar el proceso de sincronización y actualización. Para asociar el Dermapen 4™ vía Bluetooth: Cuando se le solicite, encienda el Dermapen 4™ para comenzar a asociar el Dermapen 4™ con su dispositivo inteligente. •...
- Seite 147 3 o 4 (ver apéndice 4.4.5). El Dermapen 4’s ST se calibra automáticamente a una velocidad de 60 Htz/seg. En el caso de pieles sensibles como la rosácea, es recomendable probar o comenzar con la velocidad 2 o 3 antes de continuar con la velocidad 3 o 4.
- Seite 148 (respectivamente). Se emitirá un solo tono por cada pulsación de botón válida. • El Dermapen 4™ emitirá dos tonos para indicar que el nuevo valor de profundidad ha sido aceptado y la profundidad seleccionada se mostrará en los dígitos de indicación de profundidad.
- Seite 149 Dp Dermaceuticals Micro Derm Exfoliant™ antes de iniciar el tratamiento con el Dermapen 4™. También es posible aplicar una microdermabrasión leve. Si es necesario, elimine todos los residuos del producto de limpieza con un tónico antiséptico adecuado o desinfecte la zona utilizando una solución de clorhexideno.
- Seite 150 Encienda el Dermapen 4™. Si es necesario, sincronice el Dermapen 4™ vía Bluetooth. Seleccione la profundidad de la aguja y la velocidad del Dermapen 4™ que mejor se adapte a la zona a tratar. Consulte la sección 5.5 - Potenciales Rangos de Profundidad.
- Seite 151 A medida que se crean minúsculos canales de punción, per- miten la infusión de medios de procedimiento y “meso-deslizantes”.* Sostenga el mango del Dermapen 4™ con una mano y con la otra mantenga suave- mente la piel tensa.
- Seite 152 The product may be worn whilst sleeping, post procedures. • For best results it’s recommended to repeat Dermapen 4™ superfi cial treatments every 2-4 weeks and deeper procedures every 6-8 weeks. Anywhere from 4-8 procedures may be required (based on individual patient concerns).
-
Seite 153: Solución De Problemas
SOLUCIÓN DE PROBLEMAS Solución de Problemas del Dermapen 4™ Problema Causa Solución Una vez encendido, el Dermapen 4™: No se detecta ningún Retire y vuelva a colocar • Muestra un LED de estado naranja. cartucho de aguja el cartucho de aguja para •... - Seite 154 • Almacenar el producto en un lugar seco y bien ventilado a temperatura ambiente. • Si el Dermapen 4™ no se usará por un largo periodo de tiempo, la batería debe ser removida. • Mantener el producto fuera del alcance de los niños.
- Seite 155 Cartucho intermitente. El Dermapen 4™ no funcionará hasta que el Cartucho esté instalado correctamente. Instale siempre Cartuchos Dermapen 4™ originales únicamente. La instalación de cualquier otro Cartucho implicará el riesgo de dañar el Dermapen 4™ y la posible anulación de la garantía. Limpieza y Mantenimiento •...
-
Seite 156: Swedish
SWEDISH Digital LCD display Strömport för likström Strömportens vätskespärr Direktdriftkula Skyddsförslutningar Skyddsförslutningar AOVN™ ventiler Batterilucka 16 nålar Skyddshuva... - Seite 157 DERMAPEN 4™ SYSTEM + Öka hastighet + Öka djup - Minska hastighet - Minska djup Huvudknapp (Multifunktions- på/av) Dermapen 4™ Status Synknings-/uppdateringsikon Nålhuvudstatus Batteristatus Hastighetsring Bluetooth anslutning Djup (mm) Vrid strömadapterstiftet 90° medsols för att låsa fast det.
- Seite 158 Avlägsna batterilocket. Sätt i batteriet i batteriluckan. Kontrollera att polariteten stämmer. Sätt tillbaka batterilocket och se till att det är ordentligt stängt. Om Dermapen 4™ inte startar, kontrollera att batteriet sitter rätt och är fulladdat. Använda Dermapen 4™ med strömsladden Avlägsna vätskespärren från strömporten.
- Seite 159 När kopplingen är gjord kommer Dermapen 4™ att försöka synka med kliniken. När synkningen är avslutad kommer meddelandet Pen Successfully Registered att visas. Tryck på Done för att slutföra registreringen. Din Dermapen 4™ är nu redo att användas under behandlingar, se avsnittet “Bruksanvisning”.
- Seite 160 BRUKSANVISNING Varför bör Dermapen 4™ synkas? För att din Dermapen 4™ ska få en så lång livscykel och ge så exakta resultat som möjligt är det väsentligt att du håller den synkad och uppdaterad. Synkningsprocessen möjliggör regelbunden uppdatering av Dermapen 4:s interna nålkalibreringstabeller och inbyggda programvara.
- Seite 161 Använd plus- eller minusknappen för att öka respektive minska hastigheten på nålarna. Enheten piper varje gång en giltig knapptryckning genomförs. • Dermapen 4™ kommer att pipa två gånger för att indikera att den nya hastigheten har accepterats. Den valda hastigheten kommer att visas i hastighetsringen. •...
- Seite 162 Använd plus- eller minusknappen för att öka respektive minska hur djupt nålarna går. Enheten piper varje gång en giltig knapptryckning genomförs. • Dermapen 4™ kommer att pipa två gånger för att indikera att det nya djupet har accepterats. Det valda djupet kommer att visas på displayen. •...
- Seite 163 För optimal e ekt rekommenderas att man avlägsnar döda hudceller i stratum corneum med en exfolierande produkt som Dp Dermaceuticals Micro Derm Exfoliant™ innan man påbörjar behandling med Dermapen 4™. Man kan även göra en skonsam microdermabrasion- behandling. Vid behov kan man avlägsna rengörings-produkten med en lämplig antiseptisk toner eller desinfi...
- Seite 164 BEHANDLINGSORDNING Steg 3 – Behandling med Dermapen 4™: Sätt i ett fulladdat batteri i Dermapen 4™ eller anslut strömsladden till vägguttaget. (Sätt aldrig i andra batterier än de angivna.) Sätt på handskar och montera sedan en steril nålpatron på Dermapen 4™-huvudet.
- Seite 165 Genom att skapa microkanaler möjliggörs nedslussning av behandlingspreparat och “mesoglides”* Håll Dermapen 4™-handtaget i ena handen och sträck försiktigt ut huden med den andra. *För att säkerställa patientens säkerhet och behandlingens e ektivitet rekommenderas att ENBART använda Dp Dermaceuticals™ som ”mesoglide”, dvs behandlingspreprat.
- Seite 166 Tryck och håll inne huvudknappen i tre sekunder tills display- och statuslampan slocknar. • Dermapen 4™ kan stängas av när som helst, utom under synkningar och när produkten är i testläge. • Om Dermapen 4™ är inaktiv i över två minuter stängs den av automatiskt.
- Seite 167 • Lyser orange felaktig nålpatron • Visar en blinkande patronsymbol • Piper två gånger Aktiverad Dermapen 4™: Synk-varning Synka Dermapen 4™ via • Visar synkningsikonen bluetooth så snart som • Anger dagar eller timmar på möjligt. djup-displayen • Piper en gång Aktiverad Dermapen 4™:...
- Seite 168 • Använd aldrig Dermapen 4™ om sladden eller kontakten är skadad, om den inte fungerar som den ska, om man har tappat den i golvet, om den är trasig eller har kommit i kontakt med vätska.
- Seite 169 VARNINGAR OCH RÅD Potentiella kontraindikationer Patienter med någon av följande tillstånd bör inte genomgå en behandling med Dermapen 4™ utan läkares ordination eller godkännande: papulopustular rosacea, acne vulgaris typ III-IV, herpes simplex, vårtor, scleroderma, bakteriella/svampinfektioner, öppna sår, solkeratos, hudcancer, hemofi li.
- Seite 170 Head Office 14/13A Narabang Way, Sydney, NSW, 2085, Australia Phone +61 2 9889 3636 Email info@DermapenWorld.com Website www.DermapenWorld.com Dermapen 4™ is proudly made in Australia exclusively made for DermapenWorld™.